Creating a Connector Project
This document describes how to use Maven and our IDE of choice (IntelliJ or Eclipse/Mule Studio) to create a new Anypoint connector project. DevKit relies on Maven to create the initial structure for a new connector project and to build the project as you develop it.
Assumptions
This document assumes you have installed Maven with Eclipse, IntelliJ, or Mule Studio to use as your IDE.
Creating a New Connector Project using Maven
DevKit comes with a maven archetype for Mule connectors. Using this archetype, you can create a new project that follows the proper folder structure and that already includes class skeletons containing some predefined elements. This archetype also helps Maven set up all necessary dependencies for a custom connector.
To create your new connector project, you can either use Maven through your Java IDE, or use it directly through the command line. The tabs below describe IDE-specific instructions for creating your new connector project.
| The recommended method for creating a connector project is to use the command line and then import the project into your IDE of choice. |
Command Line and Studio
From a macro level, creating a new project involves three steps:
-
generating the project from the command line
-
importing the project into your IDE
-
updating the Maven
pom.xmlfile
Generating a Project Using Maven
-
Open a Terminal or Command Line console.
-
From within the directory in which you want to create your new project, run the following command to generate a project from an archetype. Adjust the parameters of the command according to the table below.
To easily import the archetype-generated project into Studio, run the Maven generatecommand below with your current working directory set to your Mule Studio workspace folder. This ensures that Studio stores the project files in the workspace.mvn archetype:generate -DarchetypeGroupId=org.mule.tools.devkit -DarchetypeArtifactId=mule-devkit-archetype-cloud-connector -DarchetypeVersion=3.4.3 -DgroupId=org.hello -DartifactId=hello-connector -Dversion=1.0-SNAPSHOT -DmuleConnectorName=Hello -Dpackage=org.hello -DarchetypeRepository=http://repository.mulesoft.org/releasesParameter Standard Value for All Projects Value Specific to Your Project archetypeGroupId
org.mule.tools.devkit
archetypeArtifactId
mule-devkit-archetype-cloud-connector
archetypeVersion
version of DevKit
archetypeRepository
http://repository.mulesoft.org/releases
groupId
-
The group Id of the connector you are creating. A suggested value begins with the reverse of your company domain name, such as :
com.mycompany `or `com.mycompany.connectors.artifactId
-
The artifact Id of the connector you are creating. Follow the mule naming pattern:
mule-module-xxxwherexxxis the name of your connector in camelCaseversion
-
A version identifier for your connector. Usually
1.0-SNAPSHOTfor a new connector project.muleConnectorName
-
The name of the connector, in camelCase. If you set artifactId to
mule-module-myConnectorthenmyConnectorwould be the value of this parameter.package
-
The Java package for your connector, usually the same as the groupId.
Note the following: * The muleConnectorName and muleConnectorPackage are the class and package names, respectively, which your IDE uses in generating the Java code for the project. * There is a known issue with Windows: DevKit process will fail if run from a file path that includes spaces anywhere in the name, such as
C:\Documents and Settings...Ensure there are no spaces in the path of your connector project directory. -
The command line prompts you to confirm the configuration of the properties you specified (see below). Enter "Y", then press enter to confirm.
Confirm properties configuration: groupId: org.hello artifactId: hello-connector version: 1.0-SNAPSHOT package: org.hello muleConnectorName: Hello Y: : -
DevKit generates your connector project in the
hello-connectordirectory. Navigate to the folder and verify that the structure exists.
For help on the Maven’s mvn command for Unix, including a description of available parameters, consult the main page by running man mvn or mvn -? at the shell command prompt; for Window, consult the online version.
Importing a Maven Project into Studio
-
In Mule Studio, select File > Import…
-
In the Import wizard, expand the Maven folder, then select Existing Maven Projects.
-
In the wizard, enter or browse to the directory in which you created your Maven project. Select the folder for your new connector project, then click OK.
-
Studio analyzes the
pom.xmlfile. When complete, it displays your project as a checked item in the Projects field (see below). Click Finish to import the project into your workspace. Mule Studio imports the project and downloads all the required libraries; this may take several minutes.
|
The Maven build automatically generates the Mule schema and namespace handler for your connector. However, Maven tooling for Studio does not perform the full build every time you save the project. Consequently, you must manually update your project every time you add or remove methods to your connector class.
|
Updating POM to Package Connector
So that you can install and test your connector, Maven should build an Eclipse plugin update site as a zip file at the end of the build process. A property devkit.studio.package.skip in the pom.xml controls whether this is built; if set to false then the build happens.
By default, the pom.xml provided by the Maven archetype for connectors in 3.4.0 does not set this property. You must confirm that this property is set and add it if it is missing. Access your pom.xml file to confirm the existence of, or add, the following:
<properties>
...
 <jdk.version>1.6</jdk.version>
        <!-- Maven should build the update site zip file -->
        <devkit.studio.package.skip>false</devkit.studio.package.skip>
    </properties>
Command Line and Eclipse
From a macro level, creating a new project involves three steps:
-
generating the project from the command line
-
importing the project into your IDE
-
updating the Maven
pom.xmlfile
Generating a Project Using Maven
-
Open a Terminal or Command Line console.
-
From within the directory in which you want to create your new project, run the following command to generate a project from an archetype. Adjust the parameters of the command according to the table below.
To easily import the archetype-generated project into Studio, run the Maven generatecommand below with your current working directory set to your Mule Studio workspace folder. This ensures that Studio stores the project files in the workspace.mvn archetype:generate -DarchetypeGroupId=org.mule.tools.devkit -DarchetypeArtifactId=mule-devkit-archetype-cloud-connector -DarchetypeVersion=3.4.3 -DgroupId=org.hello -DartifactId=hello-connector -Dversion=1.0-SNAPSHOT -DmuleConnectorName=Hello -Dpackage=org.hello -DarchetypeRepository=http://repository.mulesoft.org/releasesParameter Standard Value for All Projects Value Specific to Your Project archetypeGroupId
org.mule.tools.devkit
archetypeArtifactId
mule-devkit-archetype-cloud-connector
archetypeVersion
version of DevKit
archetypeRepository
http://repository.mulesoft.org/releases
groupId
-
The group Id of the connector you are creating. A suggested value begins with the reverse of your company domain name, such as :
com.mycompany `or `com.mycompany.connectors.artifactId
-
The artifact Id of the connector you are creating. Follow the mule naming pattern:
mule-module-xxxwherexxxis the name of your connector in camelCaseversion
-
A version identifier for your connector. Usually
1.0-SNAPSHOTfor a new connector project.muleConnectorName
-
The name of the connector, in camelCase. If you set artifactId to
mule-module-myConnectorthenmyConnectorwould be the value of this parameter.package
-
The Java package for your connector, usually the same as the groupId.
Note the following: * The muleConnectorName and muleConnectorPackage are the class and package names, respectively, which your IDE uses in generating the Java code for the project. * There is a known issue with Windows: DevKit process will fail if run from a file path that includes spaces anywhere in the name, such as
C:\Documents and Settings...Ensure there are no spaces in the path of your connector project directory. -
The command line prompts you to confirm the configuration of the properties you specified (see below). Enter "Y", then press enter to confirm.
Confirm properties configuration: groupId: org.hello artifactId: hello-connector version: 1.0-SNAPSHOT package: org.hello muleConnectorName: Hello Y: : -
DevKit generates your connector project in the
hello-connectordirectory. Navigate to the folder and verify that the structure exists.
For help on the Maven’s mvn command for Unix, including a description of available parameters, consult the main page by running man mvn or mvn -? at the shell command prompt; for Window, consult the online version.
Importing a Maven Project into Eclipse
-
In Eclipse, select File > Import…
-
In the Import wizard, expand the Maven folder, then select Existing Maven Projects.
-
In the wizard, enter or browse to the directory in which you created your Maven project. Select the folder for your new connector project, then click OK.
-
Eclipse analyzes the
pom.xmlfile. When complete, it displays your project as a checked item in the Projects field (see below). Click Finish to import the project into your workspace. Eclipse imports the project and downloads all the required libraries; this may take several minutes.The Maven build automatically generates the Mule schema and namespace handler for your connector. However, Maven tooling for Studio does not perform the full build every time you save the project. Consequently, you must manually update your project every time you add or remove methods to your connector class.
-
Right-click the connector project in Mule Studio’s Package Explorer.
-
Select Maven > Update Project.
-
Updating POM to Package Connector
So that you can install and test your connector, Maven should build an Eclipse plugin update site as a zip file at the end of the build process. A property devkit.studio.package.skip in the pom.xml controls whether this is built; if set to false then the build happens.
By default, the pom.xml provided by the Maven archetype for connectors in 3.4.0 does not set this property. You must confirm that this property is set and add it if it is missing. Access your pom.xml file to confirm the existence of, or add, the following:
<properties>
...
 <jdk.version>1.6</jdk.version>
        <!-- Maven should build the update site zip file -->
        <devkit.studio.package.skip>false</devkit.studio.package.skip>
    </properties>
Eclipse
From a macro level, creating a new project involves two steps:
-
creating a new Maven project within Eclipse
-
updating the Maven
pom.xmlfile
Creating a Project Using Maven
-
In order to use Maven through Eclipse, you must first install the m2e extension. If you haven’t already done so, follow the instructions to install m2e in Eclipse.
-
From the File menu in Eclipse, select New > Other.
-
Expand the Maven folder, then select Maven Project. Click Next.
-
Define the location in which you want to store your project. Click Next.
-
As this is the first time you are creating a project, the DevKit connector archetype you need is not one of the default Maven archetypes, so you must add it. Click Add Archetype…
-
Input the following values, then click OK.
Field Value Archetype GroupId
org.mule.tools.devkit
Archetype Artifact Id
mule-devkit-archetype-cloud-connector
Archetype Version
3.4.3
Repository URL
https://repository.mulesoft.org/nexus/content/repositories/releases
-
Select org.mule.tools.devkit that you just created, then click Next.
-
In the final panel of the wizard, input the following values.
Field Value GroupId
org.mule.modules
ArtifactId
hello-connector
Version
0.0.1–SNAPSHOT
Package
org.mule.modules.hello_connector
-
Click the Add… button to configure one extra parameter.
-
Name:
muleConnectorNameValue:
hello-connector -
Name:
muleConnectorCategoryValue:
Community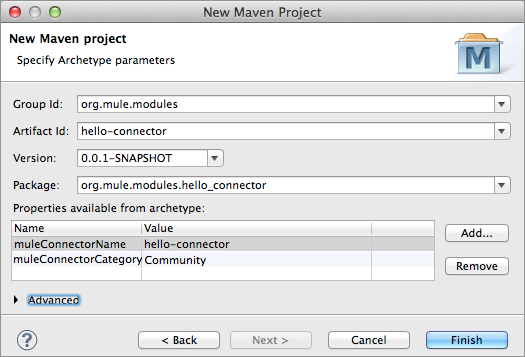
+
|
The Maven build automatically generates the Mule schema and namespace handler for your connector. However, Maven tooling for Eclipse does not perform the full build every time you save the project. Consequently, you must manually update your project every time you add or remove methods to your connector class.
|
Updating POM to Package Connector
So that you can install and test your connector, Maven should build an Eclipse plugin update site as a zip file at the end of the build process. A property devkit.studio.package.skip in the pom.xml controls whether this is built; if set to false then the build happens.
By default, the pom.xml provided by the Maven archetype for connectors in 3.4.0 does not set this property. You must confirm that this property is set and add it if it is missing. Access your pom.xml file to confirm the existence of, or add, the following:
<properties>
...
 <jdk.version>1.6</jdk.version>
        <!-- Maven should build the update site zip file -->
        <devkit.studio.package.skip>false</devkit.studio.package.skip>
    </properties>
Command Line and IntelliJ
From a macro level, creating a new project involves four steps:
-
generating the project from the command line
-
importing the project into your IDE
-
resolving the schema
-
updating the Maven
pom.xmlfile
Generating a Project Using Maven
-
Open a Terminal or Command Line console.
-
From within the directory in which you want to create your new project, run the following command to generate a project from an archetype. Adjust the parameters of the command according to the table below.
To easily import the archetype-generated project into Studio, run the Maven generatecommand below with your current working directory set to your Mule Studio workspace folder. This ensures that Studio stores the project files in the workspace.mvn archetype:generate -DarchetypeGroupId=org.mule.tools.devkit -DarchetypeArtifactId=mule-devkit-archetype-cloud-connector -DarchetypeVersion=3.4.3 -DgroupId=org.hello -DartifactId=hello-connector -Dversion=1.0-SNAPSHOT -DmuleConnectorName=Hello -Dpackage=org.hello -DarchetypeRepository=http://repository.mulesoft.org/releasesParameter Standard Value for All Projects Value Specific to Your Project archetypeGroupId
org.mule.tools.devkit
archetypeArtifactId
mule-devkit-archetype-cloud-connector
archetypeVersion
version of DevKit
archetypeRepository
http://repository.mulesoft.org/releases
groupId
-
The group Id of the connector you are creating. A suggested value begins with the reverse of your company domain name, such as :
com.mycompany `or `com.mycompany.connectors.artifactId
-
The artifact Id of the connector you are creating. Follow the mule naming pattern:
mule-module-xxxwherexxxis the name of your connector in camelCaseversion
-
A version identifier for your connector. Usually
1.0-SNAPSHOTfor a new connector project.muleConnectorName
-
The name of the connector, in camelCase. If you set artifactId to
mule-module-myConnectorthenmyConnectorwould be the value of this parameter.package
-
The Java package for your connector, usually the same as the groupId.
Note the following: * The muleConnectorName and muleConnectorPackage are the class and package names, respectively, which your IDE uses in generating the Java code for the project. * There is a known issue with Windows: DevKit process will fail if run from a file path that includes spaces anywhere in the name, such as
C:\Documents and Settings...Ensure there are no spaces in the path of your connector project directory. -
The command line prompts you to confirm the configuration of the properties you specified (see below). Enter "Y", then press enter to confirm.
Confirm properties configuration: groupId: org.hello artifactId: hello-connector version: 1.0-SNAPSHOT package: org.hello muleConnectorName: Hello Y: : -
DevKit generates your connector project in the
hello-connectordirectory. Navigate to the folder and verify that the structure exists.
For help on the Maven’s mvn command for Unix, including a description of available parameters, consult the main page by running man mvn or mvn -? at the shell command prompt; for Window, consult the online version.
Importing the Project into IntelliJ
-
When starting IntelliJ, select Import project.
-
Browse to the directory in which you saved your
hello-connectorproject, then click Next. -
Select Import project from external model, then select Maven. Click Next.
-
Confirm settings, click Next.
-
Confirm the selection of the Maven project to import, then click Next.
-
Confirm the selection Java SDK, click Next.
-
Confirm the name for your project, then click Finish.
Resolving the Schema
So that you can take advantage of auto-complete and validation in your project, follow the steps below to instruct IntelliJ to find your newly generated schema.
-
Open the namespace handler xml that the archetype generated.
-
Use the external resource drop-down to select Manually Setup External Resource.
-
Select the schema under
target/generated-resources/mule.
Updating POM to Package Connector
So that you can install and test your connector, Maven should build an Eclipse plugin update site as a zip file at the end of the build process. A property devkit.studio.package.skip in the pom.xml controls whether this is built; if set to false then the build happens.
By default, the pom.xml provided by the Maven archetype for connectors in 3.4.0 does not set this property. You must confirm that this property is set and add it if it is missing. Access your pom.xml file to confirm the existence of, or add, the following:
<properties>
...
 <jdk.version>1.6</jdk.version>
        <!-- Maven should build the update site zip file -->
        <devkit.studio.package.skip>false</devkit.studio.package.skip>
    </properties>
IntelliJ
From a macro level, creating a new project involves three steps:
-
creating the project into your IDE
-
resolving the schema
-
updating the Maven
pom.xmlfile
Creating a Project
-
Create a New Project selecting Maven Module. Define a Name and Location for the project; use no SDK. Click Next.
-
Enter values in the following fields (refer to screenshot below).
-
GroupId:
org.hello -
ArtifactID:
hello-connector
-
-
Select Create from archetype, then click Add archetype…
-
To add the DevKit connector archetype, enter information according to the table below, then click OK.
Field Value GroupId
org.mule.tools.devkitArtifactId
mule-devkit-archetype-cloud-connectorVersion
3.4.3Repository
https://repository.mulesoft.org/nexus/content/repositories/releases -
Select the archetype that you just created, then click Next.
-
IntelliJ displays the project’s Maven parameters. You can edit these values, or add and remove parameters, if you wish, but you must manually add the
muleConnectorNameand` muleConnectorCategory` parameters. (These parameters are required for Maven to run correctly and fully generate the POM file.) Click the plus sign in the lower left corner to add each parameter. -
Enter values in the following fields, then click OK, then repeat for the second parameter.
-
Name:
muleConnectorNameValue:
Hello-Connector -
Name:
muleConnectgorCategoryValue:
Community
-
-
Click Finish. IntelliJ launches the project (see below).
Resolving the Schema
So that you can take advantage of auto-complete and validation in your project, follow the steps below to instruct IntelliJ to find your newly generated schema.
-
Open the namespace handler xml that the archetype generated.
-
Use the external resource drop-down to select Manually Setup External Resource.

-
Select the schema under
target/generated-resources/mule.
Updating POM to Package Connector
So that you can install and test your connector, Maven should build an Eclipse plugin update site as a zip file at the end of the build process. A property devkit.studio.package.skip in the pom.xml controls whether this is built; if set to false then the build happens.
By default, the pom.xml provided by the Maven archetype for connectors in 3.4.0 does not set this property. You must confirm that this property is set and add it if it is missing. Access your pom.xml file to confirm the existence of, or add, the following:
<properties>
...
 <jdk.version>1.6</jdk.version>
        <!-- Maven should build the update site zip file -->
        <devkit.studio.package.skip>false</devkit.studio.package.skip>
    </properties>
About Your New Project
Regardless of the method you choose, the Maven archetype generates the same skeleton. The table below describes the four sources folders contained in the skeleton project.
| Folder | Description |
|---|---|
|
Contains the source Java files for your connector, including the skeleton Java file for your connector. As you add additional classes, the project stores them in this folder. |
|
Contains non-code resources accessed by your connector. This folder is empty when you initially create the project. |
|
Contains the Java source for the test files for your connector, including the skeleton JUnit test case. |
|
Contains non-code resources accessed by your tests. This folder contains a skeleton Mule configuration file for running tests. |
Maven also creates several files within these folders. The most important of these files are as follows:
-
src/main/java/org.mulesoft.hello/Helloconnector.javastored in the hello-connector/src/main/java/org/mule/module/helloconnector package. This file contains the bulk of the code your write to build your connector. Upon creation, DevKit has already created some foundational classes and methods. Edit this file to add functionality specific to your target application. -
pom.xmlProject Object Model (POM) is an XML representation of a Maven project, including all of the project’s external dependencies and all instructions on how to build the project. Read more about the POM at maven.apache.org.
|
If you are not familiar with Maven or POM files, please see this excellent tutorial. If your project uses libraries or dependencies other than the basic Mule core (for example, if you use any of Mule’s transports or modules, or third party libraries) you will need to include them as dependencies in the POM file. For this, you will need to add one or more In this case, the value of If you don’t know the artifact name of a library, you can search for it in http://mvnrepository.com/. The website will give you the |
See Also
-
NEXT: add a "sayHello" operation to your connector, then build it, install it in Studio, and test it in a flow.
-
Learn more about the contents of your archetype- generated project by examining the results of your work.