Barn Connector
| DevKit is compatible only with Studio 6 and Mule 3. To build Mule 4 connectors, see the Mule SDK documentation. |
Once you have built a project, you can install the skeletal connector in Anypoint™ Studio to confirm its basic functionality before adding more operations to it. This document describes the steps needed to build, install and test your connector in Anypoint Studio. The macro steps of this procedure are:
-
Set required
@Connectorannotations. -
Add a "put in barn" operation to the connector.
-
Document the "put in barn" operation.
-
Build the connector project.
-
Install the connector in Studio.
-
Test the connector’s basic functionality.

Assumption
This document assumes that you have created an Anypoint connector project.
Setting @Connector Annotation Parameters
The @Connector annotation on the Maven-generated class has a required parameter: friendlyName (see example below). This parameter defines a human-readable name for the connector, which appears as the connector’s label in the Studio palette. Without this parameter, the connector does not appear in the palette in Mule Studio releases later than 3.4.0.
@Connector(name = "barn", schemaVersion = "1.0", friendlyName = "Barn", minMuleVersion = "3.5")
Adding an Operation
A newly created connector project is immediately ready to build, then install and test in Mule Studio. However, to make testing more interesting, you can add an operation to the connector: receive a name as a string and return the same string preceded by "Hello". To add this operation, follow the steps.
-
In you IDE, open the main Java file,
src/main/java/org/mule/modules/barn/BarnConnector.java -
Paste the following code at the very end of the connector class, before the final closing curly brackets.
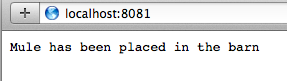
/**
 * Custom processor that places an animal in the barn.
 *
 * {@sample.xml ../../../doc/barn-connector.xml.sample barn:putInBarn}
 *
 * @param animal Name of the animal to be place in the barn
 * @return returns processed message
 */
 @Processor
 public String putInBarn(String animal)
 {
     return animal + " has been placed in the barn";
 }
The identifier name is reserved so you cannot use it for the parameter. -
If the Javadocs checks are enabled, the code example displays an error: "The
{@sample.xml}pointed by [barn:putInBarn] in the method [putInBarn] does not exist." The following sections detail a solution to this error, but for now please Disable the Javadocs check to avoid this error. To disable the Javadocs check, right-click Anypoint Connectors > Disable Javadoc check.
Using Friendly Names and Placements
A way to customize the UI and usability of your connector is using friendly names and placements. In the following example we modify the operation UI name, the parameter UI name and the group of this parameter.
/**
* Custom processor that places an animal in the barn.
*
* {@sample.xml ../../../doc/barn-connector.xml.sample barn:putInBarn}
*
* @param animal Name of the animal to be place in the barn
* @return returns processed message
*/
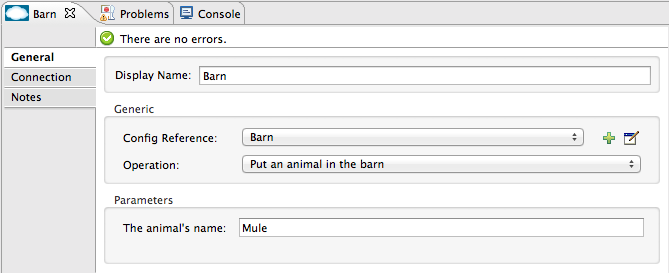
@Processor(friendlyName="Put an animal in the barn")
public String putInBarn(@Placement(group="Parameters") @FriendlyName("The animal's name") String animal) {
return animal + " has been placed in the barn";
}
Documenting the Operation
Because Anypoint DevKit enforces proper documentation of all projects, you must provide at least one example of how to use each operation you add to a connector. If you attempt to build the project without documentation, the build fails.
-
In your IDE, open the file
doc/Hello-connector.xml.samplethen paste the following snippet at the end.<!-- BEGIN_INCLUDE(barn:putInBarn) --> <barn:put-in-barn animal="#[map-payload:animal]" /> <!-- END_INCLUDE(barn:putInBarn) --> -
Confirm that the complete contents of the file appear as per the following.
<!-- BEGIN_INCLUDE(barn:myProcessor) -->
    <barn:my-processor content="#[map-payload:content]" />
<!-- END_INCLUDE(barn:myProcessor) -->

<!-- BEGIN_INCLUDE(barn:putInBarn) -->
    <barn:put-in-barn animal="#[map-payload:animal]" />
<!-- END_INCLUDE(barn:putInBarn) -->
Once your connector has some minimum functionality implemented, you’re free to build it and try it out!
See Also
-
NEXT STEP: Implement authentication on your connector.