Creating a Connector for a RESTful API Using Jersey
| DevKit is compatible only with Studio 6 and Mule 3. To build Mule 4 connectors, see the Mule SDK documentation. |
This discussion presents the steps required to build a Jersey Client connector for a RESTful Web service. Jersey interacts with the service, and maps JSON to and from Java objects.
This example uses Dropbox’s RESTful service. In practice, building a Dropbox connector might be more simply achieved using an existing Java client library, but nonetheless this serves as a useful example.
This document leads you through building the connector, beginning with the service endpoint, documentation for the service, and its supported resources and operations.

Prerequisites
This document assumes you are familiar with RESTful Web services, and have some understanding of Jersey. You can find useful background on Jersey in the Jersey User Guide.
|
The straightforward path described here should produce a working connector for any RESTful API that uses JSON to represent requests and responses. Note that:
|
Connector Architecture with Jersey Client
On a new connector project:
-
Create a
@Connectorclass and add authentication logic. -
Create Java classes (unless you are using Maps) that represent any entities passed to or returned from the service operations
-
Build a Jersey-based client in Java that works against the web service API, and converts POJOs or Maps to and from JSON for use in Mule
-
Wrap the Jersey-based client class with the
@Connectorclass that integrates it with Mule
The final architecture looks like the image below.
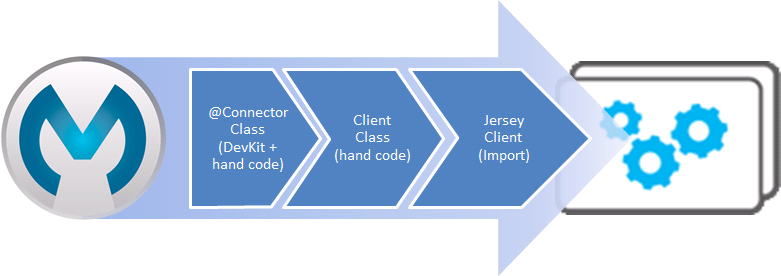
Dropbox RESTful Example Connector
The sample connector used in this discussion connects to DropBox’s Core API. Find the connector source code on GitHub.
The connector exposes the API operation GET which retrieves information about the Dropbox Account resource, described in the Dropbox documentation.
A typical response to this method looks like this:
{
    "referral_link": "https://www.dropbox.com/referrals/r1a2n3d4m5s6t7",
    "display_name": "John P. User",
    "uid": 12345678,
    "country": "US",
    "quota_info": {
        "shared": 253738410565,
        "quota": 107374182400000,
        "normal": 680031877871
    }
}
Note that the account information is a JSON object with several fields, which in turn contains a nested JSON object for account quota information. The connector will have to translate both of these JSON objects to POJOs for the response to be consumable in Mule.
The connector also exposes a second operation at the Mule level. LogInfo logs the OAuth access token and access token secret (but does not at any time call the Dropbox Web service). You may want to include similar debugging utility operations in a connector during development.
Development Process Outline
There are several major tasks in developing a connector with Jersey Client; these are outlined below.
-
Assuming you’ve prepared an initial connector project:
-
Add Jersey and Jackson dependencies to POM.
-
Create any client or entities packages.
-
Rebuild project with the new dependencies.
-
-
Create the Jersey Client class.
-
Enable Jersey Client JSON-POJO mapping.
-
-
Create the Connector class.
-
Add OAuth.
-
Build and test connector.
-
-
Add an operation.
-
Add operation to client class, and add required POJOs to project.
-
Expose client operation via Connector class.
-
Build and test manually (Optional).
-
Define and run unit tests and Javadoc examples.
-
Prepared Connector Project
Once you have created a connector project as described in Creating an Anypoint Connector Project, you must add Jersey, Jackson, and JSON-related dependencies to the POM, and create packages and classes you will use in your connector before adding operations.
Adding Dependencies to the POM
The following <dependency> elements add Jersey, Jackson, and Mule JSON support to your project:
POM Dependencies for Jersey, Jackson and JSON
<!-- Add this to use Jersey Client -->
    <dependency>
            <groupId>com.sun.jersey</groupId>
            <artifactId>jersey-client</artifactId>
            <version>${jersey.client.version}</version>
        </dependency>

    <!-- Add this to use Mule support for JSON based on Jackson -->

        <dependency>
            <groupId>org.mule.modules</groupId>
            <artifactId>mule-module-json</artifactId>
            <version>${mule.version}</version>
            <scope>provided</scope>
        </dependency>
Add these to the <dependencies> element in your POM, along with any other dependencies required by your project. For example, the Dropbox sample connector adds the following additional dependency for OAuth support:
<!-- Add this to use OAuth support in DevKit-->
        <dependency>
            <groupId>oauth.signpost</groupId>
            <artifactId>signpost-core</artifactId>
            <version>1.2.1.2</version>
        </dependency>
The complete POM for the Dropbox sample connector project as generated from the DevKit 3.5 connector Maven archetype is shown below.
<project xmlns="http://maven.apache.org/POM/4.0.0" xmlns:xsi="http://www.w3.org/2001/XMLSchema-instance"
         xsi:schemaLocation="http://maven.apache.org/POM/4.0.0 http://maven.apache.org/xsd/maven-4.0.0.xsd">
    <modelVersion>4.0.0</modelVersion>
    <groupId>org.mule.samples.devkit</groupId>
    <artifactId>dropboxrest</artifactId>
    <version>1.0-SNAPSHOT</version>
    <packaging>mule-module</packaging>
    <name>Mule ${serviceName} Cloud Connector</name>
    <parent>
        <groupId>org.mule.tools.devkit</groupId>
        <artifactId>mule-devkit-parent</artifactId>
        <version>3.5.0-andes</version>
    </parent>
    <properties>
        <junit.version>4.9</junit.version>
        <mockito.version>1.8.2</mockito.version>
        <jdk.version>1.6</jdk.version>
        <category>Cloud Connectors</category>
        <licensePath>LICENSE.md</licensePath>
        <devkit.studio.package.skip>false</devkit.studio.package.skip>
        <serviceName>DropBox REST Sample</serviceName>

        <!-- required for Jersey Client -->
        <jersey.client.version>1.6</jersey.client.version>
        <jersey.multipart.version>1.3</jersey.multipart.version>
    </properties>

 <dependencies>
        <!-- Add this to use OAuth support in DevKit-->
        <dependency>
            <groupId>oauth.signpost</groupId>
            <artifactId>signpost-core</artifactId>
            <version>1.2.1.2</version>
        </dependency>

        <!-- Add this to use Jersey Client -->
        <dependency>
            <groupId>com.sun.jersey</groupId>
            <artifactId>jersey-client</artifactId>
            <version>${jersey.client.version}</version>
        </dependency>

        <!-- Add this to use Mule support for JSON -->

        <dependency>
            <groupId>org.mule.modules</groupId>
            <artifactId>mule-module-json</artifactId>
            <version>${mule.version}</version>
            <scope>provided</scope>
        </dependency>

 </dependencies>
</project>
Creating Packages for Supporting Classes
The Dropbox REST Connector uses the following organization to support the different classes used in its connector:
-
package
org.mule.examples.restjerseyconnector.clientcontains the Jersey Client code classDropboxClient.java -
package
org.mule.examples.restjerseyconnector.exceptiondefines exceptions that can be thrown by the connector:-
DropboxRestConnectorTokenExpiredException:` `a security/authentication exception -
DropboxRestConnectorException:` `a catchall exception
-
-
Package
org.mule.examples.restjerseyconnector.entitiescontains two POJOs:AccountInfoandQuotaInfo, which represent the results from the Dropbox API
The entity classes typically wind up as incoming or outgoing payloads for operations on your connector. One way to know whether your connector needs entity classes is to look at any documentation or metadata that you have about requests and responses. Wherever you see any JSON Arrays or complex Objects, you need corresponding entity classes.
For now, create the package but don’t populate it with classes.
If your connector presents only Maps to Mule, then you probably won’t need to create this package. Only use Maps if your connector is presenting a dynamic data model.
Rebuilding the Project with New Dependencies
Now that your POM file includes these additions, perform a clean build and install of your project. Doing so now is a convenient way to spot any errors in your POM before you start doing any real coding.
Run the following Maven command on the command line from the directory where the project exists:
mvn clean install
This command invokes Maven with two goals:
-
Cleantells Maven to wipe out all previous build contents. -
Installtells Maven to:-
Compile all the code for the project
-
Run any defined tests
-
Package the compiled code as an Eclipse update site
-
Install it in the local Maven repository
-
Any failure during this process, such as a failed build or test, stops Maven from attempting subsequent goals. For further details on Maven builds, see Introduction to the Build Lifecycle at the Apache Maven project.
Your preferred IDE should have support for this process as well. For example, in Eclipse if you have m2eclipse installed, you can select the project and invoke Run as > Maven Build.
Create Client Class and @Connector Class
The client class does the real work of preparing and making calls to the remote Web service. It serializes and deserializes the request and response entities as JSON. The @Connector class creates an instance of the client class when needed, and calls methods to perform operations on resources. The two related tasks here are to create the client class, and update the @Connector class to instantiate and reference it.
The client class builds on functionality provided by the Jersey Client. See the http://repo1.maven.org/maven2/com/sun/jersey/jersey-documentation/1.6/jersey-documentation-1.6-user-guide.pdfJersey 1.6 User Guide] for more information.
Required Imports for the Client Class
In order to pick up Jackson and Jersey client functionality, the client class will require at least the following imports:
import javax.ws.rs.core.MediaType;
import com.sun.jersey.api.client.*;
import com.sun.jersey.api.client.config.ClientConfig;
import com.sun.jersey.api.client.config.DefaultClientConfig;
import com.sun.jersey.api.json.JSONConfiguration;
Additional imports may be needed for Jersey and Jackson, depending on their use in your particular client. For example, the sample client uses the following imports for OAuth functionality in Jersey:
import com.sun.jersey.oauth.client.OAuthClientFilter;
import com.sun.jersey.oauth.signature.OAuthParameters;
import com.sun.jersey.oauth.signature.OAuthSecrets;
The client class in the sample client does not make direct calls to Jackson, so no imports are required.
Expect to add more imports as you add operations, for example if you need to pick up any entity classes and exceptions.
Client Class Properties and Constructor
The easiest way to understand how to build your client class constructor is to look at the constructor for the sample connector’s client class.
public class DropboxClient {
    private Client client; /* a Jersey client instance */
    private WebResource apiResource;
    private RestJerseyConnector connector;

    public DropboxClient(RestJerseyConnector connector) {
        setConnector(connector);
        ClientConfig clientConfig = new DefaultClientConfig();
/* enable support for JSON to POJO entity mapping in Jersey */
        clientConfig.getFeatures().put(JSONConfiguration.FEATURE_POJO_MAPPING, Boolean.TRUE);
        this.client = Client.create(clientConfig);
        this.apiResource = this.client.resource(getConnector().getApiUrl() + "/" + getConnector().getApiVersion());
    }

...

/* getters, setters and other methods omitted*/

}
Note that:
-
Certain
@Connectorclass values are used frequently in the client class code:-
API URL and version
-
Operations for OAuth
-
Consumer key
-
Access token
-
Consumer secret
-
Access token secret
-
-
-
Without passing
@Connectorclass values to every operation or defining them in two places:-
Such values are defined as properties on the
@Connectorclass -
An instance of the
@Connectorclass is passed into the client class constructor and stored as a property on the client class
-
-
Every client operation will use instances of
com.sun.jersey.api.Client(the actual Jersey client instance) andcom.sun.jersey.api.client.WebResource(which represents the top level resource on the service). So these instances are created in the constructor and stored on the client class’sclient.andapiResourceproperties. (Getters and setters for these instances are defined, but that code is omitted here.)
Enabling Jersey Client JSON-to-POJO Mapping
To configure a Jersey client instance to enable optional functionality, such as support to map JSON content to POJOs, complete these steps:
-
Create an instance of
ClientConfig. -
Set the desired options.
-
Pass the
ClientConfigto theClient.create()method.
In this case, adding the feature JSONConfiguration.FEATURE_POJO_MAPPING enables the mapping of JSON responses to Java objects.
You will need this functionality regardless of whether you are using a static data model with POJOs for your entities, or a dynamic data model with Maps for your entities.
Later, define the entities passed to and from the class with annotations on the entity classes to control how JSON documents are mapped to object instances.
Note that while Jackson is the default provider of serialization/deserialization for Jersey, you can substitute other providers, such as GSON. Also, note that using a different provider will change how you map the service’s JSON documents to your connector’s entity classes; for more information, refer to your serialization provider’s documentation.
Client Class Code, Before Adding Operations and Authentication
The complete code for our sample connector, before adding operations and references to entities used, is shown below.
package org.mule.examples.restjerseyconnector.client;

import javax.ws.rs.core.MediaType;

import com.sun.jersey.api.client.*;
import com.sun.jersey.api.client.config.ClientConfig;
import com.sun.jersey.api.client.config.DefaultClientConfig;
import com.sun.jersey.api.json.JSONConfiguration;
import com.sun.jersey.oauth.client.OAuthClientFilter;
import com.sun.jersey.oauth.signature.OAuthParameters;
import com.sun.jersey.oauth.signature.OAuthSecrets;
import org.mule.examples.restjerseyconnector.RestJerseyConnector;
import org.mule.examples.restjerseyconnector.entities.AccountInfo;
import org.mule.examples.restjerseyconnector.exception.RestJerseyConnectorException;
import org.mule.examples.restjerseyconnector.exception.RestJerseyConnectorTokenExpiredException;

public class DropboxClient {

    private Client client;
    private WebResource apiResource;
    private RestJerseyConnector connector;

    public DropboxClient(RestJerseyConnector connector) {
        setConnector(connector);

        ClientConfig clientConfig = new DefaultClientConfig();
        clientConfig.getFeatures().put(JSONConfiguration.FEATURE_POJO_MAPPING, Boolean.TRUE);
        this.client = Client.create(clientConfig);
        this.apiResource = this.client.resource(getConnector().getApiUrl() + "/" + getConnector().getApiVersion());
    }

    public Client getClient() {
        return client;
    }

    public void setClient(Client client) {
        this.client = client;
    }

    public WebResource getApiResource() {
        return addSignHeader(apiResource);
    }

    public void setApiResource(WebResource apiResource) {
        this.apiResource = apiResource;
    }

    public RestJerseyConnector getConnector() {
        return connector;
    }

    public void setConnector(RestJerseyConnector connector) {
        this.connector = connector;
    }
}
Completing the @Connector Class
When you created your connector project, Maven generated a skeleton @Connector class for you. Now you will enhance it to add needed properties (some of them @Configurable), initialize the client class when the @Connector is initialized, and add authentication functionality.
Your connector uses @Configurable properties for a few purposes, such as:
-
Changing the API root resource URL and version for the service to target a specific sandbox or test system instead of a production environment
-
Storing authentication-related values the user must configure:
-
For OAuth: the API key and API secret
-
For basic authentication: a username and password.
-
There may also be properties that are not @Configurable but that are used internally. For the example, OAuth1 support needs certain properties for the access token and access token secret.
Create properties as needed for all of these:
/**
     * Dropbox API Url
     */
    @Configurable @Optional @Default("https://api.dropbox.com")
    private String apiUrl;

    /**
     * Dropbox API version
     */
    @Configurable @Optional @Default("1")
    private String apiVersion;

    /**
     * The ApiKey
     */
    @Configurable @OAuthConsumerKey
    private String consumerKey;
    /**
     * The consumerSecret
     */
    @Configurable @OAuthConsumerSecret
    private String consumerSecret;


    @OAuthAccessToken
    private String accessToken;

    @OAuthAccessTokenSecret
    private String accessTokenSecret;
Note:
-
The use of
@Optionaland@Defaultwith@Configurable. For more on these annotations, see Defining Connector Attributes -
The use of the OAuth annotations
The @Connector Class @Start Method and the Client Class
The @Connector class in this instance does NOT have a constructor. Most of its instance properties are configuration properties. Instead, a @Start method leverages the Mule life cycle to create an instance of the client class when first needed. It is then saved in an instance variable on the @Connector class:
See Integrating Connectors with the Mule Life Cycle for details on the use of the @Start annotation.
|
This example illustrates a useful pattern you can follow in your own connectors.
|
Adding OAuth Authentication
Supporting OAuth 1.0a authentication requires that you make changes in both the @Connector class and the client class. These changes are outlined below.
-
Import OAuth packages.
-
Add OAuth annotations to the
@Connectorclass as required for authentication. -
Add OAuth-related
@Configurableproperties:-
API key
-
API secret
-
access token
-
access token secret (including setters and getters)
-
-
Include the client class code to pass OAuth 1.0a request headers with each request.
For a detailed discussion on the code changes required for OAuth support, seeImplementing OAuth 1.0 Authentication, which references the same code sample used in this discussion.
Building and Testing your Connector
At this point, your connector project has all the necessary elements to build and install in Studio. It’s a handy sanity check to perform testing before you begin adding operations.
The process is described in Installing and Testing Your Connector.
Building the bare-bones version of the Jersey client connector and installing it in Studio gives you a component in the palette to drag and drop into the canvas.
Adding an Operation to the Connector
To add an operation to a connector, you must
-
Define any entity classes used with the operation, and any new exceptions to be raised
-
In the client class, add Jersey code to call the operation, and to serialize and deserialize results
-
Add a
@Processormethod to the@Connectorclass to expose the operation to Mule
|
Apply a Test-Driven Approach When it comes to adding operations to your connector, many successful projects follow a cycle similar to test-driven development. First, identify detailed requirements for the operation:
Then, iterate through the following cycle until you have completed all of your planned functionality:
Continue until you cover all the functionality for each operation. When complete, you have a complete validation suite for your connector to catch any regressions in the event of changes in the target service, the connector itself, Mule, or DevKit. You may ask, "When do I try my connector in Studio?" It is useful, as well as gratifying, to manually test each operation as you go, in addition to the automated JUnit tests. Testing each operation allows you to
Manual testing provides the opportunity to polish the appearance of the connector, improve the experience with sensible defaults, and so on. However, this does not diminish the value of the test-driven approach. Many connector development projects have bogged down or produced hard-to-use connectors because of a failure to define tests as you define the operations, which it seems like (and is) more work up front, but does pay off – you get a better result, faster. |
Defining and Annotating Entity Classes
Defining entity classes (POJOs or Maps) used with your connector operations is up to you – you decide the object model your connector operations present to the rest of Mule. Once you define these classes, you also have to define how to map between the JSON structure and your POJOs. You should add these incrementally, as they are needed by the operations you build.
Internally, Jersey relies on a Jackson-based serialization provider to marshal and unmarshal JSON documents to the object classes passed to and from your connector. This process relies upon Jackson annotations that describe how to map the fields of your entity POJOs to the structure of the JSON content being returned by the Web service.
The details on the Jackson annotations used for this purpose are in the Jackson Databind annotations documentation and the full Jackson annotations documentation.
Note that the @Generated annotation on class AccountInfo indicates that this class definition was produced using the jsonschema2pojo utility. If you don’t want to come up with your own data model, you can also make use of jsonschema2pojo to generate class definitions from sample JSON documents.
|
|
Online Tool Covering all possible permutations of mapping a JSON schema or document to a POJO using Jackson is beyond the scope of this document. One way to quickly produce an object model from JSON documents returned by a Web service is to use the jsonschema2pojo project and online utility. This utility was used to produce the entity classes in this example. You can see the final results in the project entity class code in GitHub and particularly for the above code snippet, the AccountInfo class. |
Mapping the class and its members to a JSON document requires that you make a few changes, outlined below:
-
annotate the entity class to configure JSON serialization:
@JsonSerialize(include = JsonSerialize.Inclusion.NON_NULL)
@Generated("com.googlecode.jsonschema2pojo")
@JsonPropertyOrder({ "referral_link", "display_name", "uid", "country", "quota_info" })
public class AccountInfo {
...-
Add the
@JsonPropertyannotation to the entity class instance properties (and their getters and setters):
@JsonProperty("referral_link")
    private String referralLink;

...

    @JsonProperty("referral_link")
    public String getReferralLink() {
        return referralLink;
    }


    @JsonProperty("referral_link")
    public void setReferralLink(String referralLink) {
        this.referralLink = referralLink;
    }
Implement the Operation in the Client Class
Next, you add code to the client class to make the Web Service request via Jersey Client.
Helper: Adding Authentication to Jersey Client Requests
Depending on what method of authentication you are using, you will probably have to make code changes in both the @Connector and client classes to implement each operation called on the target service.
In the sample connector, the DropBox API uses OAuth 1.0 to access protected resources. Authentication requires including an authorization header when sending each request.
Jersey provides a filter chaining mechanism for modifying requests, which can be used to add the header. Because this step is needed for any operation protected by OAuth, the sample uses the convenient method addSignHeader:
/**
     * Adds the required OAuthClientFilter to insert the required header when the WebResource is used
     * to access the protected resources of the DropBox API
     *
     * @param webResource The WebResource in which the header will be added
     */
    private WebResource addSignHeader(WebResource webResource) {
        OAuthParameters params = new OAuthParameters();
        params.signatureMethod("PLAINTEXT");
        params.consumerKey(getConnector().getConsumerKey());
        params.setToken(getConnector().getAccessToken());
        OAuthSecrets secrets = new OAuthSecrets();
        secrets.consumerSecret(getConnector().getConsumerSecret());
        secrets.setTokenSecret(getConnector().getAccessTokenSecret());
        OAuthClientFilter filter = new OAuthClientFilter(client.getProviders(), params, secrets);
        webResource.addFilter(filter);
        return webResource;
    }
For more information, see the Jersey User Guide.
Helper: Executing a Request via Jersey
Making any request requires:
-
Marshaling inbound objects to JSON
-
Calling the Web service
-
Unmarshalling the response
-
Handling response status codes and exceptions
As with authentication, use a helper method to encapsulate all these repeated steps. In the sample client class, method execute() implements all this logic, as shown below.
/**
     * Executes the Dropbox request
     *
     */
    private <T> T execute(WebResource webResource, String method, Class<T> returnClass) throws RestJerseyConnectorTokenExpiredException,
            RestJerseyConnectorException {
        ClientResponse clientResponse = webResource.accept(MediaType.APPLICATION_JSON).method(method, ClientResponse.class);
        if(clientResponse.getStatus() == 200) {
            return clientResponse.getEntity(returnClass);
        } else if (clientResponse.getStatus() == 401) {
            throw new RestJerseyConnectorTokenExpiredException("The access token has expired; " +
                    clientResponse.getEntity(String.class));
        } else {
            throw new RestJerseyConnectorException(
                    String.format("ERROR - statusCode: %d - message: %s",
                            clientResponse.getStatus(), clientResponse.getEntity(String.class)));
        }
    }
Handling Exceptions
As already noted, define any exceptions that may arise in your connector in a separate exceptions package. At a minimum, you need a general catch-all exception. Specific exceptions may also be useful to diagnose failures more easily, such as authentication-related failures, application-level errors, and so on. The execute() method above is a good place to centralize your exception-handling code, since it passes all requests for all operations.
For our sample connector, package org.mule.examples.restjerseyconnector.exception contains two exceptions: a catchall RestJerseyConnectorException and the OAuth-related RestJerseyConnectorTokenExpiredException.
Note also that the execute() method provides a well-formatted error message. This step improves your ability to diagnose the issue if your connector encounters an error. You may want to put more verbose information here, such as the message sent, the HTTP request method, and so on.
|
+ As you develop your test cases, your tests of invalid or failed requests can check for messages associated with the correct exception.
Use the @InvalidateConnectionOn annotation to handle the reconnection. If the connector uses @OAuth as the authentication method, use @OAuthInvalidateAccessTokenOn (exception = MyAccessTokenExpiredException.class).
Creating the Operation Client Method
With those helper classes in place, the actual client method to make a request of a resource is quite short. For the example, the getAccountInfo() method makes a GET request of the /account/info resource:
/**
     * Returns the Account Information of the user
     *
     * @return The AccountInfo
     * @throws org.mule.examples.restjerseyconnector.exceptions.RestJerseyConnectorException If the response is an error or the response cannot be parsed as an AccountInfo
     * @throws org.mule.examples.restjerseyconnector.exceptions.RestJerseyConnectorTokenExpiredException If the current token used for the call to the service is no longer valid
     */
    public AccountInfo getAccountInfo()
            throws RestJerseyConnectorException, RestJerseyConnectorTokenExpiredException {
        WebResource webResource = getApiResource().path("account").path("info");
        return execute(webResource, "GET", AccountInfo.class);
}
Exposing the Operation in the @Connector Class
To expose an operation from the client class on the @Connector class, you will need to add a @Processor method that calls the corresponding method on the Jersey client.
-
Update the
@Connectorclass to import any entity and exception classes needed to call the client class operation. -
Define a
@Processormethod on the@Connectorclass, named for the operation.-
Annotate the method as needed for authentication.
-
-
The parameters to this method must match the parameters to expose at the Mule ESB level (in the XML configuration or in the property dialog).
-
Annotate the parameters to control default and optional values, their desired positions in Studio property dialogs, etc.
-
-
The method body should call the operation method on the client class, pass the appropriate object, and return the value to be set to the payload.
For our getAccountInfo operation, we add the following imports in the @Connector class:
import org.mule.examples.restjerseyconnector.entities.AccountInfo;
import org.mule.examples.restjerseyconnector.exceptions.RestJerseyConnectorException;
import org.mule.examples.restjerseyconnector.exceptions.RestJerseyConnectorTokenExpiredException;
The @Processor method that exposes the` getAccountInfo` operation is shown below.
/**
     * Returns the Account Information of the user
     *
     * {@sample.xml ../../../doc/rest-jersey-connector.xml.sample rest-jersey:get-account-info}
     *
     * @return The AccountInfo object
     * @throws org.mule.examples.restjerseyconnector.exceptions.RestJerseyConnectorException If the response is an error or the response cannot be parsed as an AccountInfo
     * @throws org.mule.examples.restjerseyconnector.exceptions.RestJerseyConnectorTokenExpiredException If the current token used for the call to the service is no longer valid
     */
    @OAuthProtected
    @Processor
    public AccountInfo getAccountInfo() throws RestJerseyConnectorException, RestJerseyConnectorTokenExpiredException {
        return getClient().getAccountInfo();
    }
Adding XML Configuration Examples for JavaDoc
DevKit enforces Javadoc documentation of the connector’s operations, including samples of XML configuration for each supported operation. These are used in the generated JavaDoc for the connector. (To learn more about JavaDoc annotations for DevKit, see Creating Reference Documentation.)
In the @Connector class source code, the following comment links the method to its required XML sample:
-
{@
sample.xml ../../../doc/rest-jersey-connector.xml.sample rest-jersey:get-account-info}
You will see the sample code snippets file in the doc folder inside the DevKit generated project.
DevKit created this file, but we need to populate it with example Mule XML configurations for each operation. For this example, add the following to the file to document the operation:
<!-- BEGIN_INCLUDE(rest-jersey:get-account-info) -->
    <rest-jersey:get-account-info />
<!-- END_INCLUDE(rest-jersey:get-account-info) -->
When you build the JavaDoc, the sample above is inserted into the documentation.
Manually Testing Your Connector
Once you have completed all of the steps above, you are ready to build and test your connector manually in Studio. See Installing and Testing Your Connector for the steps to follow to build your connector and import it into Studio.
DevKit does not force you to add unit tests for your connector, though as noted earlier, this is strongly recommended. If you have added unit tests that your connector does not pass, then your Maven builds fail. You can temporarily bypass your unit tests by adding the argument -Dmaven.test.skip=true to your Maven command. For example:
mvn clean install -Dmaven.test.skip=trueOnce you have imported your connector into Studio, you will see it in the palette, and you can use it in flows. The Properties Editor shows your operations.
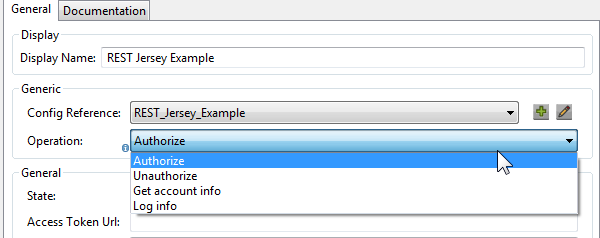
Note the Authorize and Unauthorize operations that are added automatically by DevKit to any OAuth connector.
See Also
Congratulations! You have a connector that works well enough to install in Studio and to pass basic unit tests. Now you can:
-
Continue to add operations through the iterative process described above, until you have your desired operations and test cases to validate all desired behaviors.
-
Add tests to your test suite as described in Developing DevKit Connector Tests.
-
Refine the appearance of the connector dialog boxes and XML element, as described in Defining Connector Attributes - Customizing Attributes look and feel.
-
You can also return to the Anypoint Connector Development.