Creating a Connector for a RESTful API using @RestCall Annotations
| DevKit is compatible only with Studio 6 and Mule 3. To build Mule 4 connectors, see the Mule SDK documentation. |
This example walks you through the implementation of an Anypoint Connector for a RESTful API. Anypoint DevKit provides a convenient set of annotations called @RestCall for creating a Connector for a RESTful API.
The @RestCall annotations are applied to methods (@Processor) in a Connector’s @Connector class that declaratively describe the URLs for resources exposed on the API. At compile time, Anypoint DevKit generates client code for all the operations, and provides most of the functionality for the methods. For particularly well-defined RESTful APIs, this can be a convenient solution for quickly producing a connector.
This discussion sketches the architecture of a @RestCall-based connector, introduces the @RestCall annotations and their use, and finally presents a sample Facebook connector that implements some basic operations.
Prerequisites
This document assumes you are familiar with RESTful APIs, and with the DevKit connector architecture described in Anypoint Connector DevKit.
@RestCall-Based Connector Architecture
DevKit has built-in client functionality that can handle many "well-behaved" RESTful Web services, which require clean URLs, correct HTTP verb usage, etc.
The client is exposed through a set of annotations (the @RestCall annotations) that you apply to your @Connector class and its methods.
The architecture of a connector built using the @RestCall annotations looks like the image below.
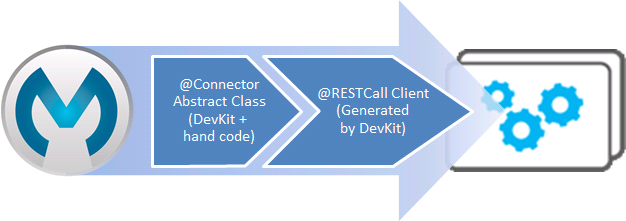
Compared to most connectors, creating these connectors requires writing very little code. You still define a @Connector class, with properties and methods; but in this case, the @Connector class and its methods are all abstract. (Any entity classes passed to the operations are still concrete classes, as with other connector types.) For each operation, apply the @RestCall annotations to provide:
-
A URI template for the target resource
-
The HTTP verb for the request
-
Any parameters to substitute into the URI or send in the query/POST body to parameterize the request
DevKit generates the entire REST client in a subclass that implements the abstract method. You as a developer never see this class.
This level of simplicity is possible because the patterns for accessing a well-defined RESTful API are extremely consistent.
About the @RestCall Client and Annotations
DevKit provides a set of annotations to simplify working with RESTful APIs. These annotations handle all necessary operations, generating each REST call, and incorporating each REST call parameter.
The generated code creates the URI, which is based on the arguments passed to the @RestCall annotation, and makes a request using the verb specified by the method parameter of @RestCall.
The URI is populated with every item annotated with the @RestUriParam annotation. In the example below, the bucket portion of the URI, indicated between braces, is replaced with the contents of bucketName, as specified in the @RestUriParam annotation on the last line. The example below is based on the Amazon S3 connector.
@Processor
@RestCall(uri = "http://{bucket}.s3.amazonaws.com/?max-keys=0", method = HttpMethod.HEAD)
    public abstract Object bucketExists(@RestUriParam("bucket"),
         String bucketName);
As explained below, you can use the @RestUriParam annotation, as well as other related annotations, on @Processor method arguments or @Configurable fields of the connector.
When generating the request call, DevKit includes a non-annotated argument and an argument annotated with @Payload as the body of the call.
@RestCall Annotations Reference
The sections below detail the full set of annotations for implementing a connector against a RESTful API.
@RestCall
Used with the @Processor annotation. Indicates that upon invocation, the processor makes a RESTful request.
Required arguments:
-
uri: URI of the REST resource to query -
method: HTTP method to use
@Processor
@RestCall(uri = "http://mybucket.s3.amazonaws.com/?max-keys=0",
   method = HttpMethod.HEAD)
   public abstract Object bucketExists("mybucket")
   String bucketName);
The example above uses a static URI. For details on using dynamically-generated URIs, see @RestURIParam.
@RestQueryParam
Specifies URI query parameters, which are appended to the path of the URI after a ? or & symbol. You can apply this annotation to @Processor method arguments or to connector fields marked @Configurable. This enables you to use dynamically-generated arguments as query parameters.
@RestURIParam
Allows you to insert URI parameters that are part of the URI path itself, which is required by some URIs. As with the @RestQueryParam annotation, you can apply this annotation to @Processor methods arguments or to connector fields marked @Configurable. This enables you to use dynamically-generated arguments as URI parameters.
Required Arguments
Argument to the message processor to replace using a URI parameter
To use the @RestURIParam annotation, you must specify the argument in the URI to replace with the annotation, by surrounding it with curly braces. In the example below, the argument is {path}.
@RestCall(uri = "http://myservice.com/{path}", method = HttpMethod.HEAD)Reference the argument in the @RestURIParam annotation:
...
Public abstract String setPath(@RestURIParam String path ...
@RestHeaderParam
Allows you to insert custom headers in the call. You can apply this annotation to @Processor method arguments or to a @Configurable field of the HTTP header marked in the annotation. This enables you to use dynamically-generated arguments as query parameters.
Required Arguments
Name of the header to include in the call.
@RestHeaderParam("AuthorizationCode")
@Configurable private String authorizationCode;
@Processor
@RestCall(uri = "http://\{bucket\}.s3.amazonaws.com/?max-keys=0",
   method = HttpMethod.HEAD)
   public abstract Object bucketExists(@UriParam("bucket")
   String bucketName);
@RestPostParam
Allows you to set parameters in the body of POST method calls. You can apply this annotation to @Processor method arguments or to connector fields marked @Configurable. DevKit ensures that you apply this annotation only to POST methods.
Processor methods annotated with @RestPostParam cannot use a non-annotated argument or a @Payload annotated argument.
Implementing a @RestCall Connector
The remainder of this document walks you through implementing a @RestCall connector. You can follow the walkthrough literally to build this specific example, or you can apply the same process to build a connector for your own API.
Example @RestCall Connector: Facebook Graph API
The Facebook Graph API is the primary way for apps to get data into and out of Facebook’s social graph and interact with the Facebook platform. For background information, see Facebook’s Getting Started: The Graph API.
This discussion is built around a sample connector for the Facebook Graph API that uses OAuth authentication and exposes two operations:
-
Retrieve the profile information of a specified user as a User object
-
Post an update on the Facebook Timeline for a specified user
Setting Up Access to the Facebook Graph API
The Graph API supports unauthenticated access for reading public information, but requires OAuth2 authentication for write access. OAuth2 access to the Graph API requires that you:
-
Sign up for a Facebook developer account
-
Create a Facebook application (which associates your Facebook client application with your developer account identity on Facebook’s servers)
For details on setting up authenticated API access, see the Facebook documentation. Facebook generates a Consumer Key and Consumer Secret, which you need to complete the exercise.
Implementing the @Connector Class
The RestCall client can be used with the @OAuth authentication annotations or the connection management framework. In this case, the Facebook connector uses OAuth 2.0 authentication. The abstract @Connector class, FacebookConnector, gets the @RestCall annotations and OAuth-related annotations on the class.
The following code excerpt is taken from the @Connector class FacebookConnector:
/**
 * Facebook OAuth2 connector
 *
 */
@OAuth2(accessTokenUrl = "https://graph.facebook.com/oauth/access_token",
        authorizationUrl = "https://graph.facebook.com/oauth/authorize",
        accessTokenRegex = "access_token=([^&]+?)&", expirationRegex = "expires=([^&]+?)$")
@Connector(name = "facebook-connector")
public abstract class FacebookConnector {

    /**
     * Your application's client identifier (consumer key in Remote Access Detail).
     */
    @Configurable
    @OAuthConsumerKey
    private String consumerKey;

    /**
     * Your application's client secret (consumer secret in Remote Access Detail).
     */
    @Configurable
    @OAuthConsumerSecret
    private String consumerSecret;

    //@RestQueryParam("access_token")
    @OAuthAccessToken
    private String accessToken;

    @OAuthCallbackParameter(expression = "#[json:id]")
    private String userId;

    @OAuthAccessTokenIdentifier
    public String getUserId() {
        return userId;
    }

    /* ...Getters and setters omitted */
}
Notes:
-
The class
FacebookConnectoris an abstract class, which is required for a RestCall connector -
The OAuth2 annotations are used on the relevant methods and properties, as described in OAuth V2
-
Code for operations are omitted at this stage
Implementing Data Model Entity Classes
Define any entity classes that represent the data passed to and returned from the Web service requests, and how JSON documents map to Java classes used with the connector.
Given a JSON schema or sample documents for the service, you can generate classes using the tool JSONSchema2POJO, available at http://www.jsonschema2pojo.org/. (The wiki on GitHub provides getting started and reference documentation for JSONSchema2POJO.)
After you create your data model classes, add them to your project, and import them into your @Connector class.
Facebook User Class Example
For our example, class User is the entity class that passes data about a Facebook user to the API. Define and add this class to the project before you implement the operations that use it.
The full definition for User.java follows:
package com.fb;
import java.util.HashMap;
import java.util.Map;
import javax.annotation.Generated;
import org.apache.commons.lang.builder.EqualsBuilder;
import org.apache.commons.lang.builder.HashCodeBuilder;
import org.apache.commons.lang.builder.ToStringBuilder;
import org.codehaus.jackson.annotate.JsonAnyGetter;
import org.codehaus.jackson.annotate.JsonAnySetter;
import org.codehaus.jackson.annotate.JsonProperty;
import org.codehaus.jackson.annotate.JsonPropertyOrder;
import org.codehaus.jackson.map.annotate.JsonSerialize;
@JsonSerialize(include = JsonSerialize.Inclusion.NON_NULL)
@Generated("com.googlecode.jsonschema2pojo")
@JsonPropertyOrder({
    "id",
    "name",
    "first_name",
    "last_name",
    "link",
    "username",
    "gender",
    "locale"
})
public class User {
    /**
     * User ID
     *
     */
    @JsonProperty("id")
    private String id;
    /**
     * User name
     *
     */
    @JsonProperty("name")
    private String name;
    /**
     * User first name
     *
     */
    @JsonProperty("first_name")
    private String first_name;
    /**
     * User last name
     *
     */
    @JsonProperty("last_name")
    private String last_name;
    /**
     * Link
     *
     */
    @JsonProperty("link")
    private String link;
    /**
     * Username
     *
     */
    @JsonProperty("username")
    private String username;
    /**
     * Gender
     *
     */
    @JsonProperty("gender")
    private String gender;
    /**
     * Locale
     *
     */
    @JsonProperty("locale")
    private String locale;
    private Map<String, Object> additionalProperties = new HashMap<String, Object>();
    /**
     * Get user ID
     *
     */
    @JsonProperty("id")
    public String getId() {
        return id;
    }
    /**
     * Set user ID
     *
     */
    @JsonProperty("id")
    public void setId(String id) {
        this.id = id;
    }
    /**
     * Get user name
     *
     */
    @JsonProperty("name")
    public String getName() {
        return name;
    }
    /**
     * Set user name
     *
     */
    @JsonProperty("name")
    public void setName(String name) {
        this.name = name;
    }
    /**
     * Get user first name
     *
     */
    @JsonProperty("first_name")
    public String getFirst_name() {
        return first_name;
    }
    /**
     * Set user first name
     *
     */
    @JsonProperty("first_name")
    public void setFirst_name(String first_name) {
        this.first_name = first_name;
    }
    /**
     * Get user last name
     *
     */
    @JsonProperty("last_name")
    public String getLast_name() {
        return last_name;
    }
    /**
     * Set user last name
     *
     */
    @JsonProperty("last_name")
    public void setLast_name(String last_name) {
        this.last_name = last_name;
    }
    /**
     * Get the link
     *
     */
    @JsonProperty("link")
    public String getLink() {
        return link;
    }
    /**
     * Set the link
     *
     */
    @JsonProperty("link")
    public void setLink(String link) {
        this.link = link;
    }
    /**
     * Get the username
     *
     */
    @JsonProperty("username")
    public String getUsername() {
        return username;
    }
    /**
     * Set the username
     *
     */
    @JsonProperty("username")
    public void setUsername(String username) {
        this.username = username;
    }
    /**
     * Get user gender
     *
     */
    @JsonProperty("gender")
    public String getGender() {
        return gender;
    }
    /**
     * Set user gender
     *
     */
    @JsonProperty("gender")
    public void setGender(String gender) {
        this.gender = gender;
    }
    /**
     * Get the locale
     *
     */
    @JsonProperty("locale")
    public String getLocale() {
        return locale;
    }
    /**
     * Set the locale
     *
     */
    @JsonProperty("locale")
    public void setLocale(String locale) {
        this.locale = locale;
    }
    @Override
    public String toString() {
        return ToStringBuilder.reflectionToString(this);
    }
    @Override
    public int hashCode() {
        return HashCodeBuilder.reflectionHashCode(this);
    }
    @Override
    public boolean equals(Object other) {
        return EqualsBuilder.reflectionEquals(this, other);
    }
    @JsonAnyGetter
    public Map<String, Object> getAdditionalProperties() {
        return this.additionalProperties;
    }
    @JsonAnySetter
    public void setAdditionalProperties(String name, Object value) {
        this.additionalProperties.put(name, value);
    }
}
Notes:
-
The
@Generated("com.googlecode.jsonschema2pojo")annotation indicates that this class was generated using the JSONSchema2POJO tool, hosted at http://www.jsonschema2pojo.org/. -
The multiple imports from package
org.codehaus.jackson.annotateand the specific annotations used (such as@JsonProperty, @JsonAnySetter, @JsonAnyGetter) reflect the fact that the RestCall client uses Jackson internally to serialize and deserialize JSON data exchanged with the service. Be sure to use JSONSchema2POJO in Jackson mode.
Adding Operations to the @Connector Class
When implementing operations on the @Connector class, note that for RestCall connectors the operation methods, like the class itself, are abstract. Annotations on the methods specify:
-
A template for the REST URL, with placeholders for parameters
-
Values to:
-
Substitute for the placeholders in the URL
-
Append as GET query parameters
-
Send in the POST body
-
-
The class to expect as the return value
-
The HTTP request method to use (such as GET, POST, or PUT)
|
Apply a Test-Driven Approach Based on MuleSoft experience, most successful connector implementation projects follow a cycle similar to test-driven development when building out operations on a connector:
Iterate until you cover all the scenarios covered in your requirements for an operation. Then use the same cycle to implement each operation, until your connector functionality is complete. If your client library is well-documented, the expected behaviors for operations should be clear, and you may be able to get away with less unit testing for edge cases and certain exceptional situations, but bear in mind that your connector is only as reliable as the Java client you base it on. You may ask, "When do I try my connector in Studio?" It is useful, as well as gratifying, to manually test each operation as you go, in addition to the automated JUnit tests. Testing each operation allows you to:
Manual testing provides the opportunity to polish the appearance of the connector, improve the experience with sensible defaults, and so on. However, this does not diminish the value of the test-driven approach. Many connector development projects have bogged down or produced hard-to-use connectors because of a failure to define tests as you define the operations, which it seems like (and is) more work up front, but does pay off – you get a better result, faster. For details on developing connector tests, see Developing DevKit Connector Tests. |
Example FacebookConnector Operation Methods
The following connector exposes the getUser() and publishWall() operations:
/**
 * GET a user profile.
 * {@sample.xml ../../../examples/Facebook.default.xml.sample facebook-connector:default}
 *
 * @param user
 * Represents the ID of the user object.
 * @param metadata
 * The Graph API supports introspection of objects, which lets
 * you see all of the connections an object has without knowing
 * its type ahead of time.
 * @return  a User object.
 * @throws IOException
 * when the call fails
 */
@Processor
@RestCall(uri = "https://graph.facebook.com/{user}", method = HttpMethod.GET)
public abstract User getUser(
    @RestUriParam("user") String user,
    @RestQueryParam("metadata") String metadata)
    throws IOException;
/**
 * Post a message on a user's wall
 * {@sample.xml ../../../examples/Facebook.default.xml.sample facebook-connector:default}
 *
 * @param message
 * Message to be published
 * @param user
 * User ID
 * @return  No return information available
 * @throws IOException
 * when the call fails
 */

@OAuthProtected
@Processor
@RestCall(uri = "https://graph.facebook.com/{user}/feed", method = HttpMethod.POST, contentType = "application/json")
public abstract String publishWall(
    @RestUriParam("user") String user,
    @RestPostParam("message") String message)
throws IOException;-
getUser()does not have the@OAuthProtectedannotation. Facebook permits getting some user information even without authentication (though a more complete response may be returned with authentication, depending on the authenticated user’s relationship to the requested user, the privacy settings of the requested user, and so on) -
Posting to a wall requires authentication, so it is annotated
@OAuthProtected
See Also
After you have a connector that works well enough to install in Studio and to pass basic unit tests, you can:
-
Continue to add operations through the iterative process described above, until you have your desired operations and test cases that validate all desired behaviors.
-
Refine the appearance of the connector dialog boxes and XML element through more annotations, as described in Defining Connector Attributes.
-
You can also return to the Anypoint Connector Development.