Setting Up API Access
| DevKit is compatible only with Studio 6 and Mule 3. To build Mule 4 connectors, see the Mule SDK documentation. |
Before starting a connector project, research the API to which you wish to connect. Beyond collecting and reading any API documentation offered by the target’s provider, prepare access to an instance so you can test against it.
Sandbox access, supporting code and documentation, and other support required for building a connector to a local enterprise application or other Web service is usually provided by your local administrator or the application vendor. SaaS applications usually provide a self-service process for accessing the API, which varies from service to service.
This document summarizes typical preparation steps you might need to perform, then presents examples for two cases: Salesforce Example and Twitter Example.
Prerequisites
This document assumes you are familiar with your API, Web service or other resource, and that the documentation for your target’s APIs or client library is publicly available.
Cloud APIs
Cloud APIs, also known as Software as a Service (SaaS) or Web services, may require you to set up a test/developer account, sandbox environment and API access privileges with the application provider. Generally, these tasks require you to complete several steps; you must check your API provider’s documentation for the correct procedure in each case. As a reference we’ve included two examples below: Salesforce and Twitter.
| The examples below are accurate at the time of writing this guide; however, bear in mind that the API owners may change their instructions over time. |
Salesforce Example
-
Register for a Salesforce account. You need to provide an email address to receive a confirmation email.
-
After you’ve filled out the registration form, open the confirmation email and click the link provided to enable you to set a password and log in to Salesforce Developer Edition.
-
To enable remote applications to log in to Salesforce, you must reset your security token on Salesforce by completing the following steps:
-
From the Salesforce UI, select Your Name > My Settings in the upper right corner.
-
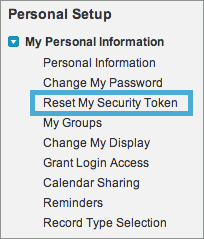
Expand the My Personal Information on the left sidebar, then select Reset My Security Token.

-
On the Reset Security Token page, click the Reset Security Token button. Salesforce emails a new Security Token.
-
-
Record your security token, username and password as these items are required to complete the example below.
Twitter Example
Twitter is a good example of a relatively simple API to access from a connector as many Web applications or services follow a similar model.
-
To access the Twitter API, you must first obtain a Twitter account.
-
To access Twitter APIs through the account you created, you need to create an empty Twitter application at Twitter’s developer portal.
-
To test the Twitter connector, obtain the following elements from Twitter:
-
Access key
-
Access secret
-
Consumer key
-
Consumer secret
-
-
For detailed instructions on creating an application on the Twitter platform, see Configure Twitter for API Access.
SOAP-Based APIs
For SOAP-based APIs, you need to obtain a WSDL file from the API provider. On top of this, SOAP-based services may have different authentication schemes such as persistent sessions, security headers included in each message, security tokens, or others. Each of these require specific attention when implementing the connector.
Using Java Libraries
If available, you can download any existing Java library for accessing the service. This may be a client library that are the only means of accessing the application, or they may be a wrapper for the application’s publicly exposed web service. To use a library, you can include it as a Maven dependency in your project.
| For details on building applications with Maven, see Introduction to the Maven Build Cycle in the official Maven documentation. |
See Also
NEXT: Continue to Creating an Anypoint Connector Project to begin developing your connector.


