Create Your First Mule Application with Flow Designer
You are the connectivity lead for Salesforce Sales Cloud at Northern Trail Outfitters (NTO). NTO makes stylish and comfortable apparel, and gear for outdoor recreation and fitness.
NTO uses Sales Cloud to track the opportunities in the pipeline for bulk swag orders. After they close opportunities, sales reps need to go into the order management system and place the orders. Also, their customers often call NTO to check on orders.
NTO wants to use MuleSoft to create a process that places orders automatically when opportunities are closed, and that notifies customers via SMS about their order status and ETA.
Your task is to put this process in place within a tight deadline. You realize that it is critical for four systems that NTO uses to be integrated with each other for this process to work
| System | Purpose |
|---|---|
Salesforce Sales Cloud |
Manages sales opportunities |
MySQL database |
Stores product information and SKUs |
NTO Order system |
Internal system that can place orders and return tracking information + order ETA. Callable through the NTO Order API. |
Twilio |
Sending notifications to customers |
Your approach
To automate this process, you have to overcome a few integration challenges. You come up with this list of what needs to happen in order to automate this order-to-cash cycle.
-
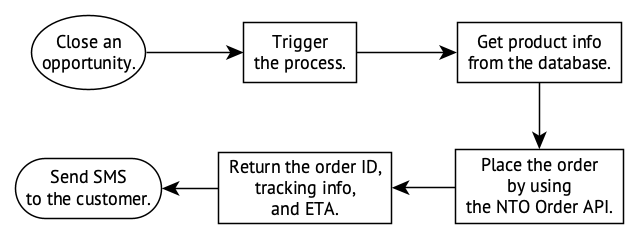
Salesforce starts the workflow automation process when a sale is made. This process is triggered in Salesforce when an opportunity is changed to "Closed Won".
-
The process retrieves the appropriate product information from the products database.
-
After the process has retrieved the information, it places an order with the NTO Orders API.
-
The Orders API returns the order number, tracking information, and ETA for delivery.
-
The information returned by the API is translated into human readable text and sent as an SMS to the customer.
Visually, the process should look like this:
Fortunately, you know just the tool to help you carry out this plan: Flow Designer!
Before You Begin
-
Sign up for a 30-day trial of MuleSoft Anypoint Platform, if you do not already have access to it.
-
Sign up for a free developer account from Salesforce. You’ll need your credentials for this account, as well as your security token.
-
Sign up for a free Twilio developer account. You’ll need a trial phone number that Twilio provides for your account. You’ll also need your account SID and authentication token.
Capture opportunities that are won
You need to ensure that your application is triggered as soon as the status of an Opportunity in Salesforce is changed to ‘Closed Won’. To do this, use an SOQL query in Salesforce which fields to send and our criteria for triggering the application. After you build the query, you can set up a Push Topic that can serve as the trigger for your MuleSoft application.
-
Navigate to the SOQL query builder. (You have to log in with your Salesforce credentials.)
-
Select Opportunity as the Object.
-
Select Amount, CloseDate, Id, and Name from the Fields menu.
-
In the Filter results by fields, add
StageName = ‘Closed Won’. -
Test the query by using the Query button. You should get a list of all closed Opportunities. Your query should look like this :
SELECT Amount,CloseDate,Id,Name FROM Opportunity WHERE StageName = 'Closed Won'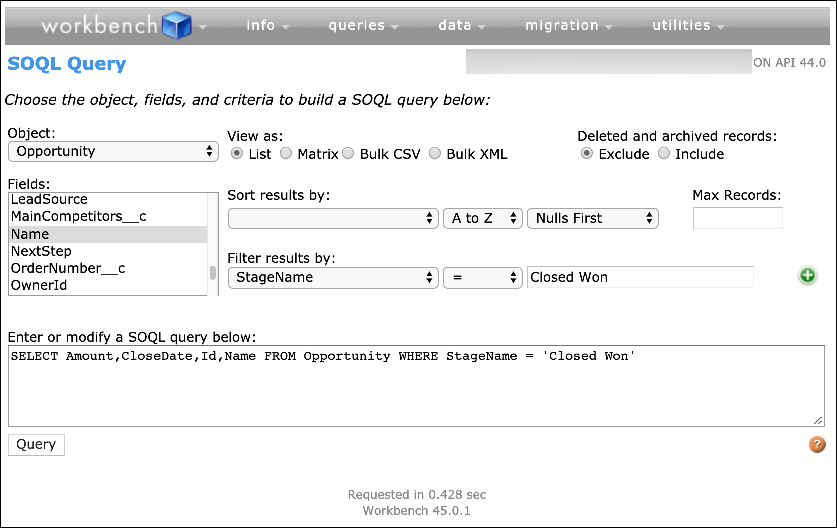
-
Copy the query to your clipboard.
-
Navigate to the Streaming Push topics page from the query menu at the top of the workbench.
-
Create a new Push Topic by selecting the option Create New.
-
Name the Push Topic
ClosedOppsand paste in the query that you built. -
Save the Push Topic.
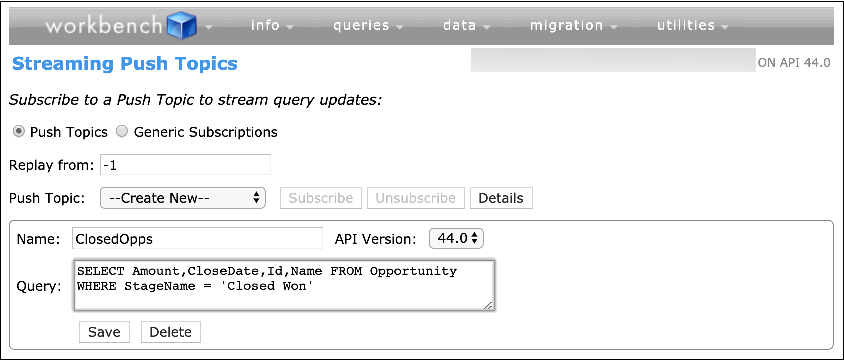
Now, every time the query criteria are met, Salesforce will push an event into the ClosedOpps Push Topic.
Create a project in Flow Designer
When you are working in Flow Designer, you create your Mule applications in projects. A project can contain only one Mule application.
A Mule application consists of one or more flows. A flow, as MuleSoft defines the term, is a simple, flexible mechanism that enables orchestration of services using the sophisticated message flow capabilities of Mule runtime engine. Also referred to as service orchestration. In Flow Designer specifically, a flow is a sequence of cards that represent core components (such as loops, conditionals, transformations, and more) or connectors to systems and APIs (such as Salesforce, SAP, Google Docs, and more). Cards can represent a couple of other things, too; however, for this tutorial, you need know only about those two.
Data moves from the beginning of a flow to the end of the flow. Along the way, the cards can update systems, query systems, send messages, delete database rows, or do any of the things that core components and connectors can do.
There is a good number of core components and there are many connectors. For this tutorial, you’ll use these:
-
Salesforce connector
-
Set Variable component
-
Choice router component
-
Database connector
-
Set Payload component
-
Transform component
-
Twilio connector
For this project, you’ll create only a single flow.
Follow these steps to create the project.
-
Log into Anypoint Platform.
-
Open Design Center and create a new Mule application.
-
From the Projects page, click Create new.
-
Select New Mule App.
-
In the New Mule App dialog, name your project
Order-to-cash automation. -
Click Create App.
-
-
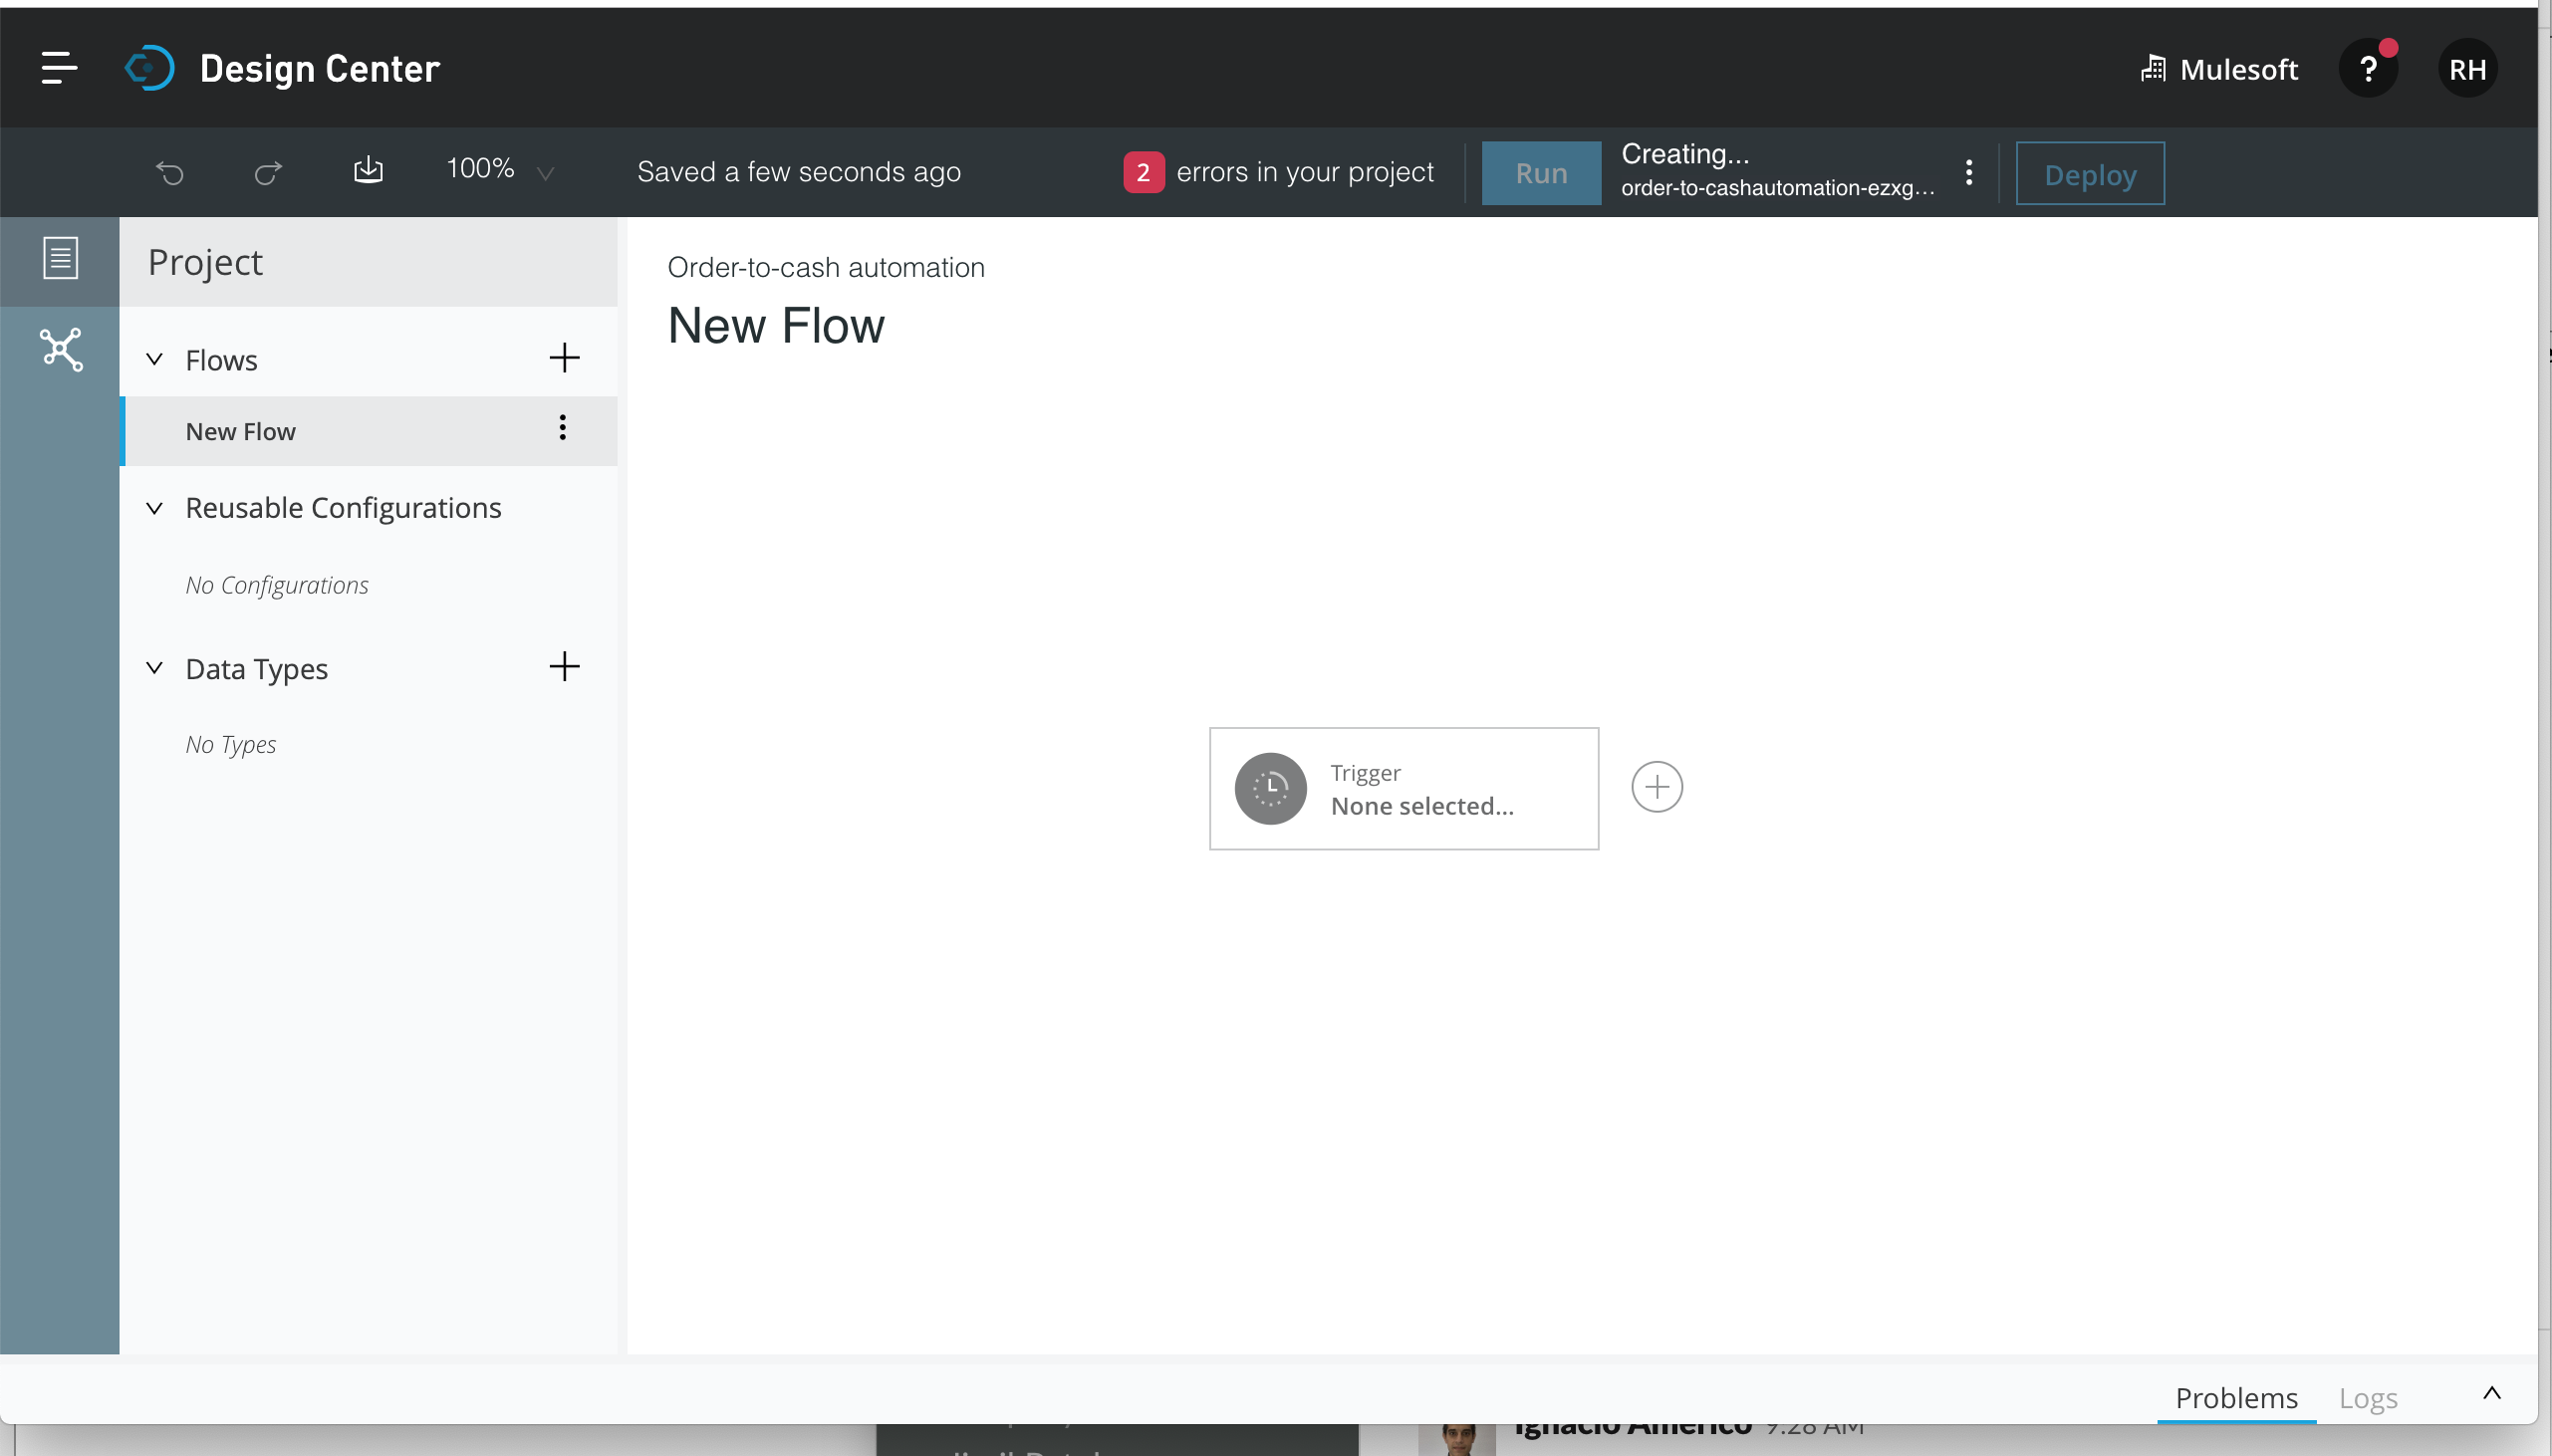
In the Let’s Get Started wizard, click the link
Go straight to canvas, which is in the bottom-left corner.Result: Flow Designer appears with an empty trigger card displayed in the middle of the canvas.
Configure the trigger for the flow
A trigger is an event that starts a flow in a Mule application. In your project, the trigger is the change in status of an opportunity in Salesforce Sales Cloud to Closed Won. You can configure the trigger card to represent a Salesforce connector that is subscribed to the topic ClosedOpps, which you created above in "Capture opportunities that are won".
-
Click the Trigger card.
Result: A list of the available connectors is displayed in the card.
-
In the Search field, type “Salesforce”.
Result: The Salesforce connector appears in the list.
-
Select the Salesforce connector.
Result: A list of operations that you can use to trigger Mule applications with the Salesforce connector is displayed.
-
Select the operation Subscribe Topic.
Result: The card is opened. In its top-left corner, it is identified as a Salesforce connector. The name of the operation — Subscribe Topic — is also displayed. At the top of the card is the message “You need to set up the Salesforce configuration. Click here to set it up.”
-
Specify how you want Flow Designer to authenticate to Salesforce.
-
Click the linked text that is in the message.
-
In the Connection Type field, select Basic Username Password. If reusable connections are available, select one.
-
Specify your username, password, and security token.
-
Click the Test button to check whether Flow Designer can connect with the credentials that you specified. If the test fails, double-check your credentials and token. Save the configuration after the test succeeds.
-
-
Add your Push Topic to the connector by typing
ClosedOppsin the Topic field. Then, close the card either by clicking the X in the top-right corner or by clicking an empty space on the canvas.
Configure the card for Twilio
Because you want to notify the customer with an SMS, you can use the Twilio connector and its Send Message operation.
-
Click the plus sign that is to the right of the Salesforce card.
-
Select the Twilio connector and the operation Send Message.
Result: The Twilio card is opened. At the top of the card is the message “You need to set up the Twilio Connector configuration. Click here to set it up.”
-
Specify how you want Flow Designer to authenticate to Twilio.
-
Click the linked text that is in the message.
-
In the Username field, specify your account SID for Twilio. In the Password field, specify your authentication token for Twilio.
Do not specify your username or password in these fields. If you do, the Twilio card returns the message
HTTP POST on resource 'https://api.twilio.com:443/<Date>/Accounts/<account-SID>/Messages.json' failed: Timeout exceeded.when you trigger the flow in your app. -
Click the Test button to check whether Flow Designer can connect with the credentials that you specified. If the test fails, double-check your credentials and token. Save the configuration after the test succeeds.
-
-
In the Account SID field, specify your account SID again. Then, close the card.
Create data types
The NTO systems all use different formats for data. Because the flow that you are creating needs to pass data through those systems, Flow Designer requires you to give examples of those data types. Because you’ll reuse a few of the data types, you can create them at the project level, rather than at the points in the flow where you need them.
Create the type for the data sent by Salesforce
-
In the Project sidebar, click the plus icon that is next to the heading of the Data Types section.
Result: The New Type dialog is opened.
-
Create the data type that represents a Salesforce opportunity and that the Push Topic
ClosedOppssends to trigger the flow.-
Name the data type ‘Salesforce Opportunity’.
-
Paste this JSON into the Add your JSON example field.
{
 "Amount": 15000,
 "Id": "0061U0000079dWXQAY",
 "CloseDate": "2019-01-25T00:00:00.000Z",
 "Name": "Dickenson Mobile Generators"
}
Result: The fields from the example are parsed automatically in the right sidebar of the dialog.
-
-
Click Save.
Create the type for the data sent to and returned from the Orders API
Following the same steps, create the following two data types:
Name: Order Information
The process sends data to the Orders API in this format. Here is an example to use in the New Type dialog:
{
       "OppId": "fsjf3439d993",
       "OrderAmount": 500000,
       "orderdate": "2018-11-13T11:15:45",
       "productInfo": {
           "productID": "CK111274",
           "category": "Small",
           "SKU": "CKS0",
           "productName": "Old School Classic Kicks",
           "inventory": 9999
       }
}Save the opportunity data into a variable
Because you’ll be using data from the opportunity later in the flow, and cards that follow the trigger will be creating their own outputs, you need to store all of the opportunity data into a variable.
-
Mouse over the arrow between the Salesforce card and the Transform card to change the arrow to a plus sign. Then, click the plus sign to add a new component.
-
Search for and select the ‘Set Variable’ component
-
Name the variable
OppDetails. -
Click Custom Expression in the list of items on the right side of the card and drag it into the Value field.
-
Click the arrow on the right side of the expression box and click EXPAND.
-
In the Custom Expression dialog, type
payloadin the Expression field.The expression
payloadindicates the entire input that arrives at the Set Variable card during one activation of the Mule app. As you can see in the right-hand pane of the card, the payload consists in this case of four data elements. It’s possible to specify use one or more of those in the Expression box, rather than the expressionpayload. You could click and drag those elements into the box. However, for this tutorial, we’re using the full payload.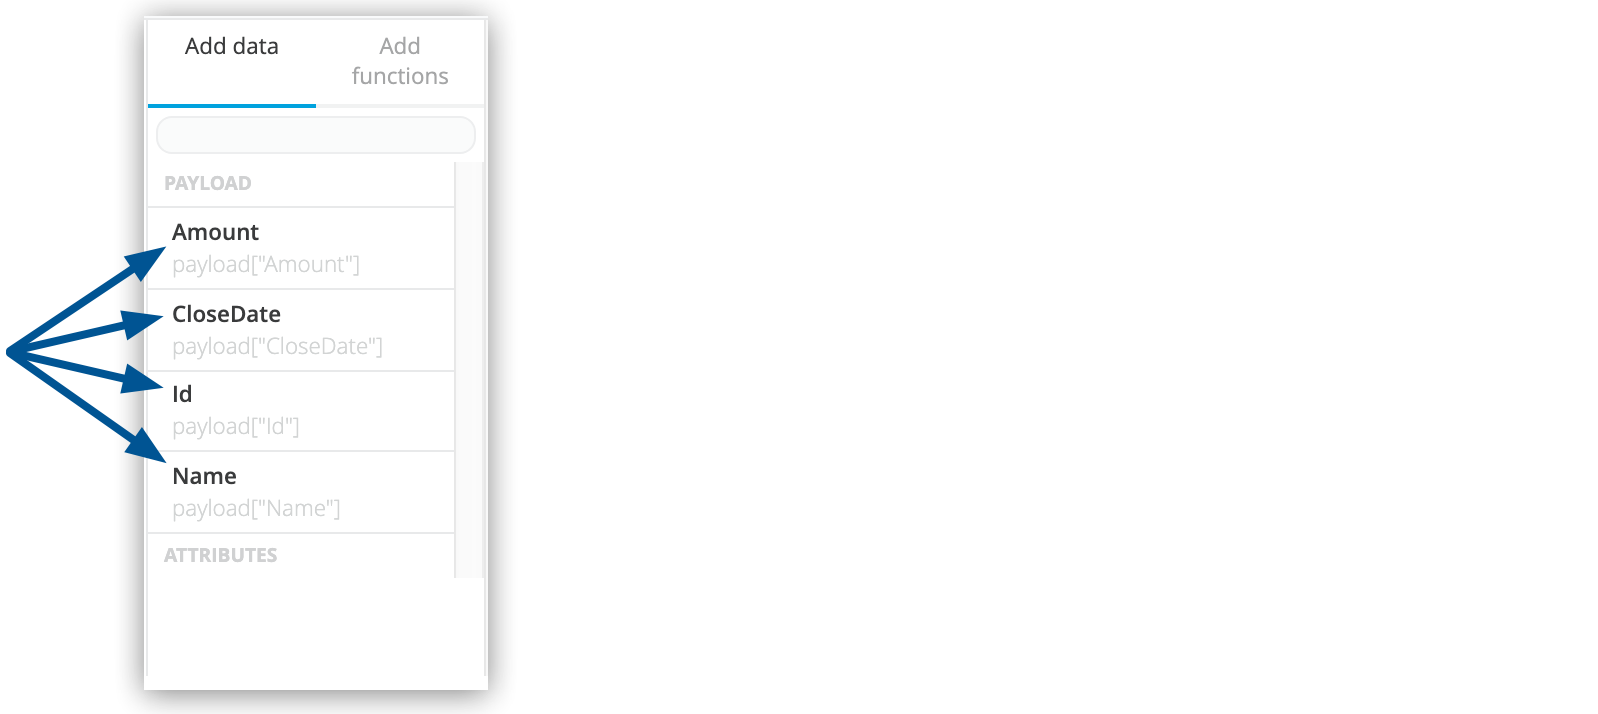 Figure 1. The four data elements that make up the payload that arrives at the Set Variable card.
 -
Click OK and then close the card.
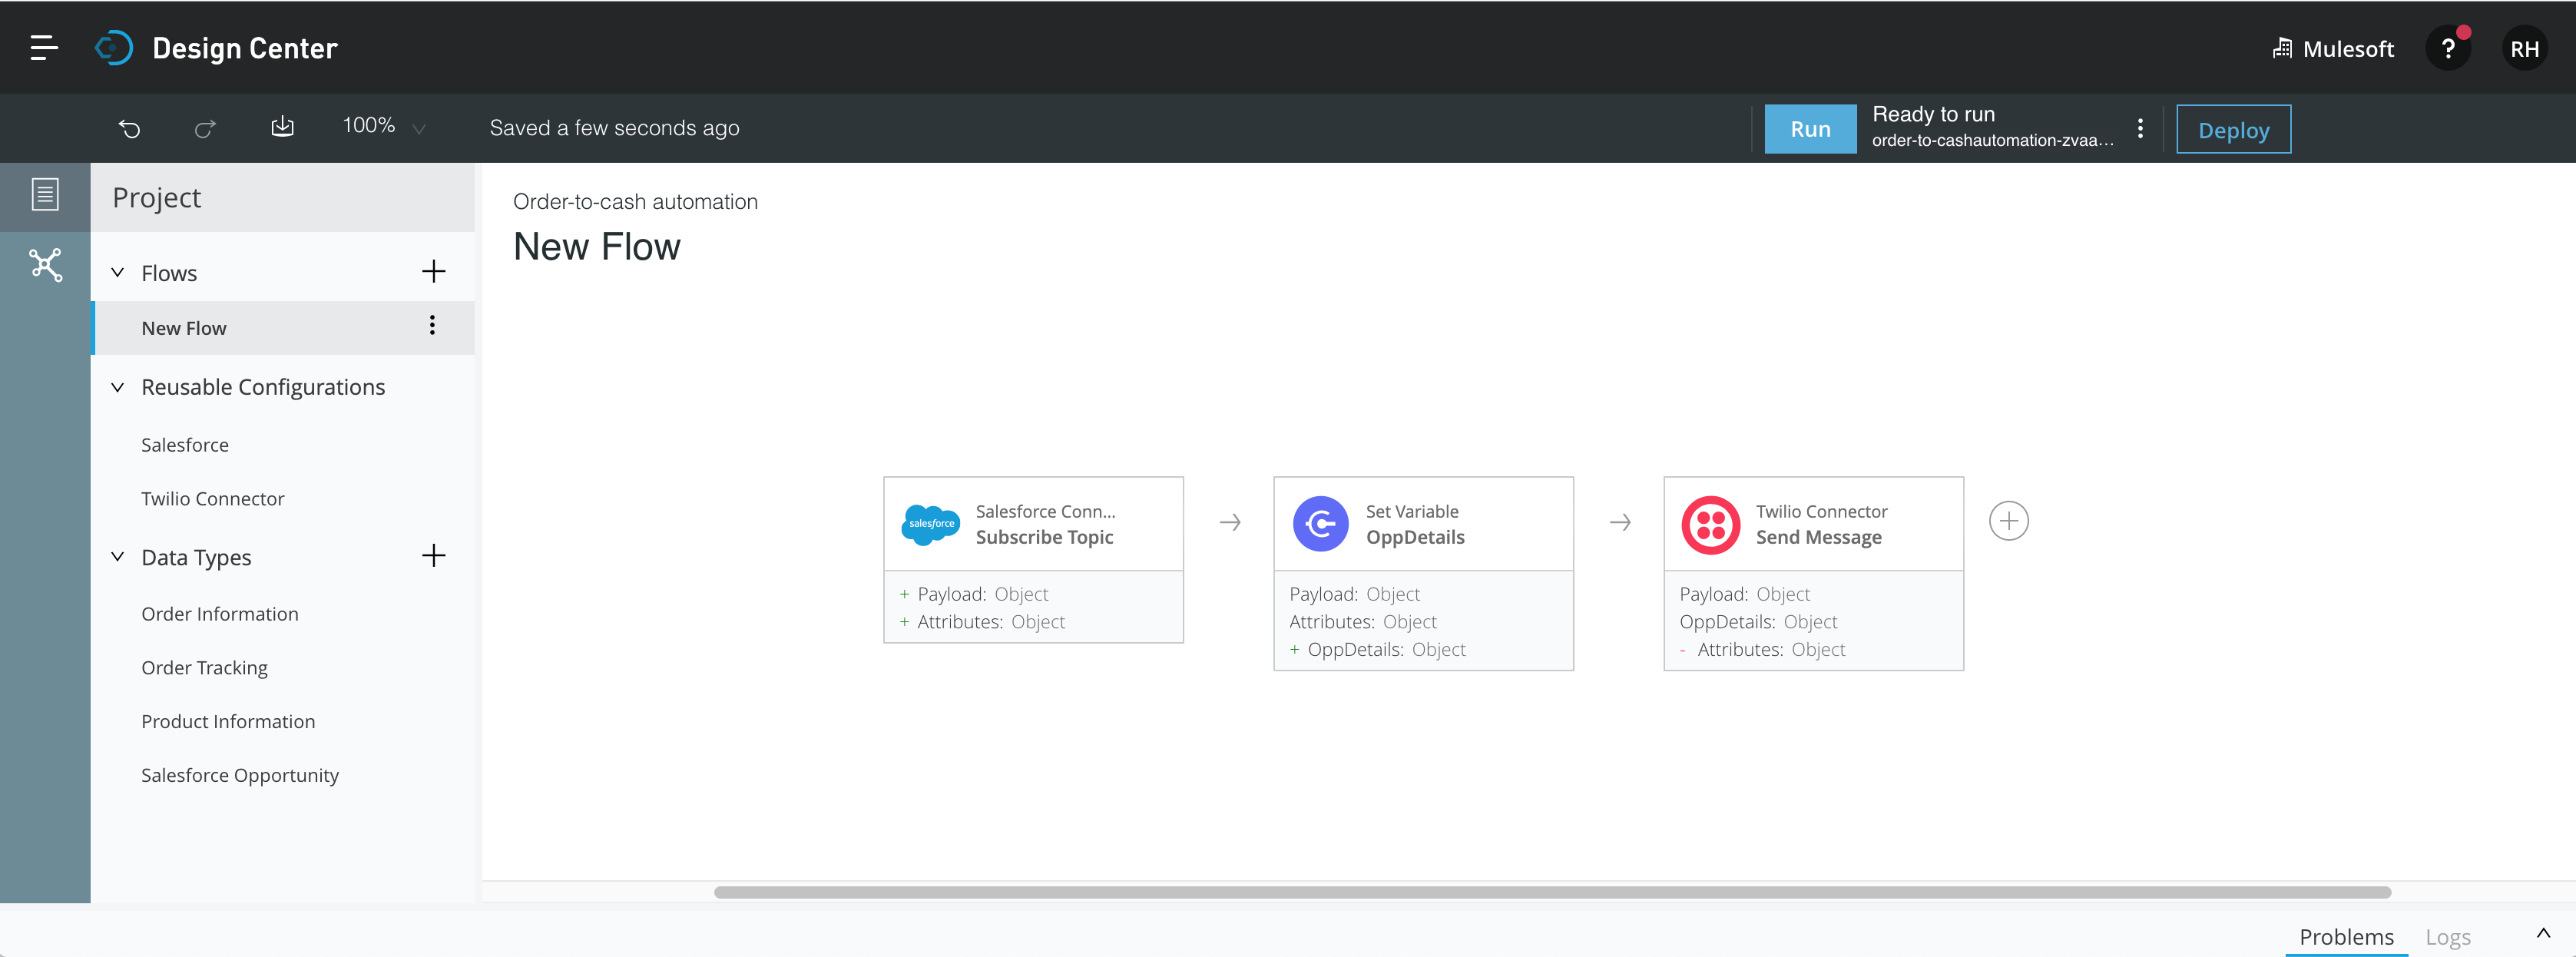
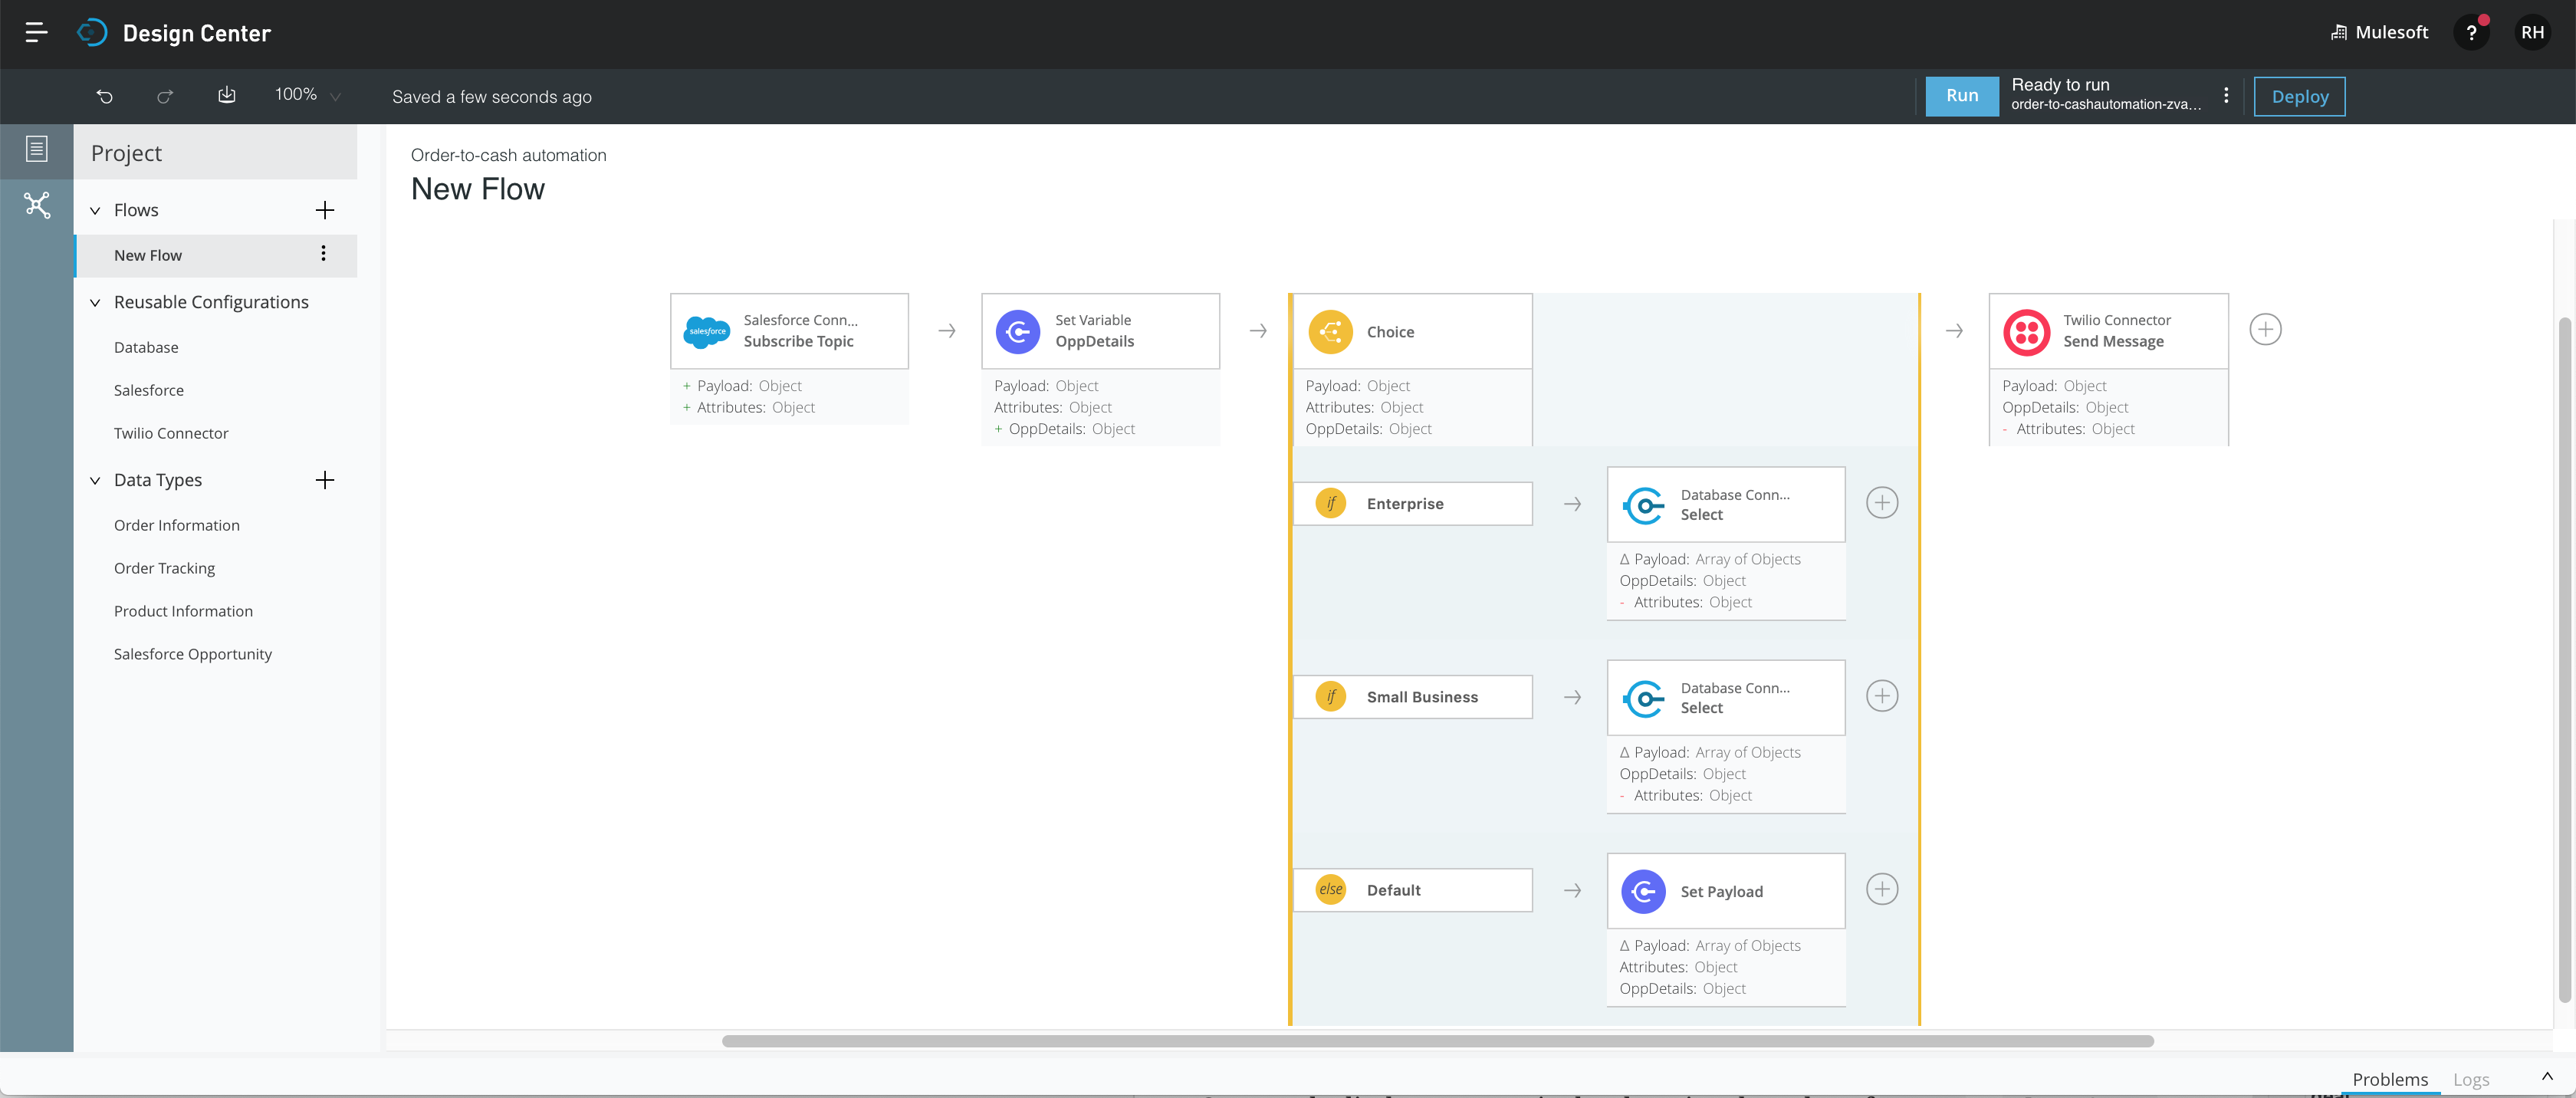
Your flow should look like this:
Add SKUs that are based on the size of the deal
NTO has different SKUs (stock keeping units) for their enterprise customers, small business customers, and retail customers. You need to add the appropriate product information from the product database to the opportunity based on the deal size. The table below explains how products are segmented.
| Deal Size (Opportunity Amount) | Product Category |
|---|---|
More than $100,000 |
Enterprise |
More than $50,000 |
Small Business |
$50,000 or less |
Retail |
You can use the Choice router component together with the Database component to achieve this branching, if-else logic. For example, with the Choice router, you can specify that, if the deal size is greater than $100,000, the process should search in the database among the SKUs that are in the Enterprise product category.
|
The Choice router component is part of Mule Runtime. There are several other components that are part of Mule Runtime. These components don’t connect to other systems, but instead help you to create the logic of a flow. |
-
Add a Choice router block (which consists of a Choice card and two or more subcards for the routing options) to the flow.
-
Click the plus sign that is between the Set Variable card and the Twilio card.
-
Select the Choice router.
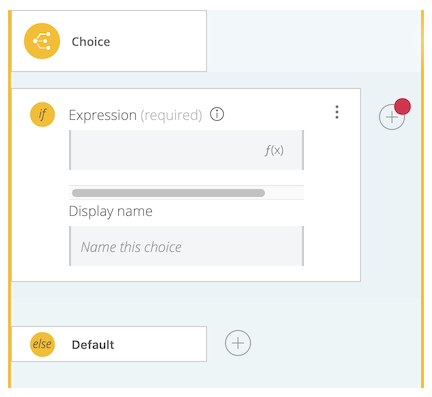
Result: The Choice router block appears in the flow.
-
-
Set up the routing options.
-
Click the first subcard to open it.
-
Click the three dots in the subcard’s top-right corner and select Add Below. The current subcard closes and another opens beneath it.
-
Click the first subcard.
-
Paste
payload.Amount > 100000into the Expression field. -
Name the subcard
Enterprise. -
Click the second subcard.
-
Paste
payload.Amount > 50000into the Expression field. -
Name the subcard
Small Business.
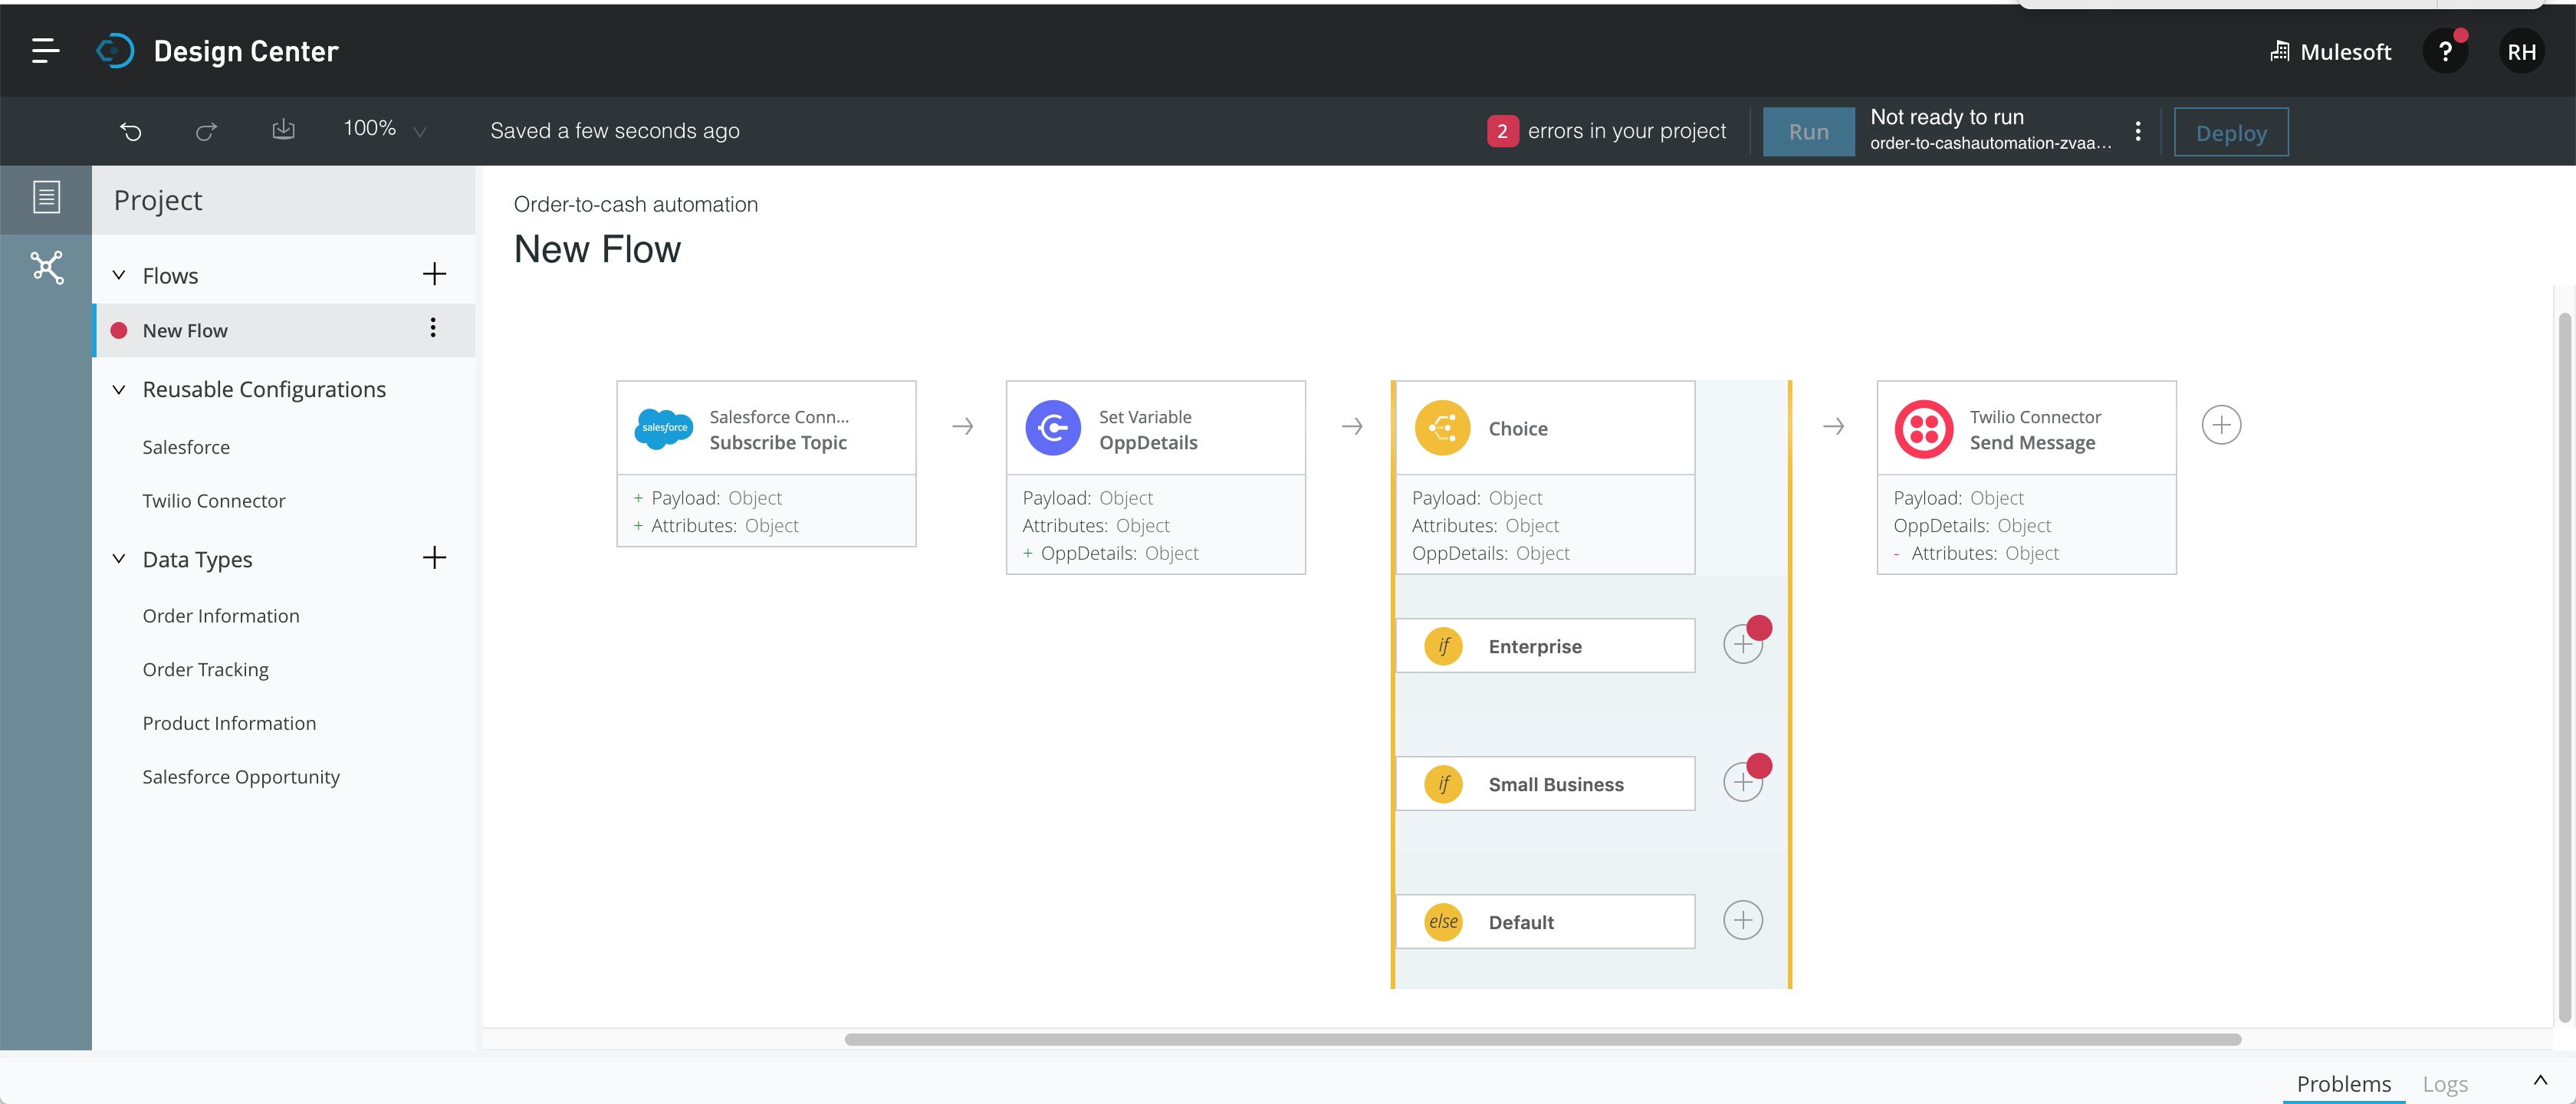
Result: The Choice router block now has the three routing options that you need in your flow. The Default option is used for the Retail SKUs because it is for orders in the amount of $50,000 and below. Your flow now looks like this:
+
-
-
Query the product database according to whether the size of the deal is “Enterprise” or “Small Business”.
-
Click the plus icon next to the Enterprise subcard.
-
Add a Database card and choose the Select operation.
-
Configure the database driver by using the following information:
-
Connection Type:
MySQL Connection -
Host:
ntoproducts.c3w6upfzlwwe.us-west-1.rds.amazonaws.com -
Port:
3306 -
User:
mulesoft -
Password:
mulesoft -
Database:
nto_products
-
-
Test the connection and click Save if it is successful.
-
Add this query to the Database card:
select * from products where category = "Enterprise" and inventory > 1 limit 1 -
Close the Database card.
-
Add a Database card after the Small Business subcard, and select the Select operation.
Notice that you do not have to configure the database driver again. That’s because, when you configured it earlier, Flow Designer saved the configuration. If you look under the heading “Reusable Configurations” in the Projects sidebar, you’ll see an entry labelled “Database”.
-
Add this query to this Database card:
select * from products where category = "Small Business" and inventory > 1 limit 1
-
-
Set up the default option for when the size of the deal is $50,000 or less. In this case, you do not need to query the database.
-
Add a Set Payload card after the Default subcard. You use the Set Payload card here so that, if the Choice router block routes to this default option, the flow simply adds the required SKU and associated information.
-
In the open Set Payload card, click the f(x) button to enter script mode in the Value field.
-
Paste the following JSON data into the field:
[
 {
   "productID": "CK111274",
   "category": "Retail",
   "SKU": "CKS0",
   "productName": "Old School Classic Kicks",
   "inventory": 9999
 }
]
-
The flow should now look like this:
Change the format of the information before passing it to the NTO Order API
By this point, the flow has obtained information about the opportunity from Salesforce and about the product from the product database. Before using this information to place an order with the NTO Order API, the flow needs to format it in the way that the API is expecting.
-
Click the plus sign to the right of the Choice router block and add a Transform card.
-
In the Input pane, specify input data types.
-
Click the three dots next to
payload. -
Select Set.
-
Select the
Product Informationdata type that you created earlier. -
Click the three dots next to
OppDetailsundervarsand set the data type toSalesforce Opportunity.
-
-
In the Output pane, set the data type for
payloadtoOrder Information.Result: The Transform card should look like this:
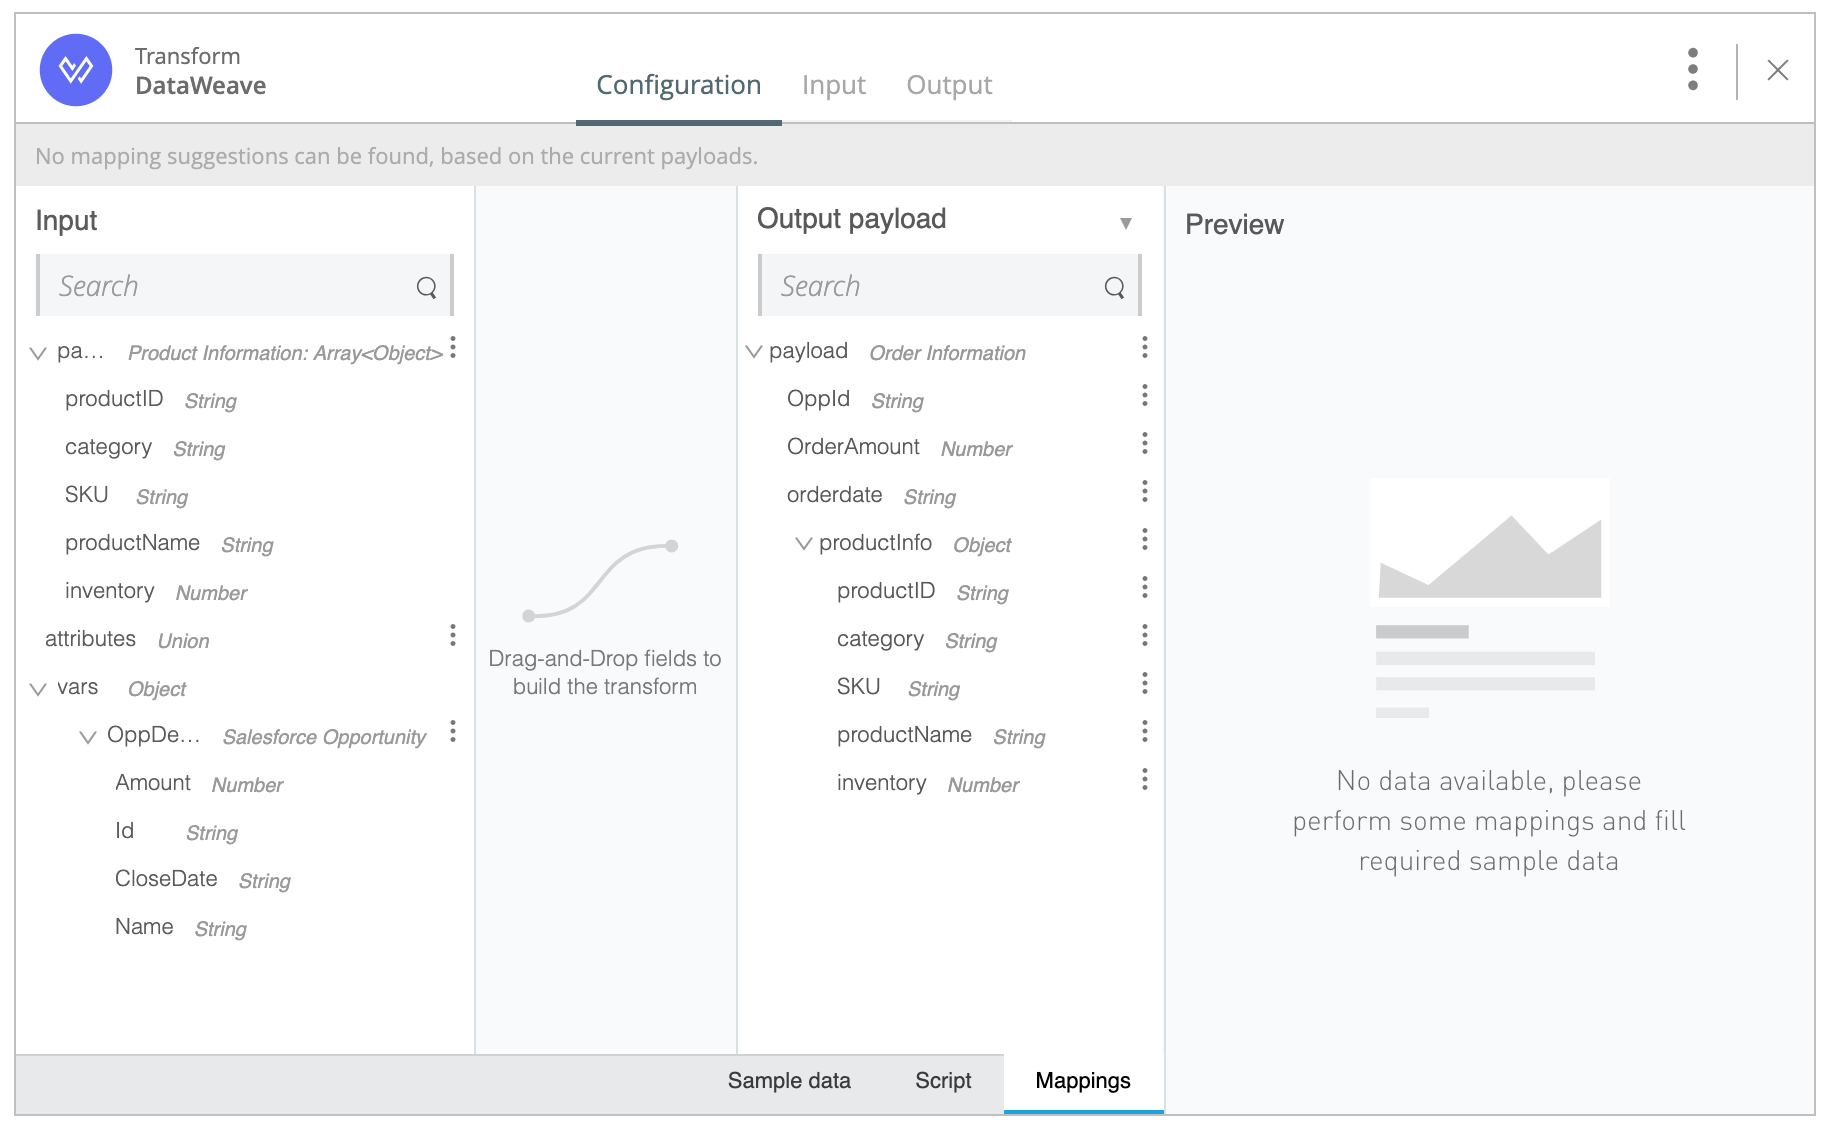
-
Drag and drop elements from the left side to right side according to the mappings below:
This Element on the Left Side Maps to This Element on the Right Side productIDproductIDcategorycategorySKUSKUproductNameproductNameinventoryinventoryAmountOrderAmountIdOppIdCloseDateorderDate
If you see the message Output media type differs from expected one, click the Fix it link to resolve the problem.
When you are done changing the format, the Transform card looks like this:
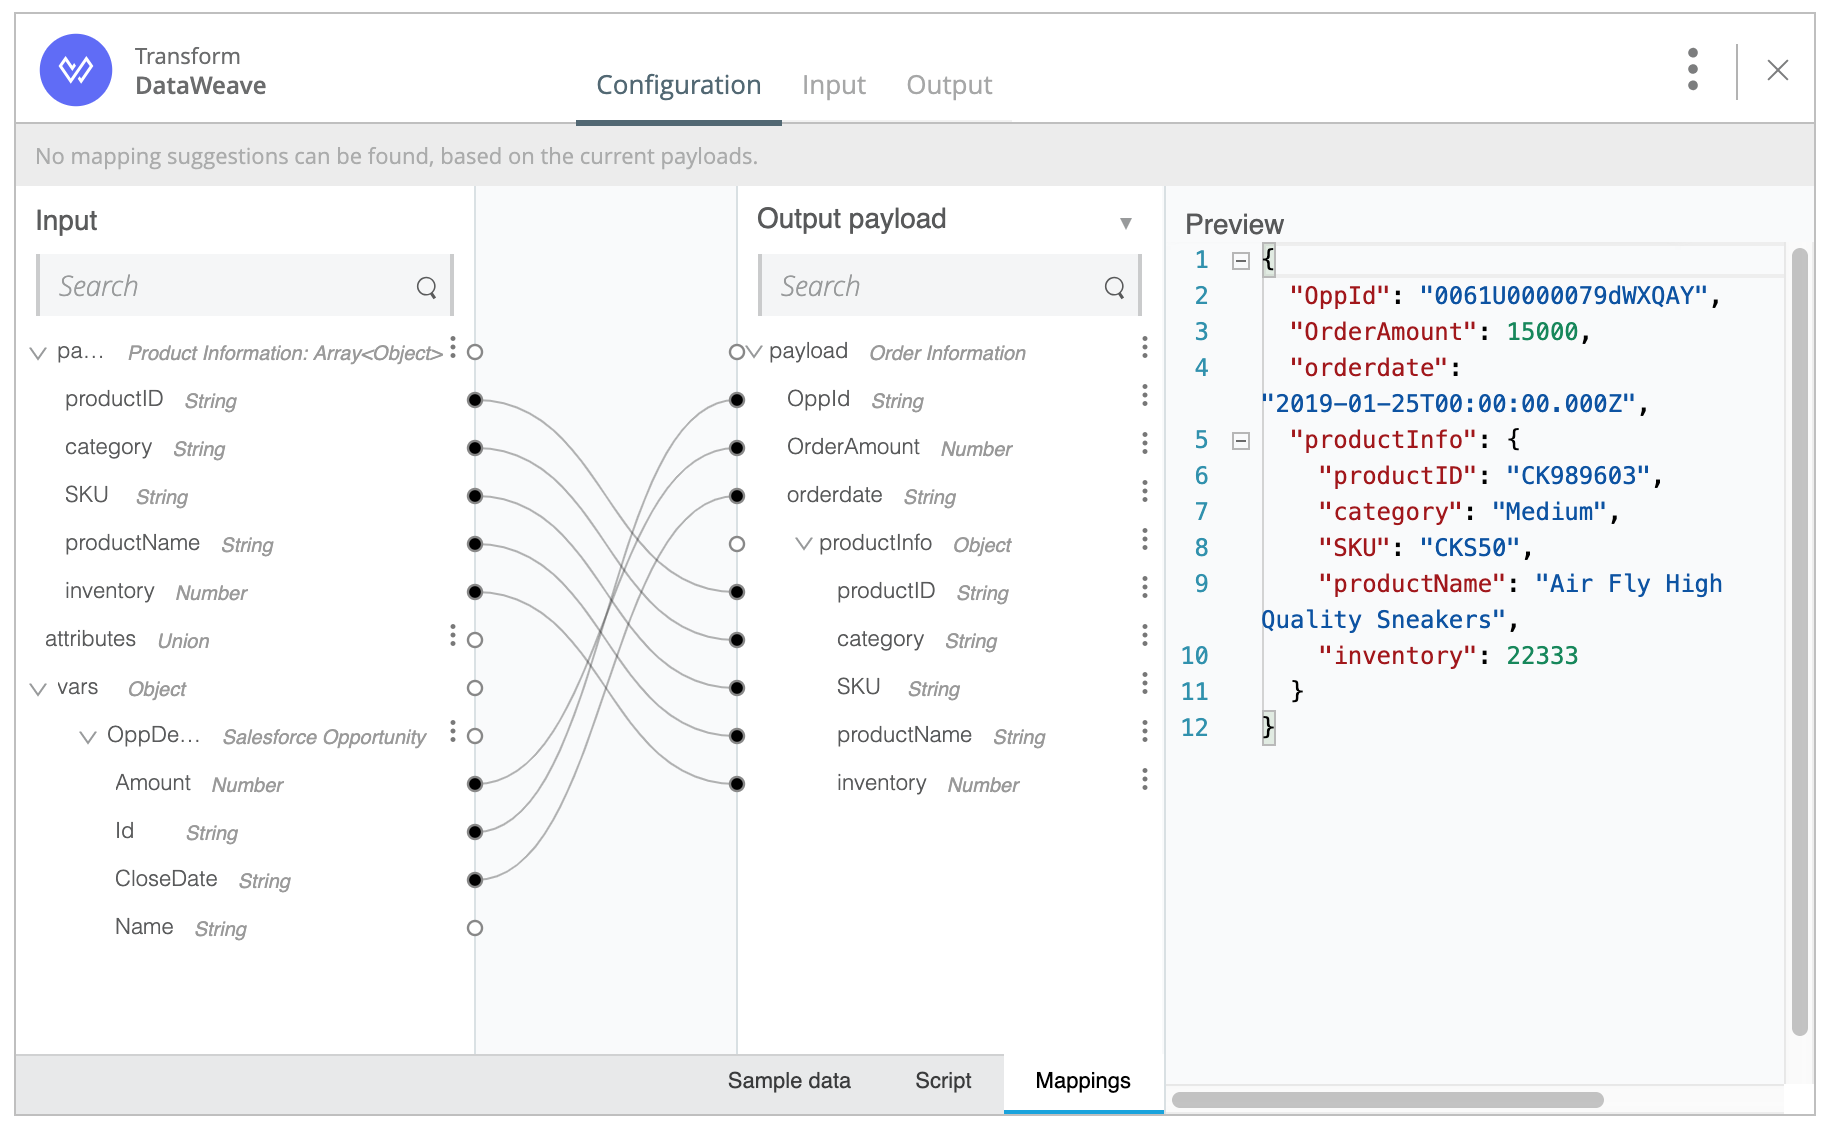
The JSON that the card displays in the Preview pane is an example of the JSON that the flow will send to the NTO Order API when placing an order.
Place an order using NTO Order API
Now the flow is ready to place an order. The flow can place it with the NTO Order API, which is a REST API, by sending a POST request. In response, the API will return the order ID, the tracking number for the order, and the estimated arrival time for the order at the customer’s location.
-
Add an HTTP Request card on the right side of the Transform card you just configured.
-
In the card, specify these details:
-
Method: POST
-
URL (this is the URL for the NTO Order API): https://anypoint.mulesoft.com/mocking/api/v1/sources/exchange/assets/org.mule.examples/quick-start-nto-orders-api/1.0.0/m/orders
-
Transform data for the Twilio API
At this point, the NTO Order API has returned the order ID, the tracking number for the shipment of the order, and the ETA for the shipment at the customer’s location. The last step is to send this information to the Twilio API, which will then send an SMS with the details to the customer. For Twilio to accept this information, you need to format the message in the format that Twilio requires.
-
Add a Transform card to the left of the Twilio card.
-
In the Input section, set two data types:
-
Set the data type for
payloadtoOrder Tracking. -
Set the data type for
OppDetailstoSalesforce Opportunity.
-
-
In the Output section, follow these steps:
-
Double-click the
Tofield and add your phone number, together with the country prefix. (For example, the country prefix for the United States is 1, so a telephone number would look like this: 12223334444.) -
Double-click the
Fromfield and add the free phone number that you obtained when you opened your Twilio developer account.
-
-
At the bottom of the Transform card, click the Script tab.
-
Rather than map fields, create the transformation an alternative way. Paste the following DataWeave script into the position in the Transformation script panel that the screenshot shows:
Body: "Order for " ++ vars.OppDetails.Name ++ " has been placed. Details:
" ++ "OrderID: " ++ payload.OrderID as String ++ ", Tracking: " ++ payload.TrackingNo ++ ", ETA:" ++ payload.ETA as Date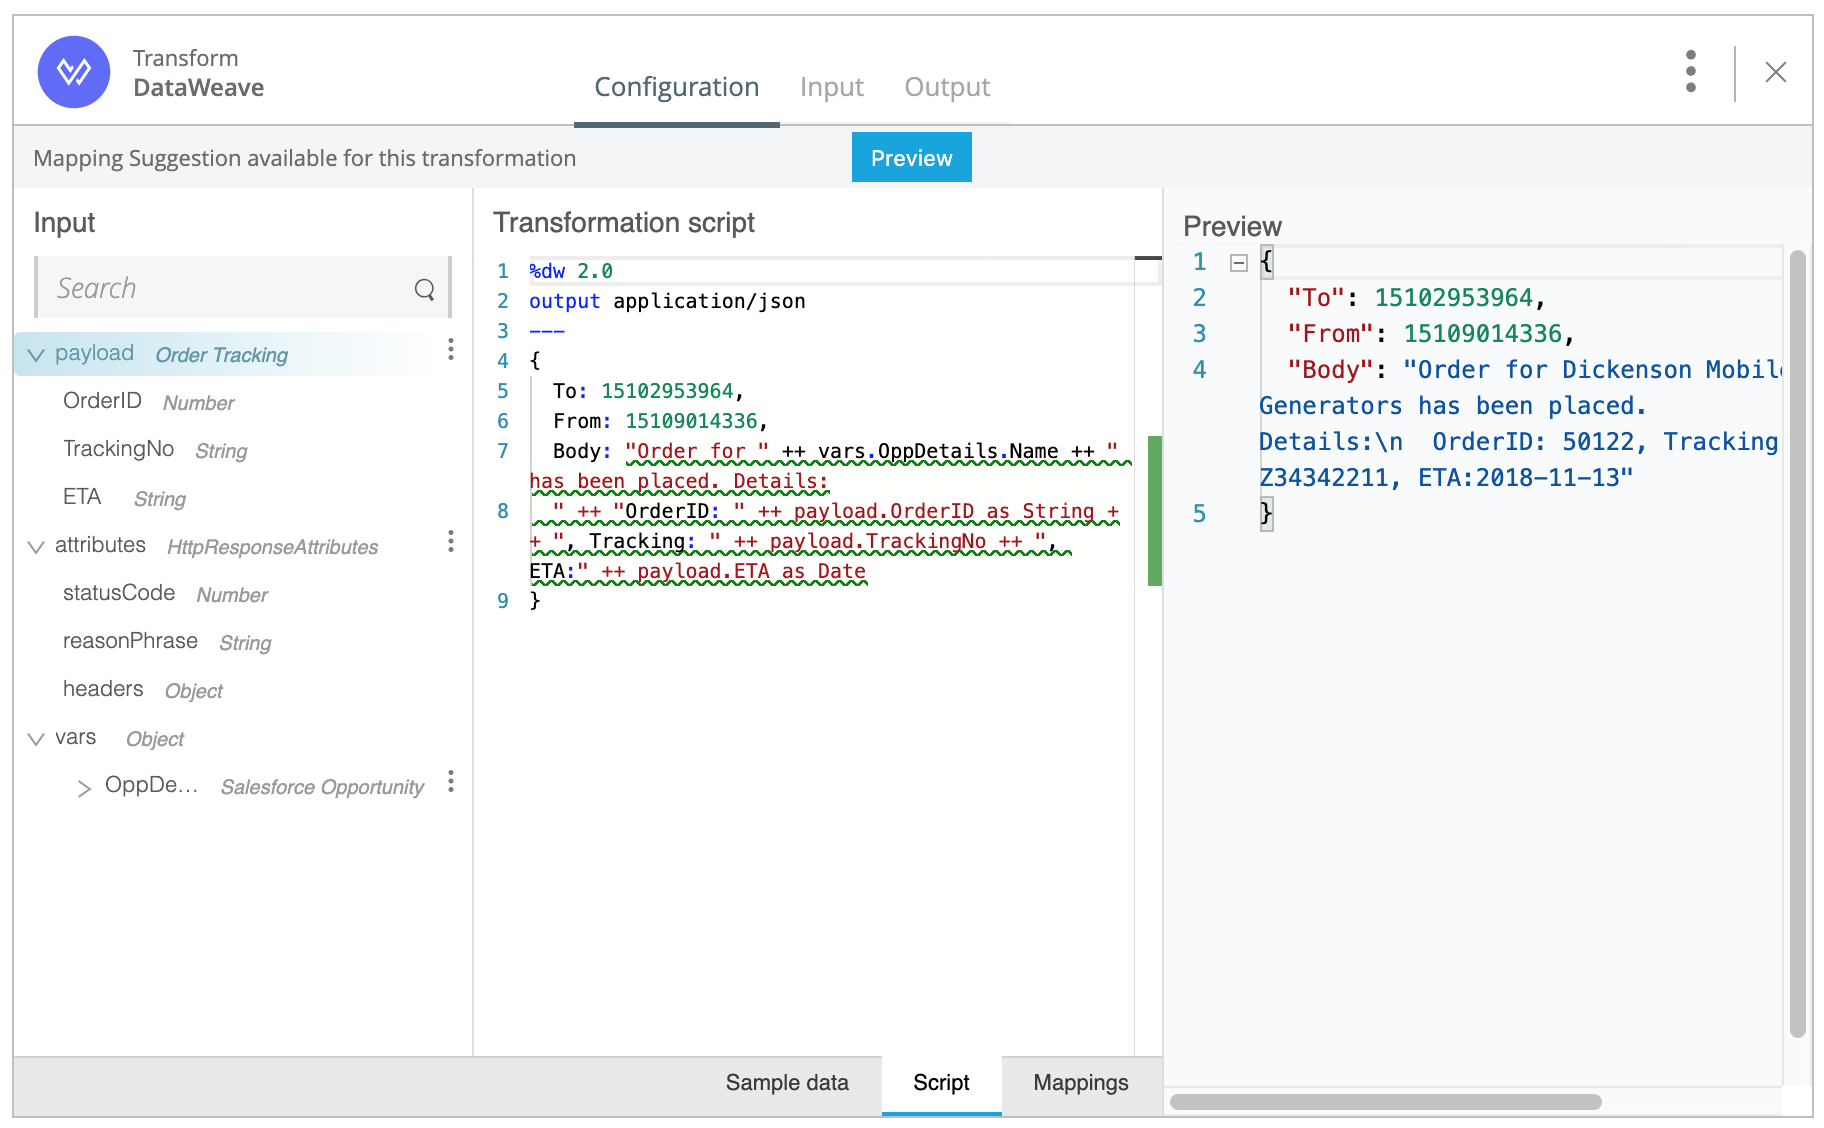
Using DataWeave scripts is another way of mapping input fields to output fields. Click the Mappings tab to see how the fields are mapped as the script specifies.
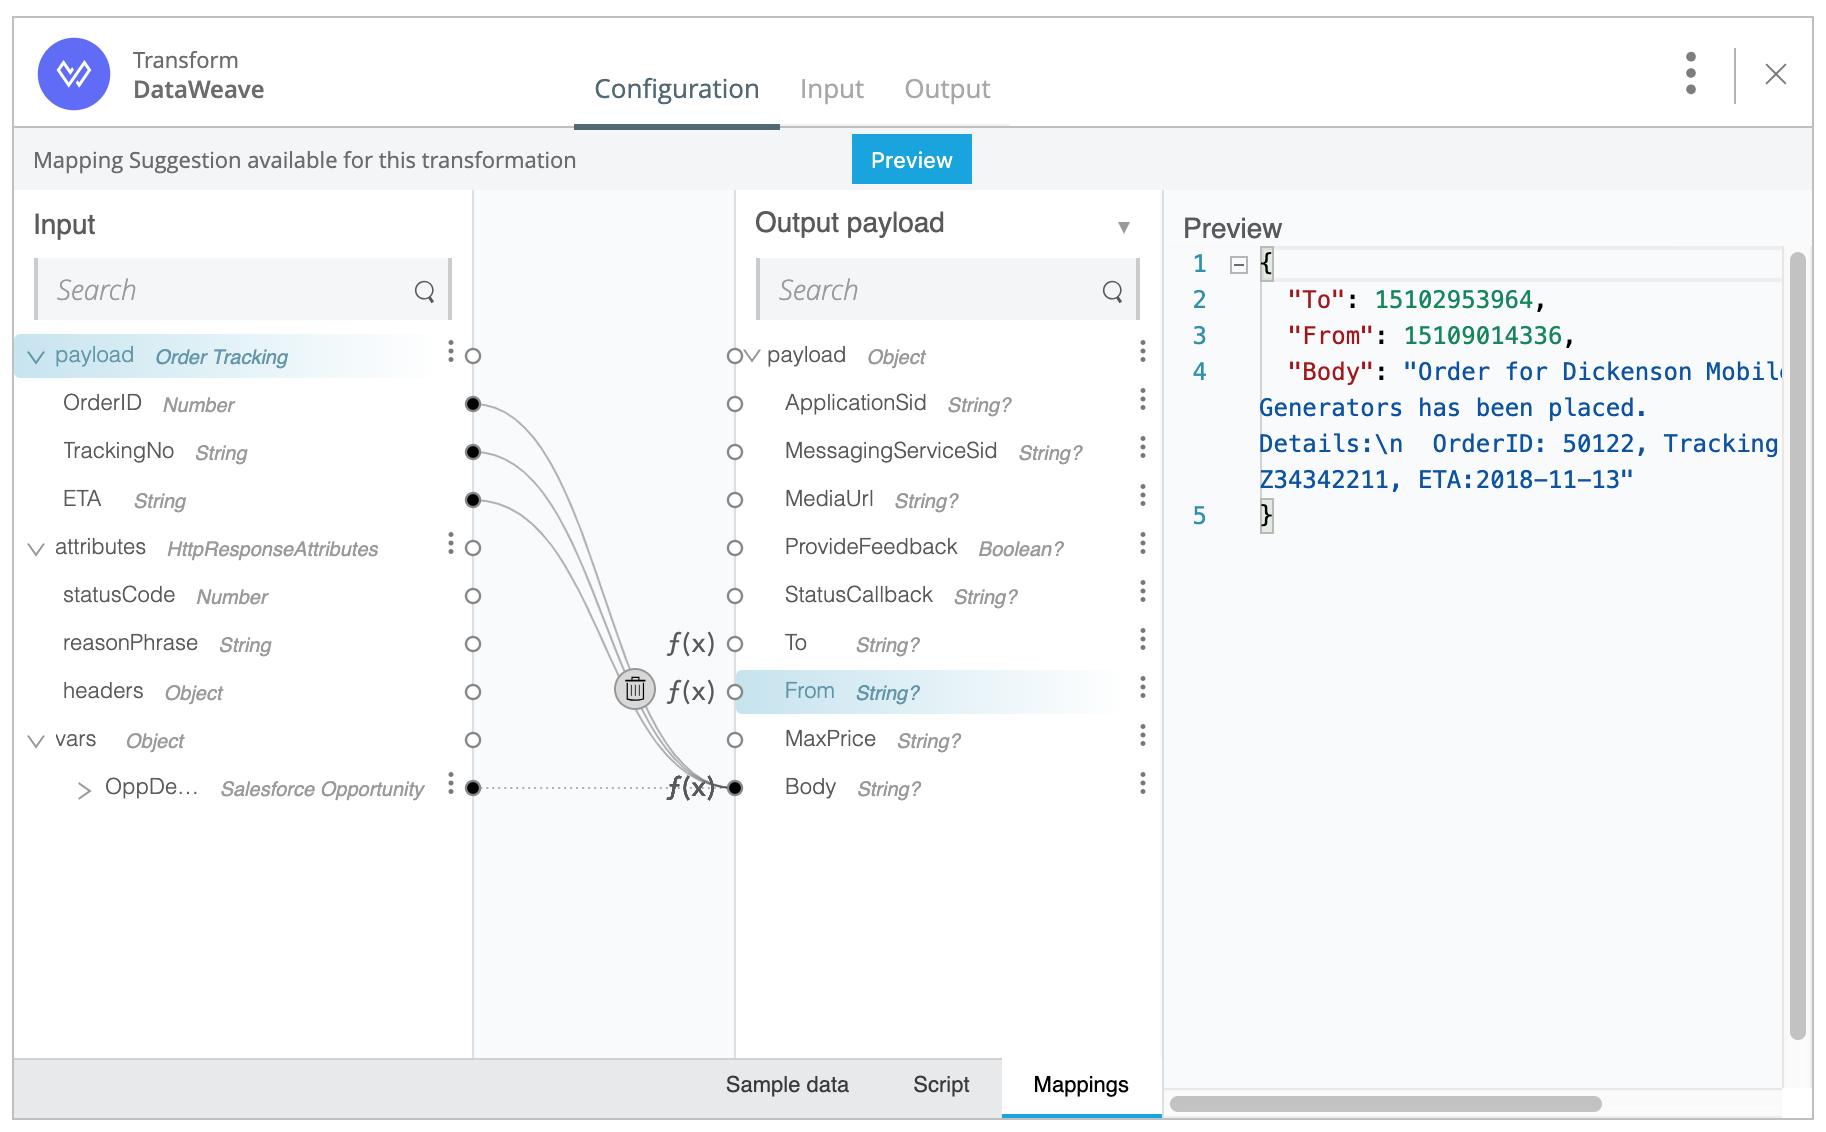
Result: The Preview pane shows an example of the JSON messages that the Transform card will send to the Twilio card.
Test your application
You are just about ready to test your Mule application. First, though, make sure there are no errors in the flow. If there are errors, you can open the Problems pane at the bottom of the canvas to read descriptions of them. Click an error to be taken to its location in the project.
If there are no errors and if the Run button is enabled in the top-right corner of Flow Designer, click Run to run the application. Then, follow these steps:
-
Log in to your Salesforce instance using the credentials you used in the Salesforce card.
-
In the top-left corner of your browser window, open the Sales app from the app switcher, which looks like this:

-
Go to Opportunities and change the view to All Opportunities.
-
Find an opportunity that is not in the
Closed Wonstage. -
Open and edit the opportunity by changing the value of
StagetoClosed Won. -
Update the amount to be greater than $100,000, and then click Save.
-
Go back to your Mule application in Flow Designer. If you see a green line in each card, the flow was triggered and a text message with the order details was sent to your mobile phone.
Nice job!
You’ve received your text message, run around the office showing it to everyone, and triggered the application several times to admiring audiences and many congratulatory remarks. You’ve replied with modesty, jovially and collegially explaining what Flow Designer is, pointing to the cards, explaining what connectors and components you use in the application, and indicating with your forefinger how the flow is triggered and how data moves through it. You’ve even received a thumbs-up for making your application available outside of the Design environment where you created it.
So, you are now ready for the very last step: deploying your Mule application. This tutorial doesn’t cover that, but the link takes you to help that shows the steps, if you want to deploy this example Mule application.
We hope this tutorial was easy enough to follow, yet complex enough to show you how you can use Flow Designer to your benefit in real-world scenarios. Happy flow-designing!