MSMQ Connector
Standard
The MSMQ Connector allows you to send and receive data from MSMQ queues via the Anypoint Gateway for Windows.
After reading this page you should be able to accomplish the following:
-
Download and install the MSMQ Connector
-
Build a simple example project
-
Upload, deploy, and run your project
Installation and Configuration
Installing the Anypoint Gateway for Windows
-
Download the Anypoint Gateway for Windows installer from [here]. Unzip the software distribution.
-
Double click the
Anypoint-Gateway-Service.exefile. -
Click the Options to change the installation location, or click Install to start the installation.
-
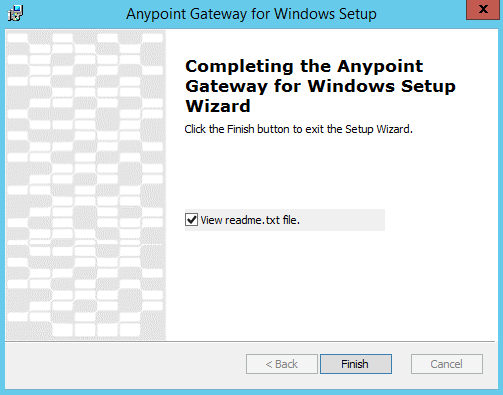
After the installation completes, the installer gives you the option to view the
readme.txtfile with additional instructions. Click Finish to exit. -
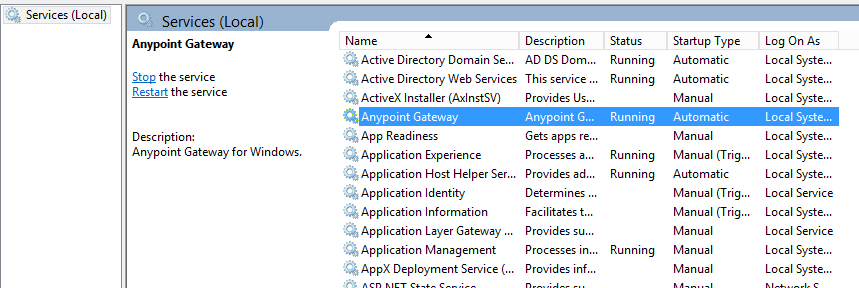
The installation create the new Anypoint Gateway Windows service, which the installer starts.
To view the running service, in Windows 7, when the Control Panel View by option is set to Small Icons, click Control Panel > Administrative Tools > Services. The services appears as:
Configuring the Anypoint Gateway for Windows Service
The install location for the Windows Service is c:\Program Files(x86)\Anypoint Gateway for Windows. This folder contains the Mule.SelfHost.exe executable, the Mule.SelfHost.exe.config configuration file and PowerShell scripts to automate configuration tasks.
| If the configuration file doesn’t appear in the folder, in Windows 7, when the control panel View by option is set to Small icons, click Control Panel > Folder Options > View > Show hidden files, folders, and drives. |
The executable starts a new web server at port 9000, which only accepts secure connections using HTTPS. You can change the port number and the authentication token for the gateway in the Mule.SelfHost.exe.config configuration file:
<appSettings>
    <!-- Configure the service to listen on the following address. -->
    <add key="OwinHostAddress" value="https://+:9000/"/>
    <!-- Token that must be sent by the Mule connector's client in the Authorization header when accessing the Rest Api. -->
    <add key="mule-auth-token" value="3nGdw7W+G1fSO2YBEHDmpo4N1Tg="/>
</appSettings>
This web server uses a self-signed SSL certificate auto-generated during installation. The certificate is in the Personal folder on the Local Computer certificate store:

Because the Windows service relies on http.sys for self-hosting the web server, any change in the port number or SSL certificate requires reconfiguring Windows. The Register-SslCert.ps1 PowerShell script in the installation directory handles this task. If the port or certificate changes, run the following command from a [Powershell] console:
Register-SslCert.ps1 <certificate-thumbprint> <windows-account> <port>
-
<certificate-thumbprint>: The thumbprint of the SSL certificate. It must be stored in the Personal Folder of the Local Store Account. -
<windows-account>: Windows User or Group that receives permissions to register the port. The account impersonating the Windows service or console application must be part of this group. -
<port>: HTTP port
Example:
Register-SslCert.ps1 a495cbf8c4af496f1ef81efb224c8097d039f922 everyone 9001
Installing the MSMQ Connector in Anypoint Studio
-
Under the Help menu in Anypoint Studio, click Install New Software.
-
Next to Work with field, click the drop down and select
Anypoint Connectors Update Siteorhttp://repository.mulesoft.org/connectors/releases/3.5.0. -
Click, the arrow next to Standard to open the node, then search or browse to find the MSMQ Connector, as shown. Check the box, then click Next.
-
Review the details of the item you selected, then click Next..
-
Click to accept terms and conditions of the product, then click Finish.
-
Click Restart Now to complete the installation.
-
After Studio restarts, expand the Cloud Connectors palette group to see your new MSMQ Connector.
Example
This example requires some basic familiarity with with Mule ESB. The following documentation describes the Mule ESB features in this example:
Setup Demo Queue in MSMQ
Step 1: Create Queue
-
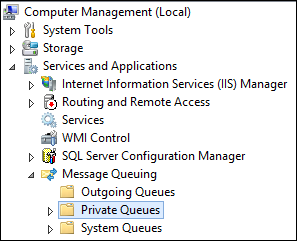
Open the Computer Management console on the server where MSMQ is running.
-
Expand Services and Applications.
-
Expand Message Queuing.
-
Right-click Private Queues, click New, and Private Queue.
-
Name the new queue msmq-demo, and click Ok.
Step 2: Grant Permissions
Set the appropriate permissions for the identity that the MSMQ Connector uses to interact with the queue.
-
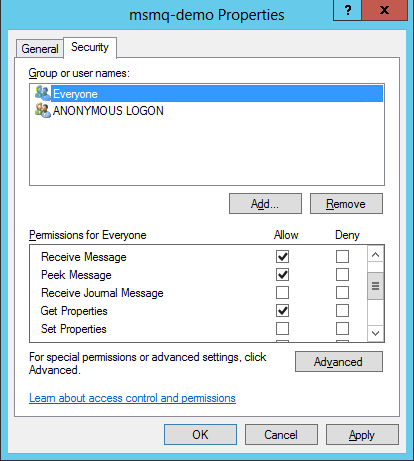
Right click the msmq-demoqueue and click properties.
-
Select the Security Tab. For this demo, make sure that “Everyone” has permissions to the following:
-
Receive Message
-
Peek Message
-
Get Properties
-
Get Permissions
-
Send Message
-
Setting Up a Mule Project
Step 1: Create a New Mule Project
After Anypoint Studio launches, create a new project:
-
Go to File > New > Mule Project.
-
In the New Mule Project configuration menu, provide a name for this project: msmq-demo.
-
Click Finish.
Step 2: Create a MSMQ Global Element
-
Click Global Elements tab.
-
Click Create to display the Global Type dialog box.
-
Filter by msmq.
-
Select MSMQ from Cloud Connectors section and click OK.
-
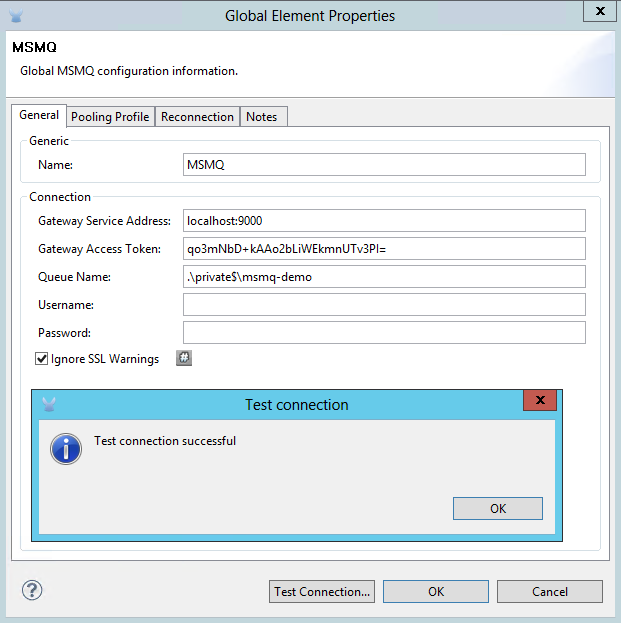
Fill in Gateway Service Address using the format
machinename/ip address : port. (For example,localhost:9000). Don’t use URLs as they are not supported. -
Fill in Gateway Access Token. You can find the configured token in the Windows Service configuration file (
c:\Program Files(x86)\Anypoint Gateway for Windows\Mule.SelfHost.exe.config) under the mule-auth-token appSetting key. -
Fill in the Queue name using the supported syntax by MSMQ. For example,
.\private$\msmq-demofor the private queue created above. Because the required permissions have been granted to “Everyone,” you do not need to specify a UserName and Password for this demo. -
If you are using a self-signed SSL certificate such as the one included out of the box, make sure Ignore SSL Warnings is checked.
-
Click Test Connection to make sure everything was set up correctly.
-
Click OK.
Building Flows
The sample flows send and receive messages from an existing queue. Transformers put the necessary information on the Mule Message for subsequent operations to consume. The end result looks like this:
Step 1: Building the "Send" Flow
-
Filter the Palette by http and drag and drop an HTTP Endpoint in the canvas. This creates a new flow
“msmq-demoFlow1”. -
Filter the Palette by payload and drag a Set Payload Transformer next to the HTTP Endpoint.
-
Filter the Palette by logger and drag a Logger Component next to the Set Payload.
-
Filter the Palette by msmq and drag a MSMQ Connector next to the Logger.
-
Double-click HTTP Endpoint. After its properties dialog displays, select one-way from the Exchange Patterns group. Make sure Host is set to
localhostand the Port is set to8081. Save the changes. -
Double-click Set Payload Transformer. After its properties dialog displays, set Value to
#[header:INBOUND:http.relative.path], and save the changes. -
Double-click Logger Component. After its properties dialog displays, set Message to
Sending message: #[payload], and save the changes. -
Double-click MSMQ Connector. After its properties dialog displays, select the Config Reference named MSMQ. Leave the rest of the fields with the default values, and save the changes.
Step 2: Building the "Receive" Flow
-
Filter the Palette by msmq and drag a MSMQ Connector to the canvas, outside of the existing flow
“msmq-demoFlow1”. This creates a new flowmsmq-demoFlow2. -
Filter the Palette by byte and drag a Byte Array To String Transformer next to the MSMQ Connector.
-
Filter the Palette by logger and place a Logger Component next to the Byte Array To String Transformer.
-
Double-click MSMQ Connector. After its properties dialog displays, select the Config Reference named MSMQ , and leave the rest of the properties with the default values. Save the changes.
-
Double-click the Logger Component. After its properties dialog displays, set Message to
Received from queue: #[payload], and save the changes.
Step 3: Running the Flows
-
Right-click msmq-demo.mflow and click Run As > Mule Application.
-
Check the console to see when the application starts. You should see a message Started app
'msmq-demo'message if no errors occurred.++++++++++++++++++++++++++++++++++++++++++++++++++++++++++++ + Started app 'msmq-demo' + ++++++++++++++++++++++++++++++++++++++++++++++++++++++++++++ -
Access the endpoint at
http://localhost:8081/Hello-Worldand check the operation payload. -
The following messages should display in the console.
INFO  XXXX-XX-XX XX:XX:XX,XXX [[msmq-demo].msmq-demoFlow1.stage1.02] org.mule.api.processor.LoggerMessageProcessor: Sending message: Hello-World
INFO  XXXX-XX-XX XX:XX:XX,XXX [[msmq-demo].msmq-demoFlow2.stage1.02] org.mule.api.processor.LoggerMessageProcessor: Received from queue: Hello-World
INFO  XXXX-XX-XX XX:XX:XX,XXX [[msmq-demo].msmq-demoFlow1.stage1.02] org.mule.api.processor.LoggerMessageProcessor: Sending message: Hello-World
INFO  XXXX-XX-XX XX:XX:XX,XXX [[msmq-demo].msmq-demoFlow2.stage1.02] org.mule.api.processor.LoggerMessageProcessor: Received from queue: Hello-World