Automating Tasks Using Scripts
Using the Admin shell to write scripts you can easily build and install your own extensions for the management console. Once written, you can install scripts (that is, set up the scripts to run on startup) or schedule them using a cron-like scheduling mechanism. Scripts are written using the Groovy scripting language, a language similar to the Java programming language. For more information about Groovy, see groovy language reference.
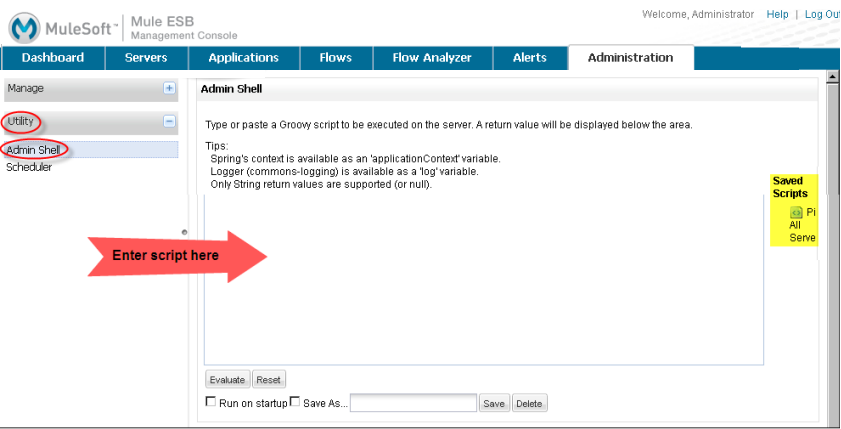
The pane displays any saved scripts to the right of the editing box. By default, the management console includes a script that pings all your servers looking for unregistered Mule ESB instances. You should see this script in the Saved Scripts area. You should not need to modify this script. Any additional scripts you create and save appear in this area.
Creating a Script
To create a script, click the Administration tab, then click Utility to expand its options. Click the Utility option Admin Shell. You enter your script in the blank box in the middle of the pane. (See the figure below.) Depending on the size of your screen, you may need to scroll down to see the function buttons (such as Evaluate, Reset, Save As, and so forth) at the bottom of the script editing box.
For example, you might enter (or paste in) the following script:
println "Hello"Saving a New Script
To save a new script, check the Save As box and enter a unique name for the script. Once you check the Save As box, the console does not let you save the script until you enter a name for it. (See the figure below.) Then, click Save.

Installing a Script to Run on Startup
To have a script run whenever the management console starts, select the script if it has been saved previously or enter the new script into the edit box. Then, check the Run on startup box. Click Save to save and install the script.
Modifying and Deleting a Script
You can use an existing script as a template for a new script. Click the existing script on the right side of the screen, make your modifications, and then check Save As. Enter a new name for the script, then click Save. This is identical to saving a new script.
You can also modify an existing script and save it with the same name. Click the existing script from the Saved Scripts list. Make your modifications. When you’re done, click Save. Your changes to the script are saved with the same name. Be sure that you do NOT click Save As when you want your changes to overwrite the existing script.
At any time, you can click Reset to return to the last saved version of the script.
To delete a script, select it from the Saved Scripts list on the right side of the screen, and then click Delete.
Testing a Script
Click the Evaluate button to run a test of a new or modified script. If the script runs without errors, you can save it and, if you want, schedule it to run as a scheduled job or install it to run at startup. If the script evaluation fails, an error message pops up at the top of the page.
Note that using the Evaluate function does not save, schedule, or install the script. It merely tests the correctness of the script code.
Scheduling a Script
You can use the scheduler to periodically run your script, which is useful for jobs such as replication.
Create a Scheduled Job
-
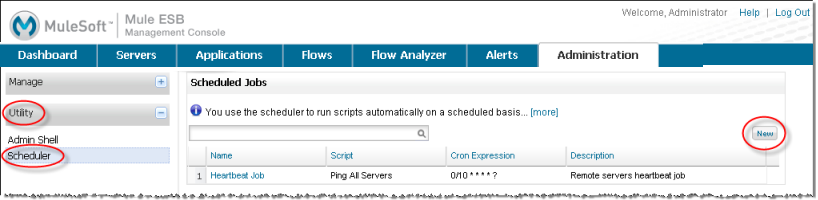
On the Administration tab, click Utility, then Scheduler. You should see a pane listing all scheduled scripts.
-
Click New to open the Add Scheduled Item pane to set up a new schedule for a script.
-
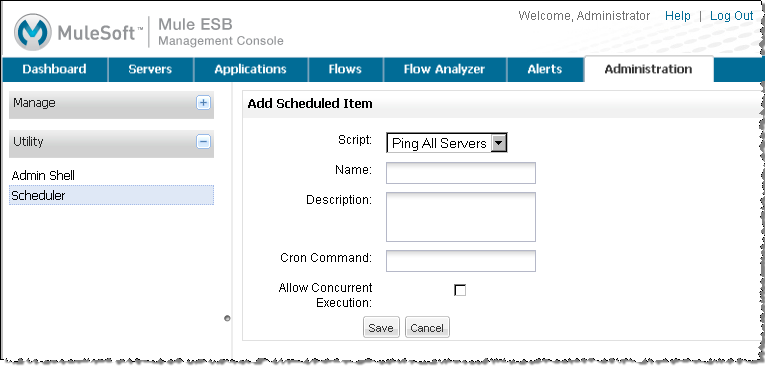
Select the script to run from the Script pull-down list. (See below.)
-
Enter a unique name and description for this scheduled job.
-
Enter a mmc:cron command to specify when the script should be run.
-
To allow this script to be run even if the last execution of the script is still running, click Allow Concurrent Execution.
-
Click Save.
| After you click Save to save the scheduled job, the script will run on the specified schedule until you delete the job. |
Cron Command Syntax
You use the following syntax when specifying the cron command:
| Field Name | Mandatory | Allowed Values | Allowed Special Characters |
|---|---|---|---|
Seconds |
YES |
0-59 |
, - * / |
Minutes |
YES |
0-59 |
, - * / |
Hours |
YES |
0-23 |
, - * / |
Day Of Month |
YES |
0-31 |
, - * / L W |
Month |
YES |
1-12 or JAN-DEC |
, - * / |
Day Of Week |
YES |
1-7 or SUN-SAT |
, - * / L # |
Year |
NO |
empty, 1970-2099 |
, - * / |
Following is a description of the special characters:
| Character | Description |
|---|---|
, |
Separates individual values, such as 0,30 in the minutes position to run the job on the hour and half hour. |
- |
Specifies a range of values, such as MON-FRI in the Day Of Week position to run the job each day of the work week. |
* |
Specifies all values for that position, such as every day of the week when * is specified in the Day Of Week position. |
? |
Skips setting a value for that position. Since Day of Week and Day of Month are mutually exclusive, always use ? in one of these fields and specify * or a specific value for the other. |
/ |
Specifies increments, such as every fifteen seconds starting on the first second of each minute when 1/15 is specified in the Seconds position. |
L |
Specifies the last day of the month or week, depending on the position. |
W |
Specifies the weekday nearest the specified day, such as running the job on the weekday closest to the third of the month when 3W is specified in the Day of Month position. |
# |
Specifies a day of the week as it occurs in the month, such as running the job the second Friday of every month by specifying 6#2 in the Day of Week position (where 6 is the sixth day of the week, or Friday, and #2 specifies the second occurrence of that day in the month). |
Following are some examples of cron commands:
| Command | Description |
|---|---|
0 0 12 * * ? |
12pm (noon) every day. Note that no year is specified, because the year position is optional. |
0 15 10 ? * * |
Any of these commands runs the job at 10:15am every day |
0 0/5 14 * * ? |
Every 5 minutes starting at 2pm and ending at 2:55pm, every day |
0 0/5 14,18 * * ? |
Fire every 5 minutes starting at 2pm and ending at 2:55pm, AND fire every 5 minutes starting at 6pm and ending at 6:55pm, every day |
0 0/5 14-16 * * ? |
Every 5 minutes starting at 2pm and ending at 4:55pm, every day |
0 10,44 14 ? 3 WED |
2:10pm and 2:44pm every Wednesday in March |
0 15 10 ? * 6L 2010-2012 |
10:15am on the last Friday of every month during the years 2010, 2011, and 2012 |