Setting Up Alert Definitions and Notifications
Alert destinations are the locations, such as email addresses, to which notifications are sent when alerts are triggered. You need to set up alert destinations prior to creating any alert notifications, since notifications are associated with specific destinations. Setting up a notification is described in the mmc:section.
Setting Up Alert Destinations
Click the Alert Destinations node in the navigation tree to see currently defined destinations. The pane displays the user-supplied name of the destination and the destination type, either email or SNMP.
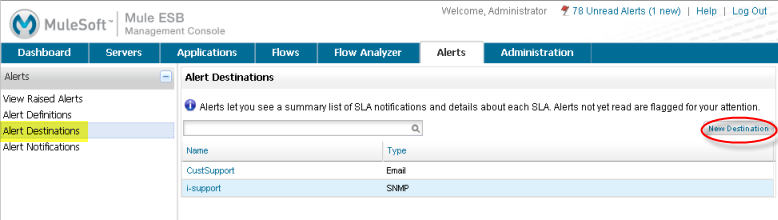
Click the New Destination button to create a new destination. The Add Alert Destination pane opens. You start by entering a name for the destination and selecting the destination type. From the Type pull-down list, select the type of destination: email or SNMP. (See below.)
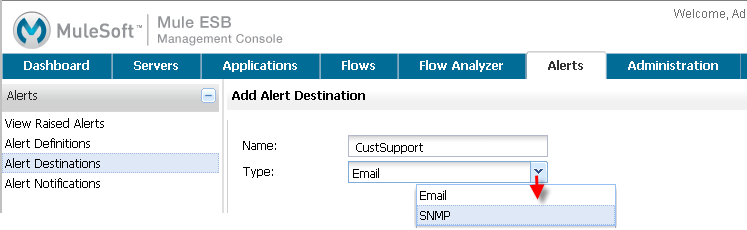
Depending on the destination type you select, you are prompted for additional fields.
Configuring Email Destinations
When adding an email-type destination, you must designate server and the recipient user information. The figure below is an example of configuring an email destination:
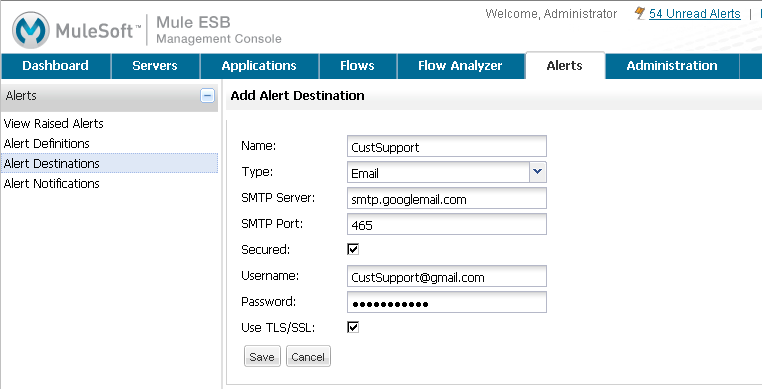
For an email destination, you need to specify the following:
-
SMTP server designation: You can identify the SMTP server by its IP address, such as 192.168.0.1, or by its url, such as
smtp.mycompany.com. -
SMTP server port number: The server port number, such as 25.
-
User email name: The email name and address for the recipient, such as user@mycompany.com.
-
Password: The recipient’s email password.
Check the TLS/SSL box if the server requires a secure environment. You must set this field to conform to your SMTP provider’s server configuration.
When finished, click Save to complete adding the destination.
Examples of Email Destinations
The following examples show how you set up email destinations for Google and Yahoo mail recipients.
For Google mail (gmail), set the fields as follows:
| Field | Input Data |
|---|---|
Name |
Name of the alert destination |
Type |
|
SMTP Server |
smtp.googlemail.com |
SMTP Port |
465 |
Username |
<username>@gmail.com |
Password |
<email password> |
Use TLS/SSL |
Yes |
For Yahoo mail, set the fields as follows:
| Field | Input Data |
|---|---|
Name |
Name of the alert destination |
Type |
|
SMTP Server |
smtp.mail.yahoo.com |
SMTP Port |
465 |
Username |
<username> |
Password |
<email password> |
Use TLS/SSL |
Yes |
Configuring SNMP Destinations
SNMP-type destinations have different fields than email-type destinations. The figure below is an example of how you might set up an SNMP destination:

Specify the following for SNMP destinations:
-
OID: An identifying name for the destination. The OID you enter needs to conform to SNMP conventions. For example, a valid OID might be
1.3.6. -
Local address: The local SNMP address to which to bind the destination. The address must conform to SNMP conventions. An example of a local address might be
udp:127.0.0.1/40162. -
Target address: The SNMP target address to which to send the alert notification. This address also must conform to SNMP conventions. For example, you might enter an address such as
udp:127.0.0.1/40163. -
Version: The SNMP version number. The default value is 2c.
-
Username: The SNMP user name.
-
Password: The user password.
-
Passphrase: The user’s identifying pass phrase.
When finished, click Save to complete adding the destination.
To edit a destination, double-click the destination entry in the Alert Destinations pane. The edit pane displays the data entered for that destination and you can change values as needed.
Specifying Notifications
Set up notifications after you have defined possible destinations for your notifications. When you create a new notification, you must select a destination for the notification from a list of defined destinations.
Click the Alert Notifications node in the navigation tree to view alert notifications that are already defined. The pane displays the names of all alert notifications and their destinations.
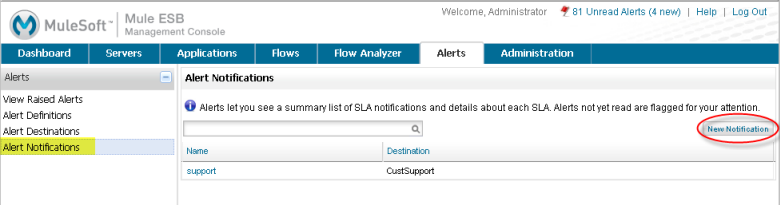
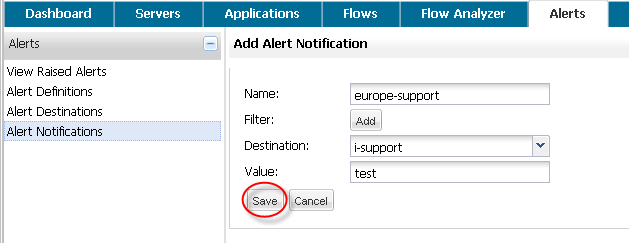
To create a new notification, click the New Notification button. The Add Alert Notification pane opens. (See below.)
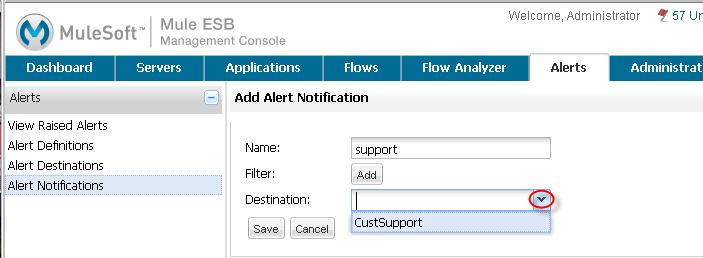
Enter a name for the notification. Specifying a filter for the notification is optional and is covered in the next paragraph. Select the notification destination from the Destination pull-down list. If you have not yet defined a destination, then this list is empty and you cannot complete the notification specification.
You optionally may specify one or more filters. When you click the Add button in the middle of the pane, the pane displays a table into which you specify the filter field(s) and values for these field(s). You may add as many filter fields as you like. Select each filter field from the Field pull-down menu. The Value pull-down menu displays the values that correspond to the selected field. (The figure below is an example of this.)
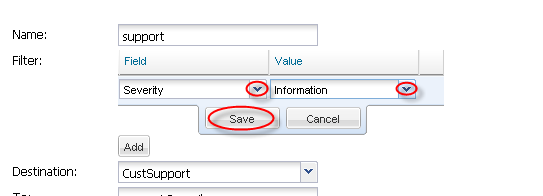
For each filter field you specify, be sure to click the Save button beneath the Field/Values table to save that filter, or click Cancel to discard the entry. You can select filter fields and delete them, if you want. Add additional filters by clicking the Add button, but be sure you click Save or Cancel before specifying these additional filter fields.
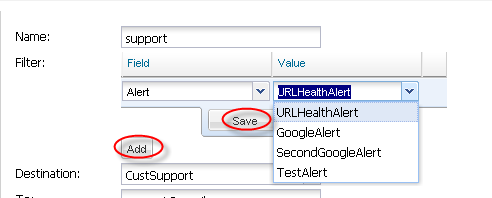
For example, the next figure shows how you might filter notifications on the Alert field. Once you select Alert for the Field column, the Value column displays any alerts that have been defined and you can select an alert value from the list.
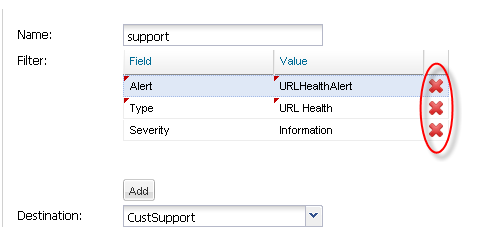
The Filter table displays any added filters. You can remove any filters you have added by clicking the red X to the right of the Value column.
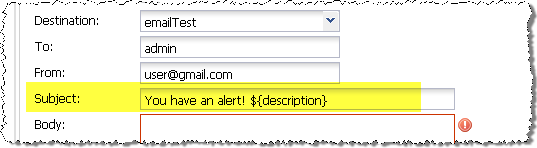
If the destination type you select is email, you enter the email recipient name, the name of the sender, a subject, and text for the body of the email. You must enter data for all these fields (See the figure below.)

For email destinations, you may use an expression in the subject and body fields. To use an expression and have it correctly interpreted, you must enclose the expression in curly braces and precede it with a dollar sign ($) symbol, as shown below. For example:
${expression}You can combine the expression with some other text. For example, you might want a subject line that displays a standard message that an alert has been triggered but also includes an expression indicating the alert condition. You might set the subject field as follows:
See mmc:below for more information on properties that you can use with these alert expressions.
When the destination type is SNMP, you are prompted just for a value, as shown below. You must enter data for the Value field to be able to save the notification.
For all notifications, be sure to click the Save button after you have entered all required data. Notice that the Save button is grayed out until all required fields are completed.
To edit a notification, double-click the notification entry in the Alert Notifications pane. The edit pane displays the data entered for that notification and you can change values as needed.
Properties Used in Alert Expressions
There are a number of properties whose values you can incorporate into alert destinations and notifications. You incorporate these properties using the expression syntax shown above. Some properties are common to all alert types, while others pertain to specific alert types.
The following properties are common to all alert types. (The class com.mulesoft.console.alert.RaisedAlert contains the declaration of alert properties.)
| Property | Description |
|---|---|
id |
Service identifier |
name |
Service name |
serverId |
Server identifier |
serverName |
Server name |
description |
Description of the raised alert |
timestamp |
Time when the alert was raised |
source |
Source of the raised alert |
severity |
Severity of the alert, such as Fatal or Critical |
type |
The type of the alert, such as Low Memory or Exception |
Certain alert types have other accessible properties in addition to the common properties shown above. The table below shows the alert types for which additional properties are defined and the specific properties.
| Alert Type | Property | Description |
|---|---|---|
Exception Alert |
||
exceptionMessage |
A short text message describing the exception |
|
exceptionFullMessage |
A complete or full text message describing the exception |
|
exceptionRootCause |
The cause of the exception |
|
Threshold-based Alert (may be a custom, thread pool, or JMX alert) |
||
actualValue |
The value that caused the alert to be raised |
|
threshold |
The threshold value at which point the alert is raised |
|
thresholdEventType |
The type of the event raising the alert |
|
URL health Alert |
||
urlStatus |
The error status identifier from the URL |
|
urlMessage |
The error message from the URL |
|
Log Alert |
||
logFile |
The log file name |
|
logLine |
The line in the log file |