Persisting MMC Data to PostgreSQL
This document will cover how to persist environment and transaction data to PostgreSQL databases. Follow the instructions to PostgreSQL Installation, then follow the specific instructions for Persisting Environment Data or Persisting Transaction Data persistence to set up your user, create your database, and configure your MMC instance to persist your data.
| Remember that environment data and transaction data must exist in two separate databases (regardless of whether they are on the same server or use the same platform). |
Jump to:
Assumptions
This document assumes that you have an understanding of the data persistence options for environment and transaction data and that you are familiar with the basic Architecture of the Mule Management Console. It also assumes that you have installed:
-
Mule Enterprise 3.4.1. Download it from the customer portal if you need to upgrade to this version.
-
MMC Version 3.4.1. Download it from the customer portal if you need to upgrade to this version.
-
a Web application server such as Tcat, Tomcat, or JBoss. Please refer to the Hardware and Software Requirements for the latest information about hardware requirements and supported application servers, Java Runtime Environments, and browsers.
For practical purposes, this document mentions Tomcat as the servlet container; however, the instructions contained here apply also to Tcat or JBoss. If you are using Tcat or JBoss, make sure to unpack the Management Console .war file in the appropriate directory. For additional information, see Installing the Production Version of MMC.
In this document, <MMC_HOME> refers to the directory where MMC is installed. If using the trial version, this is <Mule install path>/mmc/webapps/mmc, for example /opt/mule/mule-enterprise-3.4.1/mmc/webapps/mmc. If using an application server such as Tomcat, this should be similar to <Tomcat root>/webapps/mmc-console-3.4.1, for example /var/lib/tomcat6/webapps/mmc-console-3.4.1.
|
PostgreSQL Installation
The PostgreSQL installation outlined here is basic: the database server is installed on the local machine and listening on the default port, with security deactivated (unsecured connection to the database by the database owner).
Tools
-
PostgreSQL 9.1.3 (Download)
-
pgAdmin III (select it when installing Postgres)
-
PostgresSQL driver, included with the MMC installation. See the Database Driver section for details
Installing the Database
The easiest way to install the database is by using the Enterprise One-Click installer, which is freely available for download.
| You need administrator privileges on your machine for the installation to proceed. |
| For further details, refer to the quick Postgres tutorials for Linux, Mac OS X and Windows. |
Version 9.1 installs with the following default values:
-
Default port:
5432 -
Default admin user:
postgres
Mule recommends installing one of Postgres’s GUI administration utilities, such as phpPdAdmin (Web-based) or pgAdmin III. These can be selected for installation during the Postgres installation process. In this document, we will use pgAdmin III.
Setting Up the Database Listener
Locate the file postgresql.conf, which is under the root directory of the Postgres installation, for example in /opt/PostgreSQL/9.1/data or /opt/PostgreSQL/9.1/main.
Open the postgresql.conf file for editing, then go to the "Connections and Authentication" section. Locate the line that begins with:`listen_addresses =` . If the line reads:
listen_addresses = 'localhost'Then modify it to read as below.
listen_addresses = '*'This will make PostgreSQL listen on all of the available interfaces.
Locate the file pg_hba.conf, which should be in the same data directory of the Postgres installation. In this file, find the line that begins with: host all. It will probably look similar to the following.
host all all 127.0.0.1/32 md5Modify it as per below.
host all all 0.0.0.0/0 trustThis ensures that Postgres accepts all attempts to connect from any host, without asking for an encrypted password. After testing the database connection, you may wish to modify this file to restrict connections according to the security needs of your site.
(For a detailed description of the pg_hba.conf file, see the online documentation.)
After setting up the listener, the database must be restarted. To do this, open a terminal window (Unix terminal or DOS prompt) and use the pg_ctl command as described below.
-
To restart the PostgreSQL server, run:
pg_ctl restart -
To verify the state of the PostgreSQL server, run:
pg_ctl status
|
Run pg_ctl on Unix The
Then just run |
When running pg_ctl status, you may get the following output:
pg_ctl: no database directory specified and environment variable PGDATA unset
Try "pg_ctl --help" for more information.
In that case, issue the command with the following options: pg_ctl status -D <Postgres data directory>, as shown below.
pg_ctl status -D /opt/PostgreSQL/9.1/dataThe same is valid for the restart option of the pg_ctl command. For example, to restart the PostgreSQL server:
pg_ctl restart -D /opt/PostgreSQL/9.1/dataThe next step is to create the database user. Follow the relevant setup instructions below, depending on whether you are setting up a database for Persisting Environment Data or Persisting Transaction Data.
Persisting Environment Data
To set up PostgreSQL to persist your MMC environment data, you need to complete four steps:
-
Create the database user
-
Create the database
-
Verify the database
-
Set up MMC
Creating the Database User
We will create a new database user, with the following parameters:
-
Role name:
mmc_status -
Password:
mmc123
Using pgAdmin III
-
Log in to the database server as role
postgres:-
In pgAdmin III’s object browser (on the right-hand pane), right-click server PostgreSQL on localhost, then select Connect.
-
-
On the Object Browser, right-click Login Roles, then select New Login Role.
-
At the New Login Role dialog box, type
mmc_statusin the Role name field. -
Go to the Definition tab in the dialog box, and type the password
mmc123in both Password fields. -
Click OK to close the New Login Role dialog box.
Creating the New Database
We will create a database called mmc_persistency_status, owned by role mmc_status.
Verifying the New Database
Use PostgreSQL’s psql command-line utility to log in to database mmc_persistency_status as user mmc_status. To do this, open a terminal and run:
psql postgres –Ummc_statusWhen you run this command, psql should prompt for the user’s password. After typing it, you should get a prompt similar to the following:
mmc_persistency_status=#This indicates that you have successfully connected to the mmc_persistency_status database as user mmc_status.
If you can’t login using the psql command
|
Depending on you PostgreSQL configuration, you may get the following error when trying to connect to the database: This probably means that PostgreSQL is configured to accept connections for the specified user only if the operating system first authenticates that user. So, for example, to connect as user If you do not desire this configuration, check for the following line in the PostgreSQL configuration file If the line exists, modify it as per below. |
An example of the full login command and output:
mitra:/opt/PostgreSQL/9.1/bin$ ./psql mmc_persistency_status -Ummc_status
Password for user mmc_status:
psql.bin (9.1.3)
Type "help" for help.
mmc_persistency_status=#
To exit psql, type \q, then press Enter.
Creating the Tables
On the first run, JCR will automatically create all the tables needed to store persistent MMC information. However, you have to manually create some tables that store Quartz job info; otherwise at some point the following error will occur:
ERROR: relation "qrtz_locks" does not exist
  Position: 15 [See nested exception: org.postgresql.util.PSQLException: ERROR: relation "qrtz_locks" does not exist
  Position: 15]]
To create and insert the tables:
-
Navigate to the directory
<Mule install path>/apps/mmc/webapps/mmc/WEB-INF/classes/quartz. -
Execute the
tables_postgres.sqlscript on the target databasemmc_persistency_status. One way to do this is by running the following command:psql –d mmc_persistency_status –Ummc_status –f tables_postgres.sqlIf necessary, in the above command specify
<full path>/tables_postgres.sql.
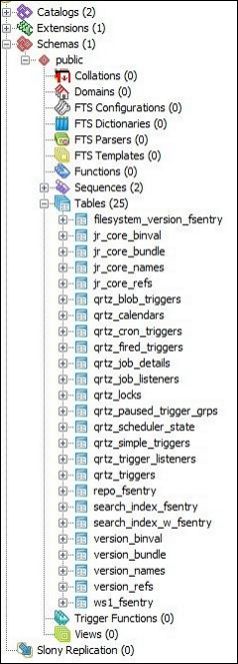
At this point, the Postgres database should be completely defined, as shown below.
Setting Up MMC to Use PostgreSQL for Persisting Environment Data
In this section, <MMC_HOME> refers to the directory where MMC is installed. If using the trial version, this will be <Mule install path>/mmc/webapps/mmc, for example /opt/mule/mule-enterprise-3.4.1/mmc/webapps/mmc. If using an application server such as Tomcat, this will be similar to <Tomcat root>/webapps/mmc-console-3.4.1, for example /var/lib/tomcat6/webapps/mmc-console-3.4.1.
|
Database Driver
To check whether your MMC installation has the PostgreSQL driver installed, go to the directory <MMC_HOME>/WEB-INF/lib, and look for a file called <postgresql-<version>.jdbc<version>.jar, for example postgresql-9.1-901.jdbc3.jar.
If you do not have such a file, the driver is not installed and you will need to install it. If you do have this file, you may wish to check that it is the latest version, and update it if necessary. Both actions are explained below.
Installing or Updating the PostgreSQL JDBC Driver
-
Go to the PostgresSQL driver download site and download the .jar file for the latest version, for example
postgresql-9.3-1100.jdbc41.jar. -
Ensure that MMC is not running.
-
Copy the .jar file to the directory
<MMC_HOME>/WEB-INF/lib. -
If the directory contains a previous version of the driver, delete it.
MMC Configuration
Follow the instructions in the sections below for editing the following configuration files:
Configuration File: mmc.properties
(Directory: <MMC_HOME>/WEB-INF/classes/META-INF.)
-
In the directory listed above, locate the file called
mmc.properties. -
Edit the file as per the following.
script=postgres
datasource.username=mmc_status
datasource.password=mmc123
datasource.url=jdbc\:postgresql\://localhost\:5432/mmc_persistency_status
datasource.driver=org.postgresql.Driver
mmc.data=./mmc-data
plugin.directory=WEB-INF/plugins
console.inactivityTimeout=60| The colons (":") on the connection string should always be escaped with a backslash ("\"). |
|
Make sure that the following line does not appear: This line would conflict with the parameters for accessing the correct database, resulting in a connection error. If the line is present in the |
Configuration File: applicationContext.xml
(Directory: Same as previous file (<MMC_HOME>/WEB-INF/classes/META-INF).)
-
Locate the file called
applicationContext.xml. -
Open it for editing, then look for the bean called
internalDataSource. -
Edit the bean as per the following.
<bean name="internalDataSource" class="org.springframework.jdbc.datasource.SimpleDriverDataSource">
        <property name="driverClass" value="org.postgresql.Driver"/>
        <property name="url" value="jdbc:postgresql://localhost:5432/mmc_persistency_status"/>
        <property name="username" value="mmc_status" />
        <property name="password" value="mmc123" />
 </bean>
Configuration File: jackrabbit-repo.xml
For safety, before editing this file delete the following files (if listed): jackrabbit-repo-default.xml and jackrabbit-repo-test.xml.
|
(Directory: Same as previous file (<MMC_HOME>/WEB-INF/classes/META-INF).)
-
Locate the file
jackrabbit-repo.xml. -
Open the file for editing.
-
Replace the appropriate parameters to use Postgres instead of the default Derby database. A full listing of the modified file is provided below.
Use the following parameters for the database connection:
-
Role:
mmc_status -
Password:
mmc123 -
Schema:
postgresql -
IP:
localhost -
Port:
5432(default at installation)
The schema should be always postgresql. It defines the database, not the actual schema to be used for storing persistent data.
|
There is a newer version of org.apache.jackrabbit.core.persistence.bundle.PostgreSQLPersistenceManage, called org.apache.jackrabbit.core.persistence.pool.PostgreSQLPersistenceManage, but it currently has issues so it is not recommended yet.
|
|
Important! When configuring the default workspace and the workspace name itself, ensure that you comply with one of the following conditions:
If neither of the above conditions are met, all binary data will be persisted locally instead of on the external database. |
Example of jackrabbit-repo.xml
<?xml version="1.0"?><!DOCTYPE Repository PUBLIC "-//The Apache Software Foundation
  //DTD Jackrabbit 1.2//EN"   "http://jackrabbit.apache.org/dtd
  /repository-1.2.dtd">
<Repository>
  <FileSystem class="org.apache.jackrabbit.core.fs.db.DbFileSystem">
    <param name="schemaObjectPrefix" value="repo_"/>
    <param name="driver" value="org.postgresql.Driver"/>
    <param name="url" value="jdbc:postgresql://localhost:5432
      /mmc_persistency_status"/>
    <param name="user" value="mmc_status"/>
    <param name="password" value="mmc123"/>
    <param name="schema" value="postgresql"/>
    <param name="schemaCheckEnabled" value="true"/>

  </FileSystem>
  <Security appName="Jackrabbit">
    <AccessManager class="org.apache.jackrabbit.core.security      .SimpleAccessManager"/>
    <LoginModule class="org.apache.jackrabbit.core.security.SimpleLoginModule">
      <param value="anonymous" name="anonymousId"/>
    </LoginModule>
  </Security>
  <Workspaces rootPath="$\{rep.home\} /workspaces" defaultWorkspace="default"/>
  <Workspace name="default">
    <FileSystem class="org.apache.jackrabbit.core.fs.db.DbFileSystem">
      <param name="schemaObjectPrefix" value="workspace_"/>
      <param name="driver" value="org.postgresql.Driver"/>
      <param name="url" value="jdbc:postgresql://localhost:5432
        /mmc_persistency_status"/>
      <param name="user" value="mmc_status"/>
      <param name="password" value="mmc123"/>
      <param name="schema" value="postgresql"/>
      <param name="schemaCheckEnabled" value="true"/>

    </FileSystem>
    <PersistenceManager class="org.apache.jackrabbit.core.persistence.bundle      .PostgreSQLPersistenceManager">
      <param name="schemaObjectPrefix" value="Jackrabbit Core_" />
      <param name="driver" value="org.postgresql.Driver"/>
      <param name="url" value="jdbc:postgresql://localhost:5432
        /mmc_persistency_status"/>
      <param name="user" value="MMC_STATUS"/>
      <param name="password" value="mmc123"/>
      <param name="schema" value="postgresql"/>
      <param name="externalBLOBs" value="false"/>
      <param name="schemaCheckEnabled" value="true"/>

    </PersistenceManager>
    <SearchIndex class="org.apache.jackrabbit.core.query.lucene.SearchIndex">
      <param value="$\{wsp.home\}/index" name="path"/>
      <param value="org.apache.jackrabbit.core.query.lucene.TextPlainTextFilter,
        org.apache.jackrabbit.extractor.MsExcelTextExtractor,
        org.apache.jackrabbit.extractor.MsPowerPointTextExtractor,
        org.apache.jackrabbit.extractor.MsWordTextExtractor,
        org.apache.jackrabbit.extractor.PdfTextExtractor,
        org.apache.jackrabbit.extractor.HTMLTextExtractor,
        org.apache.jackrabbit.extractor.XMLTextExtractor,
        org.apache.jackrabbit.extractor.RTFTextExtractor,
        org.apache.jackrabbit.extractor.OpenOfficeTextExtractor"
        name="textFilterClasses"/>
      <FileSystem class="org.apache.jackrabbit.core.fs.db.DbFileSystem">
        <param name="schemaObjectPrefix" value="search_index_w_"/>
        <param name="driver" value="org.postgresql.Driver"/>
        <param name="url" value="jdbc:postgresql://localhost:5432
          /mmc_persistency_status"/>
        <param name="user" value="mmc_status"/>
        <param name="password" value="mmc123"/>
        <param name="schema" value="postgresql"/>
        <param name="schemaCheckEnabled" value="true"/>

      </FileSystem>
    </SearchIndex>
  </Workspace>
  <Versioning rootPath="$\{rep.home\}/version">
    <FileSystem class="org.apache.jackrabbit.core.fs.db.DbFileSystem">
      <param name="schemaObjectPrefix" value="filesystem_version_"/>
      <param name="driver" value="org.postgresql.Driver"/>
      <param name="url" value="jdbc:postgresql://localhost:5432
        /mmc_persistency_status"/>
      <param name="user" value="mmc_status"/>
      <param name="password" value="mmc123"/>
      <param name="schema" value="postgresql"/>
      <param name="schemaCheckEnabled" value="true"/>

    </FileSystem>
    <PersistenceManager class="org.apache.jackrabbit.core.persistence.bundle.        PostgreSQLPersistenceManager">
      <param name="schemaObjectPrefix" value="version_"/>
      <param name="driver" value="org.postgresql.Driver"/>
      <param name="url" value="jdbc:postgresql://localhost:5432
        /mmc_persistency_status"/>
      <param name="user" value="MMC_STATUS"/>
      <param name="password" value="mmc123"/>
      <param name="schema" value="postgresql"/>
      <param name="externalBLOBs" value="false"/>
      <param name="schemaCheckEnabled" value="true"/>

    </PersistenceManager>
  </Versioning>
  <SearchIndex class="org.apache.jackrabbit.core.query.lucene.SearchIndex">
    <param value="$\{rep.home\}/repository/index" name="path"/>
    <FileSystem class="org.apache.jackrabbit.core.fs.db.DbFileSystem">
      <param name="schemaObjectPrefix" value="search_index_"/>
      <param name="driver" value="org.postgresql.Driver"/>
      <param name="url" value="jdbc:postgresql://localhost:5432
        /mmc_persistency_status"/>
      <param name="user" value="mmc_status"/>
      <param name="password" value="mmc123"/>
      <param name="schema" value="postgresql"/>
      <param name="schemaCheckEnabled" value="true"/>

    </FileSystem>
  </SearchIndex>
</Repository>
Configuration File: scheduler.properties
(Directory: Same as previous file (<MMC_HOME>/WEB-INF/classes/META-INF).)
-
Locate the file called
scheduler.properties. -
Edit the file as per the following.
org.quartz.jobStore.isClustered=false   org.quartz.jobStore.driverDelegateClass=org.quartz.impl.jdbcjobstore.PostgreSQLDelegate
org.quartz.jobStore.useProperties=true
org.quartz.scheduler.instanceId=AUTO
MMC is now configured to store its persistent data in the specified PostgreSQL database. Start Mule and login to the MMC normally.
It is possible that, when using the PostgreSQL database, attempting to connect to the MMC will result in a "503 - Service unavailable” error, even if the system is configured correctly. In this case, check the file` <MMC_HOME>/logs/mule-app-mmc.log`. Look for a line that contains` PSQLException: FATAL: role "<user>" does not exist`, where <user> is the OS system user running Mule. If you find this line, use pgAdmin III to create a new role with the same name as the OS system user that runs Mule (you can follow the same steps as when creating the mmc_status role). Restart Mule, and MMC should now start normally.
|
Disaster Recovery of Environment Data
Out of the box, MMC stores persistent state data in the folder mmc-data, which is at <Mule install path>/.mule/mmc (if running the trial version) or <MULE_HOME>/mmc-data if using an application server. If for some reason database files become corrupted, you’ll probably have to delete mmc-data and start from scratch, unless you have a backup copy of mmc-data. But having a backup copy of mmc-data does not cover a catastrophic failure with complete data loss on the MMC host itself, nor does it allow for an active-passive configuration for immediate recovery.
One possible solution is to backup the database to a single file, which can then be copied to another machine. If the need for immediate recovery arises, this file can be used to restore the database to its original state.
|
When you restore MMC to a previous state, be aware of the following:
|
Scenario
-
Database server:
PostgreSQL 9.1 -
MMC is connected to Postgres
-
A database is already created. For this example the following parameters will be used:
-
Role:
mmc_status(with same permissions as the "postgres" role) -
Database name:
mmc.test-
Encoding:
UTF8 -
Owner:
mmc_status
-
-
-
Tool to access database:
pgAdmin III
Backing up the Database
To backup the mmc.test database, complete the following steps:
-
Login to pgAdmin III as admin (role
postgres). -
On the object browser on the left-hand pane, go to Server Groups > PostgreSQL 9.1 > Databases > mmc.test.
-
Right-click on
mmc.test, then navigate to Backup > File Options. -
Select the following options:
-
Format:
Tar -
Encoding:
UTF8 -
Rolename:
mmc_status -
Filename:
<Suitable name and folder>
-
-
Click Backup to create a tar archive of the database at the location you specified.
Restoring the Database
To restore the mmc.test database, complete the following steps:
-
Go to the mmc-data folder (at
<Mule install path>/.mule/mmc/mmc-data) and delete the following folders:-
db(if it exists) -
repository -
tracking(this is necessary to avoid generating several stacktraces related to JCR) -
you may need to also delete
workspaces/<name of your workspace>/index
-
-
Login into pgAdmin III as admin (role
postgres). -
On the object browser, make sure that the database called
mmc.testis defined. -
Make sure that all the tables that may be defined on the database are dropped.
-
Right click on
mmc.test, select Restore. -
On the File Options tab, select:
-
Filename:
<Database backup file> -
Format:
Custom or tar -
Rolename:
mmc_status
-
-
Click Restore.
Persisting Transaction Data
To set up PostgreSQL to persist your MMC transaction data, you need to complete three steps:
-
Create the database user
-
Create the database
-
Verify the database
-
Set up MMC
Creating the Database User
We will create a user with the following parameters:
-
Role name:
tracker -
Password:
tracker
Using pgAdmin III
-
Log in to the database server as user
postgres:-
In pgAdmin III’s object browser (on the right-hand pane), right-click server PostgreSQL on localhost, then select Connect.
-
-
On the Object Browser, right-click Login Roles, then select New Login Role.
-
At the New Login Role dialog box, type
trackerin the Role name field. -
Go to the Definition tab in the dialog box, and type the password
trackerin both Password fields. -
Click OK to close the New Login Role dialog box.
Creating the New Database
We will create a database called mmc_persistency_tracking, owned by user tracker.
Verifying the New Database
Use PostgreSQL’s psql command-line utility to log in to database mmc_persistency_tracking as user tracker. To do this, open a terminal and run:
psql postgres –UtrackerWhen you run this command, psql should prompt for the user’s password. After typing it, you should get a prompt similar to the following:
mmc_persistency_tracking=#This indicates that you have successfully connected to the mmc_persistency_tracking database as user tracker.
|
If you can’t login using the psql command Depending on you PostgreSQL configuration, you may get the following error when trying to connect to the database: This probably means that PostgreSQL is configured to accept connections for the specified user only if the operating system first authenticates that user. So, for example, to connect as user If you do not desire this configuration, check for the following line in the PostgreSQL configuration file If the line exists, modify it as per below. |
An example of the full login command and output:
mitra:/opt/PostgreSQL/9.1/bin$ ./psql mmc_persistency_tracking -Utracker
Password for user tracker:
psql.bin (9.1.3)
Type "help" for help.
mmc_persistency_tracking=#
To exit psql, type \q, then press Enter.
Setting Up MMC to Use PostgreSQL for Persisting Transaction Data
The database driver for PostgreSQL is included in the MMC installation bundle or .war file, and works out of the box. So all you need to do is to follow the instructions below for editing the following configuration files:
Configuration file: persistence.xml
(Directory: <MMC_HOME>/WEB-INF/classes/META-INF.)
-
Locate the file
persistence.xml. -
Open the file for editing, then find the line listed below.
<property name="openjpa.jdbc.DBDictionary" value="batchLimit=-1" /> -
Replace the line as per the listing below.
<property name="openjpa.jdbc.DBDictionary" value="*postgres*" />
Configuration File: applicationContext-tracking.xml
(Directory: Same as previous file (<MMC_HOME>/WEB-INF/classes/META-INF).)
-
Locate the file
applicationContext-tracking.xml. -
Open the file with a text editor.
-
Redefine the beans
dataSourceand`jpaAdapter` as listed below.
<bean id="dataSource" class="org.springframework.jdbc.datasource.DriverManagerDataSource">
    <property name="driverClassName" value="org.postgresql.Driver" />
    <property name="url" value="jdbc:postgresql://172.16.20.78:5432/mmc_persistency_tracking" />
    <property name="username" value="tracker"/>
    <property name="password" value="tracker"/>
</bean>

[...]

<bean id="jpaAdapter" >
    <property name="database" value="POSTGRESQL"/>
    <property name="showSql" value="true"/>
</bean>
Troubleshooting Tips
If you have installed the database on a remote host and experience problems, ensure that network connectivity to the database is working. Open a terminal (Unix or DOS) and run: telnet <host> <port>
Output should be similar to the following.
mitra:~$ telnet dbserver 5432
Trying ::1...
Connected to dbserver.
Escape character is '^]'.
The above output indicates a successful connection to host dbserver on port 5432. A “connection refused” error indicates that nothing is listening on the specified host and port. Any other output often indicates a connectivity problem, such as a firewall blocking requests to the specified port.
See Also
-
Read more about MMC setup.
-
Review the Architecture of the Mule Management Console.