Dynamically Adding or Removing Nodes in a Cluster
Enterprise Edition
From the Management Console or the Console’s REST API you can dynamically add or remove nodes to or from a cluster without disbanding it.
This page details the procedure to add or remove a node in the Management Console. For details on performing these operations using the REST API, consult the REST API Clusters documentation.
Adding a Node With the Management Console
Complete the following procedure to dynamically add a node to an existing cluster.
-
In the Management Console, click the Servers tab. The Servers tab displays the list of servers registered to the Management Console.
-
Select each server you wish to add to a cluster by clicking the checkbox to the left of the server’s status symbol.
-
Click the Add to Cluster button near the top right of the screen. The button displays a drop-down menu with all available clusters. Select the cluster to which you wish to add the server(s).
The image below illustrates the procedure. The numbers indicate the order in which you must click each item.
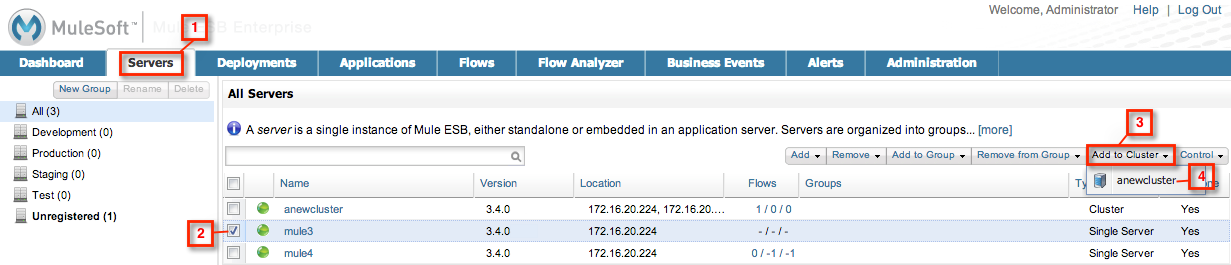
In the image above, the user clicked Servers, then selected server mule3, and then clicked the Add to Cluster button, which shows the available cluster, anewcluster. By clicking anewcluster in the drop-down menu under the Add to Cluster button, server mule3 will be added to cluster anewcluster.
The Add to Cluster button is unavailable (grayed-out), unless the following conditions are met:
-
At least one server is checked in the server list
-
All servers checked in the server list are single servers (i.e. not clusters)
-
The user has the set of permissions needed to create clusters
Validations
The following validations apply to calls to add a node to a cluster. If any of the following conditions are not met, the add operation will fail.
-
Cluster status must be OK.
-
The cluster can have a maximum of 8 nodes.
-
All nodes must be up.
-
The node(s) being added must not be already part of a cluster.
-
The node(s) being added must be of the same version as the cluster.
-
All nodes in the cluster must be running Mule ESB 3.3.0 or later.
-
The node(s) being added must have a license with cluster entitlement.
In addition to adding the node to the cluster, the Management Console performs the following actions:
-
It undeploys any previously existing deployments on the node(s) that you are adding to the cluster, and removes the node(s) from the targets of any deployments that contain the node(s).
-
It removes the node(s) being added from any groups to which they belonged.
-
It assigns to the node(s) being added any deployments that have the cluster as a target.
-
It sends the clustering information contained in the
mule.propertiesfile to the node(s) that you are adding, then restarts them. -
It sends the clustering information contained in the
mule.propertiesfile to any nodes that are already part of the cluster.
Nodes that are already part of the cluster behave as follows:
-
They should not restart, but only detect a new member and, if appropriate, reorder Hazelcast partitions among themselves.
-
On its next restart, each node should pick up the updated clustering information in the
mule.propertiesfile. So, after restarting the cluster, the cluster will have both its old and new members. -
Nodes that share a deployment with the ones being added to the cluster should not be affected (no redeployment should take place) by the clean-up of the servers being clustered.
Behavior Regarding Alerts
Adding a node with configured alerts to a cluster |
The node preserves its alerts configuration, overriding the cluster’s alerts configuration, if any. |
Adding a node to a cluster with configured alerts |
The newly added node receives the alerts configuration for the cluster, overriding the node’s alerts configuration, if any. |
Adding an alert configuration to a node in a cluster |
Only affects that node. |
Disbanding a cluster |
After disbanding a cluster with configured alerts, the newly-independent nodes will have no configured alerts inherited from the cluster, but only their specific alerts configuration, if any. |
To summarize, a node that join a cluster which has no alerts configuration, will retain its alerts configuration (if any). A node that join a cluster which has alerts configuration, will have their alerts configuration (if any) overriden by that of the cluster, but will recover its alerts if and when is ceases to be part of the cluster.
Removing a Node With the Management Console
Complete the following steps to dynamically remove a node from a cluster. The procedure is illustrated in the image below. The numbers indicate the order in which you must click each item.
-
In the Management Console, click the Servers tab. The Servers tab displays the list of servers registered to the Management Console.
-
In the left-hand pane, click All, then click the cluster from which you wish to remove a node. The Management Console displays the Cluster Details tab.
-
In the Nodes Control portlet of the Cluster Details tab, locate the node you wish to remove from the cluster, then select it by clicking the checkbox next to the node’s status symbol.
-
In the Nodes Control portlet, click Remove from Cluster.

Note that the Remove from Cluster button is not available (grayed-out) if the user does not have the set of permissions required to disband clusters.
Validations
The following validations apply to calls to remove a node from a cluster.
If any of the following conditions are not met, the remove operation will fail.
-
Cluster status must be OK.
-
The cluster must have at least 3 nodes.
-
All nodes in the cluster must be up.
-
All nodes in the cluster must be running Mule ESB 3.3.0 or later.
In addition to removing the selected node(s), the Management Console will perform the following actions:
-
If the node(s) being removed have any deployments which contain the cluster as target, these deployments will be removed from the node(s).
-
For each node being removed, the cluster information in the
mule.propertiesfile will be deleted. -
Each node that continues to be part of the cluster will receive updated
mule.propertiesinformation.
Nodes that are already part of the cluster are expected to behave as follows:
-
They should not restart, but only detect that they have lost a member and, if appropriate, reorder Hazelcast partitions among themselves.
-
On its next restart, each node should pick up the updated clustering information in the
mule.propertiesfile. So, after restarting the cluster, the cluster will have its remaining members. -
The deployments update of the nodes being removed from the cluster should not affect nodes that shared a deployment with them (no redeployment should take place).
-
If the cluster is part of a group, that group membership will not be applied for the new single server.