Deploying Studio Applications
Projects developed in Mule Studio can be run locally on the Mule CE server bundled with Studio, exported to run on a Mule EE server, or deployed to the cloud with Mule iON.
Archiving Projects
Studio lets you save a project in a zip format (a Mule Deployable Archive), which includes Mule Studio metadata. Such a packaged Mule archive provides a convenient method for transferring files between editions of Studio or backing up Studio projects. The zipped package includes all information specific to your project, including flows, configuration files, Java classes, referenced HTML files, and more.
Packaging a Mule Deployable Archive
To export a Mule Deployable Archive of your Studio project, complete these instructions:
-
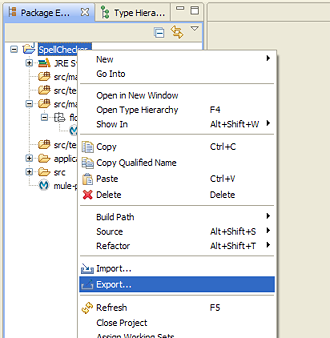
Right-click the project name in the Package Explorer pane, then choose Export. Alternatively, click a project name in the Package Explorer, then choose Export from the File menu.
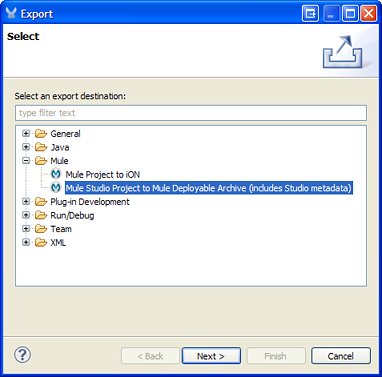
 +
. In the *Export* pane, click *Mule* to open or expand the associated node (if it isn't already open), select *Mule Studio Project to Mule Deployable Archive*, then click *Next*. +
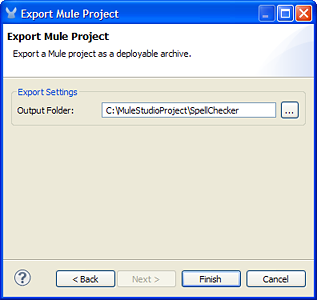
 +
. Select an output folder to which your project archive will be saved, then click *Finish*. +
+
Importing a Mule Deployable Archive
If a Mule Deployable Archive was exported from Studio, the Studio-specific metadata included in the archive is restored into Studio.
To import a Mule Deployable Archive into Studio, complete these steps:
-
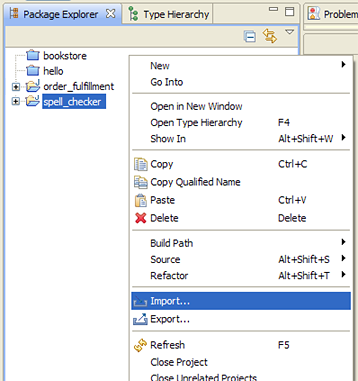
Right-click the Package Explorer pane, then select Import. Alternatively, select Import from the File menu.
 +
. In the *Import* dialog pane, choose *Mule Studio generated Deployable Archive*, then click *Next*. +
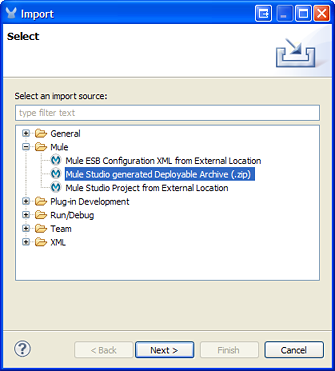
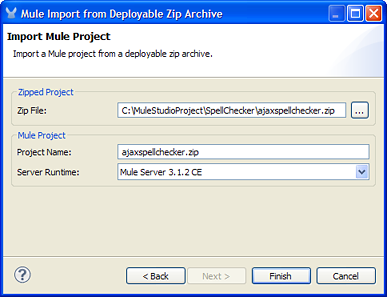
 +
. In the *Zip File* field, select the zip file where your project was archived, then click *Finish*. You can also change the *Project Name* and select from a drop-down list the *Server Runtime*, which is set to the default `Mule CE 3.2.1.` +
+
After a few moments, the imported project appears in the Package Explorer view under the project name you specified.
Running Projects in Mule Studio
Mule Studio simplifies the process of running your Mule project. When you specify Run as a Mule Application, your project is automatically built and deployed to the internal Mule server, which starts automatically, if necessary.
Complete these steps to run your project in Mule Studio:
-
Locate the reference to your project flow in the Package Explorer by opening the
flownode, which is located under the/src/main/resourcesnode under your project name. Theflownode contains the name of your flow followed by themflowextension. -
Right-click the flow (
SpellChecker.mflow, for example), select Run As from the context menu, then select Mule Application from the context menu.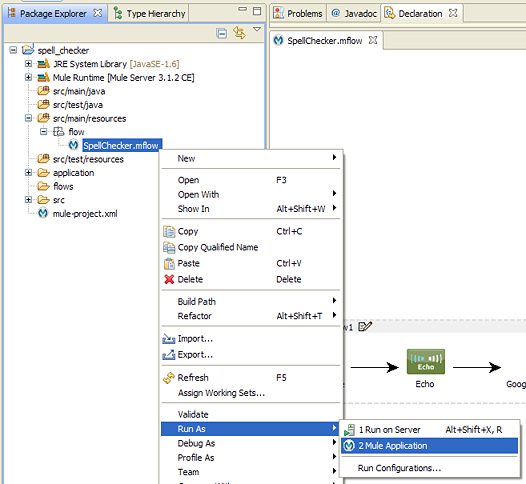
+
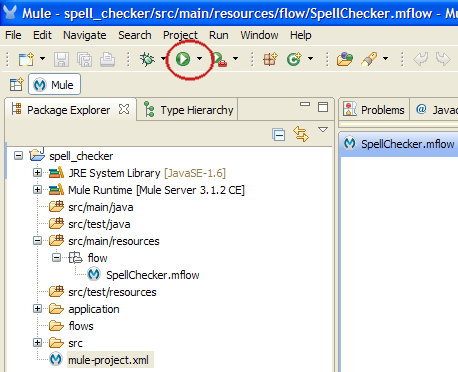
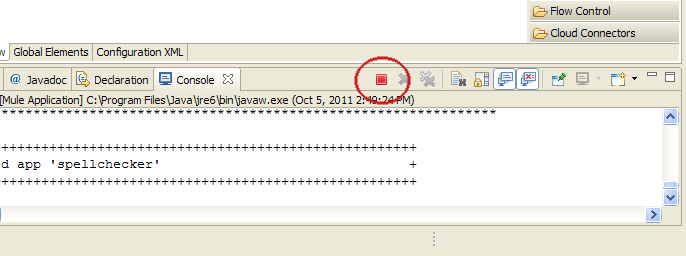
Your project deploys to the internal Mule server bundled with Studio. The Studio console displays details about the build and deploy process. When the console displays the following line, your project is deployed to Mule ESB and running:
+++++++++++++++++++++++++++++++++++++++++++++++++++++++++++++ Started app 'Your_Project_Name' +++++++++++++++++++++++++++++++++++++++++++++++++++++++++++++Re-Running Your Project
After running your project, you can quickly re-launch it without repeating the above steps. If your flow is open in the Message Flow canvas, and you previously ran it as a Mule Application, you can relaunch it simply by clicking the Run icon, which is located in the Launch group on the Studio toolbar.
If your flow is not currently open in the Message Flow canvas, click the drop-down arrow next to the Run icon, then select your project from the list. This causes Studio to deploy and run the selected project.
Run Your Project on a Mule server
Your Mule Studio project is fully deployable to both Mule CE and EE. Complete these steps to download, install, and run your project:
Download and Install Mule
If you do not already have Mule ESB installed, consult the Mule Installation manual.
Start Mule
To launch Mule:
-
Open a command window or terminal window.
-
Navigate to the
/bindirectory where Mule is installed. -
Type:
./mule(or.\muleon Windows). -
To stop Mule, enter:
Ctrl-C.
Deploy Your Mule Studio Application
-
Export your Mule Studio project to a deployable archive, as detailed above. This produces a file with a
zipextension. -
Copy this file into the
/appdirectory where Mule ESB was installed. -
Mule ESB automatically extracts your archive and deploys your application. You can view progress in the command (or terminal) window. If no errors are found, the window displays a "Started app" message. Also note that your application is unarchived or extracted in the
appdirectory. -
If you wish to undeploy your application but keep Mule ESB running, navigate to the
/appdirectory and delete the fileYourProjectName-anchor.txt. This removes your project from the/appdirectory.
Launching Projects on Mule iON
Mule iON is a cloud-based integration Platform as a Service (iPaaS). It provides a convenient way for developers to launch their applications on a cloud platform, while also providing many enhanced features for solving cloud-to-cloud and cloud-to-premise integration problems. Mule Studio is fully integrated with Mule iON and facilitates simple application deployment.
The following steps detail:
-
setting up a Mule iON account
-
deploying your Mule application to iON through Studio dialogs.
Create a Mule iON Account
Developers can obtain a Mule iON account free of charge for six months. You are limited to one "worker" during this period. Additional resources can be purchased at any time.
-
If you have a Mule community account, you simply log into Mule iON with your credentials.
-
Log in to the Mule iON interface. First time users are directed to the New Application interface where applications can be deployed to Mule iON.
For this example, however, we deploy our application directly from Studio by completing the following steps.
Adapt Your Project for Mule iON if Needed
Many projects can be deployed directly to Mule iON. However, some projects require minor modifications, as summarized below:
-
If you are deploying a project that listens on a static port, you need to change the port to a dynamic value so that Mule iON can set it at deployment time. To do so, change your port values to
${http.port}. You can create anapplication.propertiesfile that allows you to run your project locally on a specific port and also on Mule iON as a dynamic port. See the example [Build Your First Project with Mule Studio] for details on how to create this file. -
The Studio JDBC and FTP components are currently not supported by Mule iON. The EE versions of these components are supported by Mule iON, however.
-
If using the Jetty component, set the host to 0.0.0.0 and not to localhost.
Deploy Your Project to Mule iON
-
In Mule Studio, right-click your flow in the
flownode under thesrc/main/resourcesnode in the Package Explorer view. Select Mule iON from the window that opens, and then Deploy to iON… from the new window that cascades open.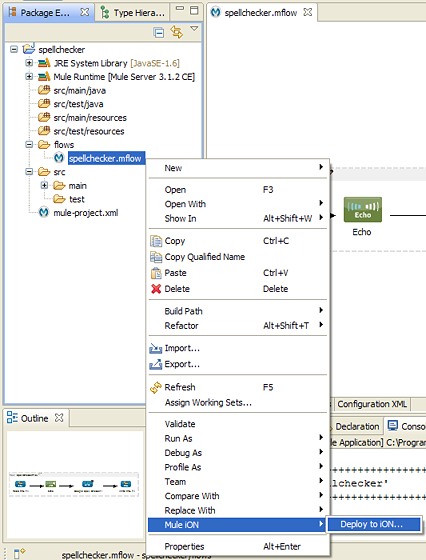
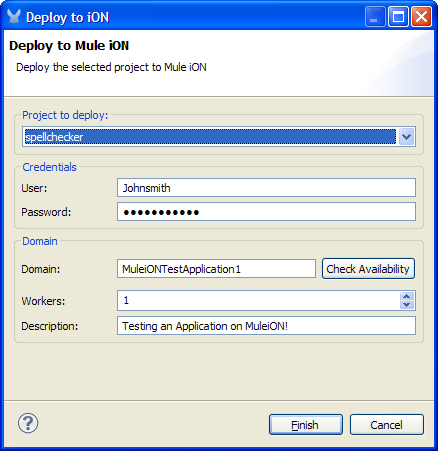
 +
. Enter your credentials, then choose a domain in which to deploy your application. The value you enter must be a unique sub-domain which is created for your application on the muleion.com domain such as, `http://Your-Project-Name.muleion.com`.
. Click on *Check Availability* to confirm that the domain is available.
. Choose *1 Worker* if you are a new user with a free account. Paying users may wish to assign additional resources to their application; however, this can be done later through the iON web interface. You may also enter an optional description.
. Click *Finish* to deploy your application to iON. +
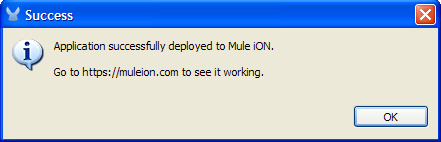
 +
. After a few moments, if your project deploys successfully, the following response appears: +
+
Inspect Your Application in the Mule iON Web Interface
To check your application’s deployment status, login to your Mule iON account.
After logging in, you are directed to the dashboard. If your application is deployed, a green icon will appear next to your application name in the upper corner of the dashboard.

You can access your running application at the displayed URL, which is based on the sub-domain you specified when deploying your application.
Debugging Your Application
Mule Studio is an Eclipse plugin (www.eclipse.org) that incorporates all Eclipse debugging features.
A Debug perspective lets you manage the debugging or running of a program in the Workbench.
You can control the execution of your program by setting breakpoints, suspending launched programs, stepping through your code, or examining the contents of variables.
These debugging features apply to Java, JavaScript, and other languages that you may use within Mule Studio to build Mule applications.
Please see the Eclipse documentation for more information on these features.