Hello World Example
This page describes the configuration and behavior of the Hello World example provided with the Mule ESB distribution.
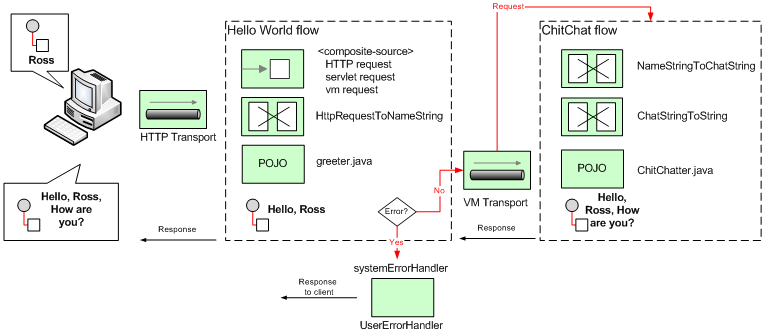
When you point a Web browser to the predefined address (http://localhost:8888/?name=Ross), Mule parses the value entered after ?name=, does some validation, and uses a java class called greeter to add some text to the string before passing it on to another flow. The second flow adds text, then passes it back via the browser. There are simpler ways to do this, but this sample uses flows and the HTTP Transport to illustrate message routing and transformation in a Mule application.

Running the Application
If you are using the Mule IDE, you can simply create a new project based on the Hello World example and run it from Eclipse as described on the Hello Mule Page.
If you are not using the Mule IDE, do the following:
Simply copy the pre-built application archive (mule-example-hello-3.0.0.zip) to the application folder ($MULE_HOME/apps) and start Mule. To access the web service invoke
http://localhost:8888/?name=Ross
from your browser.
To stop Mule, type 'CTRL-C' in the Mule console window.
Building the Example
First, make sure you have set the MULE_HOME environment variable as recommended in Mule’s README.txt
Depending on the build tool you are using (Ant or Maven), you can build the example by simply running "ant" or "mvn". This will compile the example classes, produce an application zip file and copy it to $MULE_HOME/apps.
How it Works
The Hello World application is configured in the mule-config.xml file in examples/hello/src/main/app under your Mule home directory. This section walks through the configuration and the source Java files it calls.
Resource File
Message text is taken from the hello-example-messages.properties file in the examples\hello\src\main\resources\messages folder, which has the following entries:
1=, how are you?2=Hello 3=Please enter your name: 4=Please provide a valid name with at least one character!There are translated versions of this property file in the same folder that you could specify instead, such as if you wanted to display the strings in German instead of English.
The Classes
The Mule configuration file calls out to two Java classes to process the message. The first is the Greeter class, which uses a method from the LocalMessage class to pull the string "Hello" from the properties file. The Greeter class’s method greet() then appends "Hello" to the person’s name.
public class Greeter{ private String greeting = ""; public Greeter() { greeting = LocaleMessage.getGreetingPart1(); } public Object greet(NameString person) { Object payload = person; if (person.isValid()) { person.setGreeting(greeting); } else { payload = new Exception(LocaleMessage.getInvalidUserNameError()); } return payload; }}The second class is ChitChatter, which appends ", how are you?" to the string.
public class ChitChatter{ private String chitchat = ""; public ChitChatter() { chitchat = LocaleMessage.getGreetingPart2(); } public void chat(ChatString string) { string.append(chitchat); }}Wiring the Classes Together
The Mule configuration file calls these classes from within the <flow> called Hello World, which groups three inbound endpoints in a composite source element to receive HTTP, Servlet and VM requests.
The Hello World flow uses this composite source element to take in the name entered at the browser, calles the greeter class, and routes unexpected errors to a separate handler called systemErorHandler.
<flow name="Hello World"> <composite-source> <!-- Incoming HTTP requests --> <inbound-endpoint address="http://localhost:8888" transformer-refs="HttpRequestToNameString" exchange-pattern="request-response"> <not-filter> <wildcard-filter pattern="/favicon.ico"/> </not-filter> </inbound-endpoint> <!-- Incoming Servlet requests --> <inbound-endpoint address="servlet://name" transformer-refs="HttpRequestToNameString" exchange-pattern="request-response"> <not-filter> <wildcard-filter pattern="/favicon.ico"/> </not-filter> </inbound-endpoint> <!-- Incoming VM requests --> <vm:inbound-endpoint path="greeter" transformer-refs="StringToNameString" exchange-pattern="request-response"/> </composite-source> ... </flow>The <inbound-endpoint> element receives inbound messages using the HTTP transport. The transformer-refs property specifies the inbound transformer to invoke before the Greeter receives the message. The transformer is defined earlier in the configuration file as follows:
<custom-transformer name="HttpRequestToNameString" class="org.mule.example.hello.HttpRequestToNameString"/>This transformer converts the HTTP Request it receives from the HTTP connector into a NameString object, which is the data type expected by the greet() method in the Greeter class. Note that when you specify the component, you do not need to specify a specific method to call in the class—Mule can determine the appropriate method based on the data type of the message.
After the Greeter class has prepended "Hello" to the user input, the message is dispatched on the endpoint vm://chitchatter. This calls the ChitChat flow, which calls the custom transformer class NameStringToChatString, converting the NameString object to a ChatString object.
<flow name="ChitChat"> <vm:inbound-endpoint path="chitchatter" transformer-refs="NameStringToChatString" responseTransformer-refs="ChatStringToString" exchange-pattern="request-response"/> <component class="org.mule.example.hello.ChitChatter"/> </flow>To demonstrate transformers further, the ChitChatter class expects a ChatString object, so we have a NameStringToChatString transformer that converts the message’s payload from the NameString to a ChatString before the component receives the message. The message is received on vm://chitchatter, the endpoint on which the Greeter class dispatched its message.
After processing the message, the message is sent on the back as the HTTP response. Note the response transformer on this component. Even though there is no outbound provider, there is one more transformer, ChatStringToString, which converts the payload from a ChatString to a plain string so that it can be handled by the HTTP transport and displayed in the HTTP response.
Configuring the Servlet Transport
It is common to deploy Mule inside a web container (such as Tomcat) and use the web server instead of the Mule HTTP transport to manage the HTTP connection to Mule. To invoke the Hello service via a Servlet, submit a web form such as:
<form method="POST" action="/mule-examples/rest?endpoint=greeter"> <input type="text" name="payload"/> <input type="submit" value="POST" /></form>Using the Servlet transport, the following endpoints can be added to the configuration (Note: the REST endpoint currently only works on the servlet transport only since the HttpRequestToParameter transformer only supports servlets.):
<inbound-endpoint address="servlet://name" transformer-refs="HttpRequestToNameString" exchange-pattern="request-response"> <not-filter> <wildcard-filter pattern="/favicon.ico"/> </not-filter></inbound-endpoint><inbound-endpoint address="servlet://rest" transformer-refs="HttpRequestToParameter StringToNameString" responseTransformer-refs="PlainTextResponseTransformer" exchange-pattern="request-response"/>Configuring the VM Transport
The example also demonstrates how you can connect to a service in Mule programmatically, using the Mule Client.
<vm:inbound-endpoint path="greeter" transformer-refs="StringToNameString" exchange-pattern="request-response"/>Then use the Mule Client API to call the service:
MuleClient client = new MuleClient(muleContext);client.send("vm://greeter", "Ross", null);MuleMessage response = client.send("vm://greeter", "Ross", null);System.out.println("response = " + response.getPayload());


