Installing Mule Studio
Contents:
The Mule Studio installation package contains everything you need to create and run Mule applications, including underlying Eclipse technology and a bundled runtime version of Mule CE 3.2.1.
Installation is as easy as downloading the distribution package, unzipping it to a directory on your hard drive, then launching Mule Studio!
 |
Studio is built upon the most recent Mule Flow orchestration capabilities, available since Mule 3.0. Studio does not support Mule Services, an older approach to application building that predates Flows. |
|---|
To upgrade an existing version of Mule Studio to a newer version, see Upgrading Mule Studio.
Operating System Compatibility
MuleSoft provides installation packages in both 32-bit and 64-bit versions for each of the following operating systems:
-
Windows XP, Windows Vista, and Windows 7
-
Mac OS X 10.6
-
Linux kernel series 2.4 and 2.6.
Required Java Environment
Before installing Mule Studio, ensure that the host machine has one of the following Java Development Kit versions installed on it:
-
Standard Edition 1.6.0_26 (also known as JDK SE 6 Update 26) or more recent
-
Enterprise Edition 1.6u3 (JDK EE 6 Update 3) or more recent
You can download the JDK from here.
Upgrading Mule Studio
The latest version of Mule Studio can be upgraded from an existing one. If you do not have a legacy version of Mule Studio installed on your host machine, skip this section and proceed directly to the section on Installation.
 |
On Windows you can check the version of your installed software by clicking Help > About Mule Studio on the Mule menu bar. Clicking Installation Details displays the name, version, software id, and other information about your installed version of Mule Studio. |
|---|
If you do have a legacy version of Studio installed on your host machine, use the Upgrade Manager, which is built into Studio, to upgrade to a newer version. Complete the following steps:
-
Click Help > Install New Software on the Mule menu bar.
-
After the Install window opens, click Add, which is located to the right of the Work with field.
-
Enter
Studio Updatesin the Name field. -
In the Location field, enter
http://studio.mulesoft.org/updater, which points to the Studio Updates site. -
Click OK.
-
A table will appear displaying the available version, the newest version, and the application name (Mule Studio).
-
Click the available version, then click Next, and finally click Finish. Mule Studio now updates to the latest version.
Installation
Here are the complete instructions to download and install Mule Studio for Windows, Linux, and Mac OS X.
-
Download Mule Studio from this page: Mule Studio Download Page. The current download file includes everything you need to create and run Mule applications using the Studio development environment.
-
Unzip the downloaded file to the folder where you would like to install Mule, such as
C:\Program Files\Mule. ThemuleStudiofolder appears as a child folder when the unzip operation completes. -
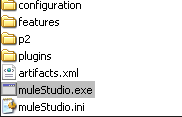
Run the
muleStudioexecutable file, which resides in themuleStudiofolder, according to the procedure for your platform. This launches both Mule Studio and the version of Mule ESB bundled with Mule Studio.
The sections below describe the installation procedure for each supported platform.
Windows
Launch Studio by running the executable muleStudio.exe, which is located on the following path:
<Mule install path>\MuleStudio
You can double-click the file in the graphic environment or enter the file name in a command window.
Proceed to Completing Studio Launch.
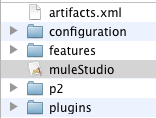
Mac OS X
Double-click the muleStudio.app file, located in the following path:
<Mule install path>/MuleStudio
Proceed to Completing Studio Launch.
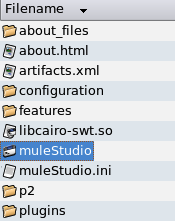
Linux
Unzip the muleStudio package, which is located in the following path:
/MuleStudio
After you have unzipped the muleStudio package, check that the executable binary has the proper permissions for execution.
Start by opening a terminal window and navigating to the newly created MuleStudio directory:
cd <Mule installation path>/Mule StudioNext, set these permissions on the muleStudio file:
chmod u+x muleStudio
Finally, use the command ls -1 muleStudio to check the permissions on the muleStudio file, which should return a display similar to the following in your terminal window:
user@system:~/MuleStudio$ ls -1 muleStudio-rwxr-xr-x 1 user user 71162 2010-08--25 09:59 muleStudio |
Typically, you can also set and verify these permissions through the GUI file system browser on your Linux system, if such a GUI browser exists. |
|---|
Enter the following command in the console to launch muleStudio:
./muleStudio
Alternatively, double click the muleStudio file in the Linux graphic interface, as shown below:
Proceed to Completing Studio Launch.
Completing Studio Launch
When you launch Studio, the following pop up prompts you to specify the workspace folder in which all your project-specific files will reside.
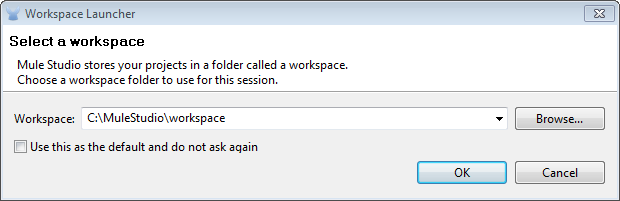
The popup provides three options for specifying a workspace and one for quitting Studio:
-
Click OK to accept the default workspace, which will be something similar to:
C:\MuleStudio\Workspace. (Optionally, click Use this default and do not ask again before you click OK so that each subsequent Studio launch uses the folder displayed in the Workspace field). -
Click Browse, navigate to the directory you want to use as your workspace, then click OK.
-
Click within the field to the right of Workspace, type the path of the directory you want to use as your workspace, then click OK.
-
Click Cancel only if you want to exit Studio without specifying a workspace.
The first time you launch Mule, the following window pops up after you have specified your workspace:
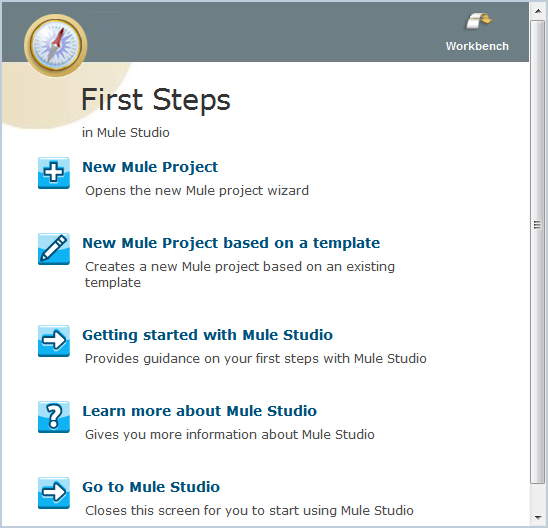
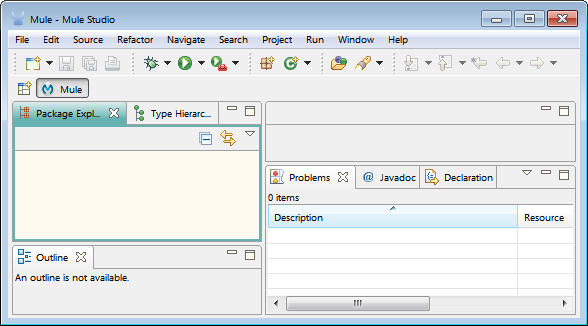
Click the fifth option, "Go to Mule Studio", to display the Studio application window, which should look similar to the following:
Now that Mule Studio is up and kicking, take a quick tour of Mule Studio by returning to the Getting Started with Mule Studio page.