The Studio Palette
The Studio Palette, which appears to the right of the Message Flow canvas, contains a complete set of building blocks for creating Mule Flows. Deploying a building block is as simple as dragging an icon from the palette to the canvas.
The Palette Groups
For convenience, the palette building blocks fall into seven functional groups, as detailed by the following table:
| Folder | Description | Configuration Details |
|---|---|---|
Endpoints |
exchange messages (and their embedded data payloads) with external parties, such as customers of a commercial website. Inbound endpoints, which are also known as Message Sources within the context of a Mule application, listen for and receive messages on various channels such as HTTP and FTP. |
[Studio Endpoints] |
Scopes |
combine entities ranging from building blocks to messages to parts of data payloads so that they an be processed as a single unit by other Message Processors in the flow. |
[Studio Scopes] |
Components |
package business logic and other functionality developed for a specific Mule application. Depending on the programming or scripting language used to develop this functionality, the code is packaged in a building block that supports Groovy, Javascript, Pojo, Spring Bean, or other language. |
[Studio Components] |
Transformers |
enhance, translate, or otherwise change message headers or their data payloads. For example, a payload received as part of an HTTP request-response exchange pattern can be converted to JDBC format before it is passed to a database. |
[Studio Transformers] |
Filters |
use various criteria to select messages for further processing. For example, incomplete or invalid user credentials may be ignored, while valid credentials are passed to an LDAP server for processing. |
[Studio Filters ] |
Flow Controls |
use various criteria to route messages and data to different building blocks in your flow. For example, a filter might route customer billing information to a credit card billing web site, while the rest of the merchandise order is sent to the warehouse for fulfillment. |
[Studio Flow Controls] |
Cloud Connectors |
facilitate calls to Web service APIs such as Salesforce, Twitter, and Mongo DB. |
[Studio Cloud Connectors] |
Resizing the Palette
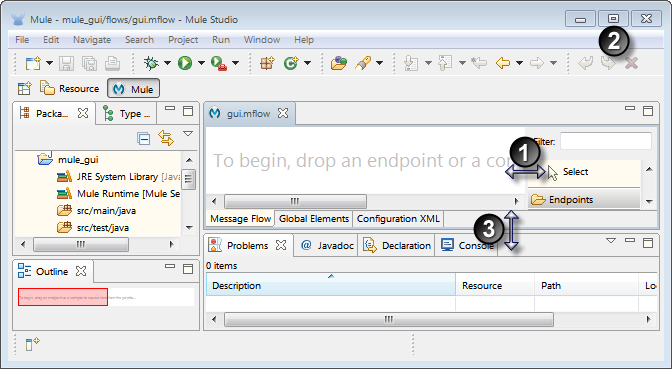
Hover your cursor over the left edge of the palette to adjust its width. (This coincides with the right edge of the vertical scroll bar associated with the Message Flow canvas). After the horizontal, double-ended arrow cursor appears ❶, right-click on it and drag the arrow to the left to make the palette wider and to the right to narrow it.
To provide enough space for the Palette pane and other interface elements, you may need to resize your Studio application window, which you can do by clicking the Maximize button ❷, if the window is not maximized, or by using your mouse to adjust the window size and aspect ratio.
The Palette pane and the Message Flow canvas share the same height adjustment controls. To increase or decrease the height of these panes, hover your mouse over the boundary line that separates the tabs for the Message Flow pane from the Console pane tabs. After the vertical, double-ended arrow cursor appears ❸, right click your mouse and drag the vertical arrow up to decrease the height of the Palette and Canvas panes or down to increase their height.
Displaying Building Blocks
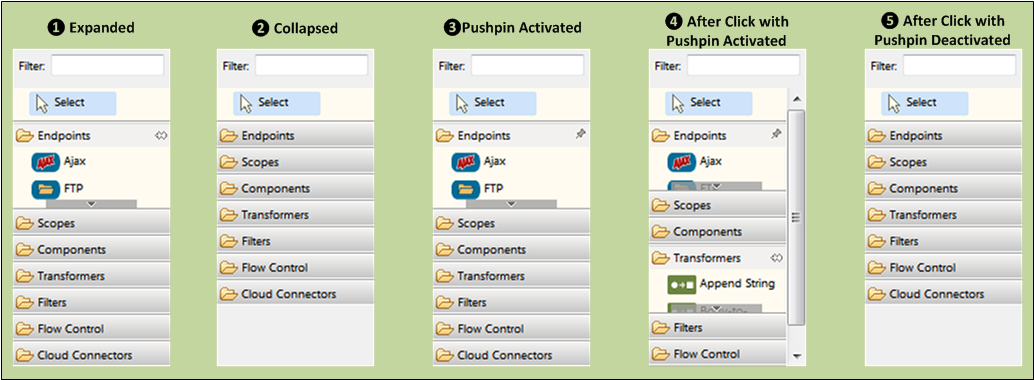
The names of the building blocks groups appear on grey title bars within the Palette pane. Click a title bar to expand ❶ or hide ❷ the underlying group.
If you click the pushpin icon ❸ on the right side of a title bar after expanding the underlying group, that group remains expanded ❹ when you click any other title bar to expand its underlying group. (Note that the vertical scroll bar appears, because title bars or building blocks are obscured). By contrast, if you don’t click the pushpin on the title bar of an expanded group (or click the pushpin an even number of times so that the pushpin ends up deactivated), the underlying group pane will close the next time you click the title bar of some different group ❺.
Depending on the vertical height of your Palette pane, all the building blocks in an expanded group or all the groups on the Palette may not display at the same time. The vertical scroll bar on the right edge of the Palette can help you display obscured title bars (as well as the building blocks in expanded groups).
Within each expanded group, one or two vertical scroll arrows appear whenever members of the group are obscured. As necessary, position you cursor over one or the other vertical scroll arrow and hold down the right mouse button to scroll the obscured building blocks into view.
Using the Building Block Filter
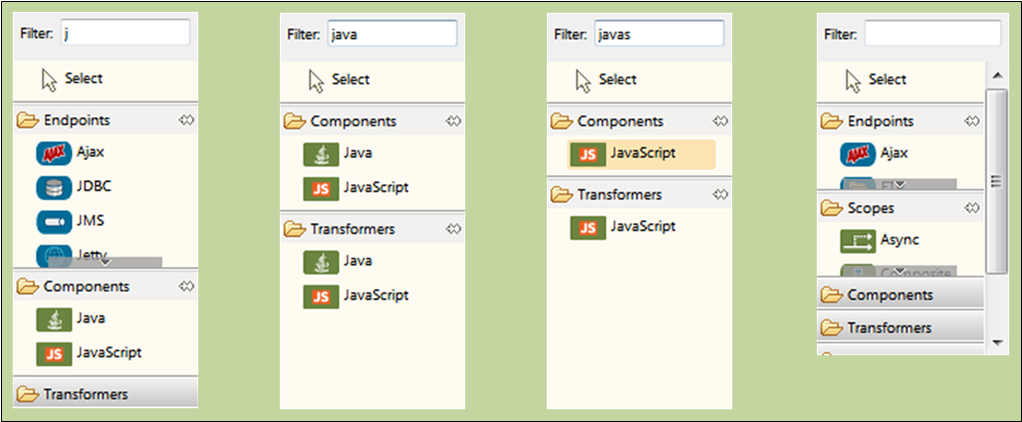
Positioned at the top of the Palette pane, the Palette Filter facilitates searches for building blocks. If you know the name of the building block you want to display in the Palette, simply type any part of that name into the text box to the right of the Filter label. The Palette immediately begins to display every building block whose name includes the string you have typed. For instance, typing j displays all the building blocks whose names contain the letter j. Typing java displays a total of four building blocks: both Java and Javascript in both the Components and Transformer groups. Typing javas displays only the building blocks named Javascript.
To restore all the title bars (and all the building blocks in the expanded groups) to the Palette display, delete from the Filter text box all the search text you previously typed.
Using Hover Help
For a brief description of an individual building block, hover your mouse cursor over the icon associated with that building block.
Deploying a Building Block from the Palette
When you select an icon from the Palette and move it to the Canvas, you are actually transferring a copy of the building block you selected. This ensures that exactly one icon for each type of building block remains within the Palette and is always available for cloning onto the canvas.
Hover your cursor over the building block you want to place on the canvas, hold your left mouse button down, drag the icon to the point on the canvas where you want it to land, then release the left button. Arrows or other indicators appear automatically to indicate how the flow passes through the building block. You can change the position of a building block simply by dragging it to a new location in the flow. New arrows or other markers will appear to indicate the building block’s new relationship to the building blocks that surround it.