Deploying Studio Applications
After modeling, then configuring your Mule Studio application, only two steps remain to put your application to work: debugging, then deploying.

|
Quick Version
|
Debugging an Application
As an Eclipse plugin, Mule Studio incorporates all Eclipse debugging features. Studio’s Debug perspective lets you control the execution of your application by setting breakpoints, suspending launched applications, stepping through your code, or examining the contents of variables.
Refer to see the Eclipse documentation for more information debugging your application.
Opening the Debug Perspective
-
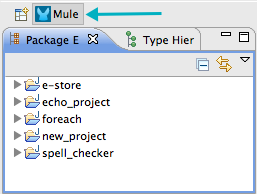
Above the Package Explorer, Studio displays icons that represent the project’s perspectives. By default, the Studio opens the Mule perspective (see below) in which you model and configure your application. Click the table icon next to the Mule perspective, then select Other. . ..
-
In the perspectives panel, select Debug, then click OK.
-
Studio opens the Debug perspective, which looks similar to the Mule perspective, minus the Package Explorer, and including two new panels above the canvas (see below).

-
To close the Debug perspective, right click its icon, the select Close.
Deploying an Application
You can deploy an application developed in Mule Studio in four ways:
-
Deploy on the embedded test server
-
Deploy on a Mule Enterprise server
-
Publish to the Mule Management Console Application Repository
-
Deploy to Cloudhub
Deploy on the embedded test server
Run your application locally, on the Mule server embedded in Studio, to test it. The embedded Mule test server bundled with the Community Edition runs for 12 hours before it must be restarted.
When you specify Run as a Mule Application, Studio automatically builds and deploys your application to the internal Mule server, which starts automatically, if necessary.
-
In the Package Explorer, right-click your project’s name, then select Run As > Mule Application.
-
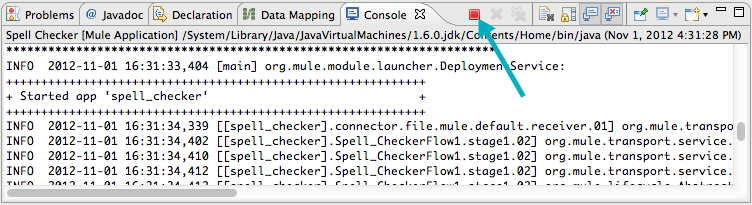
Studio runs the application on the embedded Mule test server. (Unless you stop it, Studio runs the application for a period of 12 hours.) View the application’s activities in the Studio console.
-
To stop the application from running, click the red, terminate button at the top edge of the console.
Deploy on an a Mule Enterprise server
Export the Studio application to a zip file, then run it on a Mule Enterprise server. This approach is ideal for Mule servers in production environments. The zip file contains all the resources (such as code libraries and application metadata) necessary to run the application, and import it into Studio again for further development.
Deploying a Studio-built application in production on an Mule Enterprise server involves three steps:
-
Export the application from Studio
-
Launch the Enterprise server
-
Deploy the application on the Enterprise server
Exporting an Application from Studio
Studio lets you save a project as a Mule Deployable Archive (i.e. zip file). Such a packaged Mule archive provides a convenient method for transferring files between editions of Studio or backing up Studio projects. The package includes all information specific to your application(s), including flows, configuration files, Java classes, referenced HTML files, and more.
-
Right-click the project name in the Package Explorer pane, then select Export . . ..
-
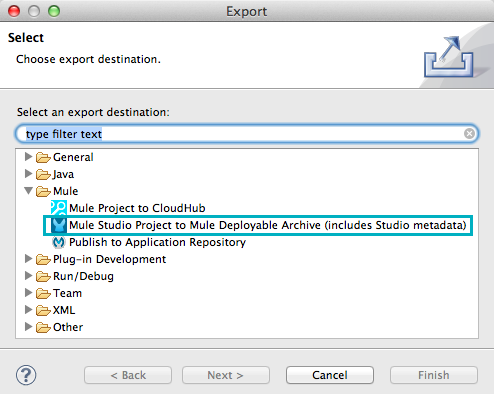
In the Export wizard, click Mule to expand the associated node, select Mule Studio Project to Mule Deployable Archive (includes Studio metadata), then click Next.
-
Select an output folder to which your project archive will be saved, then click Finish.
Launching the Enterprise Server
-
If you do not already have Mule ESB Enterprise Standalone installed on your system, download Mule ESB 3.3 Enterprise Runtime trial.
-
Start Mule.
Need more detail?
+
-
Open a new command line. PC: Open the Console. Mac: Open the Terminal application (Applications > Utilities > Terminal).
-
Access the directory and folder in which you unpacked Mule Standalone (i.e. the application folder in Mule). For example, type
cd /Users/aaron/Downloads/mule-enterprise-standalone-3.3.1/ -
Start Mule. For example, type
./bin/mule
-
Deploying an Application on the Enterprise Server
-
Navigate to the folder on your local drive into which saved your archived Studio application, then copy the zip file.
-
Navigate to the folder that contains your copy of Mule ESB Standalone, then paste the application’s zip file into the
appsfolder. -
Mule polls the
appsfolder every 5 seconds; it picks up the application you copied to theappsfolder, then extracts and deploys it automatically. In the command line, Mule notifies you that it has deployed the application.********************************************************************** * - - + APPLICATION + - - * - - + STATUS + - - * ********************************************************************** * my_first_application * DEPLOYED * * mmc * DEPLOYED * * default * DEPLOYED * * 00_mmc-agent * DEPLOYED * ********************************************************************** INFO 2012-10-29 15:40:57,516 [WrapperListener_start_runner] org.mule.module.launcher.DeploymentService: ++++++++++++++++++++++++++++++++++++++++++++++++++++++++++++ + Mule is up and kicking (every 5000ms) + ++++++++++++++++++++++++++++++++++++++++++++++++++++++++++++ -
If you wish to undeploy your application but keep Mule ESB running, navigate to the
appdirectory and delete the fileyour_application.txt. This removes your application from the/appdirectory. -
To stop Mule ESB from running in the command line, hit CTRL-C.
Publish to the Mule Management Console Application Repository
Publish the application to the Application Repository in the Mule Management Console. Once in the repository, the application can be deployed from the repository to multiple Mule server instances, and even to multi-node Mule clusters. (The Mule Management Console is only available in Mule ESB Enterprise Edition.)
Once in the repository, the application can be deployed from the Repository to multiple Mule server instances and even to multi-node high-availability clusters. To publish an application to the management console’s app repo, you must first download, then install and set-up Mule ESB Standalone with Mule Management Console. Access the management console’s Quick Start Guide to set up a console environment, then complete the following steps to publish your Studio application to its application repository.
-
In Studio, right-click the project name in the Package Explorer pane, then select Mule Management Console > Publish to Application Repository . . ..
-
In the publication wizard, input a value for each of the fields to specify the location, login credentials of your management console, and the settings for your application.
-
Click Finish to publish the app to the repository.
-
Follow the directions in the management console Quick Start Guide to deploy your application to the Mule server (or cluster of servers).
Deploy to CloudHub
Deploy the application to CloudHub, Mule’s platform for cloud-based integration. CloudHub represents the least painful approach for fast, worry-free cloud-to-cloud and cloud-to-premise deployment.

CloudHub is a cloud-based integration Platform as a Service (iPaaS). It provides a convenient way for developers to launch their applications on a cloud platform, while also providing many enhanced features for solving cloud-to-cloud and cloud-to-premise integration problems. Mule Studio is fully integrated with CloudHub and facilitates simple application deployment.
Deploying a Studio-built application to CloudHub involves three steps:
-
Create an Anypoint Platform account.
-
Adapt your Studio application to CloudHub
-
Deploy your Studio application to CloudHub
Creating an Anypoint Platform Account
-
If you have a Mule Community account, simply log into CloudHub using your Community credentials. If you do not have a community account, go to cloudhub.io/signup.html to create an account.
-
Next, visit the Anypoint Platform to log in to the Runtime Manager interface.
For this example, however, we deploy our application directly from Studio, as detailed below.
Adapting an Application for CloudHub
Many projects can be deployed directly to CloudHub. However, some projects require minor modifications, as summarized below.
-
If you are deploying a project that listens on a static port, you need to change the port to a dynamic value so that CloudHub can set it at deployment time. To do so, change your port values to
${http.port}. You can create anapplication.propertiesfile that allows you to run your project locally on a specific port and also on CloudHub as a dynamic port. See the example Hello World on CloudHub for details on how to create this file. -
If using the Jetty component, set the host to
0.0.0.0instead oflocalhost.
Deploying an Application to CloudHub
-
In Studio, right-click the project name in the Package Explorer pane, then select Deploy to Anypoint Platform → Cloud.
-
In the deploymen wizard, enter your Anypoint Platform login credentials, then choose a domain in which to deploy your application. The value you enter must be a unique sub-domain which CloudHub creates for your application on the cloudhub.io domain such as,
My-Project-Name. CloudHub automatically checks the availability of the sub-domain, then displays a checkmark icon to confirm that your entry is unique.
-
Click Finish to deploy your application to CloudHub.
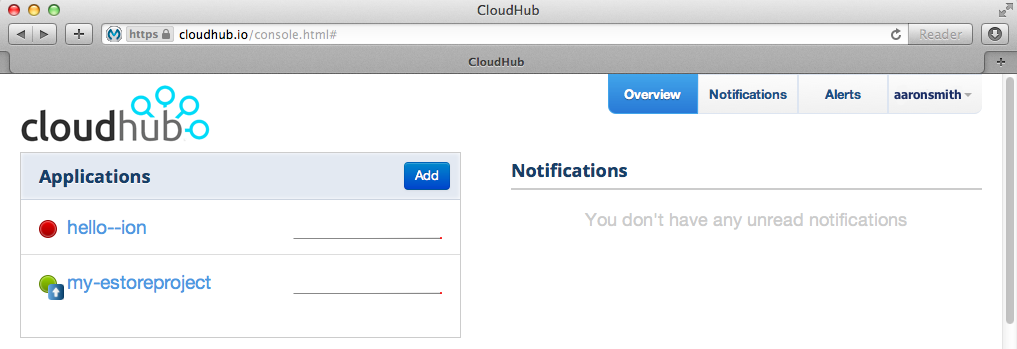
-
On your Web browser, access your Runtime Manager console to view your newly deployed application.