Mule Digital Signature Processor
Adding a Digital Signature to a Message
The Mule Digital Signature Processor adds a digital signature to a message payload, or part of the payload, to prove the identity of the message’s sender. Mule can also verify a signature on a message it receives to confirm the authenticity of the message’s sender. To sign or verify the signature of a message, Mule uses one of the following two Digital Signature Strategies:
-
JCE Signer
-
XML Signer
As the sender of a message, use a digital signature when you want to advise the message’s receiver that you are a legitimate sender and that you vouch for all, or part, of its contents.
Use the table below to determine which type of digital signature strategy best suits your security needs.
| Digital Signature Strategy | Characteristics |
|---|---|
JCE Signer |
• sign a message payload, or part of a payload, using a key and algorithm |
XML Signer |
• sign a message payload, or part of a payload, using a keystore |
As the receiver of a message, use the digital signature feature when you need to verify the identity and confirm the legitimacy of its sender.
JCE Signer
As Mule’s default signature strategy, the Java Cryptology Extension (JCE) signer enriches a message payload with a digital signature.
| This topic introduces the idea of Global Elements; if you are unfamiliar with this functionality, access Understand Global Mule Elements to learn more before proceeding. |
At minimum, you must explicitly define the following:
-
a Global Signature element
-
a Signature message processor in your Mule flow
|
Global vs. Local To apply a digital signature to a message in Mule, you must use two elements, as described above: a Signature message processor in a Mule flow, and a Global Signature element to which the Signature message processor refers for configuration information. The example below uses a Global Signature element to apply most of the attribute configurations of the digital signature, the three minimum configurations Mule needs to apply a digital signature: default signer, algorithm, and key. The example then uses a local Signature message processor within a Mule flow to reference the Global Signature element. However, you can reverse the configuration so that the local Signature message processor contains most of the configuration information – including the minimum configurations – and the Global Signature element contains only the Default Signer type: JCE_SIGNER. Either configuration is fine, though you may wish to use the former if you intend to apply the same type of signature to messages in several flows in your Mule application. In such a case, a global element saves you from coding the same configurations multiple times in one application. Note that any configuration entered in the local message processor will further specify or override any configuration in the global element and will cause the application to refer only to the configurations in the global element which do not conflict with local configurations. For example, you could first configure a global element properties for Algorithm, Keystore Path, and Keystore Password and apply this global element multiple times within one application. Then, within each message processor that references this global element, you can configure the local attributes for Key and Key Password to specify which key within the keystore should be referenced for each specific message processor. You can also select a different Algorithm than the one you configured in the global element – this locally configured algorithm will override the algorithm specified in the global element for this message processor only. |
You can define the required configurations in either the Global Signature element or the local Signature message processor. Note, however, that you can only instruct Mule to use a key in a keystore via the configurations in the Global Signature element.
The following procedure describes how to apply JCE digital signatures to messages processed in a Mule flow.
-
In Mule Studio, double-click to open the Signature message processor’s Pattern Properties panel. Alternatively, add a
signature:signelement to your XML configuration. -
Enter a Display Name for the message processor, then select
Signin the Operation field of the Signature message processor.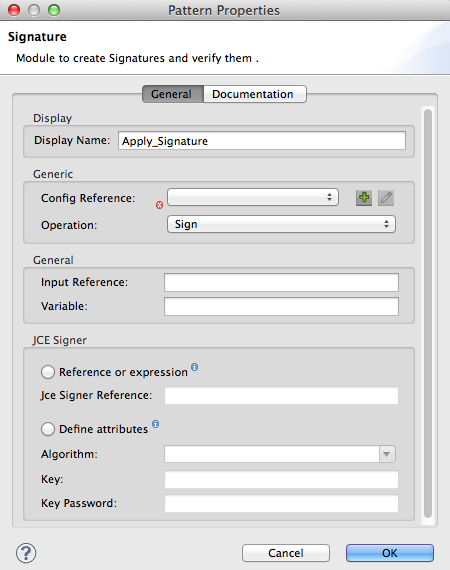
<signature:sign config-ref="" doc:name="Apply_Signature"/> -
In the Input Reference field, identify the payload of the message to which you want to apply the signature. This value must be in byte array format.
-
In the Variable field, indicate the location in which Mule should store the signature which enriches the message.
-
Select one of two radio buttons to choose how to define the attributes of the message processor:
-
select the Reference or expression radio button to use an expression to reference attributes you have defined elsewhere in the XML configuration of your applications, or to reference the configurations defined in a bean.
-
select Define attributes to manually assign values to the attributes listed in the table below. Bold font in the Attribute column indicates a required field; bold font in the Values column indicates default values.
Note that you can apply the required configurations in the Global Signature element, instead of this message processor, if you prefer. Refer to the Global vs. Local tip for more details.Attribute Values Function Algorithm
refer to Appendix
algorithm to encrypt the key, not required if using keystore
Key
unique key that encrypts and decrypts message
-
-
Click the
 icon next to the Config Reference field.
 -
In the Global Element Properties panel, enter a Name for your global element.
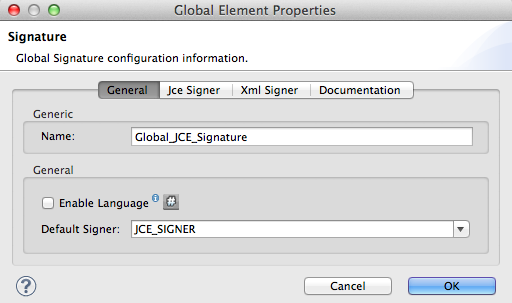
<signature:config name="Global_JCE_Signature" doc:name="Signature"/> -
In the Default Signer field, select
JCE_SIGNER. At this point, you can click OK to save this simple Global Signature element, with no further configurations. If you do, Mule uses the configurations you defined in your local Signature message processor (step 5, above) to digitally sign a message. -
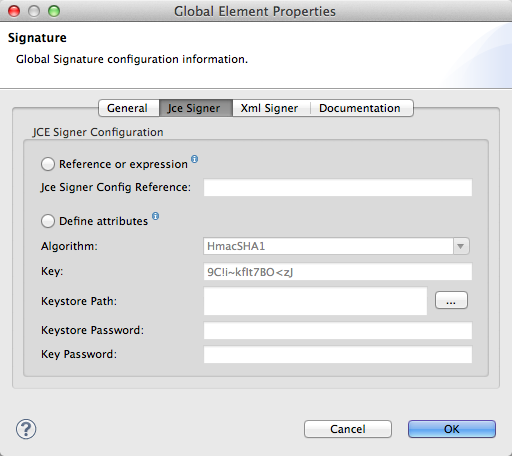
Click the JceSigner tab.
-
Select one of two radio buttons to configure the attributes of the Global element:
-
select the Reference or expression radio button to use an expression to reference attributes you have defined elsewhere in the XML configuration of your applications, or to reference the configurations defined in a bean.
-
select Define attributes to manually assign values to the attributes listed in the table below. Bold font in the Attribute column indicates a required field; bold font in the Values column indicates default values.
-
Note that you can define all the attributes – save Keystore Path and Keystore Password – in the local Signature message processor, if you prefer. Refer to the Global vs. Local tip above for more detail.
| Attribute | Values | Function |
|---|---|---|
Algorithm |
refer to Appendix |
algorithm to encrypt the key, not required if using a keystore |
Key |
unique key that encrypts and decrypts message; or, if using keystore, the name of the specific key within the keystore |
|
Keystore Path |
indicates the location (i.e. filepath) of the keystore file, required if using keystore |
|
Keystore Password |
password to access the keystore, required if using keystore |
|
Key Password |
password to read the key within the keystore; required only if the specific keys within the keystore have their own passwords |
|
If you are using a Keystore, you must also define a Key to specify which key within the keystore the application should invoke. The key can be configured either on the Global Element Properties window or in the Pattern Properties window.
|
-
Click OK to save your Global element configurations.
<signature:config name="Global_JCE_Signature" doc:name="Signature"> <signature:jce-signer-config algorithm="HmacMD5" key="1@s9bl>1LOJ94z4"/> </signature:config> -
Click OK to save your local Signature message processor configurations.
<signature:sign config-ref="Global_JCE_Signature" doc:name="Apply_Signature"/>
XML Signer
The XML signer enriches a message payload with a digital signature.
| This topic introduces the idea of Global Elements; if you are unfamiliar with this functionality, access Understand Global Mule Elements to learn more before proceeding. |
At minimum, you must explicitly define the following:
-
a Global Signature element
-
a Signature message processor in your Mule flow
You can define the required configurations in either the Global Signature element or the local Signature message processor. Refer to the Global vs. Local tip above for more information on how to apply configurations. Note, however, that you can only instruct Mule to use a key in a keystore via the configurations in the Global Signature element.
The following procedure describes how to apply XML digital signatures to messages processed in a Mule flow.
-
In Mule Studio, double-click to open the Signature message processor’s Pattern Properties panel. Alternatively, add a
signature:sign-xmlelement to your XML configuration. -
Select
Sign xmlin the Operation field of the Signature message processor.
<signature:sign-xml config-ref="" doc:name="XML_Signature"/> -
Apply attributes, listed in the table below, to the message processor to instruct Mule how to sign the message payload. Bold font in the Attribute column indicates a required field; bold font in the Values column indicates default values.
Note that you can apply the required attribute configurations in the Global Signature element, instead of this message processor, if you prefer. Refer to the Global vs. Local tip above for more detail.Attribute Values Function Input
whole payload
the payload to which Mule applies the signature; must be a byte array
Key
unique key that encrypts and decrypts message
Reference URI
any URI
external URI reference for messages with a Detached signature type
Digest Method Algorithm
RIPEMD160
SHA1
SHA256
SHA512the algorithm Mule uses to encrypt the digest
Canonicalization Algorithm
EXCLUSIVE
EXCLUSIVE WITH COMMENTS
INCLUSIVE
INCLUSIVE WITH COMMENTSthe algorithm Mule uses for XML canonicalization
Signature Method Algorithm
RSA_SHA1
DSA_SHA1
HMAC_SHA1the algorithm Mule uses to protect the message from tampering
Signature Type
DETACHED
ENVELOPED
ENVELOPINGDefines whether the signature applies to:
• data outside its containing document (detached)
• a part of its containing document (enveloped)
• data it contains within itself (enveloping) -
Click the
icon next to the Config Reference field. -
In the Global Element Properties panel, enter a Name for your global element.
-
In the Default Signer field, select
XML_SIGNER. At this point, you can click OK to save this simple Global Signature element, with no further configurations. If you do, Mule uses the configurations you defined in your local Signature message processor (step 3, above) to digitally sign a message.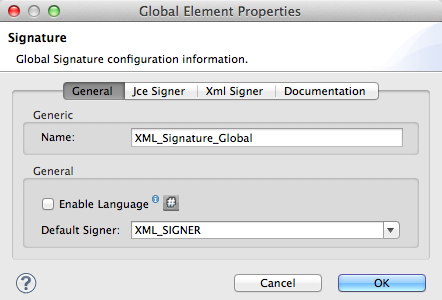
<signature:config name="Global_XML_Signature" doc:name="Signature" defaultSigner="XML_SIGNER"/> -
Click the Xml Signer tab.
-
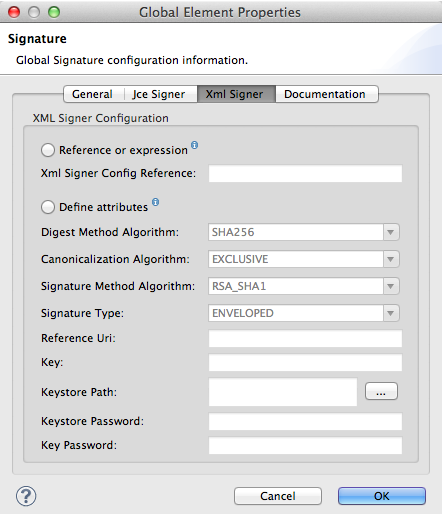
Select one of two radio buttons to configure the attributes of the global element:
-
select the Reference or expression radio button to use an expression to reference attributes you have defined elsewhere in the XML configuration of your applications, or to reference the configurations defined in a bean.
-
select Define attributes to manually assign values to the attributes listed in the table below. Bold font in the Attribute column indicates a required field; bold font in the Values column indicates default values. This table includes only those attributes not listed in the table above, in step 3.
Note that you can define all the attributes – except for Keystore Path and Keystore Password – in the local Signature message processor, if you prefer. Refer to the Global vs. Local tip above for more detail.Attribute Value Function Keystore Path
indicates the location (i.e. filepath) of the keystore file, required if using keystore
Keystore Password
password to read the key stored in the keystore, required if using keystore
If you are using a Keystore, you must also define a Key to specify which key within the keystore the application should invoke. The key can be configured either on the Global Element Properties window or in the Pattern Properties window.
-
If configured in the Global Element Properties window, that key will be invoked for all building blocks which refer to that global element — unless there is a different key specified in the local Pattern Properties window for that building block, because local configuration overrides global configurations.
-
If configured in the local Pattern Properties window, that key will be invoked only for that building block, so any other building blocks in the same flow that also refer to that global element would need a key configured in their Pattern Properties windows.
-
-
-
Click OK to save your Global element configurations.
<signature:config name="Global_XML_Signature" doc:name="Signature" defaultSigner="XML_SIGNER"> <signature:xml-signer-config digestMethodAlgorithm="SHA512" key="1@s9bl>1LOJ94z4"/> </signature:config> -
Click OK to save your local Signature message processor configurations.
<signature:sign-xml config-ref="Global_XML_Signature" doc:name="XML_Signature"/>
Example of a Signed Payload
What follows are examples of a message payloads: one without a digital signature (below, top), and one with an XML digital signature (below, bottom).
View the XML Without Digital Signature
<PurchaseOrder>
 <Item number="130046593231">
  <Description>Video Game</Description>
  <Price>10.29</Price>
 </Item>
 <Buyer id="8492340">
  <Name>My Name</Name>
  <Address>
   <Street>One Network Drive</Street>
   <Town>Burlington</Town>
   <State>MA</State>
   <Country>United States</Country>
   <PostalCode>01803</PostalCode>
  </Address>
 </Buyer>
</PurchaseOrder>
View the XML With Digital Signature
<PurchaseOrder>
 <Item number="130046593231">
  <Description>Video Game</Description>
  <Price>10.29</Price>
 </Item>
 <Buyer id="8492340">
  <Name>My Name</Name>
  <Address>
   <Street>One Network Drive</Street>
   <Town>Burlington</Town>
   <State>MA</State>
   <Country>United States</Country>
   <PostalCode>01803</PostalCode>
  </Address>
 </Buyer>
<Signature xmlns="http://www.w3.org/2000/09/xmldsig#"><SignedInfo><CanonicalizationMethod Algorithm="http://www.w3.org/2001/10/xml-exc-c14n#"/><SignatureMethod Algorithm="http://www.w3.org/2000/09/xmldsig#rsa-sha1"/><Reference URI=""><Transforms><Transform Algorithm="http://www.w3.org/2000/09/xmldsig#enveloped-signature"/></Transforms><DigestMethod Algorithm="http://www.w3.org/2001/04/xmlenc#sha256"/><DigestValue>tkrLEansVMTKqAOuW6b8Dx+OUNWk9bVpW6RFvfuEmM8=</DigestValue></Reference></SignedInfo><SignatureValue>PeeHVw+XvZkkhhPlEopRp1PBDfTcR9U2IBimTTo1gOMF5cWq1tFqZ0B4ScNBiZVtd0yS4j06xl3W
B2Q87oobwA==</SignatureValue><KeyInfo><KeyValue><RSAKeyValue><Modulus>i8OP+VX/EORWwHiHiqLmMgpXz4IubPv2y+gHdiSCUzKoFfUYD6wFGBwi6vVmRSrmNbNZvZ9DFvST
PZJEyUhn5w==</Modulus><Exponent>AQAB</Exponent></RSAKeyValue></KeyValue></KeyInfo></Signature></PurchaseOrder>
Signing Part of a Message Payload
By default, Mule signs the entire message payload when you apply a signature. However, you can use a Mule Expression to sign a specific part of a message payload rather than the whole payload. Enter a Mule expression in the Input Reference field of a JCE or XML Signature message processor to define the specific part(s) of the payload you wish to sign.
Applying a Signature Using MEL
As described above, to apply a digital signature to a message in Mule, you normally need two ingredients:
-
a Global Signature element which defines all, or some, of the signature attributes
-
a Signature message processor in a Mule flow which defines all, or some, of the signature attributes
However, you can also add a signature to a message without adding a Signature message processor to a Mule flow. To do so, you need:
-
a Global Signature element which defines all of the signature attributes
-
a Mule expression appended to a message processor as message attribute, which references the Global Signature element to apply a signature to the message
To reference a Global Signature element via Mule expression in another element, you must first set the Global Signature element’s Enable Language attribute to true (below, left), then apply all the Global Signature attributes (below, right).
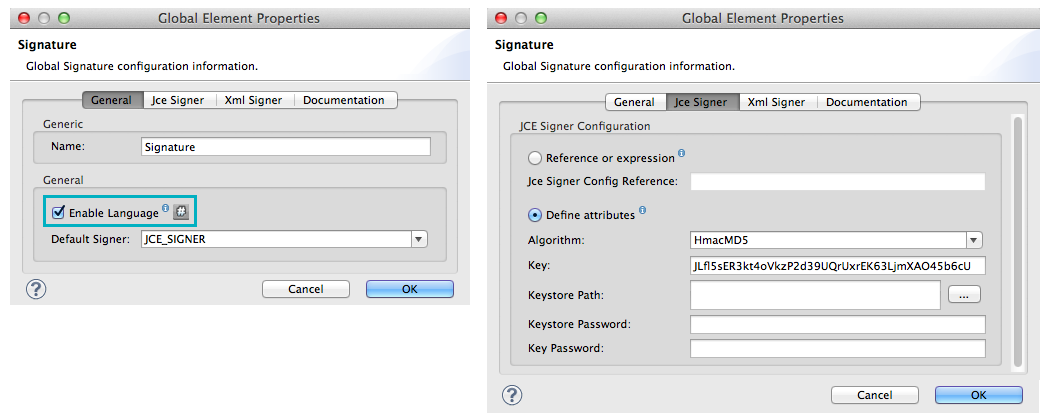
<signature:config name="hmacPlain" enableLanguage="true">
        <signature:jce-signer-config algorithm="HmacMD5" key="JLfl5sER3kt4oVkzP2d39UQrUxrEK63LjmXAO45b6cU="/>
</signature:config>
Then, add a message attribute to an element in your flow, a Logger, for example, to apply a digital signature according to the configurations in the Global Signature element.
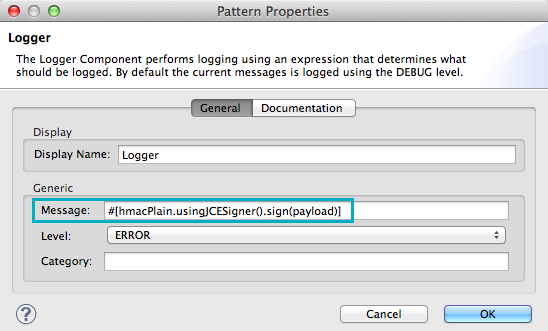
<flow name="testHmacPlain">
        <logger level="ERROR" message="#[hmacPlain.usingJCESigner().sign(payload)]"/>
 </flow>
Verifying a Digital Signature
In addition to signing a message, Mule also uses a Signature message processor to verify the identity of a message’s sender as legitimate. Where Mule discovers an invalid signature, it discards the message, processing it no further.
Mule verifies the signature on the message payload according to the configurations of any of the optional attributes if explicitly defined (see lists above for JCE- and XML-specific attributes).
| This topic introduces the idea of Global Elements; if you are unfamiliar with this functionality, access Understand Global Mule Elements to learn more before proceeding. |
To verify JCE or XML signatures on messages in a Mule flow, you must, at minimum, create:
-
a Global Signature element
-
a Signature message processor in your Mule flow
The following procedure describes how to verify digital signatures on messages a Mule flow receives.
-
In your Mule flow, add a Signature message processor early in your flow in Studio to verify signatures on messages that arrive to be processed.
-
In the Operations field, select
Verify Signature. Alternatively, add a Signature element to your flow, configured to verify signatures (see code, below).<signature:verify-signature config-ref="" doc:name="Signature"/> -
Use the Using field (or
usingattribute in XML) to indicate the type of signature:` JCE_SIGNER` orXML_SIGNER. -
Optionally, enter a Mule expression in the Input Reference field to indicate the part of the message payload to which the signature applies. In other words, a signature may apply to only part of the message payload.
-
In the Expected Signature field, enter a Mule expression that Mule can use to compare and verify that the signature on a message it received is authentic.
-
Configure any other attributes of the local Signature message processor. Refer to the JCE Signer and XML Signer sections above for attribute configuration details. Also, refer to the Global vs. Local tip to decide which attributes to configure locally, on the Signature message processor, and which attributes to configure in the Global Signature element.
-
Configure any other attributes of a Global Signature element. Again, refer to the JCE Signer and XML Signer sections above for attribute configuration details.
-
Configure the Signature message processor to reference the Global Signature element.
<signature:config name="Signature" enableLanguage="true" doc:name="Signature"> <signature:jce-signer-config algorithm="HmacMD5" key="JLfl5sER3kt4oVkzP2d39UQrUxrEK63LjmXAO45b6cU="/> </signature:config> ... <flow name="Get_CC_information" doc:name="Get_CC_information"> <http:inbound-endpoint exchange-pattern="request-response" host="localhost" port="8081" doc:name="HTTP"/> <signature:verify-signature config-ref="Signature" input-ref="#[message.inboundProperties['user']]" expectedSignature="#[message.inboundProperties['token']]" doc:name="Verify User Signature" doc:description="Verify if the Signature is correct, so we can validate the User"/> <set-payload value="#[new String("<user><name>Royal Bank of Canada</name><id>Royal_Bank_Of_Canada</id><cc><company>Visa</company><number>1234567890</number><secret>123</secret></cc></user>")]" doc:name="Set Payload"/> <encryption:encrypt config-ref="plainXml" doc:name="Encrypt the XML (only th CC Info)" using="XML_ENCRYPTER" input-ref="#[payload.toString()]"/> </flow>
Next Steps
Examine the Anypoint Enterprise Security Example Application which illustrates how to verify the digital signature of a message.
Appendix
| JCE Signer Available Algorithms |
|---|
HmacMD5 |
HmacSHA1 |
HmacSHA256 |
HmacSHA384 |
HmacSHA512 |
MD2WithRSAEncryption |
MD4WithRSAEncryption |
MD5WithRSAEncryption |
RIPEMD128WithRSAEncryption |
RIPEMD160WithRSAEncryption |
RIPEMD256WithRSAEncryption |
SHA1WithRSAEncryption |
SHA224WithRSAEncryption |
SHA256WithRSAEncryption |