Setting Up Eclipse for Use with Maven
When you work with Mule ESB, you can make configuration and development much easier by using an IDE. The simplest approach is to use the Mule IDE with Eclipse and Maven. This page describes how to set up Mule using Maven and Eclipse 3.6 (Helios), which you can download here (download the Eclipse IDE for Java EE Developers).
Setting up a Maven Development Environment
-
Download the Maven distribution from the Maven web site and unpack it to any folder (for example,
C:\Apache). Since there were some critical bugs in earlier versions, Maven 2.0.9 is recommended. If you are using a Macintosh, you must use Maven 2.0.9. -
Create a Maven repository directory with no spaces in the path, such as
c:\.m2\repositoryon Windows. (If Windows Explorer does not allow you to create the .m2 folder name, use themkdircommand in a console window instead.) -
Open the
settings.xmlfile in your Mavenconfdirectory (e.g.,c:\apache-maven-2.0.9\conf) and specify the repository directory. For example:<localRepository>c:/.m2/repository</localRepository>
Ensure that this entry is not commented out in this file.
Generate the Eclipse Project
You generate the Eclipse project by typing the following command:
mvn eclipse:eclipse
You can now configure Eclipse and import the project.
Configure Eclipse
You only need to configure Eclipse once. With subsequent projects, you can skip these steps.
-
Start Eclipse.
-
In the Workspace Launcher, specify the location of the examples directory under your Mule home directory (such as C:\mule\examples), and click OK.
-
Click the Workbench icon on the right to display the workbench.
-
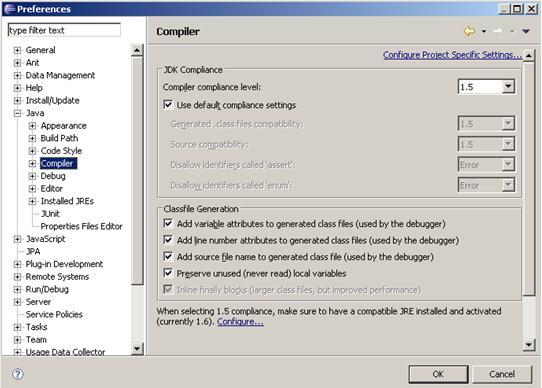
Choose Window > Preferences.
-
Expand Java in the navigation tree, click Compiler, and then change the compiler compliance level to 1.5.
-
Click Installed JREs. If the JRE is not version 1.5, click Edit, click Directory and navigate to your JDK1.5 directory, and then change the JRE name to
jdk5. Click Finish, and then click OK. -
When prompted to rebuild, click No.
Import the Eclipse Project
-
In the Workbench window of Eclipse, choose File > Import.
-
Expand General, click Existing Projects into Workspace, and then click Next.

Configure the Eclipse Build Path
You only need to take these steps once. Future Mule projects will use the same build path.
-
In the Project Explorer, right-click the hello project and choose Build Path > Configure Build from the popup menu.
-
In the Properties dialog box, click the Libraries tab, and then click Add Library.
-
Click User Library and click Next.
-
Click User Libraries, and then in the Preferences dialog box, click New.
-
In the New User Library dialog box, enter MULE_LIB and click OK.
-
Click Add JARs, navigate to the
\lib\muledirectory under your Mule home directory, select all the JARs, and click Open. -
Click OK and then Finish.
-
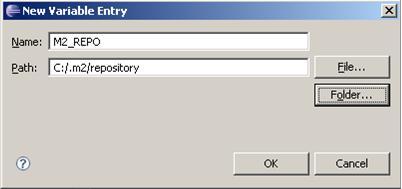
Click Add Variable, click Configure Variables, and then in the Preferences dialog box, click New.
-
In the New Variable Entry dialog box, create a variable called M2_REPO that points to your Maven repository (such as C:\.m2\repository), which you created when you installed Maven. Click OK.
You can now add flows to the configuration, write POJOs as needed, debug your code, and compile and run your code, all within the IDE.
If you are building Mule ESB from source or including Mule artifacts in your Maven project, it may be necessary to add the 'mule-deps' repository to your Maven configuration. This repository contains third-party binaries which may not be in any other public Maven repository.