Connect with Salesforce Example
Enterprise, CloudHub
This application uses pre-packaged tools to intelligently connect with Salesforce. Based on a simple use case, the application takes a CSV file of contacts and uploads the contact information to an active Salesforce user account. It uses Mule DataSense and the Anypoint DataMapper Transformer to map and transform data, thereby facilitating quick integration with this Software as a Service (SaaS) provider.
This document describes the details of the example within the context of Mule Studio, Mule ESB’s graphical user interface, and includes configuration details for XML Editor where relevant.
Connect with Salesforce
At times, you may need to connect one or more of your organization’s on-premise systems with a SaaS such as Salesforce. Ideally, these independent systems would talk to each other and share data to enable automation of end-to-end business processes. Use Mule applications to facilitate communication between your on-prem system(s) and Salesforce. (Though this use case does not extend as far, you can also use Mule to facilitate communication between SaaS providers.)
Example Use Case
Though a simple example, this application nonetheless employs complex functionality to demonstrate a basic use case. The application accepts CSV files which contain contact information – name, phone number, email – and uploads them into a Salesforce account, automatically inserting the correct data into each Salesforce field.

Set Up and Run the Example
Complete the following procedure to create, then run this example in your own instance of Mule Studio. Skip ahead to the [How it Works] if you prefer to simply examine this example via screenshots and code snippets.
To witness end-to-end functionality, you must have an active Salesforce account into which you don’t mind inserting three sample contacts. After this application automatically uploads these contacts, you can manually delete them in your Salesforce account.
-
Create the example application in Mule Studio. Do not run the application.
-
Log in to your Salesforce account. From your account menu (your account is labeled with your name), select Setup.
-
In the left navigation bar, under the My Settings heading, click to expand the Personal folder.
-
Click Reset My Security Token. Salesforce resets the token and emails you the new one.
-
Access the email that Salesforce sent and copy the new token onto your local clipboard.
-
In your SaaS Integration application in Mule Studio, click the Global Elements tab.
-
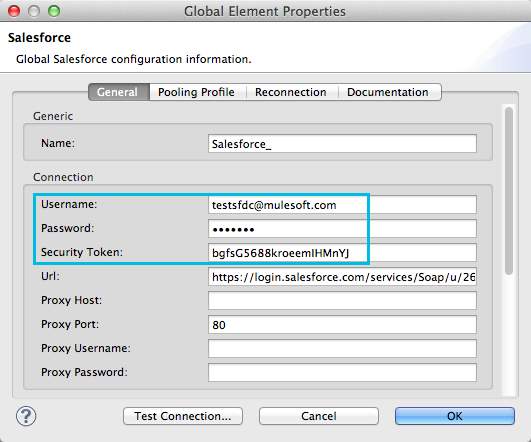
Double-click the Salesforce global element to open its Global Element Properties panel. In the Security Token field, paste the new Salesforce token you copied from the email. Alternatively, configure the global element in the XML Editor.
Alternatively, in the Studio XML Editor:
<sfdc:config name="Salesforce" username="testsfdc@mulesoft.com" password="password" doc:name="Salesforce" securityToken="bgfsG5688kroeemIHMnYJ"> <sfdc:connection-pooling-profile initialisationPolicy="INITIALISE_ONE" exhaustedAction="WHEN_EXHAUSTED_GROW"/> </sfdc:config> -
Change the contents of the Username and Password fields to your account-specific values, then click OK to save your changes.
-
Back in the connector’s Properties Editor, set the Operation to 'Create' and the sObject Type to 'Contact'.
-
In the Package Explorer, right-click the SaaS Integration project name, then select Run As > Mule Application. Studio runs the application on the embedded server.
-
This project includes a sample CSV file, called
contacts.csv, that you can use to witness end-to-end functionality of the application. In the Package Explorer, click thesrc/test/resourcesfolder to expand it, then find thecontacts.csvfile inside this folder. -
Click and drag the
contacts.csvfile into theinputfolder in the same directory. -
The File Endpoint in the application polls the
inputfolder every ten seconds. It picks up the CSV file, processes it, then deposits it into theoutputfolder in the same directory. (Hit F5 to refresh the contents of theinputandoutputfolders.) -
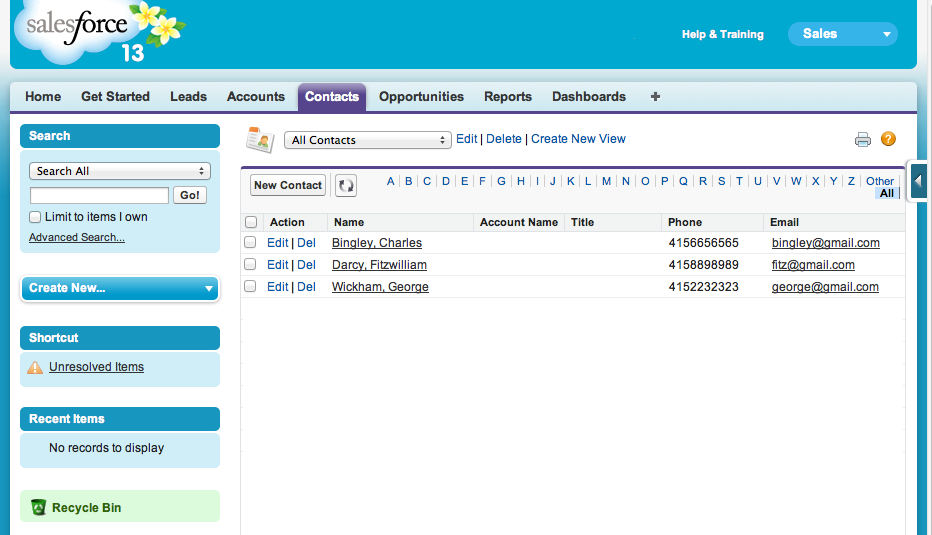
In your browser, access your Salesforce account, then navigate to the Contacts tab.
-
Use the drop-down menu to display All Contacts, then scan your contacts for three new entries:
-
Charles Bingley
-
Fitzwilliam Darcy
-
George Wickham
-
-
Stop the Mule application by clicking the square, red terminate button in the Console.
-
Delete the three sample contacts from your Salesforce account.
How it Works (Studio Visual Editor)
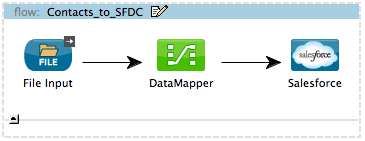
Using a single flow with three elements, this application accepts CSV files which contain contact information, then uploads the contacts to Salesforce.
The File Endpoint polls the input folder for new files every ten seconds. When it spots a new file, it reads it and passes the content to the DataMapper Transformer. This transformer not only converts the format of the data from CSV to a collection, it automatically maps the input fields from the CSV file – FirstName, LastName, etc. – to output fields that Salesforce uses in a collection. Each mapping earns an arrow which helps you to visualize the activity that occurs within the DataMapper transformer. When it has converted all the contacts in the file to a collection of Salesforce-friendly data, the application uses a Salesforce Connector to push data into your Salesforce account. The connector’s configurations specify the operation – Create – and the sObject type – Contact – which dictate exactly how the data uploads to Salesforce; in this case, it creates new contacts.
While the application’s functionality is relatively straightforward, the beauty of this project is illustrated through its use of DataSense. Rather than building the application serially – adding, then configuring each of the elements manually according to the order in which they appear in the flow– you can use DataSense to complete the most difficult configurations automatically. The following steps outline the process to build this application.
-
Set a File endpoint into your application, completing the simple configuration to enable it poll a specific folder for input files.
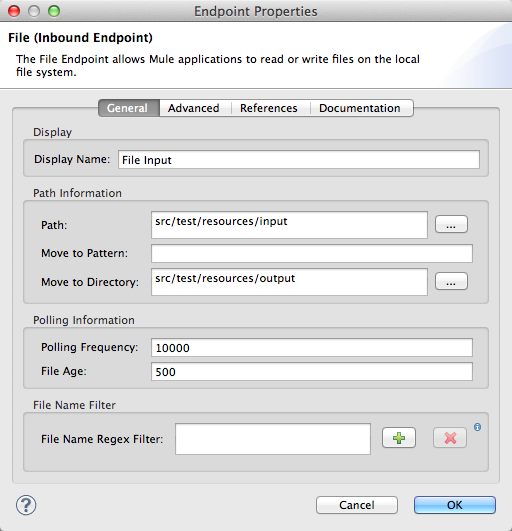
Field
Value
Display Name
File InputPath
src/test/resources/inputMove to Directory
src/test/resources/outputPolling Frequency
10000 -
Next, add a Salesforce Connector to the flow. At this point, you can configure the connector with your Salesforce account-specific details and test the connection to Salesforce. Not only does the embedded Mule DataSense functionality confirm that you have a clear channel for communication, it gathers metadata about Salesforce objects and the type of data it accepts. (The value of this metadata becomes apparent with the introduction of a DataMapper into the flow further in this procedure.)
-
Modify the display name for the connector, if you wish, then click the plus sign next to the Config Reference drop-down to create a new Global Element.
-
Select the Salesforce global element, then click OK.
-
Enter values in the U sername, P assword and Security token fields, then click OK. (See the Set Up section above for details on how to acquire the security token.) Notice that Studio automatically enables DataSense in the global element.
-
-
When you click OK, Mule tests the connection to Salesforce (see image below). With a valid username, password and security token, the connection test results in success and Mule saves your global element configurations. If any of the values are invalid, the connection test results in failure, and Mule does not save the global element, prompting you to correct the invalid configurations.

-
Back in the Salesforce connector General Tab, use the drop-down menus to select the Operation and sObject Type. Because the DataSense activity has gathered metadata about Salesforce’s operations and data sObject types, Mule is able to present a list of Salesforce-specific values in the drop-down menus for each of these fields (see image below).
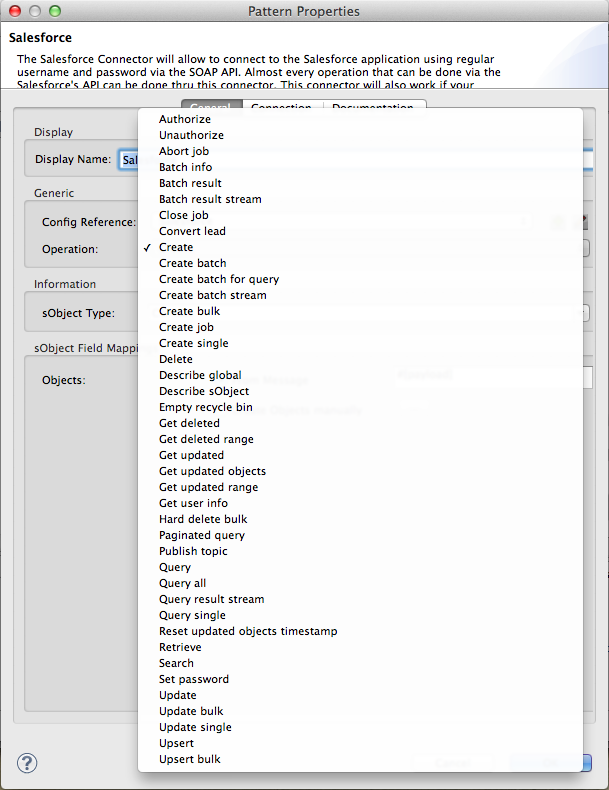
Field Value Operation
Create
sObject Type
Contact
-
Having defined the Salesforce-friendly output, you can then drop a DataMapper between the elements in the flow to map CSV input fields to Salesforce output fields. Because DataSense has already acquired the operation and sObject information from Salesforce, the DataMapper demands that you configure only the input values (below, left). In this example application, we used an existing CSV example to define the input fields in DataMapper (below, right).
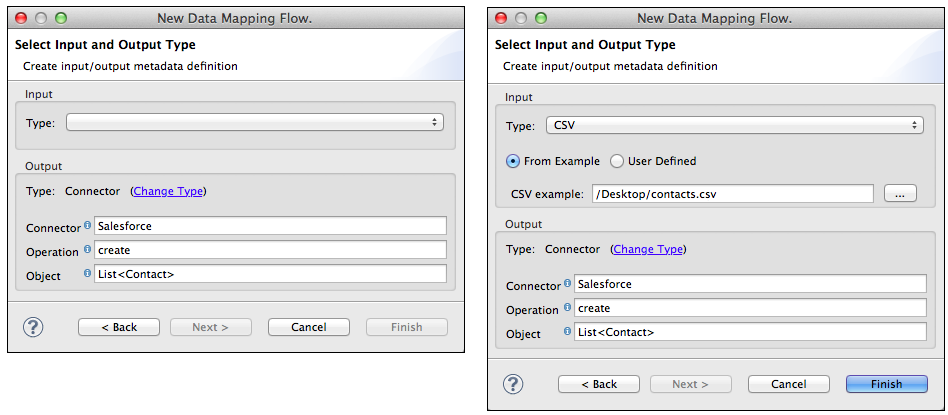
-
When you save the DataMapper configurations, Mule maps input fields to output. Where the input and output fields have identical names, DataMapper intelligently, and automatically, maps input to output, as with the fields in this example application. Otherwise, you can map input to output manually by clicking and dragging input fields to output fields in the Data Mapping Console.
-
The configuration now complete, you can save, then run the application. Feed CSV files with contact information into the input folder, and watch the new contents appear in your Salesforce account (see image below).
How it Works (Studio XML Editor)
<file:inbound-endpoint path="src/test/resources/input" moveToDirectory="src/test/resources/output" pollingFrequency="10000" responseTimeout="10000" doc:name="File Input"/>Attributes and values are:
-
path:
src/test/resources/input -
moveToDirectory:
src/test/resources/output -
pollingFrequency:`10000`
-
doc:name:
File Input
<sfdc:config name="Salesforce" username="testsfdc@mulesoft.com" password="password"  doc:name="Salesforce" securityToken="bgfsG5688kroeemIHMnYJ">

        <sfdc:connection-pooling-profile initialisationPolicy="INITIALISE_ONE" exhaustedAction="WHEN_EXHAUSTED_GROW"/>

    </sfdc:config>
<flow>
...
</flow>
<?xml version="1.0" encoding="UTF-8"?>
<mule xmlns:data-mapper="http://www.mulesoft.org/schema/mule/ee/data-mapper" xmlns:sfdc="http://www.mulesoft.org/schema/mule/sfdc" xmlns:file="http://www.mulesoft.org/schema/mule/file" xmlns:tracking="http://www.mulesoft.org/schema/mule/ee/tracking" xmlns="http://www.mulesoft.org/schema/mule/core" xmlns:doc="http://www.mulesoft.org/schema/mule/documentation" xmlns:spring="http://www.springframework.org/schema/beans" version="EE-3.4.0" xmlns:xsi="http://www.w3.org/2001/XMLSchema-instance" xsi:schemaLocation="
http://www.mulesoft.org/schema/mule/file http://www.mulesoft.org/schema/mule/file/current/mule-file.xsd
http://www.mulesoft.org/schema/mule/ee/data-mapper http://www.mulesoft.org/schema/mule/ee/data-mapper/current/mule-data-mapper.xsd
http://www.mulesoft.org/schema/mule/sfdc http://www.mulesoft.org/schema/mule/sfdc/5.0/mule-sfdc.xsd
http://www.springframework.org/schema/beans http://www.springframework.org/schema/beans/spring-beans-current.xsd
http://www.mulesoft.org/schema/mule/core http://www.mulesoft.org/schema/mule/core/current/mule.xsd
http://www.mulesoft.org/schema/mule/ee/tracking http://www.mulesoft.org/schema/mule/ee/tracking/current/mule-tracking-ee.xsd ">
<sfdc:config name="Salesforce" username="testsfdc@mulesoft.com" password="password" doc:name="Salesforce" securityToken="bgfsG5688kroeemIHMnYJ">
<sfdc:connection-pooling-profile initialisationPolicy="INITIALISE_ONE" exhaustedAction="WHEN_EXHAUSTED_GROW"/>
</sfdc:config>
<data-mapper:config name="datamapper_grf" transformationGraphPath="datamapper.grf" doc:name="DataMapper"/>
<flow name="Contacts_to_SFDC" doc:name="Contacts_to_SFDC" doc:description="Upload a csv file of contact information into Salesforce as new contacts.">
<file:inbound-endpoint path="src/test/resources/input" moveToDirectory="src/test/resources/output" pollingFrequency="10000" responseTimeout="10000" doc:name="File Input"/>
<data-mapper:transform config-ref="datamapper_grf" doc:name="DataMapper"/>
<sfdc:create config-ref="Salesforce" type="Contact" doc:name="Salesforce">
<sfdc:objects ref="#[payload]"/>
</sfdc:create>
</flow>
</mule>Documentation
Studio includes a feature that enables you to easily export all the documentation you have recorded for your project. Whenever you want to share your project with others outside the Studio environment, you can export the project’s documentation to print, email or share online. Studio’s auto-generated documentation includes:
-
A visual diagram of the flows in your application
-
The XML configuration which corresponds to each flow in your application
-
The text you entered in the Documentation tab of any building block in your flow