Installing Connectors
Installing Connectors
Beyond those included with the out-of-the-box version of Mule Studio, there are many more Anypoint Connectors you can download and use in your Mule applications to connect to third-party APIs. If you want to add to your catalog of Mule Studio connectors, you can download many more from the MuleStudio Connectors Update Site. If you don’t use Mule Studio, you can install the appropriate Maven dependencies into your pom.xml file.
Mule Studio
-
Under the
Helpmenu in Mule Studio, selectInstall New Software.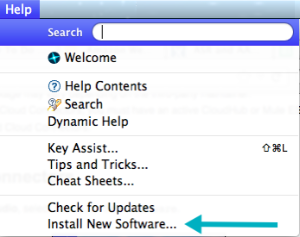
-
In the Work with: field in the Install wizard, use the drop-down menu to select
MuleStudio Cloud Connectors Update Site.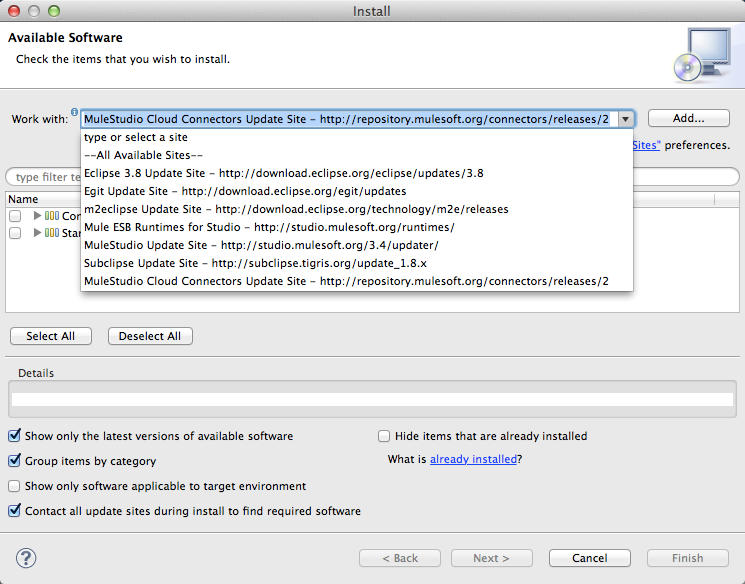
-
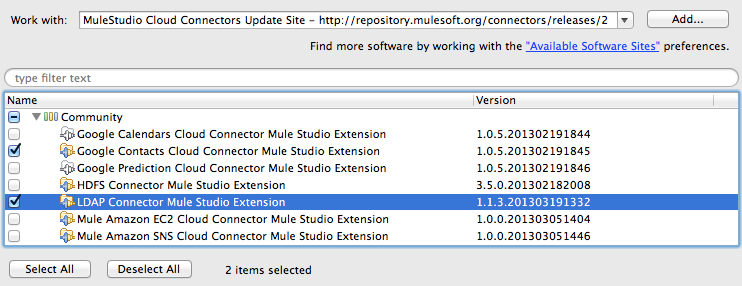
Expand the node(s) for Community and/or Standard to view the connectors available for download.
-
Check the box next to one or more connectors to select those you wish to use, then click Next.
-
Review your selections in the Install Details screen of the wizard, then click Next.
-
Select I accept the terms of the license agreements in the Review Licenses screen, then click Finish.
-
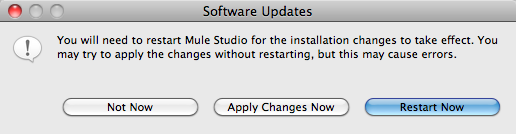
Click Restart Now to complete the installation.
-
Mule restarts Studio, displaying the new connectors in the palette.
Maven
Refer to the connector-specific instructions linked from the connectors site for installation instructions and copy-pasteable code that you can add to your pom.xml file to install the connector as a Maven dependency (recommended).
Uninstalling Connectors
Mule Studio
-
Under the
Mule Studiomenu in Mule Studio, selectAbout Mule Studio.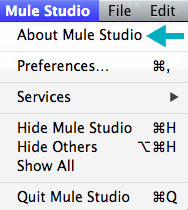
-
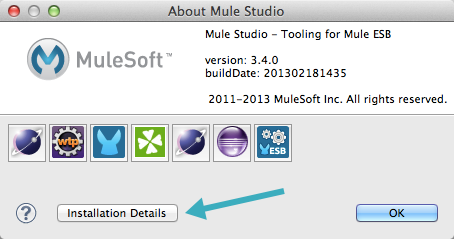
In the About Mule Studio panel, click Installation Details to display a list of the connectors you have installed on your instance of Mule Studio.
-
In the Installed Software tab, select the line item you wish to uninstall, then click Uninstall….
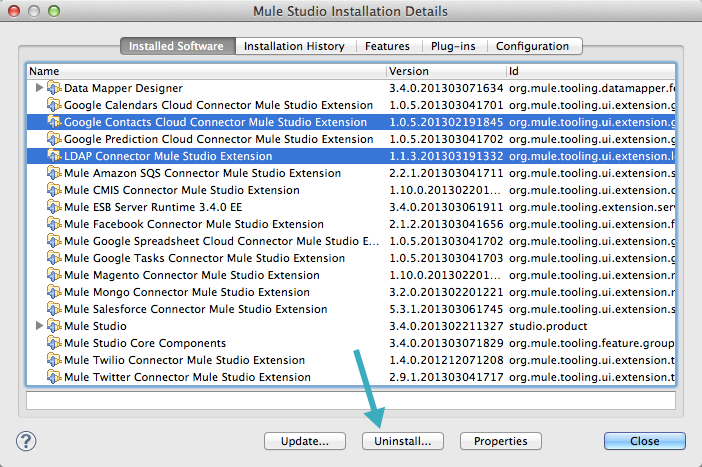
To uninstall more than one item, click to select the first line item, then hold down the CRTLkey (PC) orcommandkey (Mac) as you click other line items. -
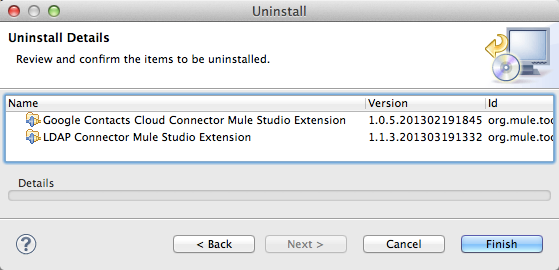
Click Finish to uninstall the item(s) you selected.
Maven
To uninstall a connector, remove the Maven dependency for that connector from your pom.xml file.
Dependencies
Mule Studio
When you add a connector to your flow, Studio automatically adds all of its dependencies (including .jar files) to your project’s classpath. Mule manages each connector’s dependencies as an Eclipse user library. Because Studio adds a connector’s dependencies to your project’s classpath, you can reference connector classes within other projects in your Mule Studio instance.
Manually Adding Connector Dependencies
Complete the following procedure to manually add connector dependencies to your project’s classpath in Studio.
-
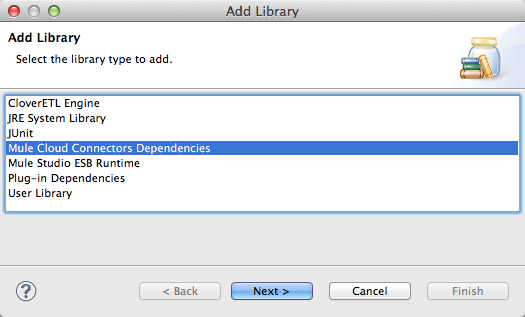
In the Package Explorer pane, right-click on your project’s name, then select Build Path > Add Libraries.
-
In the Add Libraries wizard, select Mule Cloud Connector Dependencies, then click Next.
-
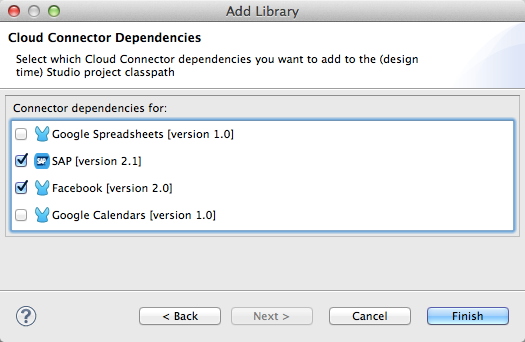
Check the boxes associated with the connector dependencies you wish to add to your project’s classpath.
-
Click Finish to add the dependencies.
Maven
If you are installing a connector as a Maven dependency, ensure that you complete the following three steps for each connector:
-
To make any connector module available to a Mavenized Mule application, first add the following repositories to your
pom.xmlfile:<repositories> <repository> <id>mulesoft-releases</id> <name>MuleSoft Repository</name> <url>https://repository.mulesoft.org/releases/</url> <layout>default</layout> </repository> <repository> <id>mulesoft-snapshots</id> <name>MuleSoft Snapshot Repository</name> <url>https://repository.mulesoft.org/snapshots/</url> <layout>default</layout> </repository> </repositories> -
Then add the module as a dependency to your project, replacing
insert-artifactId-herewith the artifactId of the specific module you are adding and replacing RELEASE with the version of this module.<dependency> <groupId>org.mule.modules</groupId> <artifactId>insert-artifactId-here</artifactId> <version>RELEASE</version> </dependency> -
If you plan to use this module inside a Mule application, you need to add it to the packaging process. As such, the final zip file which will contain your flows and Java code will also contain this module and its dependencies. Add a special inclusion to the configuration of the Mule-Maven plugin for this module, replacing
insert-artifactId-herewith the artifactId of the specific module you are adding.
<plugin>
    <groupId>org.mule.tools</groupId>
    <artifactId>maven-mule-plugin</artifactId>
    <extensions>true</extensions>
    <configuration>
        <excludeMuleDependencies>false</excludeMuleDependencies>
        <inclusions>
            <inclusion>
                <groupId>org.mule.modules</groupId>
                <artifactId>insert-artifactId-here</artifactId>
            </inclusion>
        </inclusions>
    </configuration>
</plugin>
See Also
-
Read more about using Anypoint Connectors.
-
Review full connector-specific documentation, including video demonstrations and complete code samples, on the connectors site.
-
Learn how to build your own Mule extensions with Anypoint Connector DevKit.