Using a Connector to Access an OAuth API
Mule offers a sizable collection of connectors you can insert into a flow and use in a plug-and-play fashion. In some cases, these connectors make use of an OAuth security protocol to manage user identities. In these cases, using the connector involves a few additional steps. Mule simplifies the implementation of the OAuth protocol to a great extent, and the remaining steps to configure a connector to use OAuth are explained in this document.
Assumptions
This page assumes an understanding of basic Mule Concepts, Message Sources, Message Processors, and Global Elements.
What is OAuth?
OAuth (Open standard for Authorization) is a method for allowing an application to have limited access to a protected resource via a 3rd-party Web service. In other words, OAuth provides a secure way for a Web service to gain limited, temporary access to a resource, such as a user account, via another Web service.
OAuth allows a Web service provider to:
-
grant consumers of the Web service limited access to secure data
-
avoid disclosing an end user’s access credentials to a Web service consumer
-
retain the authority to revoke the consumer’s access to an end user’s secure data at any time
There are currently two versions of OAuth that are generally in use: OAuth1 and OAuth2. This document will explain the process for dealing with OAuth2. OAuth1 implementation details vary from connector to connector, so please read your specific connector’s documentation if you need to consume OAuth1.
Using a Connector with OAuth2
To better explain the procedure, this document will walk through an example of building a Mule flow that uses OAuth with a Salesforce connector.
Acquire OAuth Tokens
To implement OAuth2 into your connector, you must first acquire a consumer key and a secret from the application you are going to connect to. This procedure varies from one service provider to another, so look for the documentation provided by them.
The OAuth provider (i.e. the service you want to connect to) will ask that you provide a callback URL. The callback URL is the URL that the OAuth provider calls with the authorization tokens once authorization has been completed. Remember the URL you set here, as it must match the one your application uses.
Configure Your Connector
In your Mule application you now need to create and set up a new connector with the following:
-
your consumer key
-
your secret
-
the OAuth callback URL
STUDIO Visual Editor
-
If you haven’t already done so, create a new Mule project.
-
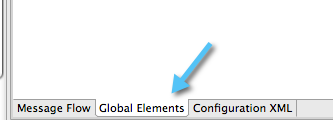
Click the Global Elements tab at the bottom of the canvas.
-
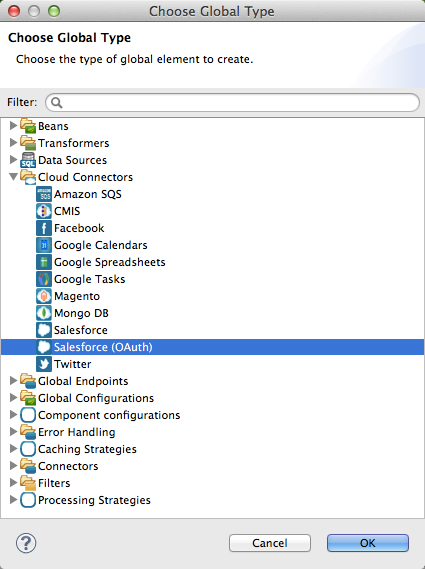
Click on Create to create a new global element, then expand the Cloud Connectors node and select the appropriate global type that matches your OAuth-enabled connector.
-
Complete the Consumer Key and Consumer Secret with the information that the service provider gave you.

-
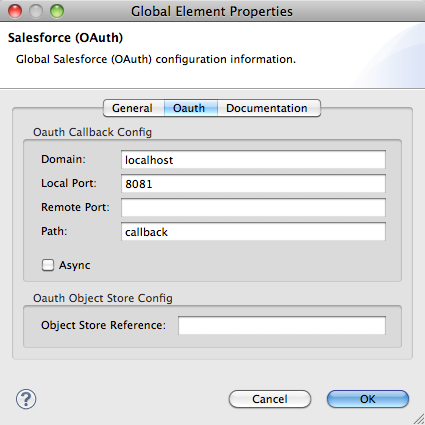
On the OAuth tab, enter the callback URL.
Field
Example
CloudHub
Domain
localhost${fullDomain}The domain of the endpoint where your OAuth callback is hosted. When in production, this will be the domain where your application is hosted.
Local Port
8081${http.port}The port which your authorization flow is hosted on. This will be the port which your HTTP endpoint is hosted on.
Remote Port
${fullDomain}The port of the endpoint where your OAuth callback is hosted.
Path
callbackcallbackThe path of the endpoint where your OAuth callback is hosted.
What you place in these parameters will be used to construct the full callback URL in the following form:
http://[domain]:[remotePort]/[path]. The example above results in a callback URL ofhttp://localhost:8081/callback.
Controlling Flow Processing
You can decide what happens when a connector is invoked by a user that has no OAuth token set for the connector (i.e. he is not yet authenticated via OAuth). There are two options:
-
STOP_FLOW: acts as a filter and kills the execution of the flow.
-
EXCEPTION: throws an exception informing that the token is not acquired.
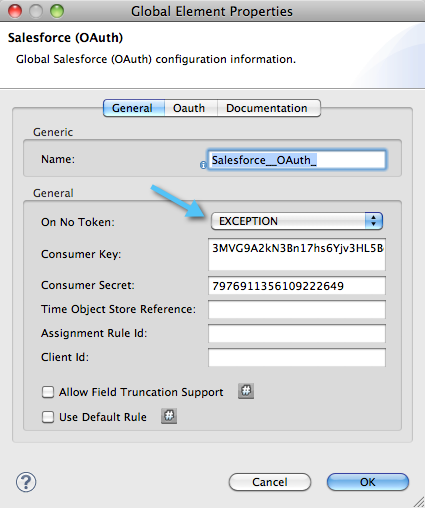
EXCEPTION is the default value of this parameter. If you want to keep error logs light, STOP_FLOW is probably the ideal choice as it doesn’t create exceptions before you have had a chance to authorize your connector to access the OAuth provider.
XML Editor or Standalone
Configure a connector as shown in the following example:
<sfdc:config-with-oauth name="salesforce" consumerKey="[insert key]" consumerSecret="[insert secret]" doc:name="Salesforce (OAuth)">
        <sfdc:oauth-callback-config domain="localhost" remotePort="8081" path="callback"/>
 </sfdc:config-with-oauth>
The Callback URL
The oauth-callback-config element instructs the connector and the OAuth provider what the callback URL should be. Here are the different parameters that can be set on this element:
Field |
Example |
CloudHub |
|
Domain |
|
|
The domain of the endpoint where your OAuth callback is hosted. When in production, this will be the domain where your application is hosted. |
Local Port |
|
The port which your authorization flow is hosted on. This will be the port which your HTTP endpoint is hosted on. |
|
Remote Port |
|
|
The port of the endpoint where your OAuth callback is hosted. |
Path |
|
|
The path of the endpoint where your OAuth callback is hosted. |
What you place in these parameters will be used to construct the full callback URL in the following form: http://[domain]:[remotePort]/[path]. The example above results in a callback URL of` http://localhost:8081/callback`.
Controlling Flow Processing
You can decide what happens when a connector is invoked by a user that has no OAuth token set for the connector (i.e. he is not yet authenticated via OAuth). The onNoToken parameter can be used to set this, it has two possible values:
-
STOP_FLOW: acts as a filter and kills the execution of the flow. -
EXCEPTION: throws an exception informing that the token is still not acquired.
EXCEPTION is the default value of this parameter. If you want to keep error logs light, STOP_FLOW is probably the ideal choice as it doesn’t create exceptions before you have had a chance to authorize your connector to access the OAuth provider.
<sfdc:config-with-oauth name="salesforce" consumerKey="[insert key]" consumerSecret="[insert secret]" doc:name="Salesforce (OAuth)" onNoToken="[STOP_FLOW|EXCEPTION]">
        <sfdc:oauth-callback-config domain="localhost" remotePort="8081" path="callback"/>
 </sfdc:config-with-oauth>
Creating an Authorization Flow
The Salesforce connector created in this example can be employed by an end user of the application to perform a variety of operations with his Salesforce account. Before he can do any operations, though, he must first authenticate himself. To make authentication possible you need to create an authorization flow. The authorization flow acquires the tokens from the OAuth provider that your application needs these to be able to interact with the OAuth service.
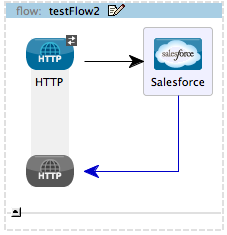
The flow consists of an HTTP endpoint followed by an invocation of the authorize operation on your OAuth-enabled connector.
STUDIO Visual Editor
-
Dragging elements from the palette to the canvas, build the following Mule flow:
-
Configure your HTTP endpoint’s host and port to correspond to the callback URL that you set in your global element. (In the example, the callback URL is http://localhost:8081/callback.) Leave the path blank.
-
Open the Salesforce connector properties and set the Config Reference to the global element created in the previous section.

-
Set the Operation to Authorize.
-
Configure any additional fields required by the connector you have selected. See below for configuration details of the Salesforce connector example.
Field Value Config Reference
The name of the global element you created for your connector.
Operation
Authorize
Access Token URL
(Optional, see below.) Example: https://na1.salesforce.com/services/oauth2/token
Authorization URL
(Optional, see below.) Example: https://na1.salesforce.com/services/oauth2/authorize
Display
POPUP
Access Token and Authorization URLs
Some applications expose different sets of URLs to acquire access tokens and perform authorization (for example, one URL for sandboxed development and one URL for production). These can also be set on the Authorize operation if the default values are not sufficient.
| Variable | Description |
|---|---|
Authorization URL |
Optional. The URL defined by the Service Provider where the resource owner will be redirected to grant authorization to the connector |
Access Token URL |
Optional. The URL defined by the Service Provider to obtain an access token |
Access Token ID |
Optional. (Not shown in Visual Editor. XML only.) The OauthAccessTokenId under which tokens will be stored. Default value: connector’s config name. |
Scopes
Depending on the service you are using OAuth with, there may or may not be different scopes to choose. A scope gives you access to perform a set of particular actions, such as viewing contacts, posting items, changing passwords, etc. The Salesforce connector doesn’t use scopes. Connectors that require scopes include it as a configurable field in the properties window. If the connector you wish to use makes use of scopes then refer to the documentation of the application you wish to connect to in order to determine what values are valid.
XML Editor or Standalone
Create an authorization flow, as shown in the following example:
<flow name="OAuthTestFlow1" doc:name="OAuthTestFlow1">
        <http:inbound-endpoint exchange-pattern="request-response" host="localhost" port="8081" doc:name="HTTP" />
        <sfdc:authorize config-ref="Salesforce__OAuth_" display="POPUP" doc:name="Salesforce" accessTokenUrl="https://na1.salesforce.com/services/oauth2/token" authorizationUrl="https://na1.salesforce.com/services/oauth2/authorize"/>
</flow>| Element | Description |
|---|---|
|
Invokes the authorize operation of the connector. |
| Attribute | Value |
|---|---|
config-ref |
The name of the global element you created for your connector. |
accessTokenUrl |
(Optional, see below.) |
authorizationUrl |
(Optional, see below.) |
display |
POPUP |
In the above example, the display, accessTokenUrl, and authorizationUrl parameters are configured. Depending on the connector you select, some of these may not be present.
On the HTTP endpoint the port MUST correspond to the remotePort attribute in your oauth-callback-config.
Access Token and Authorization URLs
Some applications expose different sets of URLs to acquire access tokens and perform authorization (for example, one URL for sandboxed development and one URL for production). These can also be set as attributes on the connector’s authorization operation if the default values are not sufficient.
| Variable | Description |
|---|---|
|
Optional. The URL defined by the Service Provider where the resource owner will be redirected to grant authorization to the connector. |
|
Optional. The URL defined by the Service Provider to obtain an access token. |
|
Optional. The OauthAccessTokenId under which tokens will be stored. Default value: connector’s config name. |
Scopes
Depending on the service you are using OAuth with, there may or may not be different scopes to choose. A scope gives you access to perform a set of particular actions, such as viewing contacts, posting items, changing passwords, etc. The Salesforce connector doesn’t use scopes. Connectors that require scopes include it as a configurable field in the properties window. If the connector you wish to use makes use of scopes then refer to the documentation of the application you wish to connect to in order to determine what values are valid.
About the Authorization Flow
If you hit the HTTP endpoint created above using a browser, Mule will initiate the OAuth dance, redirecting the user to the service provider page. Mule will also create a callback endpoint so the service provider can redirect the user back once the user has been authenticated and properly authorized. Once the callback is called, the connector will automatically issue an access token identifier that will be stored in the ObjectStore.
The authorize operation is an interceptor. If a user requests something that requires authentication but the connector is not authorized yet, the authorize operation will be triggered. It will redirect the user to the service provider so that he can authorize the connector. Once authentication and authorization are successful, the service provider needs to redirect the user back to the service consumer (i.e., your application). This is what the callback is for. The callback is a reference URL that gets sent to the service provider as a parameter when requesting authorization. The service provider will then redirect the user to this URL and include the authentication tokens as parameters. The connector will extract information from this callback, set its own internal state to authorized, and then move on to executing anything that had been interrupted by the authorization method.
After Authentication
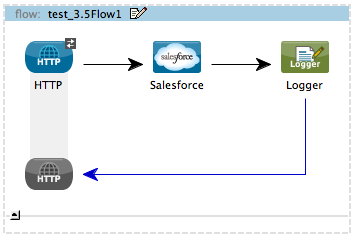
Add a Logger element to your flow after the connector set to the authorization operation. If the connector is not yet authorized, the execution of the logger will be delayed until the callback is received. On the other hand, if the user has already been authorized in a previous request and the connector already has his TokenId, then the flow execution will continue and the logger will get executed immediately rather than after the service provider returns the callback.
Studio Visual Editor
-
Drag a Logger message processor from the palette to the canvas and place it after the Salesforce connector.
-
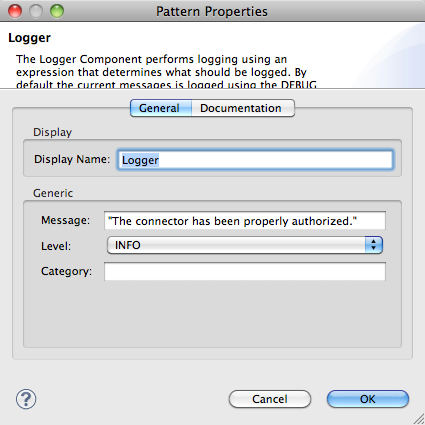
Open the Logger’s properties and add a message for the Logger to output. For example: "The connector has been properly authorized."
XML Editor or Standalone
Add a logger element into your flow:
<logger message=""The connector has been properly authorized."" level="INFO" doc:name="Logger"/>The full flow code should look like this example:
<flow name="authorizationAndAuthenticationFlow">
<http:inbound-endpoint exchange-pattern="request-response" host="localhost" port="8081"/>
<sfdc:authorize config-ref="Salesforce__OAuth_" display="POPUP" accessTokenUrl="https://na1.salesforce.com/services/oauth2/token" authorizationUrl="https://na1.salesforce.com/services/oauth2/authorize"/>
<logger message=""The connector has been properly authorized."" level="INFO" doc:name="Logger"/>
</flow>Managing OAuth Tokens (optional)
Configure ObjectStore
To keep data persistent you need to store it somewhere, it is recommended you use ObjectStore for this. Install an ObjectStore connector. Configure it like this in your application:
<objectstore:config name="ObjectStore" doc:name="ObjectStore" />Storing Tokens After Authorization
After the authorization dance is done, the accessTokenId for the service you are invoking is available as a flow variable called OAuthAccessTokenId. You must persist this ID so you can use it in future invocations of your connector. This example shows how to store this variable into ObjectStore under the key accessTokenId.
<flow name="authorize-google" doc:name="authorize-google">
        <http:inbound-endpoint exchange-pattern="request-response" host="localhost" port="8081" path="authorize" doc:name="HTTP"/>
        <google-contacts:authorize config-ref="Google_Contacts" doc:name="Authorize GContacts"/>
        <objectstore:store config-ref="ObjectStore" key="accessTokenId" value-ref="#[flowVars['OAuthAccessTokenId']]" overwrite="true" doc:name="ObjectStore"/>
</flow>
Using Your Access Token
Any invocation of your connector must load the access token from ObjectStore and reference it. This example shows loading it from ObjectStore and checking if it was set, before proceeding.
<enricher target="#[flowVars['accessTokenId']]" doc:name="Message Enricher">
            <objectstore:retrieve config-ref="ObjectStore" key="accessTokenId" defaultValue-ref="#['']" doc:name="Get AccessToken"/>
</enricher>
<expression-filter expression="#[flowVars['accessTokenId'] != '']" doc:name="Is Access Token Set"/>
Once accessTokenId is available as a flow variable, you can reference it in your connector operations:
<google-contacts:get-contacts config-ref="Google_Contacts" accessTokenId="#[flowVars['accessTokenId']]" />