Deploying to Multiple Environments
| Mule Runtime Engine versions 3.5, 3.6, and 3.7 reached End of Life on or before January 25, 2020. For more information, contact your Customer Success Manager to determine how you can migrate to the latest Mule version. |
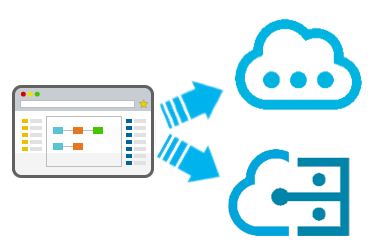
Throughout the different phases in the development lifecycle you may wish to deploy an application to multiple different environments, such as Production, QA and Test. You can configure your Mule application to facilitate deployment to one of many different environments, both on-premise and in the cloud. To do so, you must complete the following macro steps:
-
In your application, create a properties file for each environment.
-
Configure a property placeholder in your application to look for the deployment environment upon launch.
-
Configure an environment variable to point to a specific environment during application deployment.
Consider externalizing other aspects of your configuration, like time-out values, polling frequencies, etc… even if they don’t vary between environments. This will facilitate tuning and experimenting as the whole Mule application would become configurable through a single properties file.
Assumptions
This document assumes that you are familiar with the exercise of building and deploying Mule applications in Mule Studio. Consider reading the Mule Fundamentals for more information.
Configuring an Application to Deploy in Multiple Environments
STUDIO Visual Editor
-
Define a list of environments you wish to support in your application. For example, one common use case involves configuring the application to support both Production and a QA environments.
-
Right-click the
src/main/resourcesfolder, then select New > File to create a properties file for each environment you wish to support. For example:-
qa.properties
-
production.properties
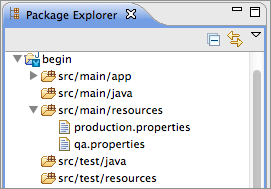
-
-
Double-click each of these new files to open them in new tabs in Studio. By editing hem, you can configure the properties of the environment that correspond to the filename. For example, in
production.properties, you may wish to add the properties as per the image below. Keep in mind that you can use these properties anywhere in your application.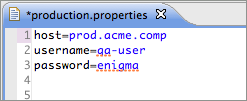
Learn how to encrypt a properties file using the Mule Credentials Vault.
-
Close the properties files.
-
Click in the Global Elements tab of your Studio project, below the canvas.
-
Create a new global element. When selecting the element type, pick Property Placeholder under Component Configurations.
-
Set the value of the Location field to
${mule.env}.propertiesLearn more about configuring variable properties.
-
To configure Studio to use a specific environment when deploying on-premise , debugging or using DataSense to retrieve metadata from a SaaS provider, double-click to open your application’s
mule-project.xmlfile, located in the root directory of your project.If you deploy your application to the cloud, in Studio select Deploy to Anypoint Platform → Cloud. Studio allows you to specify your environment variables prior to deployment, effectively enabling you to choose your deployment environment at runtime.
-
Add an environment variable named
mule.envwith a value that matches the environment to which you wish to deploy by default (in the image below, the value isqa).
-
Close the
mule-project.xmlfile, then save your application. When you debug your application or deploy it on-premise, Studio deploys to the environment you specified in themule-project.xmlfile. -
To change the default deployment environment at any time, change the value of the environment variable key. For example, to deploy to a test environment – assuming you have a
test.propertiesfile in your application– change the value totest.
XML Editor
-
Define a list of environments you wish to support in your application. For example, one common use case involves configuring the application to support both Production and a QA environments.
-
Right-click the
src/main/resourcesfolder, then select New > File to create a properties file for each environment you wish to support. For example:-
qa.properties
-
production.properties
-
-
Double-click each of these new files to open them in new tabs in Studio. By editing hem, you can configure the properties of the environment that correspond to the filename. For example, in
production.properties, you may wish to add the properties as per the image below. Keep in mind that you can use these properties anywhere in your application.
Learn how to encrypt a properties file using the Mule Credentials Vault.
-
Close the properties files.
-
At the top of your XML config, above all other flows, add a <context: property-placeholder/> element with a
resourcesattribute configured as per below.<context:property-placeholder resources="$mule.env.properties"/>Learn more about configuring variable properties.
-
To configure Studio to use a specific environment when deploying on-premise , debugging or using DataSense to retrieve metadata from a SaaS provider, double-click to open your application’s
mule-project.xmlfile, located in the root directory of your project.If you deploy your application to the cloud, right click on your project in the package explorer and select Deploy to Anypoint Platform → Cloud. Studio allows you to specify your environment variables prior to deployment, effectively enabling you to choose your deployment environment at runtime.
-
Add an environment variable named
mule.envwith a value that matches the environment to which you wish to deploy by default (in the image below, the value isqa).
-
Close the
mule-project.xmlfile, then save your application. When you debug your application or deploy it on-premise, Studio deploys to the environment you specified in themule-project.xmlfile. -
To change the default deployment environment at any time, change the value of the environment variable key. For example, to deploy to a test environment – assuming you have a
test.propertiesfile in your application– change the value totest.
Deploying to a Specific Environment
Use the procedures below to deploy an application to a specific environment – production, qa, test, etc. – from Studio.
On-Premise
Studio
-
In the Package Explorer, right-click the filename of the project you wish to deploy, then select Run As > Mule Application.
-
Studio automatically deploys your application according the environment variable you specified in the
mule-project.xmlfile in the procedure above.
Standalone
Identify the the environment in which to deploy your application at runtime with an environment variable. Execute the command to run your mule application as per the example below.
/.bin/mule -M-Dmule.env=production$ mule -M-Dmule.env=productionCloudHub
-
In the Package Explorer, right-click the filename of the project you wish to deploy, then select Deploy to Anypoint Platform → Cloud.
-
Then enter your Anypoint Platform credentials and domain particulars
-
Click the plus sign under "environment variables" to add a new environment variable. Set the Key of this new variable to mule.env and it’s value to the environment you wish to deploy to (QA in this example).
-
Click Finish to deploy.
To learn more about deploying to test environments in CloudHub, access the CloudHub Sandbox Environments documentation.
See Also
-
Learn more about encrypting a properties file using the Mule Credentials Vault.
-
To learn more about deploying to test environments in CloudHub, access the CloudHub Sandbox Environments documentation.
-
Learn more about Properties Placeholders in Mule.