HTTP Response Builder
| Mule Runtime Engine versions 3.5, 3.6, and 3.7 reached End of Life on or before January 25, 2020. For more information, contact your Customer Success Manager to determine how you can migrate to the latest Mule version. |
| This element is deprecated as of Mule runtime 3.6. The HTTP Connector is able to provide this functionality. |
The HTTP response builder is an HTTP component that allows you to easily configure HTTP responses. It replaces the content of the message payload with the HTTP response, allowing you to provide custom responses to an application. Typically, the response builder is used at the last step before returning a response to the user, although it is still possible to perform more steps to alter the payload after it.
A scenario where the response builder is particularly useful is when building a RESTful API, where you may wish to generate different responses or custom error messages to reply to specific resource requests.
Assumption
This document assumes that you are familiar with the [Anypoint™ Studio interface]. To increase your familiarity with Studio, consider completing one or more [Anypoint Studio tutorials]. Further, this page assumes that you have a basic understanding of [Mule flows].
Basic Anatomy
The implementation of the HTTP Response Builder transforms the payload to the class org.mule.transport.http.HTTPResponse.
An HTTP response has two elements, which are built at runtime:
-
a body
-
a header
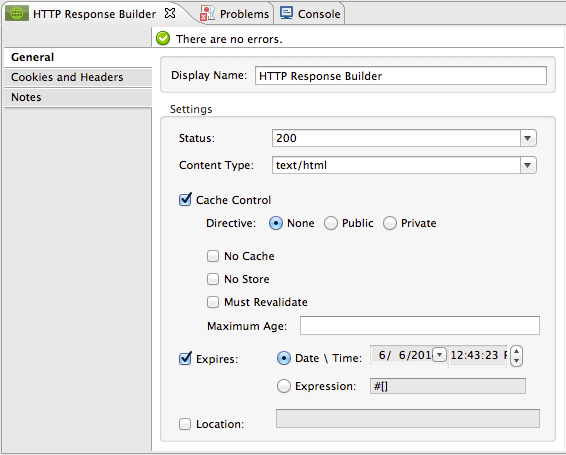
Studio Visual Editor
The Body
The existing Mule Message Payload becomes the body of the HTTP response.
Headers
You need to specify the HTTP header. Some of the most common HTTP headers you may wish to set are the following:
-
Status: The status code of the response.
-
Content-Type: The mime type of the content, e.g.
text/html;charset=utf-8 -
Location: Used in redirection or when a resource has been created.
-
Cache-Control: Tells all caching mechanisms from server to client whether they may cache this object.
-
Expires: Provides a date/time after which the response is considered stale.
For setting these, the properties editor provides a specific field for each in the general tab.
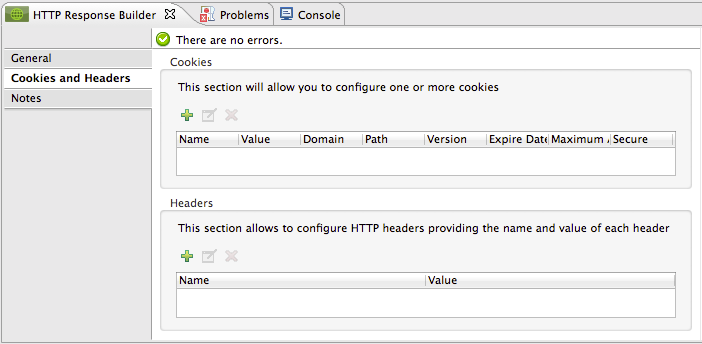
If you wish to populate your message with any headers aside from the ones mentioned above, use the Cookies and Headers tab. Here you can also add cookies, which can each be set with its own properties, such as version and expiration time.
| All configurable values inside the HTTP response element support expressions. |
XML Editor
The Body
The existing Mule Message Payload becomes the body of the HTTP response.
Headers
The most common HTTP headers are set up as atributes of the <http:response-builder element.
| Attribute | Description |
|---|---|
status |
HTTP status code of the response. Default: 200 |
contentType |
If no content type is specified, then the content type of the message will be used. If the message has no content type, then the default content type is |
<http:response-builder doc:name="HTTP Response Builder" contentType="text/xhtml" status="201"/>Other common HTTP response headers are defined in their own child element within <http:response-builder>
-
location: Used in redirection or when a resource has been created.
-
expires: Provides a date/time after which the response is considered stale.
-
cache-control: Tells all caching mechanisms from server to client whether they may cache this object.
| Child Element | Description |
|---|---|
experies |
Specifies when the cookie expires. Accepted formats are WDY, DD, Mon, YYYY, HH:MM:SS GMT |
location |
Used in redirection or when a resource has been created. |
cache-control |
Allows to specify directives that MUST be obeyed by all caching mechanisms along the request/response chain. |
<http:location value="http://localhost:8080/resources/client/5"/>The cache-control element has the following configurable attributes:
| Attribute | Description |
|---|---|
directive |
Can be set to public or private. |
noCache |
If set to true, a cache MUST NOT use the response to satisfy a subsequent request without successful revalidation with the origin server. |
noStore |
If set to true, prevents the inadvertent release or retention of sensitive information. |
mustRevalidate |
When true, that cache MUST NOT use the entry after it becomes stale to respond to a subsequent request without first revalidating it with the origin server. |
maxAge |
When the max-age cache-control directive is present in a cached response, the response is stale if its current age is greater than the age value given. If a response includes both an Expires header and a max-age directive, the max-age directive overrides the Expires header, even if the Expires header is more restrictive. |
Any other headers are configurable by adding an additional child element of the type http:header.
<http:header name="link" value="</feed>"/>The Cache-Control header can be extended if necessary by adding an http:header for the Cache-Control.
You can also include cookies into the headers by adding the child element <http:set-cookie>. This element has the following configurable attributes:
| Attribute | Description |
|---|---|
name |
(Required.) The name of the cookie. |
value |
(Required.) The value of the cookie. |
domain |
The domain scope of the cookie. |
path |
The path scope of the cookie. |
expiryDate |
The exact date/time when the cookie expires. It must be specified in the form WDY, DD, Mon, YYYY HH:MM:SS GMT. |
maxAge |
Indicates, in seconds, the max age of the cookie. This attributes is not allowed if expiryDate is defined. |
secure |
A boolean to specify that the cookie communication should be limited to encrypted transmission. Default is false. |
version |
Set the version of the cookie specification to which this cookie conforms. |
<http:set-cookie name="userId" value="5" path="/" version="1.0" maxAge="10000"/>| All of the configurable values inside the HTTP response element support expressions. |
|
Any outbound properties that were already present in the message are also propagated outwards together with the response headers. To avoid this, it is recommended that unwanted outbound properties are removed in a previous step by using a remove-property transformer. Note that Headers set by the HTTP response builder overwrite outbound properties of the same name. |
Example 1
A common use case occurs in flows that are consumed by 3rd-party monitoring tools which require either an empty response with a 200 status code, or some custom response. In the first example, the HTTP Response Builder simply returns a 200 status code.
Studio Visual Editor
-
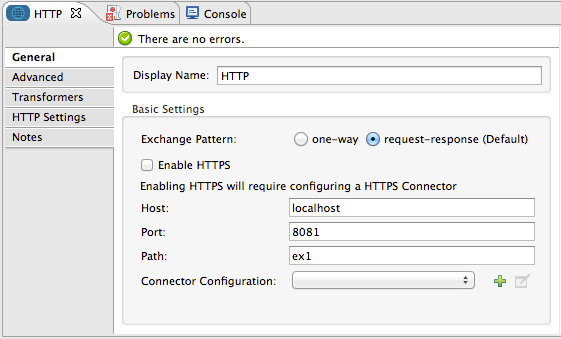
Drag an HTTP connector into a new canvas and open its properties editor.
-
Leave the host and port to their default values, then set the Path to ex1. This makes the service reachable through the URL http://localhost:8081/ex1.
-
Drag an HTTP response builder to your flow after the HTTP Connector.

-
Enter the HTTP Response Builder’s properties editor.
-
Set the Status to
200and the Content type totext/html.
-
Save, then run your project.
-
Send the HTTP endpoint a POST HTTP request to http://localhost:8081/ex1.
The easiest way to do this is to send a POST via a browser extension such as [Postman] (for Google Chrome) or the [curl] command line utility.
curl -X POST http://localhost:8081/ex1This will return a few headers, a cookie and status code 200
XML Editor
-
In a new flow, add an
http:inbound-endpointelement.<http:inbound-endpoint exchange-pattern="request-response" host="localhost" port="8081" path="ex1" doc:name="HTTP"/>Attribute Value exchange-patternrequest-responsehostlocalhostport8081pathex1doc:namehtmlThe service is now reachable through the URL http://localhost:8081/ex1.
-
Below the HTTP inbound element, add an
http:response-builderelement.<http:response-builder status="200" contentType="text/html" doc:name="HTTP Response Builder"/>Attribute
Value
status200contentTypetext/htmldoc:nameHTTP Response Builder -
Save, then run your project.
-
Send the HTTP endpoint a POST HTTP request to http://localhost:8081/ex1.
The easiest way to do this is to send a POST via a browser extension such as [Postman] (for Google Chrome) or the [curl] command line utility.
curl -X POST http://localhost:8081/ex1This will return a few headers, a cookie and a status code of 200
Example 2
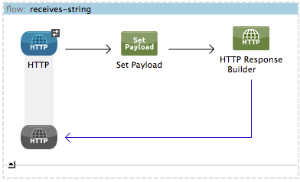
In this second example, the payload is populated with some HTML before reaching the HTTP Response Builder. The HTTP Response Builder changes the message object type and adds a series of headers, but doesn’t alter the HTML content that is passed on to it.
Studio Visual Editor
-
Drag an HTTP Connector into a new canvas, open its properties editor, leave the host and port to their default values and set the Path to ex2 so that the service is now reachable through
http://localhost:8081/ex2.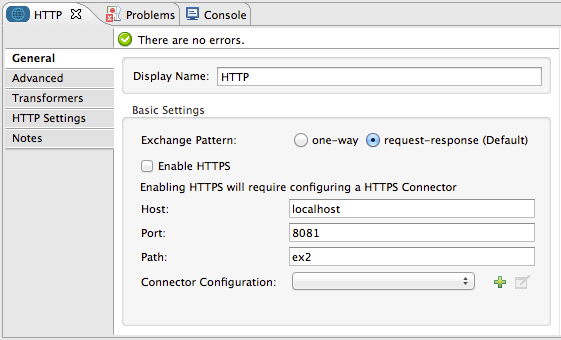
-
Drag a Set Payload component after the HTTP connector.
-
Set the Value field to
<HTML><BODY>hello world</BODY></HTML>.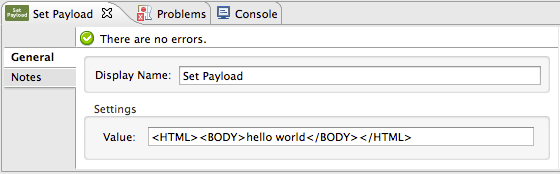
This value becomes the payload of the Mule message.
-
Drag an HTTP Response Builder to your flow, after the Set Payload component.
-
In the HTTP Response Builder’s properties editor set the Status to
200and the Content type totext/html.
-
Save, then run your project.
-
Send the HTTP endpoint a POST HTTP request to http://localhost:8081/ex2.
|
The easiest way to do this is to send a POST via a browser extension such as [Postman] (for Google Chrome) or the [curl] command line utility. |
This will return a few headers, a cookie and a Status code of 200 and the following payload:
<HTML>
    <BODY>hello world</BODY>
</HTML>
Full Code
<flow name="receives-string" doc:name="receives-string">
<http:inbound-endpoint exchange-pattern="request-response" host="localhost" port="8082" path="ex2" doc:name="HTTP"/>
<set-payload doc:name="Set Payload" value="<HTML><BODY>iamalive</BODY></HTML>"/>
<http:response-builder doc:name="HTTP Response Builder"/>
</flow>See Also
-
Read about the HTTP Connector
-
Dig deep into the details of the HTTP Transport Reference
-
Learn how to create and manage a API with the API Manager