Java Transformer Reference
| Mule Runtime Engine versions 3.5, 3.6, and 3.7 reached End of Life on or before January 25, 2020. For more information, contact your Customer Success Manager to determine how you can migrate to the latest Mule version. |
When Mule does not provide an out-of-the-box transformer to meet your application integration needs, the Java transformer enables you to package custom-coded Java logic (i.e., a Java class) that is triggered when the transformer processes the message. In most cases, this Mule building block transforms a message from its original format to a new, modified format.
To configure a Java transformer, you need to specify the following:
-
The Java class your transformer will call
-
An encoding format the transformer applies to messages
-
A MIME type for your data
The Java transformer applies these configuration settings to each message, then sends the transformed message to the next building block in your flow. Additionally, if you need to execute logic on a particular property within your Java class, the Java transformer allows you to configure Spring beans, which are containers that include developer-defined logic that executes on a specific property within your Java class. The modified Spring data can be saved in persistent storage, then recalled later in the flow. If you choose to add a property to a class, it is possible to inject additional values into the Spring property by configuring the property sub-elements. This allows you to reference arrays, maps, beans, etc. within the defined bean factory (class) or an external bean factory.
In general, MuleSoft recommends that you use a Java transformer if your transformation logic is complex or if message transformation requires the use of multiple out-of-the-box transformers. For example, when you need to create an application that returns all acceptable payment methods a customer can apply when an order is received, you can use a custom Java transformer to host a script that executes the application and returns the information to the client (below).
| If rather than just changing the payload, you want to trigger a more complex set of processes coded in Java, you might be better off using a [Java Component] rather than a Java Transformer. |
General Tab
This Properties pane tab lets you change the default display name from Java to a name that closely describes the transformation being implemented. It also lets you configure the transformer’s class settings, which expose the collection of properties, attributes and methods referenced by the transformer. (At minimum, you must select a transformer class). Finally, use the General tab to configure Spring bean settings for the transformer.
| Field | Description |
|---|---|
Display Name |
This field defaults to the generic transformer name. Change the Display Name, which must be alpha-numeric, to reflect the transformer’s specific role, i.e., |
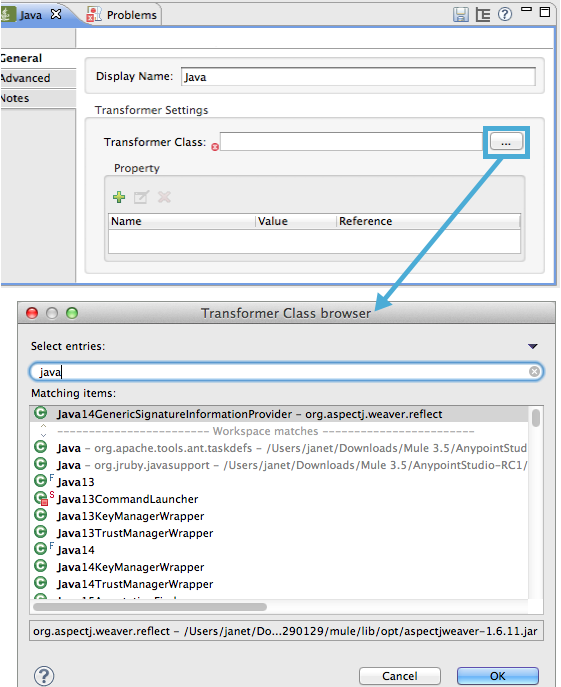
Transformer Class |
To select a Java class for this transformer instance, click the ellipsis to the right of the Transformer Class text box. After the pop-up appears, type the first few characters of a class name, then scroll to select the class you want. This is a mandatory setting. |
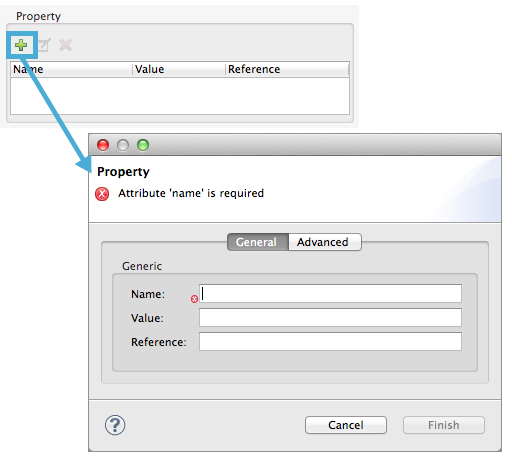
To configure Spring bean settings, click the Add Property  button, then enter a name and its associated value or reference. Spring bean configuration data can be saved in a persistent store and restored at a later time.
| Field | Description |
|---|---|
Name |
Enter the property name of the Spring element. |
Value |
Enter a string to specify a Spring element. |
Reference |
Enter a string that specifies the Spring property you want to reference (i.e., |
Spring bean sub-elements are used to define a bean value inline, instead of referring to a bean defined elsewhere in the class. To configure Spring sub-elements, complete the following steps:
-
Click the Add Property
button. -
Select the Advanced tab.
-
Click the Add Sub-elements
button. -
Choose a property element to configure.
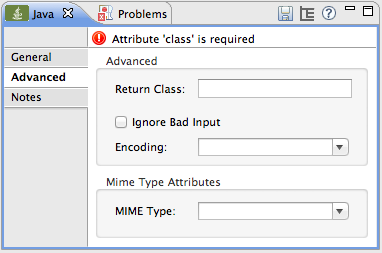
Advanced Tab
This tab lets you enter Return Class information and specify the Encoding and MIME Type for the message payload as it progresses through the Java transformer. Use the drop-down menus to select the encoding format and the MIME type to be applied to all messages received by the transformer.
| Field | Description |
|---|---|
Return Class |
The class of the message generated by the transformer. This is used whenever transformers are auto-selected to verify that the transformer returns the correct class type. |
Ignore Bad Input |
If this Java transformer is part of a chain, and message class is not supported by the Java transformer, Check the box to continue processing the message through the flow. If unchecked, the chain will end at this point, and the message will be stored. |
Encoding |
Select the character encoding format for messages as they flow out of the Java transformer. As an example |
MIME Type |
Select the file format for messages emerging from the Java transformer (i.e., |
Basic Hello World Jave Transformer Class
To create a brand new Java Transformer Class, follow these steps:
-
In the package explorer right click on your project and select New > Class
-
Name your class, and make the package
org.mule.transformers -
Use the basic class skeleton provided below to construct a simple transformer:
package org.mule.transformers;
import org.mule.api.MuleMessage;
import org.mule.api.transformer.TransformerException;
import org.mule.transformer.AbstractMessageTransformer;

public class helloWorldTransformer extends AbstractMessageTransformer{
    /**
     * @param args
     */
    public Object transformMessage(MuleMessage message, String outputEncoding) throws TransformerException {

        return "Hello World!";
    }
}| Note that the return argument will become the output payload of your transformer. |
-
Add a new Java Transformer into your flow, and set the Transformer Class field to reference your newly created class.
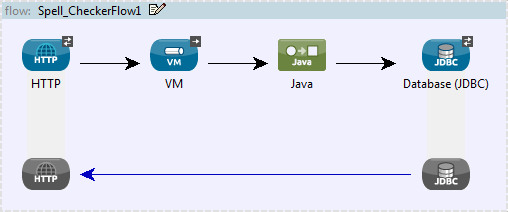
Configuring an HTTP Connector for the Java Transformer
In an HTTP client/server model, a client requests information from an external or internal server. Unless an error occurs, the server returns the requested data to user’s browser. The data sent back to the client, called the message payload, contains a header, certain data used to serve up the Web page to the client, and the message payload. For example, suppose you need a transformation process that converts HTTP data into a map so that the Java class can:
-
parse the data
-
look up a specific attribute
-
return the attribute’s value to the client
To implement this scenario in a flow, use the following building blocks:
-
HTTP endpoint
-
Body-to-Parameter Map transformer
-
Java transformer
The transport used to connect to the web resources is the HTTP connector, which contains specific parameters you enter during configuration. The Body-to-Parameter-Map transformer converts the HTTP request data into a parameter map a Java transformer can interpret.
Finally, the Java transformer modifies the message by invoking the MapLookup class and all defined attributes then retrieving specific parameters out of the map. Once this transformation process completes, the flow returns the data to the client.

Java Transformer Configuration
In our example flow, after the body to parameter map transformation occurs, a Java transformer is used to reference the data from the map. Remember, our example also wants to use the MapLookup class to reference a parameter and retrieve its value before returning the transformed message to the client. Before you configure the Java transformer, first, you need to either create a new Java class that references the MapLookup class or create a Global Java transformer that can be used to extend the MapLookup class to other Mule environments.
To select the Java transformer class double-click the icon to open the Properties Editor. Click the ellipsis button, and type the first few characters of a class name to narrow your search. After selecting a class, you can switch to the Configuration XML editor to enter any additional code that needs to execute.

Click here for XML Code
<?xml version="1.0" encoding="UTF-8"?>

<mule xmlns="http://www.mulesoft.org/schema/mule/core" xmlns:http="http://www.mulesoft.org/schema/mule/http" xmlns:doc="http://www.mulesoft.org/schema/mule/documentation" xmlns:spring="http://www.springframework.org/schema/beans" xmlns:core="http://www.mulesoft.org/schema/mule/core" xmlns:jdbc="http://www.mulesoft.org/schema/mule/jdbc" xmlns:vm="http://www.mulesoft.org/schema/mule/vm" xmlns:xsi="http://www.w3.org/2001/XMLSchema-instance" version="CE-3.2.1" xsi:schemaLocation="
http://www.mulesoft.org/schema/mule/http http://www.mulesoft.org/schema/mule/http/current/mule-http.xsd
http://www.springframework.org/schema/beans http://www.springframework.org/schema/beans/spring-beans-current.xsd
http://www.mulesoft.org/schema/mule/core http://www.mulesoft.org/schema/mule/core/current/mule.xsd
http://www.mulesoft.org/schema/mule/jdbc http://www.mulesoft.org/schema/mule/jdbc/current/mule-jdbc.xsd
http://www.mulesoft.org/schema/mule/vm http://www.mulesoft.org/schema/mule/vm/current/mule-vm.xsd ">

        <custom-transformer encoding="UTF-8" mimeType="text/html" class="org.mule.transformer.simple.MapLookup" doc:name="Java"/>
        </custom-transformer>
    </flow>
</mule>
...
Spring Configuration
Configure Spring properties to assign a value or reference to a specific property, attribute, or element. If you need to assign a value or reference to a defined property, you can extend the class by configuring the specific property subelement. In our example, after the HTTP request was converted to a map, a value is assigned to a Spring property before the response message is returned to the client.
<?xml version="1.0" encoding="UTF-8"?>

<mule xmlns="http://www.mulesoft.org/schema/mule/core" xmlns:http="http://www.mulesoft.org/schema/mule/http" xmlns:doc="http://www.mulesoft.org/schema/mule/documentation" xmlns:spring="http://www.springframework.org/schema/beans" xmlns:core="http://www.mulesoft.org/schema/mule/core" xmlns:jdbc="http://www.mulesoft.org/schema/mule/jdbc" xmlns:vm="http://www.mulesoft.org/schema/mule/vm" xmlns:xsi="http://www.w3.org/2001/XMLSchema-instance" version="CE-3.2.1" xsi:schemaLocation="
http://www.mulesoft.org/schema/mule/http http://www.mulesoft.org/schema/mule/http/current/mule-http.xsd
http://www.springframework.org/schema/beans http://www.springframework.org/schema/beans/spring-beans-current.xsd
http://www.mulesoft.org/schema/mule/core http://www.mulesoft.org/schema/mule/core/current/mule.xsd
http://www.mulesoft.org/schema/mule/jdbc http://www.mulesoft.org/schema/mule/jdbc/current/mule-jdbc.xsd
http://www.mulesoft.org/schema/mule/vm http://www.mulesoft.org/schema/mule/vm/current/mule-vm.xsd ">

        <custom-transformer encoding="UTF-8" mimeType="text/html" class="org.mule.transformer.simple.MapLookup" doc:name="Java"/>
                 <spring:property name="homeLocation" value="SanFrancisco"/>
        </custom-transformer>
    </flow>
</mule>
...