Maven Support in Anypoint Studio
| Mule Runtime Engine versions 3.5, 3.6, and 3.7 reached End of Life on or before January 25, 2020. For more information, contact your Customer Success Manager to determine how you can migrate to the latest Mule version. |
The following sections describe how to enable or disable Maven support for your projects in Anypoint Studio.
Setting Your Maven Preferences
You can adjust your Studio preferences so that Studio automatically generates a pom.xml file upon project creation.
-
Navigate to Anypoint Studio > Preferences (or Windows > Preferences in Windows).
-
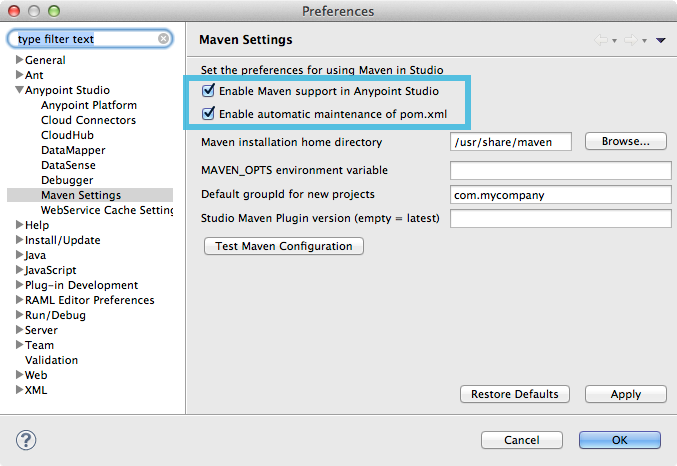
In the Preferences panel, click to expand Anypoint Studio, then select Maven Settings.
-
Click to select both Enable Maven support in Anypoint Studio and Enable automatic maintenance of pom.xml.

-
Adjust the filepath of the Maven installation home directory on your local drive, if it is empty or if you wish to use a different installation than the one Studio detected automatically.
-
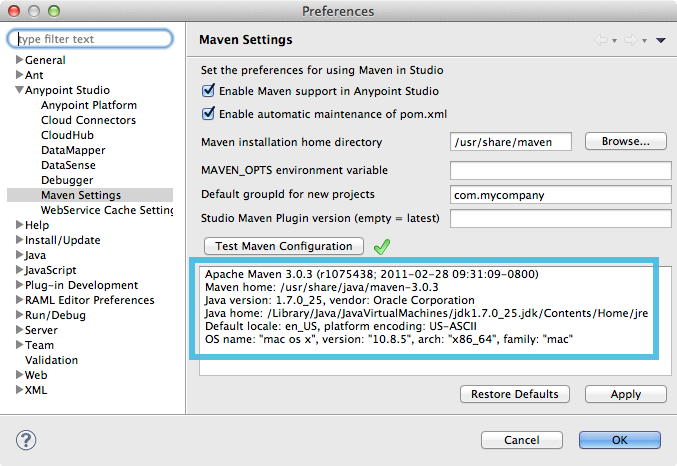
Click Test Maven Configuration to instruct Studio to run
mvn --versionin the background to validate your Maven installation. Studio produces an output of that command in a box below the button. The results will flag any problems with your settings, such as a missing JAVA_HOME environment variable.
OS X Mavericks
If you are running OS X Mavericks, Studio cannot automatically find your Maven installation, so your home directory field will be blank and the Maven support boxes unchecked.
To use Maven with Anypoint Studio on Mavericks, configure your Maven home directory manually. Once you have configured a valid Maven home, click Test Maven Configuration to verify your settings.
-
When finished, click OK to save your changes.
Disabling Maven Support in Studio
You can adjust your Studio preferences so that Studio does not auto-generate a pom.xml file for new projects. The following procedure outlines the steps to disable Maven support in your instance of Studio.
-
Navigate to Anypoint Studio > Preferences (or Windows > Preferences in Windows).
-
In the Preferences panel, click to expand Anypoint Studio, then select Maven Settings.
-
Click to deselect both Enable Maven support in Anypoint Studio and Enable automatic maintenance of pom.xml.
-
Click OK to save changes to Preferences.
When you create a new project in Studio, the option to Use Maven is grayed out.

Click configure Maven to re-enable Maven for your Studio instance, or return to the Preferences and adjust your settings there.
Disabling Maven Support in a Single Studio Project
If you have created Maven project in Studio and wish to disable Maven support for that particular project, right-click the project name in the Package Explorer, then select Mule > Disable Support. Though it does not remove the pom.xml file, Studio ceases to maintain it for the project.
You can re-enable Maven support via the Studio menu item if you did not delete the pom.xml file. Right-click the project name in the Package Explorer, then select Mule > Enable Support.
If you disable Maven support in your Studio project and delete the pom.xml file, you cannot re-enable it via the Maven Support in Studio menu item. To re-initiate Maven support, consult the Enabling Maven Support for a Studio Project documentation.
|
See Also
-
Follow along with Building a Mule Application with Maven in Studio which demonstrates the end-to-end experience of using Maven and Studio to create, manage, and deploy a Mule project.
-
Learn more about importing Maven projects into Studio or "mavenizing" existing Studio projects.
-
Using Maven outside of Studio? Refer to these instructions for configuring your Maven installation to point to the necessary repositories.


