Extra CXF Component Configurations
| Mule Runtime Engine versions 3.5, 3.6, and 3.7 reached End of Life on or before January 25, 2020. For more information, contact your Customer Success Manager to determine how you can migrate to the latest Mule version. |
This page covers more complex configuration of the CXF Component than those described in the basic discussions of publishing a SOAP API and consuming a SOAP API. You may also wish to refer to full CXF Component Reference documentation.
Using a Global CXF Configuration
To set up and reuse customized CXF behavior, you must create a global element and reference it within the CXF component(s) in your Mule flows. The following configuration information applies to all types of SOAP API Operations (service, client, and proxy).
Studio Visual Editor
-
On your canvas, click the Global Elements tab, then click the Create button, then select
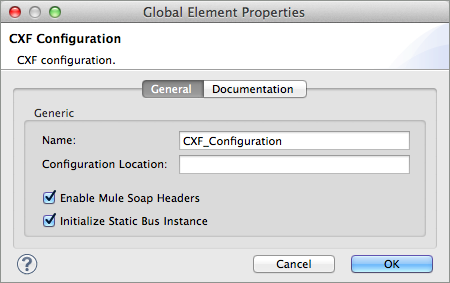
CXF Configurationfrom the list of available options under Component configurations.You can also create a Global CXF Element directly from the CXF component’s properties editor. Next to the Config Reference field, click the plus sign icon to open the Global Element Properties panel. 
-
Configure the global CXF configuration attributes according to the table below.
Field
Value
Description
Name
unique name
Enter a unique name for the global element, if you wish.
Configuration Location
filepath/filename.xml
If you have created an
.xmlfile that supplies the specifics of how you want your CXF elements to behave, enter the file path of your CXF configuration file.Enable Mule Soap Headers
true (default)
false
Note: This field is currently not implemented and has no effect.If set to true (i.e. checked) this attribute ensures that Mule can add a header to a SOAP message when required as part of the message’s processing.
For example, if your SOAP messages will be processed by a third-party schema which prohibits deviations from very specific message properties and will not process messages with Mule headers, set this attribute to false (i.e. uncheck).Initialize Static Bus Instance
true (default)
falseIf set to true, (i.e. checked) this attribute ensures that the CXF SOAP API uses Mule transports instead of CXF transports.
-
Click the Message Flow tab to return to your canvas.
-
Open the Pattern Properties panel of the CXF component, again.
-
Use the drop down menu in the Config Reference field to select the global CXF element you created.

-
Click OK to save your changes to the CXF component.
XML Editor or Standalone
-
Above all flows in your Mule project, add a global <cxf:configuration> element. Refer to code sample below.
-
Configure the global CXF configuration attributes according to the table below.
Attribute Value Description name
unique name
Enter a unique name for the global element, if you wish. (not required for Mule Standalone)
enableMuleSoapHeaders
true
false Note: This field is currently not implemented and has no effect.If set to true`,` this attribute ensures that Mule can add a header to a SOAP message when required as part of the message’s processing.
For example, if your SOAP messages will be processed by a third-party schema which prohibits deviations from very specific message properties and will not process messages with Mule headers, set this attribute to false.initializeStaticBusInstance
true
falseIf set to true, (i.e. checked) this attribute ensures that the CXF SOAP API uses Mule transports instead of CXF transports.
configurationLocation
filepath/filename.xml
If you have created an
.xmlfile that supplies the specifics of how you want your CXF elements to behave, enter the file path of your CXF configuration file. -
To the CXF element within your flow, add a
configuration-refattribute to reference the global CXF configuration element. Refer to code sample below.<mule xmlns:cxf="http://www.mulesoft.org/schema/mule/cxf" xsi:schemaLocation=" http://www.mulesoft.org/schema/mule/cxf http://www.mulesoft.org/schema/mule/cxf/current/mule-cxf.xsd"> <cxf:configuration name="CXF_Configuration" enableMuleSoapHeaders="true" initializeStaticBusInstance="true" doc:name="CXF Configuration" configurationLocation="src/test/resources/filename.xml"/> <http:listener-config name="listener-config" host="localhost" port="8081"/> <http:request-config name="request-config" host="localhost" port="8081"/> <flow name="example_flow1" doc:name="example_flow1"> <http:listener config-ref="listener-config" path="/" doc:name="HTTP Connector"/> <cxf:jaxws-client doc:name="SOAP" configuration-ref="CXF_Configuration"/> <http:request config-ref="request-config" path="/" method="POST" doc:name="HTTP Connector"/> </flow>
Adding Custom Interceptors
CXF uses chains of interceptors – the most basic processing unit – to process messages. As a message moves through an interceptor chain, each interceptor performs an action upon the message, such as reading it, transforming it, or validating it.
If you need to add an extra action to the messages processed by your CXF SOAP API (for instance, to add a header to a message), use the CXF component to add extra interceptors to the interceptor chain.
STUDIO Visual Editor
-
Open the properties editor, then click on the Interceptors tab.
-
Click on the plus sign icon to reveal the four Interceptor Providers CXF uses to add interceptors to interceptor chains; click one of the choices to add an interceptor provider.
-
Add in Interceptor -
Add in Fault Interceptor -
Add out Interceptor -
Add out Fault Interceptor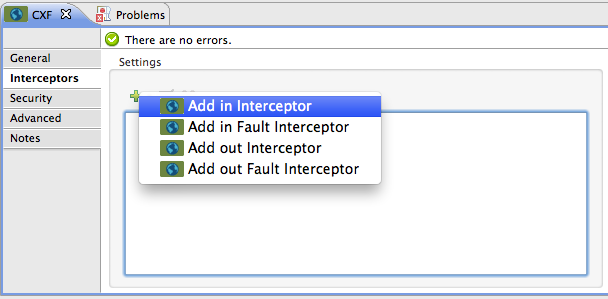
-
-
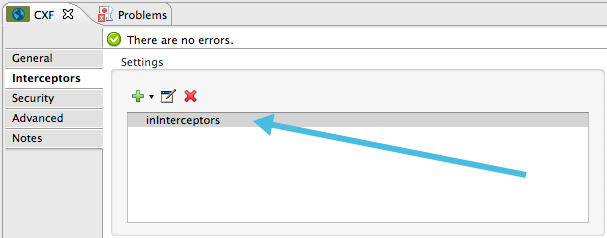
Double-click the newly created interceptor provider in the Settings pane to open the interceptor provider panel.
-
Use the drop down menu in the Beans field to select from your list of existing beans the one that will act as an interceptor.
If you have not yet created any beans, click the new button to open a new Properties Panel that facilitates the creation and configuration of new a bean, which imports the Java class you have built to specify the interceptor’s behavior. 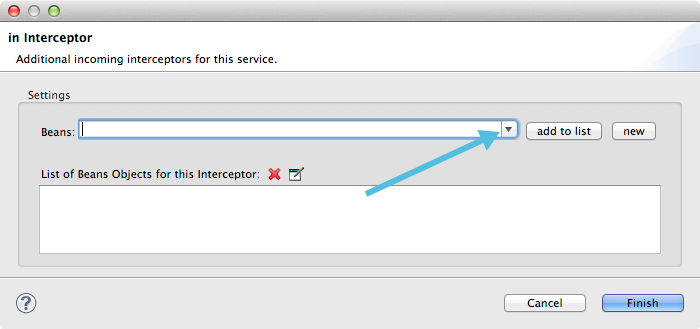
-
Click the add to list button to insert the selected bean into the interceptor chain.
-
Click Finish, then OK to save your interceptor configurations.
XML Editor or Standalone
-
Above all flows in your Mule project, create a global
spring:beanelement to import the Java class you have built to specify the interceptor’s behavior. Refer to code sample below. -
To the CXF element in your flow, add a child element according to the type of action you want the interceptor to perform:
-
cxf:inInterceptor -
cxf:inFaultInterceptor -
cxf:outInterceptor -
cxf:outFaultInterceptor
-
-
As a child element of the CXF interceptor element, add a reference to the spring bean,
spring:ref bean, you created which imports the Java class. -
Add as many as four interceptor child elements to your CXF service or client component.
<spring:beans>
    <spring:bean id="Bean" name="Bean" class="org.mule.example.myClass"/>
</spring:beans>

<http:listener-config name="listener-config" host="localhost" port="8081"/>
<http:request-config name="request-config" host="localhost"
port="8081"/>
<flow name="example_flow1" doc:name="example_flow1">
    <http:listener config-ref="listener-config" path="/" doc:name="HTTP Connector"/>
    <cxf:proxy-service doc:name="SOAP" port="8080"  serviceClass="org.mule.example.bookstore.OrderService"  payload="body" bindingId=" " namespace=" " service="" validationEnabled="true">
       <cxf:inInterceptors>
           <spring:ref bean="Bean"/>
       </cxf:inInterceptors>
    </cxf:proxy-service>
    <http:request config-ref="request-config" path="/" method="GET" doc:name="HTTP Connector"/>
</flow>
Configuring Advanced Elements
You can adjust several advanced CXF SOAP API configurations according to your requirements.
STUDIO Visual Editor
-
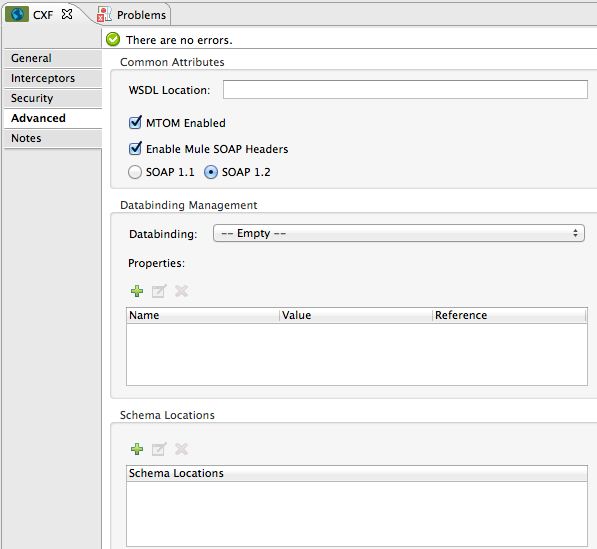
Open the Pattern Properties panel, then click on the Advanced tab.
-
Adjust configurations as needed according to the table below, then click OK to save your changes.
Configuration
Activity
WSDL Location
In the WSDL Location field, enter the URL (relative or absolute) of the WSDL file which describes the functionality of the SOAP API.
MTOM Enabled
Set MTOM Enabled to true (i.e. checked) if you want Mule to process the binary data sent as part of a SOAP message. (Message Transmission Optimization Mechanism)
Enable Mule Soap headers
By default, Enable Mule Soap Headers is set to true (i.e. checked); this ensures that Mule can add a header to a SOAP message when required as part of the message’s processing. Set to false (i.e. unchecked) if you do not want Mule to add headers to SOAP messages. For example, if your SOAP messages will be processed by a third-party schema which prohibits deviations from very specific message properties (such as added Mule headers), deactivate the Enable Mule Soap Headers box.
Note: This field is currently not implemented and has no effect.
Soap 1.1
*Soap 1.2 *Use radio buttons to select the version of SOAP you want your service to use: SOAP 1.1 or SOAP 1.2. By default, Mule sets the version to SOAP 1.1.
Databinding
Within the context of the CXF framework, data binding refers to the mapping of data from XML documents to Java objects. Use the drop down menu to select a data binding type that will meet your configuration requirements:
-
custom-databinding
Schema Locations
Click the
 icon in the Schema Locations pane to specify a
 schemaLocationsattribute that identifies a namespacenameanddescription. Reference schemaLocation for additional details.
XML Editor or Standalone
-
Within the context of the CXF framework, data binding refers to the mapping of data from XML documents to Java objects. You can specify the databinding of your client or service, if you wish. (Not configurable on proxy service or proxy client.) The following are the different types of databinding available:
-
custom-databinding
-
To the CXF element in your flow, add a child element according to the type of databinding you want your service or client to use:
-
cxf:aegis-databinding -
cxf:jaxb-databinding -
cxf:custom-databinding -
cxf:jibx-databinding
-
-
As a child element of the CXF databinding element, add one or more
spring:propertyelements with either a name and value, or name and reference, to define any databinding properties. Refer to the code sample below. -
Define a
cxf:schemalocationsattribute, if you wish, to identify a namespace to which your service should refer. (Not configurable on JAX-WS client, simple client, or proxy client.) Reference schemaLocation for additional details. To the CXF element in your flow (below any interceptor elements, if you have added any), add a ` cxf:schemaLocations ` child element. -
Within the
cxf:schemaLocationselement, add acxf:schemaLocationchild element, to specify the URL of the schema to which your service should refer. Refer to code sample below. -
As per your specific needs, configure any of the following CXF service or client attributes according to the table below. Refer to the code sample below.
Configuration |
Activity |
validationEnabled |
When set to true, validationEnabled ensures that Mule can add a header to a SOAP message when required as part of the message’s processing. Set to false if you do not want Mule to add headers to SOAP messages. For example, if your SOAP messages will be processed by a third-party schema which prohibits deviations from very specific message properties (such as added Mule headers), set validationEnabled to false. |
mtomEnabled |
Set mtomEnabled to true if you want Mule to process the binary data sent as part of a SOAP message. (Message Transmission Optimization Mechanism) |
wsdlLocation |
Enter the URL (relative or absolute) of the WSDL file which describes the functionality of the SOAP API. |
soapVersion |
Identify the version of SOAP you want your service to use: SOAP 1.1 or SOAP 1.2. By default, Mule uses SOAP 1.1. |
See Also
-
Access full CXF Component Reference documentation.
-
Learn the basics of publishing a SOAP API.
-
Learn the basics of consuming a SOAP API.