MUnit Database Server
Overview
One of the main problems of testing production code are external system connections. If we create a test of a piece of code that connects with a database server, we need to install a DB server in our local environment in order to run the tests. Another option is to have an external DB server for testing only, but the major problem with this approach is that our Maven project would not be portable — we could not send it to a third party because they would not be able to compile it without installing the DB server first.
To enable you to avoid this issue, MUnit allows you to implement a database server in your local environment.
Creating a Test Using MUnit DB Server
For the purpose of this documentation we are going to assume we are testing the following Mule code:
Studio Visual Editor
XML or Standalone Editor
<!-- Set Up a default Java Data Base Connection -->
<spring:beans>
<spring:bean id="jdbcDataSource" class="org.springframework.jdbc.datasource.SimpleDriverDataSource">
<spring:property name="driverClass" value="${db.driver}"/>
<spring:property name="url" value="${db.url}"/>
<spring:property name="username" value="${db.user}"/>
<spring:property name="password" value="${db.password}"/>
</spring:bean>
</spring:beans>
<!-- Configure your DB connector referencing your JDBC specs -->
<db:generic-config name="Generic_Database_Configuration" doc:name="Generic Database Configuration" dataSource-ref="jdbcDataSource"/>
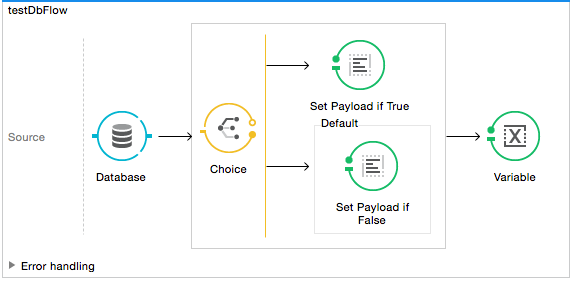
<flow name="testDbFlow">
<!-- Perform a query based on a value passed by a flow variable -->
<db:select config-ref="Generic_Database_Configuration" doc:name="Database" >
<db:parameterized-query><![CDATA[SELECT * FROM jobtitlelookup WHERE jobtitleid = #[variable:jobid]]]></db:parameterized-query>
</db:select>
<!-- Set two conditions depending on the query result -->
<choice doc:name="Choice">
<!-- If there is one or more values resulting from the query set those values as the payload -->
<when expression="#[payload.size()>0]">
<set-payload value="#[payload[0].get('jobtitle')]" doc:name="Set Payload if True"></set-payload>
</when>
<!-- If the query throws no results, inform it in the payload -->
<otherwise>
<set-payload value="No job title for #[flowVars.jobid] was found" doc:name="Set Payload if False"></set-payload>
</otherwise>
</choice>
<!-- Finally, pass the payload content as a Flow variable -->
<set-variable value="#[payload]" variableName="job" doc:name="Variable"></set-variable>
</flow>We need to create a test that:
-
Contains a Database Server with a
jobtitlelookuptable. -
Provides a valid Database Structure for the Database connector to perform its' query.
-
Passes a value for the
jobidvariable that the Database connector uses
|
This page assumes that you have When running from Maven, you need to add the MUnit DB server artifact to your Also this code example uses Spring for the Database configuration. When running from Maven, you should add Spring’s dependencies to your |
Defining The MUnit DB Server
Define the DataBase server using the DB Server connector from the MUnit Integration Test Tools in your Mule Pallet.
The DB Server can take the following parameters:
| Attribute Name | Description |
|---|---|
|
Defines the configuration name of this DB server. Must be unique. |
|
Defines the name of the in-memory DB. |
|
Specifies the path of the SQL file that defines the DB structure/contents. This parameter is used to create the DB at startup. Find out more about this in the Defining the DB Structure from an SQL File section. |
|
Specifies the path of the-comma separated file used to define the DB structure/contents. This parameter is used to create the DB at startup. Find out more about this in the Defining the DB Structure from a CSV File section. |
For this example we define the DB structure and content using a .csv file.
Create a file named jobtitlelookup.csv containing the following values:
JOBTITLE,EECSALARYORHOURLY,JOBTITLEID
Developer,10,DEV
In order for this csv file to be visible within your project, make sure you locate it in the src/test/resources directory from your application.
Proceed to define your DB Server configuration in a new MUnit Suite.
<munit:config mock-inbounds="false" mock-connectors="false"/>   (1)

<dbserver:config name="DB_Server" database="DATABASE_NAME" doc:name="DBServerConfig" csv="jobtitlelookup.csv" /> (2)| 1 | Defines MUnit configuration. Notice that mock-connectors is set to false. |
| 2 | Defines the DB server configuration. |
DB Server Connection Parameters
|
The MUnit DB server has the following default set of connection parameters: |
The values of the db.user and db.password parameters are intentionally blank.
Defining the DB Structure
There are two different ways to define the structure and content of your database:
-
SQL
-
CSV
| The MUnit DB server is based on H2. Complex structures, index and join commands may not work properly. |
Defining the DB Structure from an SQL File
To define you DB structure and content from an SQL file, provide a valid set of ANSI SQL DDL (Data Definition Language) instructions.
<dbserver:config name="DB_Server" database="DATABASE_NAME" sqlFile="FILE_NAME.sql" />Defining the DB Structure from a CSV File
You can create your DB from CSV files.
-
The name of the table is the name of the file (in the example below,
customers). -
The name of the columns are the headers of your CSV file.
<dbserver:config name="DB_Server" database="DATABASE_NAME" csv="FILE_NAME.csv"/>You can also split your DB structure among several CSV files. In this case, include the file names as a list separated by a semicolon, as shown below.
<dbserver:config name="DB_Server" database="DATABASE_NAME" csv="FILE_NAME.csv;FILE_NAME_1.csv"/>This creates two tables FILE_NAME and FILE_NAME_1
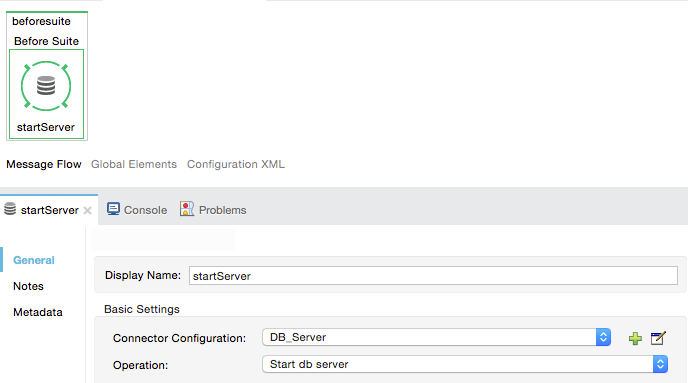
Starting The MUnit DB Server
In order for it to run, the database server must be started in a before-suite. You start the server using the start-db-server message processor.
Studio Visual Editor
XML or Standalone Editor
<munit:before-suite name="beforesuite" description="Starting DB server">
    <dbserver:start-db-server config-ref="DB_Server" doc:name="startServer"/>
</munit:before-suite>|
If you are running from Maven and are getting a If you are getting this exception and you are not using Maven, you need to add the This adds h2 libraries to your build path allowing your project to use the org.h2.Driver class |
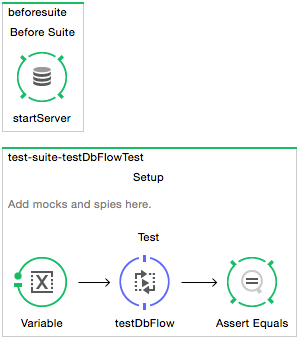
Running The Test
Once our DB server is up and running we can run our test.
Studio Visual Editor
XML or Standalone Editor
<munit:test name="test-suite-testDbFlowTest" description="Asserts the payload after running the project">

            <!-- Passes a variable to value to run in the main flow. -->
            <set-variable variableName="jobid" value="DEV" doc:name="Variable"/>

            <!-- Run the production code. -->
            <flow-ref name="testDbFlow" doc:name="testDbFlow"/>

            <!-- Asserts the payload returned by the production code. This value comes from our in-memory database. -->
            <munit:assert-on-equals expectedValue="Developer" actualValue="#[flowVars['job']]" doc:name="Assert Equals"/>
</munit:test>
We are not using any new message processor, since the database has already been initialized and loaded with the proper data. We are just validating that the query ran in our production code is correct, and that the payload returned is the expected one.
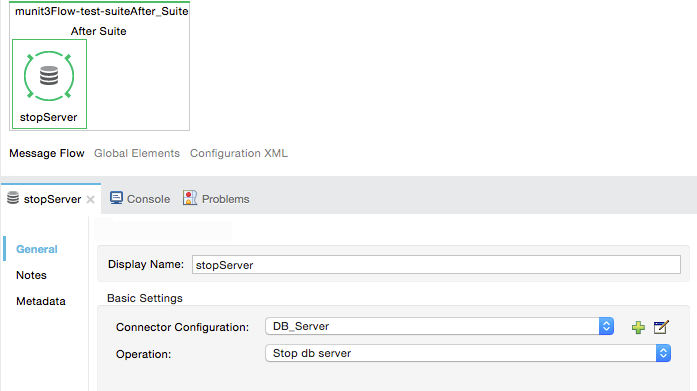
Stopping The MUnit DB Server
To stop the DB server gracefully, it needs to be stopped in an After Suite, using a db-server message processor with the Stop db server operation.
Studio Visual Editor
XML or Standalone Editor
<!-- Stop the server -->
<munit:after-suite name="munit3Flow-test-suiteAfter_Suite" description="After suite actions">
   <dbserver:stop-db-server config-ref="DB_Server" doc:name="stopServer"/>
</munit:after-suite>
Other MUnit DB server Message Processors
The MUnit DB server also offers a few other features, outlined in this section.
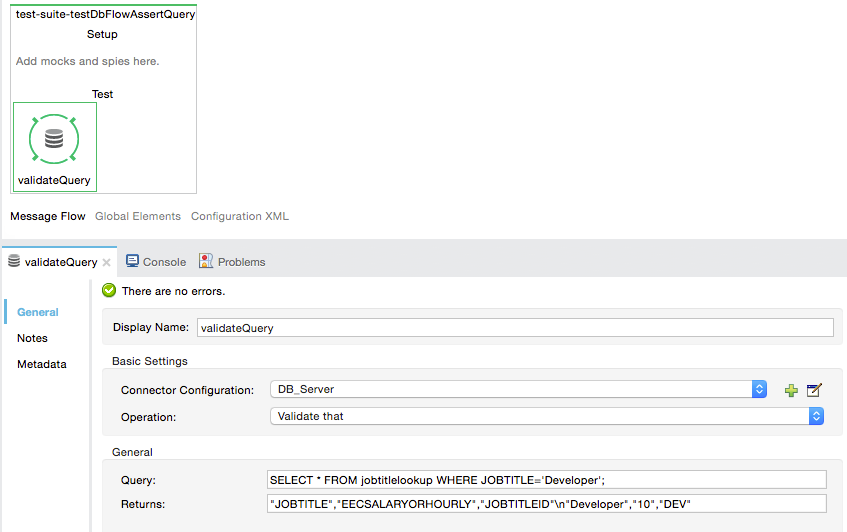
Validating SQL Query Results
The MUnit DB Server allows you to validate that the results of a query are as expected.
To do this, you use the validate-that operation. Set the results property to CSV with rows separated by a newline character (\n), as shown below.
Studio Visual Editor
XML or Standalone Editor
<munit:test name="test-suite-testDbFlowAssertQuery" description="Check if a specific query returns the expected value">
<dbserver:validate-that config-ref="DB_Server"
query="SELECT * FROM jobtitlelookup WHERE JOBTITLE='Developer';" returns=""JOBTITLE","EECSALARYORHOURLY","JOBTITLEID"\n"Developer","10","DEV"" doc:name="validateQuery"/>
</munit:test>The result should be a CSV text. In order to be able to see it as the payload, MUnit DBserver uses OpenCSV libraries
|
If you are running from Maven and are getting a If you are getting this exception and you are not using Maven, you need to add the This adds open csv libraries to your build path allowing your project to properly render the csv into your payload. |
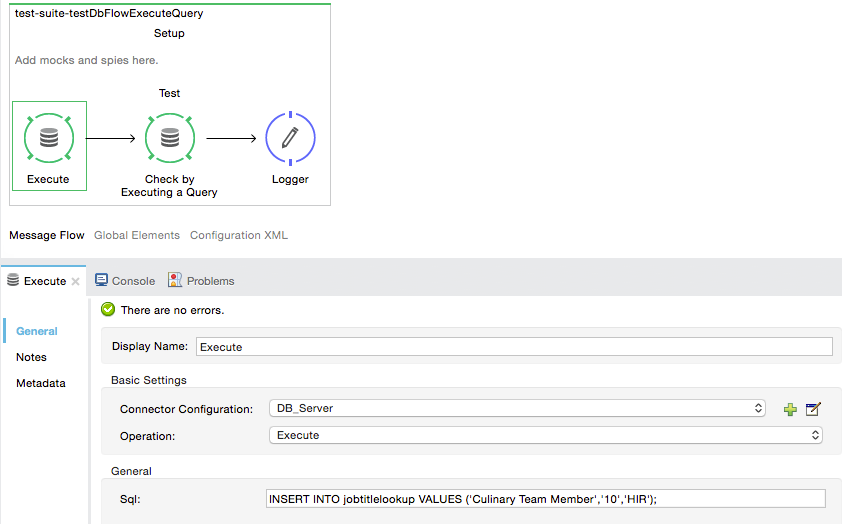
Executing SQL instructions and SQL Queries
The MUnit DB Server allows you to execute instructions on the in-memory databases, so you can add or remove registries before a test, and also check if your data was stored correctly.
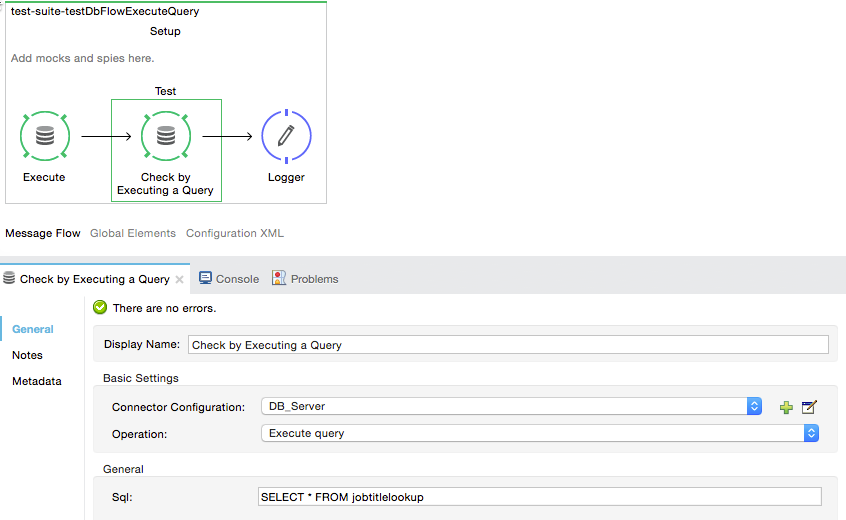
Use a DB Server connector with the execute operation to insert the values new values to the table (Culinary Team Member,10,HIR), then use another DB Server connector with an execute query operation to retrieve all values from the table (including the newly added ones) and check the payload using a logger component to store the payload.
Studio Visual Editor
XML or Standalone Editor
<munit:test name="test-suite-testDbFlowExecuteQuery" description="Execute a query from the DB connector">

	<!-- Execute a SQL instruction using the execute operation -->
	<dbserver:execute config-ref="DB_Server" doc:name="Execute" sql="INSERT INTO jobtitlelookup VALUES ('Culinary Team Member','10','HIR');"/>

	<!-- Check the update using execute-query operation -->
	<dbserver:execute-query config-ref="DB_Server" sql="SELECT * FROM jobtitlelookup" doc:name="Check by Executing a Query"/>

	<!-- log the resulting payload -->
	<logger message="#[payload]" level="INFO" doc:name="Logger"/>
</munit:test>
The logger in your console should read:
[main] org.mule.api.processor.LoggerMessageProcessor: [{JOBTITLEID=DEV, EECSALARYORHOURLY=10, JOBTITLE=Developer}, {JOBTITLEID=HIR, EECSALARYORHOURLY=10, JOBTITLE=Culinary Team Member}]Execution Environments
You may have noticed that our production code example makes extensive use of placeholders for certain parameters, such as driverName, url etc. in the example below:
<spring:bean id="jdbcDataSource" class="org.enhydra.jdbc.standard.StandardDataSource" destroy-method="shutdown">
  <spring:property name="driverName" value="${db.driver}" />
  <spring:property name="url" value="${db.url}" />
  <spring:property name="user" value="${db.user}" />
  <spring:property name="password" value="${db.password}" />
</spring:bean>
The reason for this is that properties allow us to create code that is more configurable. Compare the example above with:
<spring:bean id="jdbcDataSource" class="org.enhydra.jdbc.standard.StandardDataSource" destroy-method="shutdown">
  <spring:property name="driverName" value="org.mule.fake.Driver" />
  <spring:property name="url" value="192.168.0.3" />
  <spring:property name="user" value="myUser" />
  <spring:property name="password" value="123456" />
</spring:bean>
The second example code is untestable, even without MUnit. If we need to test this code before going to production, we always hit the production DB server with our real credentials, which entails risk.
On the other hand, the first example code allows us to define two different property files:
-
One for the testing environment
-
One for the production environment
This is use in combination with the Mule property placeholder, shown below with $site:
<global-property value="mule.${env}.property"/>In the example above, the use of $site allows us to leverage execution environments. So for example we can define two separate properties files, mule.test.properties and mule.prod.properties, containing the same properties with values according to the environment we wish to use.
To run your test from Maven and issue the env parameter from the command line, you can run: mvn -DargLine="-Dmule.env=test" clean test.
|