Using Anypoint Studio to Configure NetSuite Connector
Add the Connector to a Studio Project
Anypoint Studio provides two ways to add the connector to your Studio project: from the Exchange button in the Studio taskbar or from the Mule Palette view.
Add the Connector Using Exchange
-
In Studio, create a Mule project.
-
Click the Exchange icon (X) in the upper-left of the Studio task bar.
-
In Exchange, click Login and supply your Anypoint Platform username and password.
-
In Exchange, search for "netsuite".
-
Select the connector and click Add to project.
-
Follow the prompts to install the connector.
Add the Connector in Studio
-
In Studio, create a Mule project.
-
In the Mule Palette view, click (X) Search in Exchange.
-
In Add Modules to Project, type "netsuite" in the search field.
-
Click this connector’s name in Available modules.
-
Click Add.
-
Click Finish.
Configure in Studio
-
Drag a connector operation to the Studio Canvas.
-
Select an authentication mechanism listed on the Global connector configuration. It can be one of the followings:
Configuration Description Login Authentication
Makes use of the SuiteTalk’s login API call on the first request sent by the connector to establish a session with NetSuite.
Request Based Authentication
Using this strategy, you can send user credentials in the SOAP header of each request instead of authenticating to NetSuite by invoking login.
Single Sign-On Authentication
This is a token based authentication system that avoids the use of environment username and password. Here you supply a privateKey together with other information. The connector is then responsible for generating an authentication token and establishing a session with NetSuite via the
ssoLoginAPI call on the first request.Token Authentication
Similar to Single Sign-On Login Authentication, this is a token based authentication system. However, instead of using a privateKey generated via openssl, this uses a consumer and token key/secret pairs which are established within the NetSuite environment.
-
Configure these fields according your selection:
-
Login Authentication
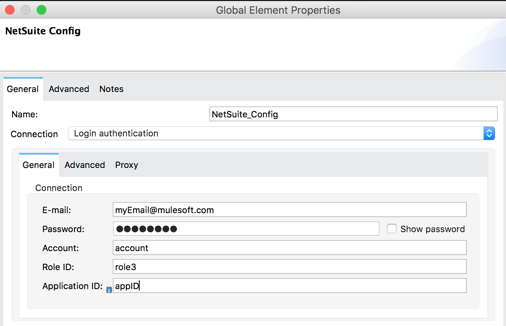
Parameter Description Name
Enter a name for the configuration with which to reference it later.
Email
Enter the login email of the NetSuite UI.
Password
Enter the corresponding password to log into NetSuite UI.
Account
Enter the account ID of the SuiteTalk NetSuite web services. This is usually found within NetSuite sandbox UI under Setup > Integration > Web Service Preferences.
Role Id
Enter the role ID for the user in SuiteTalk, which determines the Processor privileges.
Application Id
Enter the application ID corresponding to the Integration record to be used.
-
Request Based Authentication

Parameter Description Name
Enter a name for the configuration with which to reference it later.
Email
Enter the login email of the NetSuite UI.
Password
Enter the corresponding password to log into NetSuite UI.
Account
Enter the account ID of the SuiteTalk NetSuite web services. This is usually found within NetSuite sandbox UI under Setup > Integration > Web Service Preferences.
Role Id
Enter the role ID for the user in SuiteTalk, which determines the Processor privileges.
Application Id
Enter the application ID corresponding to the Integration record to be used.
-
SSO Authentication

Parameter Description Name
Enter a name for the configuration so it can be referenced later.
SSO Library
Add your SSO dependency as a Maven dependency format once you click Add Dependency.
Partner Id
Enter the partner ID used in the mapping process.
Partner Account
Enter the account ID of the SuiteTalk NetSuite web services.
Company ID
Enter the company ID used in the mapping process for the connector to generate a token.
User ID
Enter the user ID used in the mapping process for the connector to generate a token.
Key File
Enter the privateKey file name to pick up from the project. This file should be the .der file generated as per NetSuite’s specifications. This is used to encrypt the company ID and user ID into a token for ssoLogin.
Application Id
Enter the application ID corresponding to the Integration record to be used.
-
Token Authentication
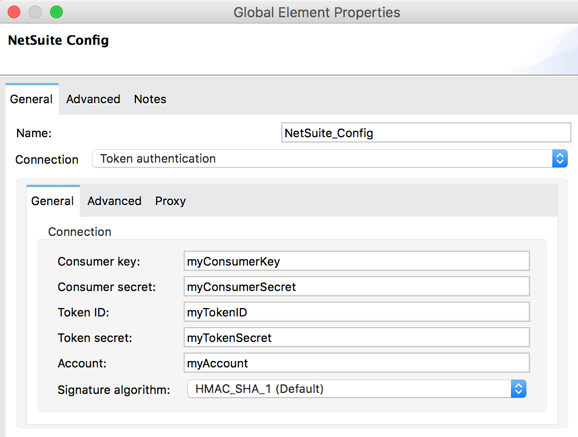
Parameter Description Consumer Key
Enter the consumer key value for the token based authentication enabled integration record being used.
Consumer Secret
Enter the consumer secret value for the token based authentication enabled integration record being used.
Token ID
Enter the token ID representing the unique combination of a user and integration generated within the NetSuite environment.
Token Secret
Enter the respective token secret for the user/integration pair.
Account
Enter the account ID of the SuiteTalk NetSuite web services. This is usually found within NetSuite sandbox UI under Set Up > Integration > Web Service Preferences.
Signature algorithm
Type of HMAC signature algorithm
-
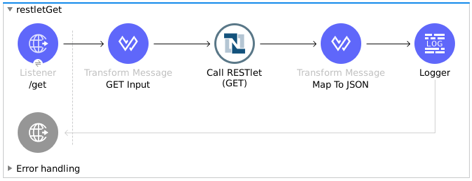
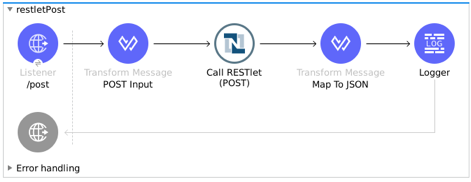
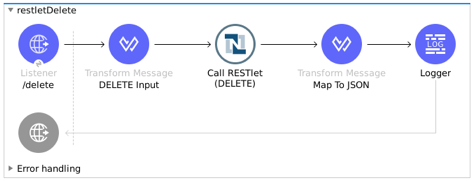
Use Case: Call NetSuite RESTlet
This use case shows how to call RESTlets that are deployed in NetSuite instances.
By following these instructions, you can:
-
Create a customer record.
-
Retrieve a customer record.
-
Delete a record.
Before You Begin
-
Java 8
-
Anypoint Studio 7.0.x
-
Mule Runtime 4.0.x EE
-
DataWeave 2.0
-
Access to a NetSuite instance with credentials in the
mule-app.propertiesfile
Deploy a Script as a RESTlet
-
Create a sample JavaScript script:
// Get a standard NetSuite record function getRecord(datain) { return nlapiLoadRecord(datain.recordtype, datain.id); // for example, recordtype="customer", id="769" } // Create a standard NetSuite record function createRecord(datain) { var err = new Object(); // Validate if mandatory record type is set in the request if (!datain.recordtype) { err.status = "failed"; err.message= "missing recordtype"; return err; } var record = nlapiCreateRecord(datain.recordtype); for (var fieldname in datain) { if (datain.hasOwnProperty(fieldname)) { if (fieldname != 'recordtype' && fieldname != 'id') { var value = datain[fieldname]; if (value && typeof value != 'object') // ignore other type of parameters { record.setFieldValue(fieldname, value); } } } } var recordId = nlapiSubmitRecord(record); nlapiLogExecution('DEBUG','id='+recordId); var nlobj = nlapiLoadRecord(datain.recordtype,recordId); return nlobj; } // Delete a standard NetSuite record function deleteRecord(datain) { nlapiDeleteRecord(datain.recordtype, datain.id); // for example: recordtype="customer", id="769" } -
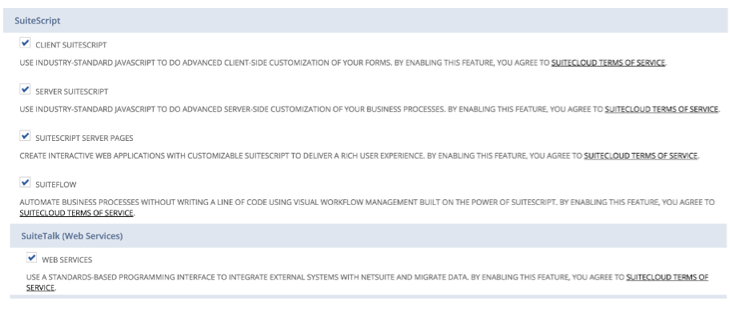
Enable SuiteScript and web services in your account. Log into NetSuite and click Set Up > Company > Enable Features > SuiteCloud.
-
Create a new script and upload the file created before. Go to Customization > Scripting > Scripts > New.
-
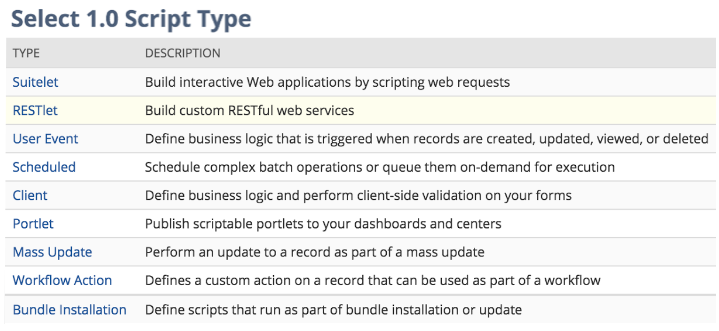
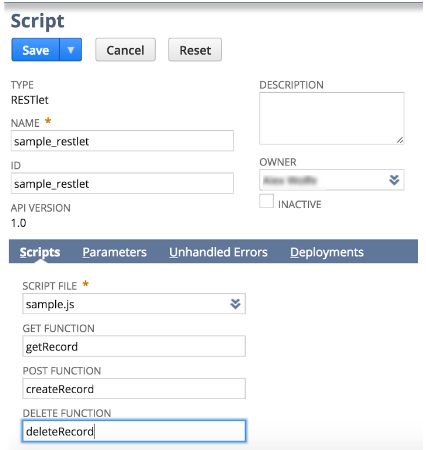
Pick the script file, click Create Script Record, and select RESTlet.
-
Fill out the form using the content of the script you uploaded, and deploy the script.
-
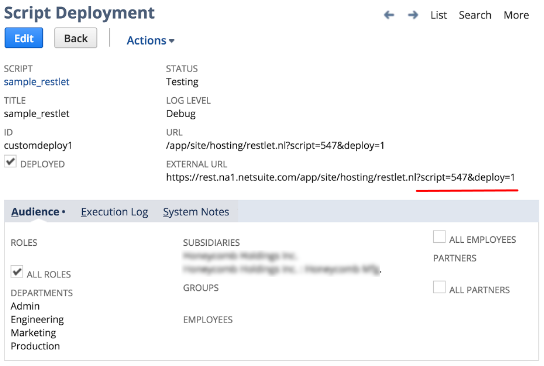
After selecting your audience you see the following page. Take note of the script and deploy numbers in the external URL since you need them to call the RESTlet.
Import the Project
-
Go to File > Import.
-
Select Anypoint Studio Project from External Location under the Anypoint Studio parent folder.
-
Provide the root path to the demo project folder.
-
Select Mule Runtime (4.1.1) or later.
-
Click Finish.
-
Configure the credentials, as well as the deployed script and deploy IDs, inside the file
src/main/resources/mule-app.properties.netsuite.email= netsuite.password= netsuite.account= netsuite.roleId= netsuite.applicationId= netsuite.subsidiary= netsuite.script= netsuite.deploy=-
Open the Global Element Configuration.
-
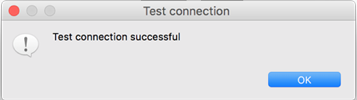
Click the Test Connection button to ensure there is connectivity with the sandbox.
Test Connection is a crucial step. If you experience connectivity issues, you won’t be able to execute any part of this use case, nor make use of DataSense.
-
A successful message should pop up.
-
Open a browser and access the URL
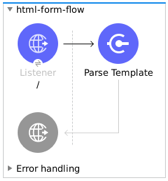
http://localhost:8081. You should see the application deployed: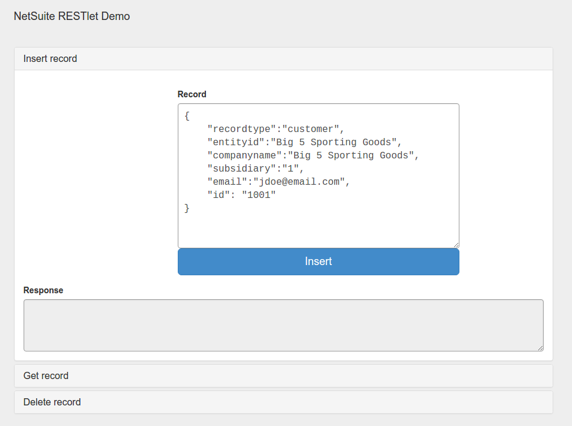
-
Next Steps
After configuring Studio, see the Examples topic for more configuration ideas.