Installing Anypoint Platform On Premises Edition
| To install this product please contact your MuleSoft Customer success representative or account executive, you must first acquire a license that enables you to use it. |
This section shows you how to install Anypoint Platform On-Premises Edition. The Anypoint Platform On-Premises Edition offers many of the features that are available in the online version of the Anypoint Platform as a service that you can run on your local servers, guarded by any security policies you may require.
Assumptions
This page assumes you have at least a basic understanding of Unix-based systems and networking, and are familiar with the command line. You should also be familiar with Docker.
Overview
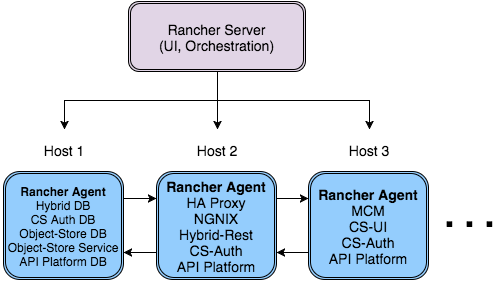
Anypoint Platform is available to download and install on-premises by obtaining the installation ZIP file from MuleSoft. Currently, Anypoint Platform On-premises Edition is run via Docker, an open-source virtualization platform, and Rancher is also used to run Docker containers in production. Docker uses containers to wrap applications in a complete filesystem with everything needed to run, including runtime and configuration data. MuleSoft provides Docker images that contain the different components of Anypoint Platform On-Premises Edition – complete with configuration – which you can run on Docker.
Docker runs natively on Linux, but you can use it on OS X and Windows via a Linux virtual machine. You can create your own virtual machine with a Linux distribution supported by Docker, or download and use Docker Toolbox, which contains both Docker Machine and Docker Compose. Docker Machine works as a wrapper around a virtual Linux machine on which Docker runs.
This document contains a brief section to provide orientation on installing Docker on your operating system, and complete instructions for downloading and running the Anypoint Platform on your Docker container.
With Rancher you have the ability to run as many copies of each stateless service as you want and Rancher will automatically balance them between registered hosts. That being said, you will only want to have 1 instance of the singleton services (databases, DBbackuper, mcm). For example, if you have 3 hosts registered and you want to run 2 copies of each service, then Rancher will automatically determine which hosts should run each service.
System Requirements
Operating system |
RHEL 7.1 or greater |
CentOS 7.1 or greater |
|
Storage |
30 GB for |
1 GB for home directory |
|
Memory |
8GB of RAM minimum |
16GB of RAM recommended |
|
Docker |
Docker engine 1.8.0 or later |
Docker Compose 1.3.1 or later |
|
Identity management provider |
OpenAM 11.0 or later |
LDAP v3 |
|
Ping Federate 6.10, 7.1 or 7.2. |
|
Network ports |
TCP: 80, 8080, 8081, 443, 8443, 9999 |
UPD: 500, 4500 |
| You need to have Docker version 1.8 or later. |
Follow the docker installation instructions that are appropriate for your system. https://docs.docker.com/engine/installation/
Download Script Bundle
Depending on what you wish to install, download the following bundle of configuration files and scripts:
-
Anypoint Platform On Premise Edition: For installing the entire functionality of the Anypoint Platform, including API administration tools.
These .zip files contain all of the configuration and installation scripts needed to run Anypoint Platform.
Architecture of Anypoint Platform on Docker
| For a more detailed explanation of Docker, see the Docker documentation. |
Docker uses a server-client architecture. It runs as a daemon on a Linux host, where the docker images are stored. A docker image is a template that contains an environment and applications. Using a client application, you tell the Docker daemon to run a container from a specific image. A container is a virtual operating system, built at runtime from the template provided by the image you specified. The container runs the image’s applications, for example a Web server.
Anypoint Platform On-Premises is a multi-container application, i.e. its modules occupy more than one container. Anypoint Platform uses Docker Compose, a tool that allows you to bring up or shut down a multi-container application with a single command. If you’re using the Docker Toolbox, it already includes Docker Compose in it.
To run Anypoint Platform On-Premises, you need to:
-
Install Docker v1.8 or later, natively or on a virtual machine
-
Install Docker Compose
-
Subscribe and login to the MuleSoft Docker repository, to download the Docker images for Anypoint Platform
-
Run Anypoint Platform
-
Run a command to seed the authentication database with an initial set of users
-
Login to Anypoint Platform
These steps are detailed below.
Installing Docker and Rancher
Docker runs natively on Linux, including Debian, Ubuntu, Red Hat, CentOS, Oracle and others.
Docker can also run on OS X (10.6 "Snow Leopard" and above) and Windows (7 and 8.1) using Docker Toolbox. However, we only recommend using Mac or Windows for demonstration purposes. The links to download instructions for OS X and Windows use Docker Toolbox.
Instructions for installing Docker:
Other resources:
Installing Docker Compose
Please follow the instructions listed on Docker Compose install
Copy platform config files to /opt/config
The Anypoint Platform configuration files must be in a predictable location on each host machine because Rancher dynamically launches services on any available host. This means that it won’t have the benefit of finding config files from a current working directory the same way docker-compose would. /opt/config has been chosen as the default directory to store platform configuration files, so what you need to do is download the Anypoint Platform On Premises and copy the config directory into the /opt folder. Repeat this procedure on every host you will setup.
> cd anypoint-platform
> sudo cp -r config /opt/.
Rancher Server Installation:
Run the rancher server on the machine you designate to host it. It occupies a single docker container.
> sudo docker run -v /opt/config/logos/:/usr/share/cattle/war/assets/images/logos -d --restart=always -p 9999:8080 rancher/server:v1.0.1
After a few minutes, the server will be running and will allow you to access the UI on your browser of choice vía HTTP: http://$SERVER_IP:9999
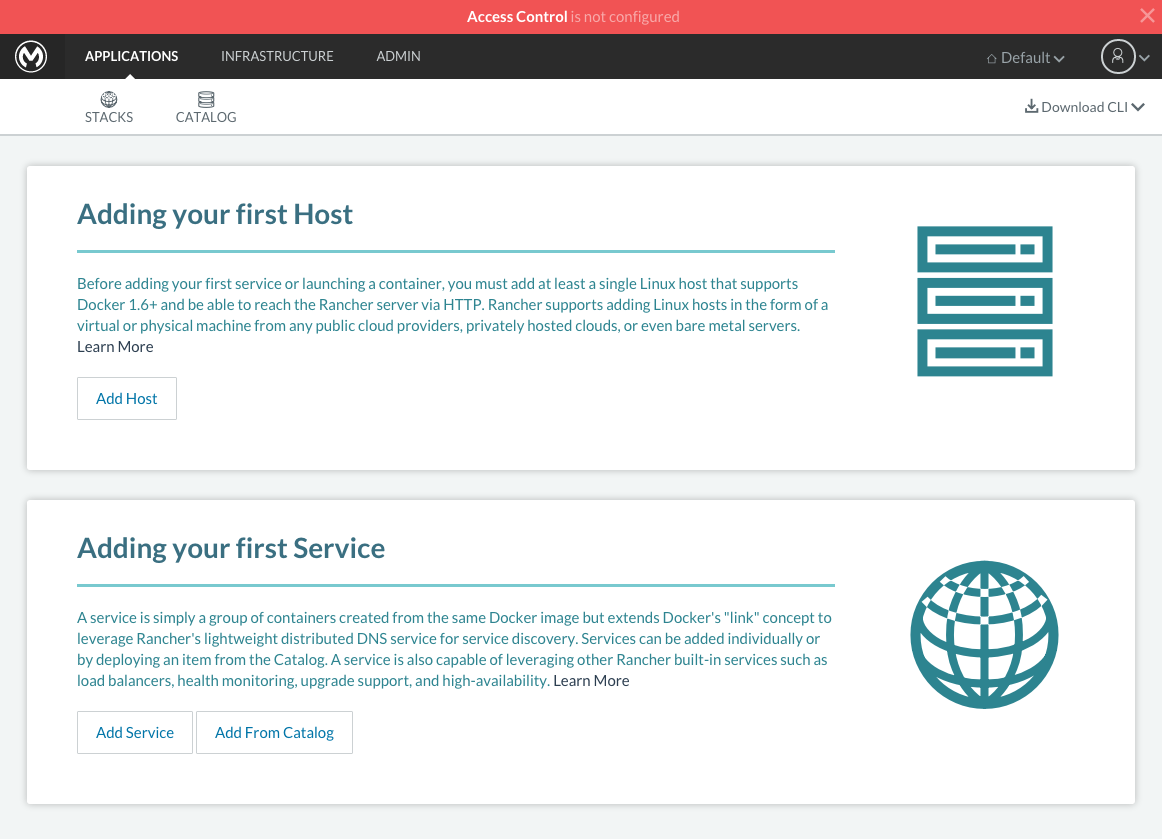
You now have the server up and running. From here onwards, this tutorial will make use of the UI instead of the terminal to manage the installation.
Register a host:
Make sure Docker and Docker compose is installed in the machine. This machine will be used as a host to run MuleSoft software. Open a terminal on this machine.
Back on to the browser from the UI top nav bar click on INFRASTRUCTURE and then HOSTS. You will see a screen that shows all registered host machines. At this point, you won’t see any registered machines.
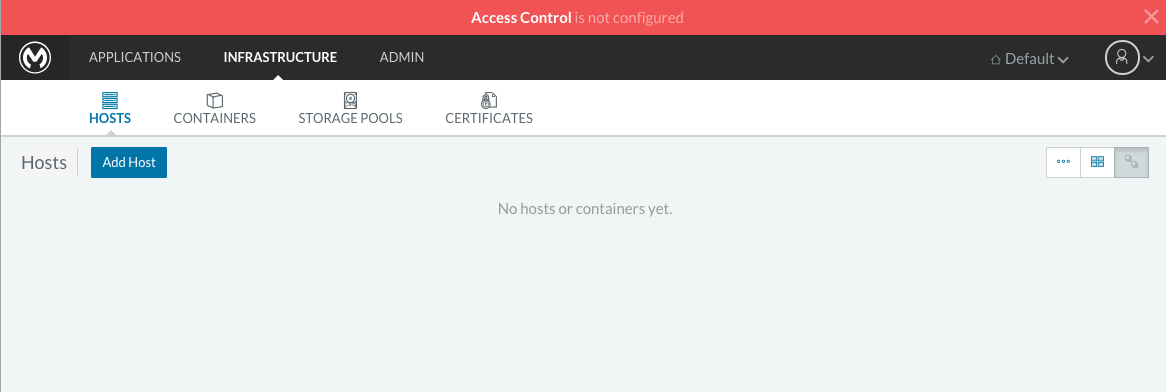
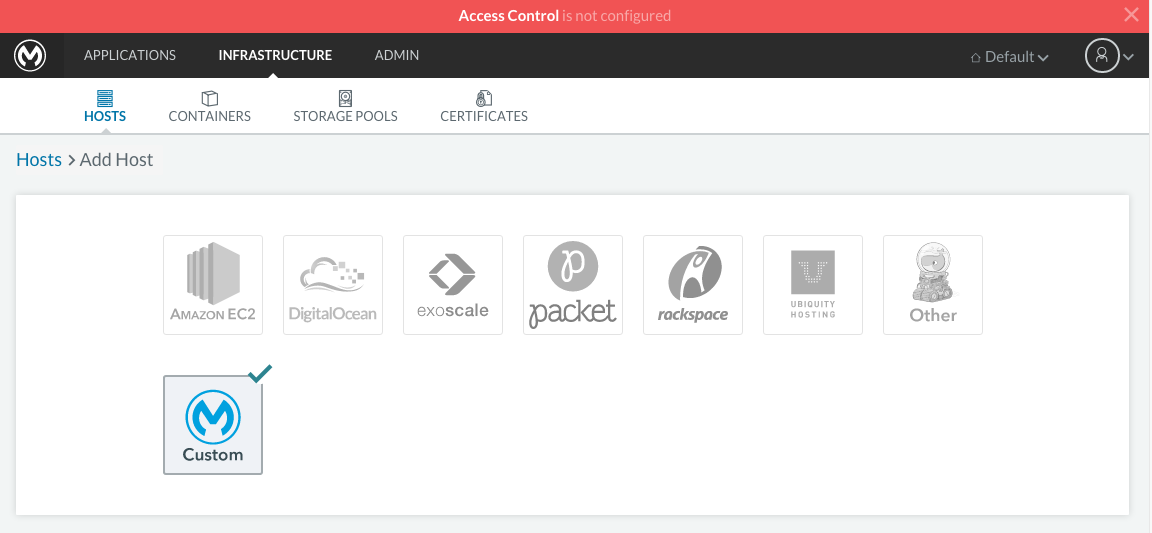
Click on the ADD HOST button to add a host. On the next page, the UI will require that you provide a base URL that the hosts should use to connect to the server. By default it will use the URL that your browser is currently at, which should be fine, so hit Save to move on to the next page.
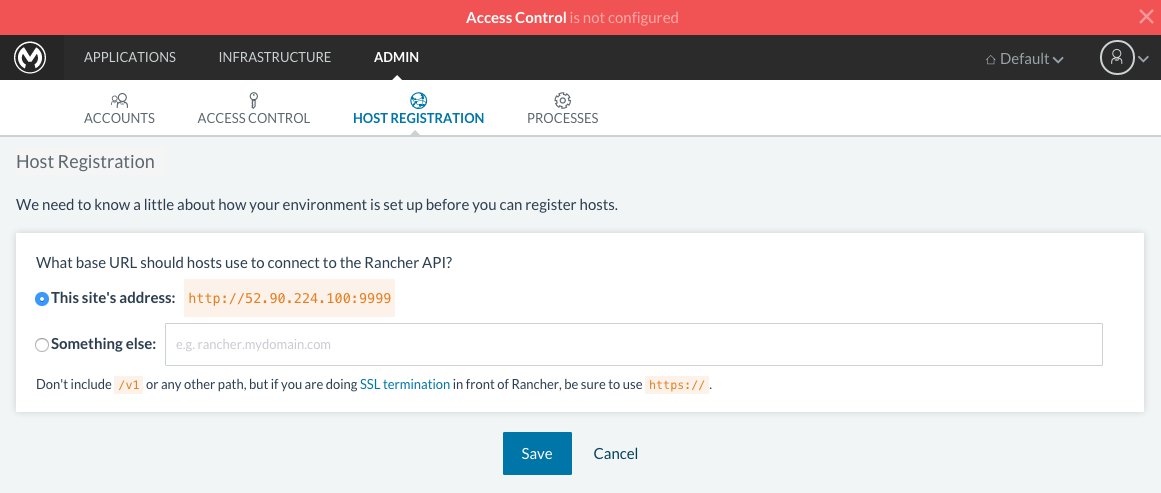
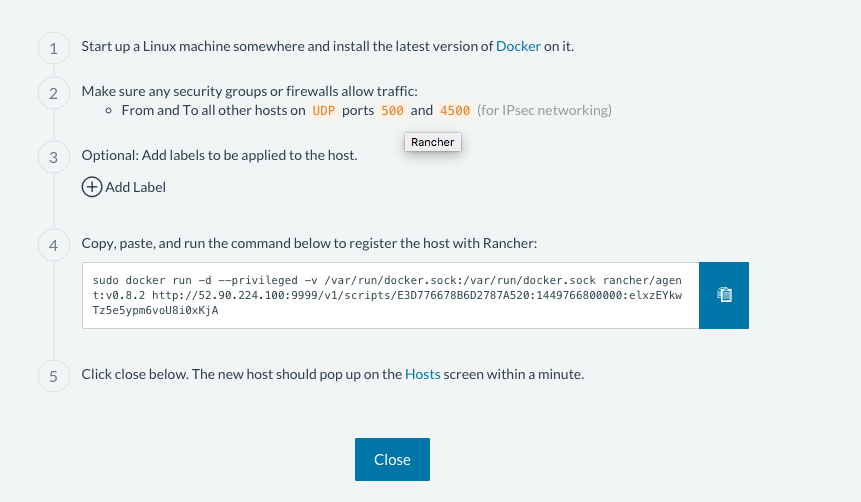
There are several ways to auto-provision hosts from different cloud providers. We will not use any of these since you have already provisioned your own server. Click on the CUSTOM icon which will give you a command to run on the host machine. Copy and paste this into your terminal to register the host with the server (this will run the Rancher agent Docker image on the host machine). Click on close. Wait for a minute and go back to the host’s screen and you will see that the host has been registered with the server and that it’s ready to receive commands.
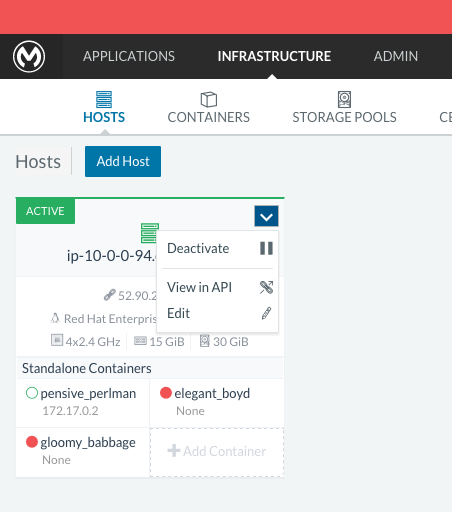
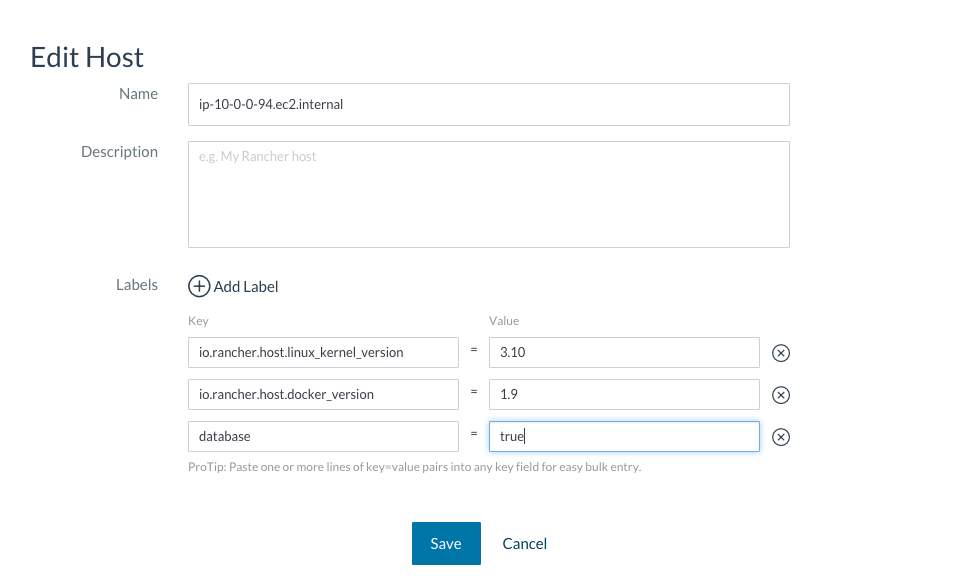
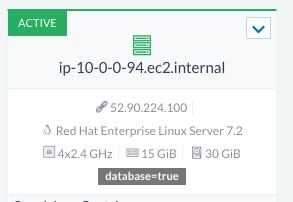
One of the hosts you are adding to your cluster needs to be designated as the “database” host, which will ensure correct container placement for failover scenarios. Pick your designated host and open its dropdown menu by clicking on the down arrow, select “Edit” and add the following label:
"database_role" = "a"
You also need to add an application host. For that you need to add a label to the host to specify the app_role = any. You can execute the Database and application on the same host (16GB of RAM), but for production use we recommend to have DB and application separate.
"app_role" = "any"
With that label, all the applications containers will be executed in that host. You can add multiple Application hosts.
You can verify that the host now displays this label when viewed on the Hosts screen.
| Make sure that exactly one single host has this label attached. |
Docker Registry Setup
Although docker registries can be manually added on every host which is managed by Rancher, it’s better to add “docker.mulesoft.com” to the platform to make sure this registry exists on all nodes under Rancher control. This way Rancher will be able to pull MuleSoft images by itself on any host without user intervention.
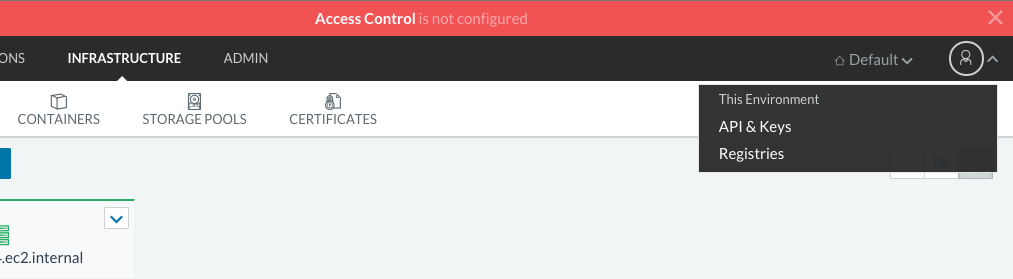
In the Rancher UI, click on the icon at the top right corner of the UI and then select Registries
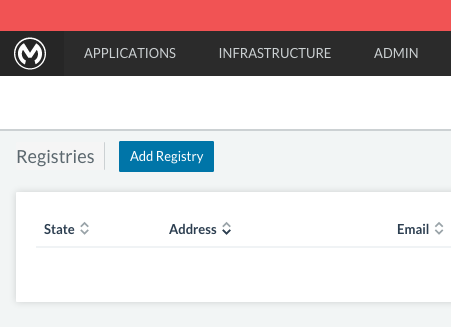
-
Create a new “custom” registry. You should enter Anypoint credentials that have proper permissions to pull images.
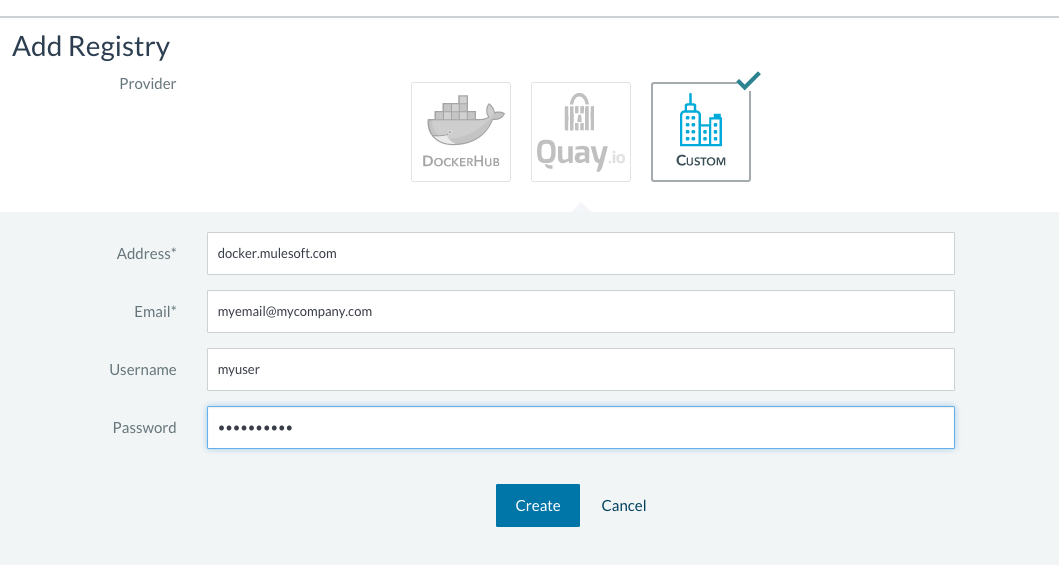
-
Verify that the new registry you created is now active
-
To add Docker registries on every host, login in each host and pull the MuleSoft images using the command line. The script
pull-docker-images.shincluded in the distribution helps to pull all images.
|
We use our own internal docker registry. To download these images you will need to have the appropriate permissions added to your Anypoint account. If you do not already have these, please contact Account Representative (CSM or AE) and they will guide you through the provisioning process. |
OPTIONAL: Regenerate certificates, keys and keystores in the platform config
Included with both zip files available for download in this document, there’s a default set of encryption keys, self-signed certificates, and keystores that are used by the platform for security purposes such as signing certificates during mule/gateway runtime registration. Out of the box, the platform works fine using these default files, but if you wish to replace them with newly generated ones for increased security we have included a script to automate this process.
> cd anypoint-platform
> keystore-generation.sh
Follow the on-screen prompts. Notice that once executed a new file will be generated from this process named truststore.jks). This file is required by the Mule Agent for all runtimes you wish to register to the console because the agent uses 2-way SSL validation. Before registering a runtime, you must copy this file to the conf/ folder of that runtime.
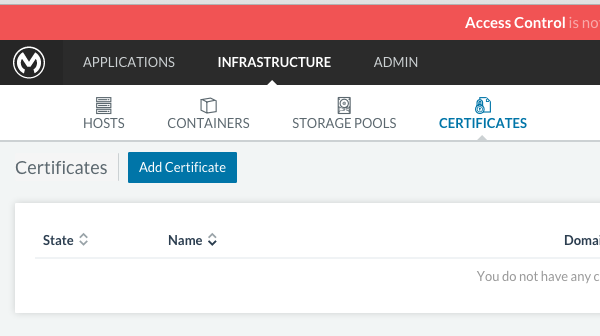
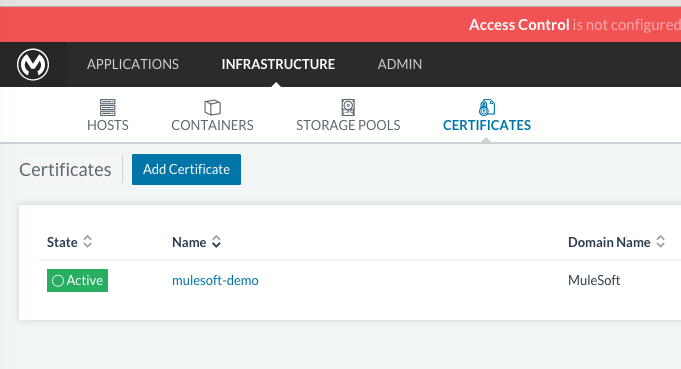
Upload SSL certificate
The Anypoint Platform creates a load balancer which makes SSL termination. By default, the Rancher configuration files rely on an existing SSL certificate named “mulesoft-demo”. To upload its key and certificate, on Rancher open INFRASTRUCTURE → CERTIFICATES and click the Add Certificate button. Then upload or insert the key and certificates.
|
If the name of your certificate is not “mulesoft-demo”, you need to modify the following line in rancher-compose.yml file: |
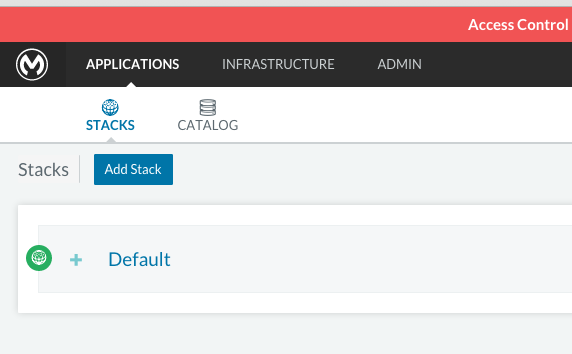
Run the platform via the UI
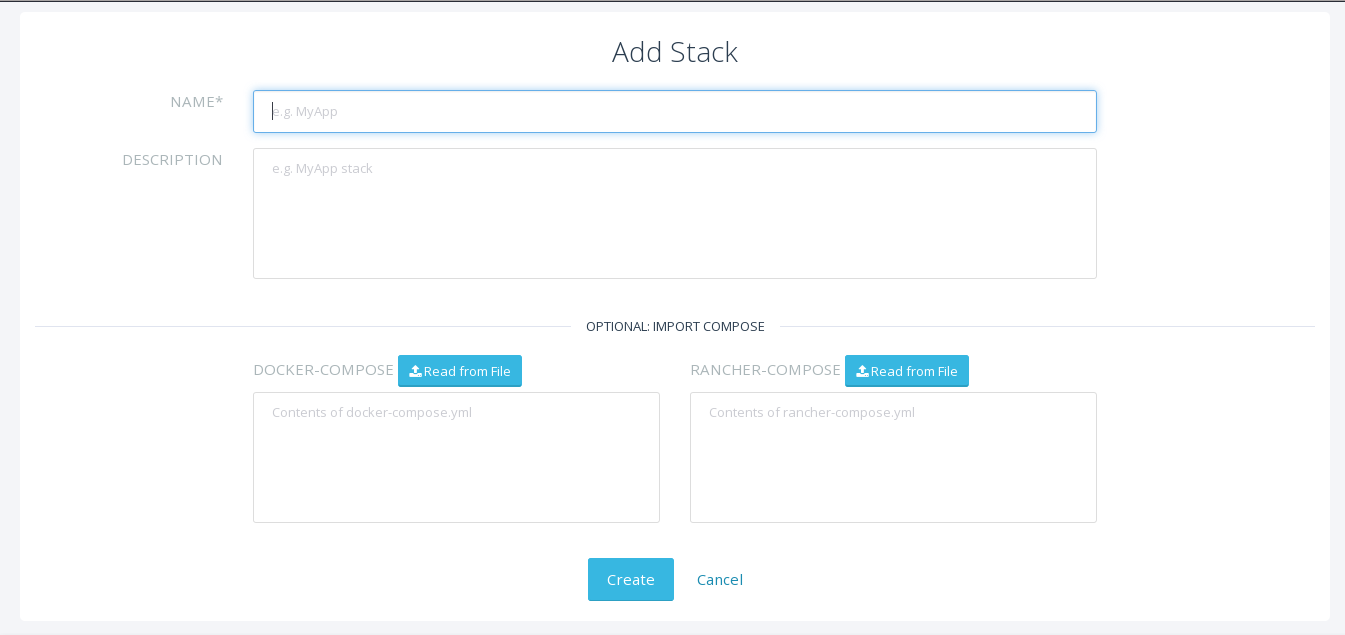
To start, click on the Applications link on the top nav bar and then click the Add Stack button.
Give the newly created stack a name (as a suggestion, name it anypoint-platform) and load the docker-compose-single-db.yml and rancher-compose.yml files available as part of either of the two .zip bundles attached at the start of this document. It’s the equivalent of “rancher-compose create” command.
After you do this, you can go back to the Stacks screen and you’ll be able to see all the images of the Anypoint Platform created under the stack name that you used. These images are not running yet, but the stack has been created with the information you provided. To run the platform, click on the Options icon for the stack and then select Start Services.
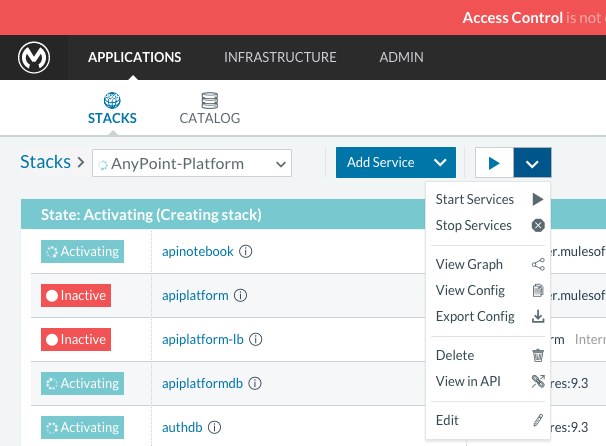
It will take several minutes for the services to come online. The icons will slowly turn green as the services start and become ready.
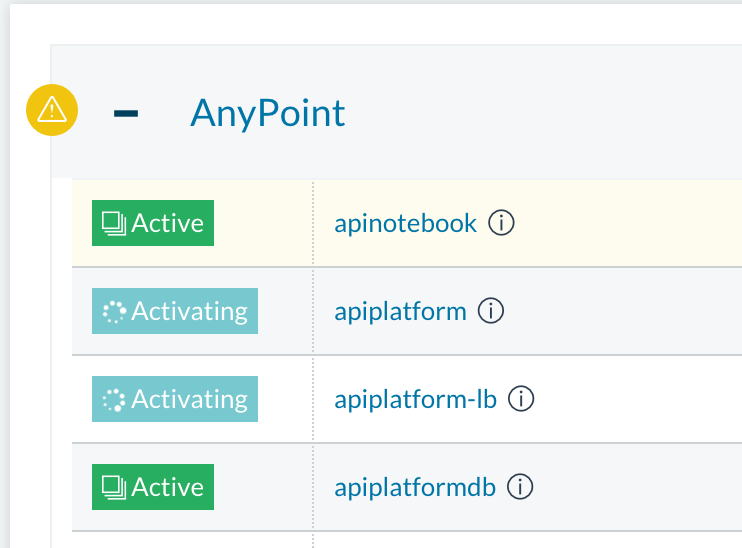
Once the images are all active (except for hybrid-rest which will remain degraded until the seed script is executed). your Stacks screen will look like in the image below:

Migrate and Seed databases
Now that all the services are up and running, you can run the migration and seed the authentication, object-store, and api-platform DBs. There are two ways to do this:
-
The easiest way is running the
seed-database.shscript, available in both of the two bundle .zip files that you can download. This script runs all 3 migrations in sequence.This script will only work if all the services are running on 1 host. -
If the services are running on different hosts, then you should use the manual method described below.
Using seed-database.sh
In both .zip bundle files, there is a file named seed-database.sh. Copy this file to the host machine running all the services and run it from the terminal. It performs all necessary migrations in sequence.
Manual database migration and seeding
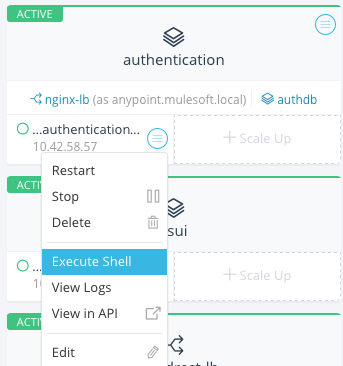
Rancher makes it easy to open a terminal window to any container via the UI, you can do that to execute the migration commands manually.
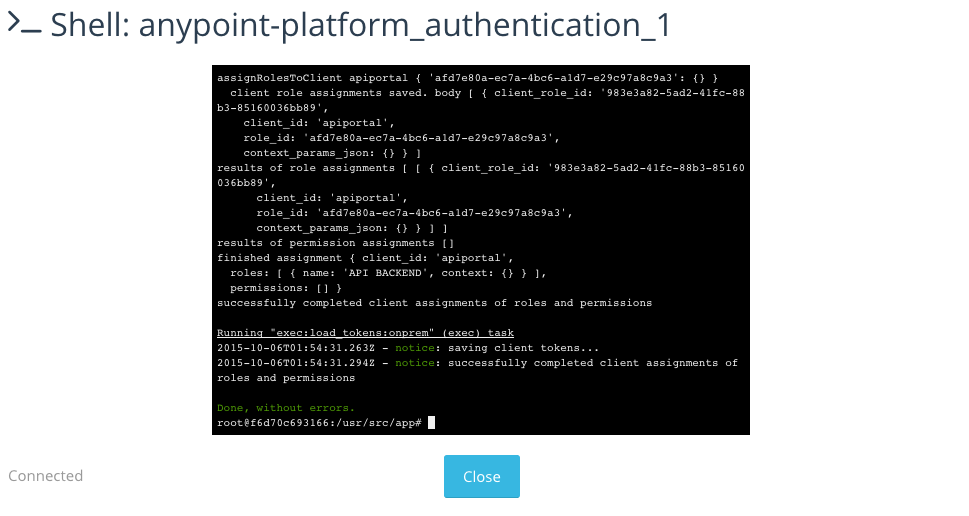
-
Among your active services, find the authentication service. Mouse over the running container and click the icon for the drop down menu. Then click on Execute Shell to open a terminal inside the container.
-
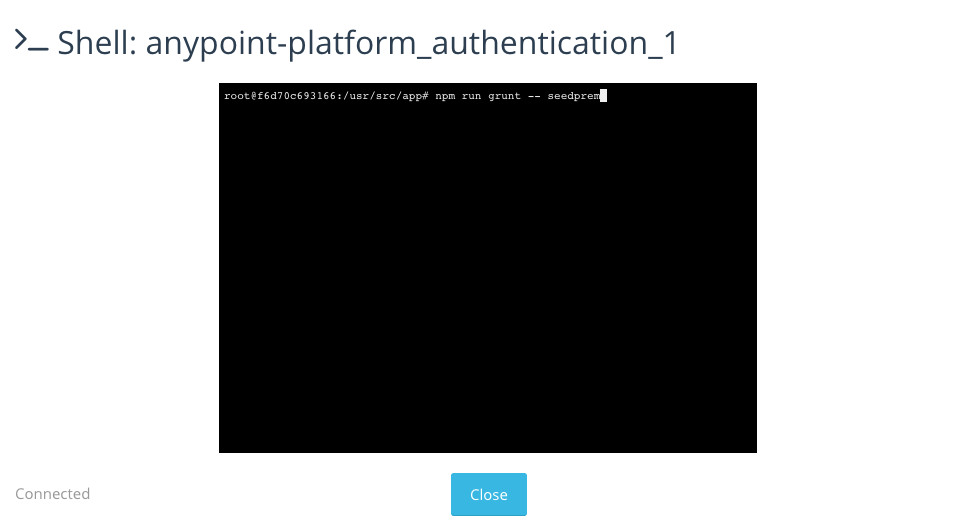
In the terminal window, run the following command to migrate and seed the database. It will notify you when it’s done and report any errors.
> npm run grunt -- seedprem
-
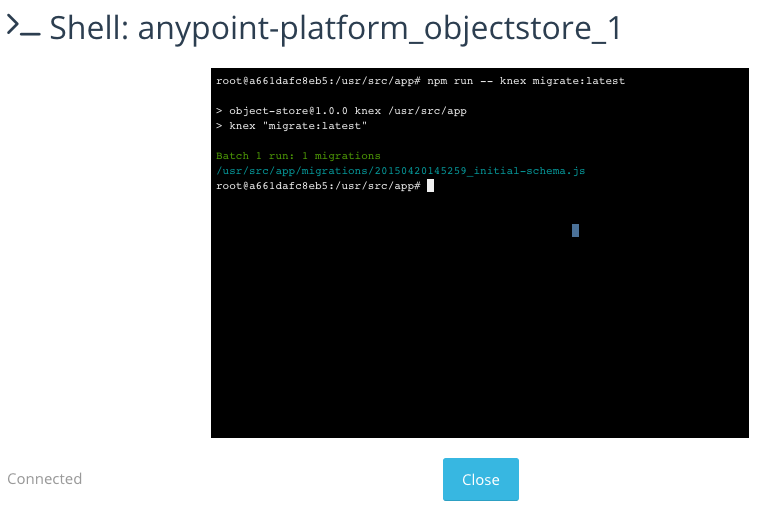
Repeat these steps with the objectstore service, but this time run the following command instead:
> npm run knex -- migrate:latest
-
Repeat the same steps with the api-platform service and run the same command as you did with the objectstore service:
> npm run knex -- migrate:latest
-
Repeat the same steps with the exchange service and run the same command as you did with the objectstore service:
> npm run gulp -- migrate-latest
-
Repeat the same steps with the hybrid-rest service to open a terminal and run this command below to seed it’s database. Do not be alarmed if the service is marked as degraded since that just means the database the service uses is not yet ready.
> /usr/local/bin/migrate.sh
-
The last step is to restart the hybrid-rest service after migration so that it can validate the schema on startup and properly initialize itself. To accomplish this, navigate the rancher ui back to the hybridrest service and click the stop button at the top to stop this service. Once the service stops the button will change into a start button that you can use to restart the service. It should come up as green and running.
Congratulations! You have now installed the Anypoint Platform running on top of Docker.
Logging Into Anypoint Platform
To log in to Anypoint Platform for the first time, point your browser to the following URL:
https://$PLATFORM_URL/accounts/#/setupEnsure to use https instead of http, or login will not work.
When you login to Anypoint Platform for the first time, Anypoint Platform prompts you to create an organization and user.
After you create an organization and user, to log in to Anypoint Platform you will be prompted to login using the user account you just created.
Subsequently, to login to Anypoint Platform you can go to https://$PLATFORM_URL.
At this point you can begin creating organizations, adding servers, inviting users, etc.
For details on managing API Platform, see Anypoint Platform Administration.
Extending to more than 1 host
Rancher allows you to distribute containers between multiple hosts and make it absolutely transparent for clients. Scaling is quite simple:
-
Make sure that you have more than 1 host for your infrastructure - you can see an example below. You can view this by accessing Infrastructure → Hosts
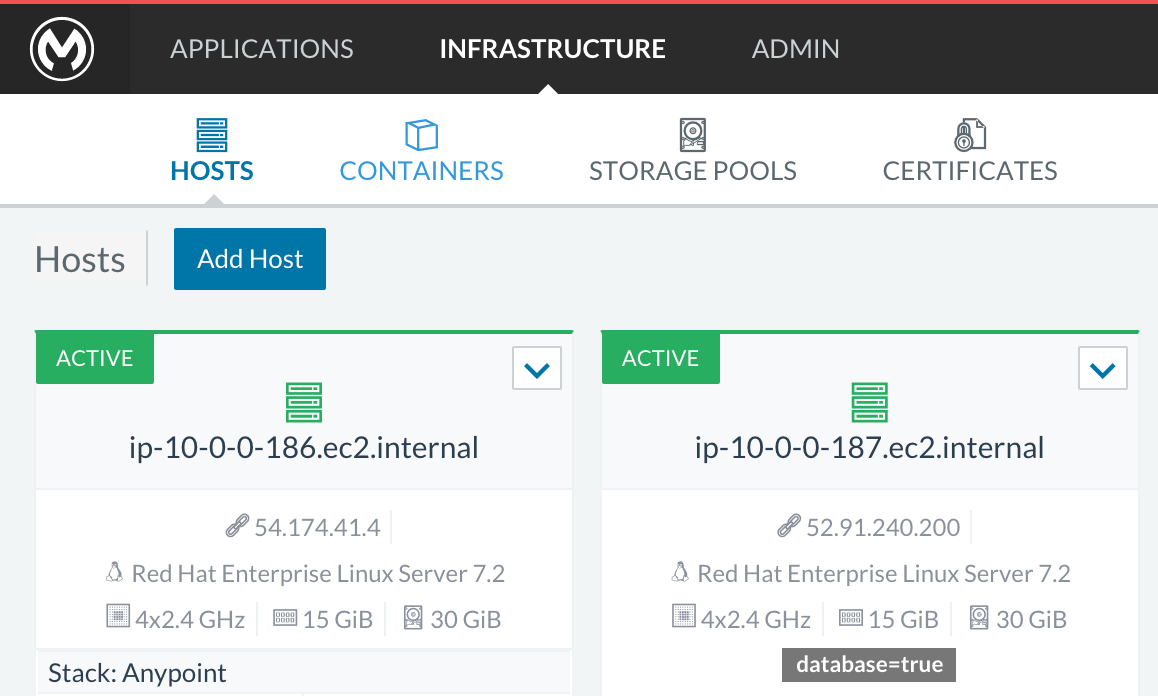
If you have only one host, scaling is still technically possible, but not very practical. -
Make sure that all configuration files for the platform exist on all hosts. You can either copy them, or preferably put on NAS and mount the share into the
/optfolder on all hosts. -
Go to Applications → Stacks and choose the service you want to scale.
As you add hosts, the platform will automatically create redundant services in the new hosts for all the parts of the platform that can be extended.
SSL termination on an external device:
If you want to make SSL encryption for Anypoint Platform traffic on an external device and don’t need an HTTPS entry point (nginx-ssl-lb - a default SSL load balancer) you can create an additional load balancer without SSL encryption.
-
On Rancher open APPLICATION → STACK and click the
Add Stackbutton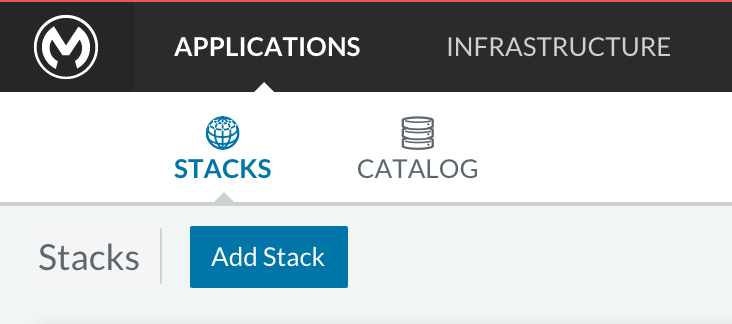
-
Type name for this stack, for instance “ExternalSSL” and click Create
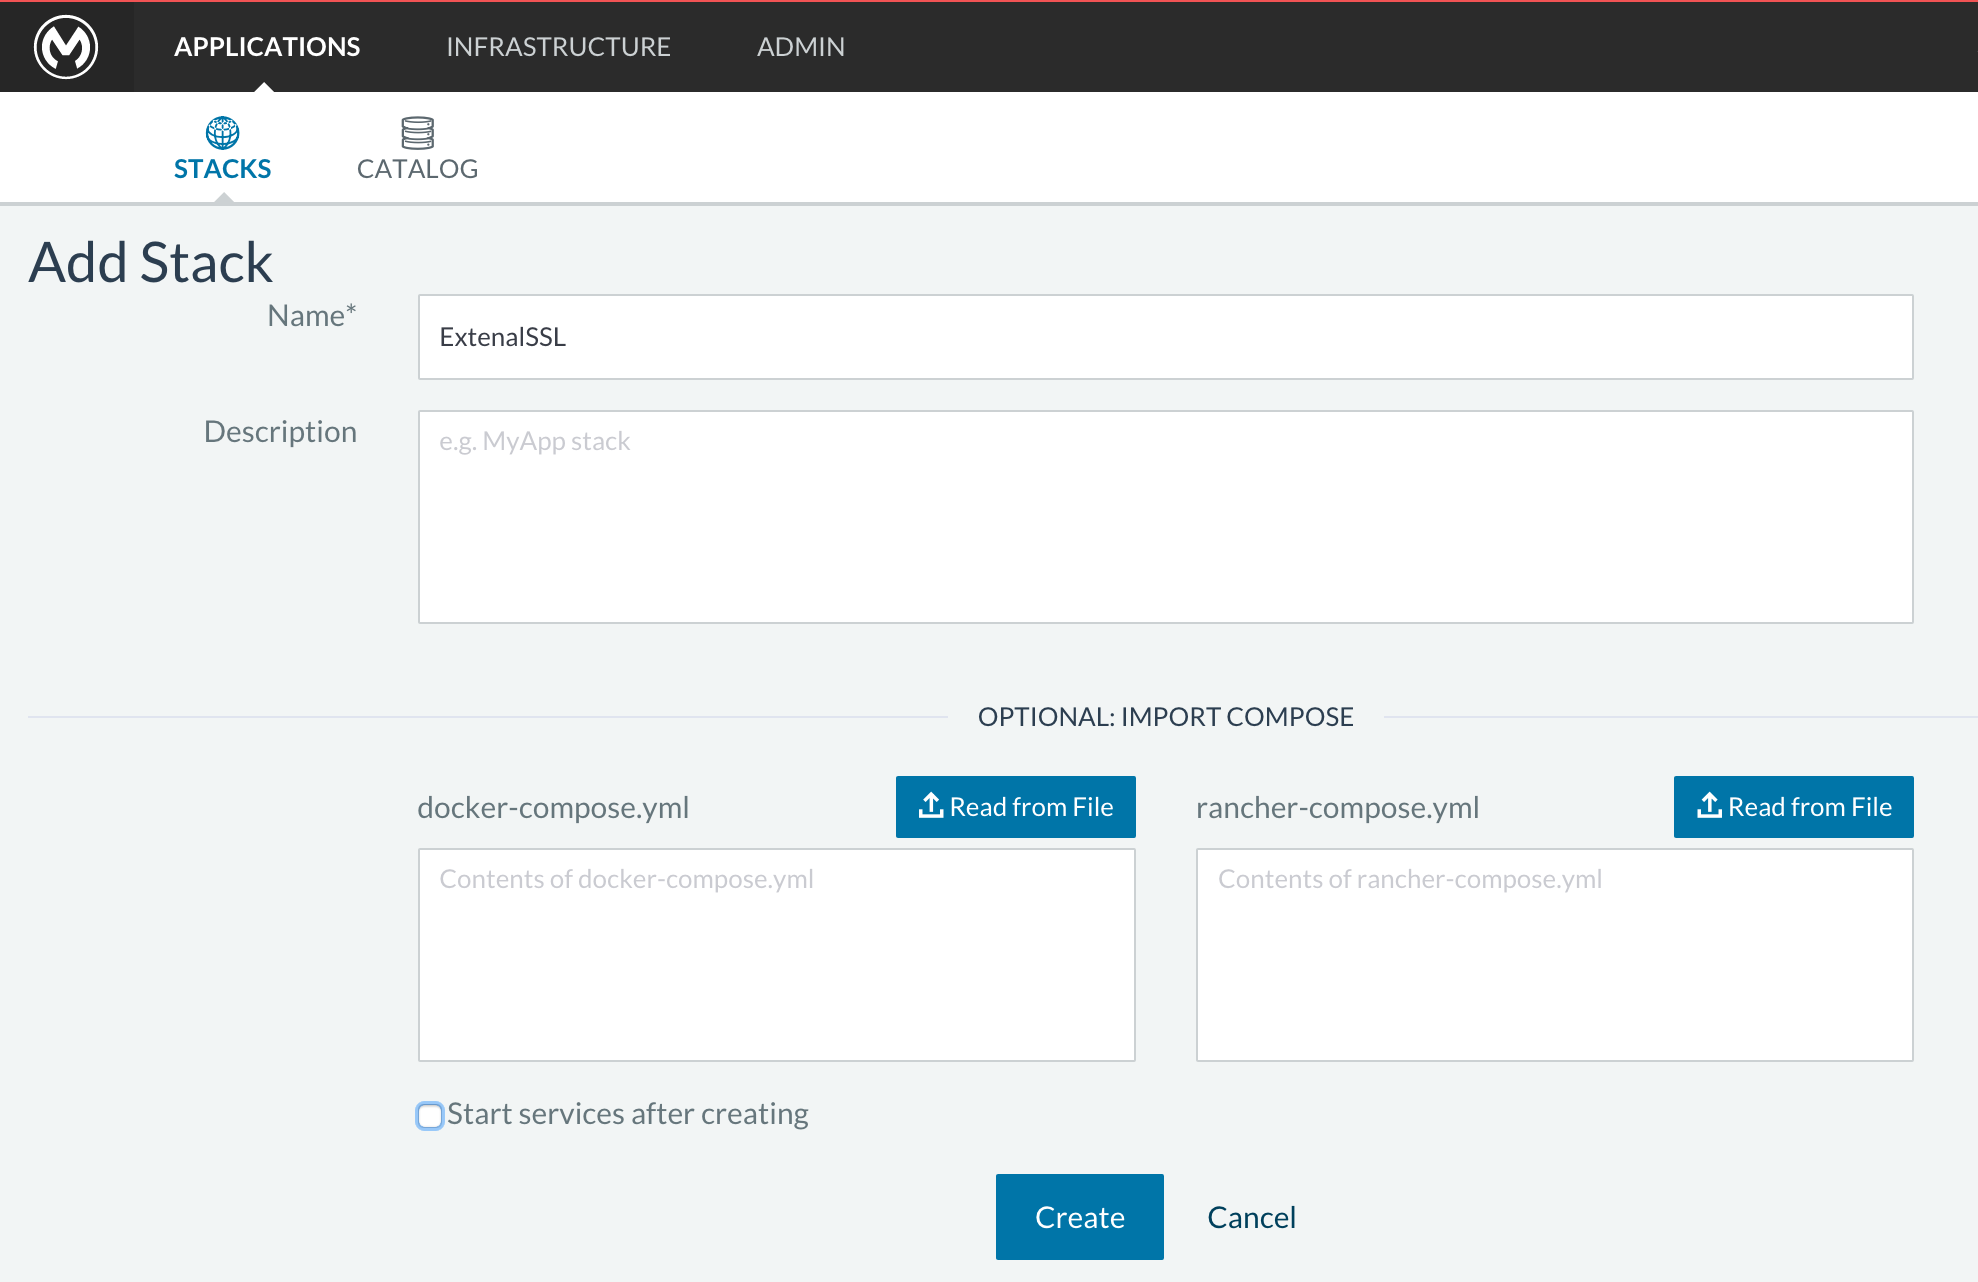
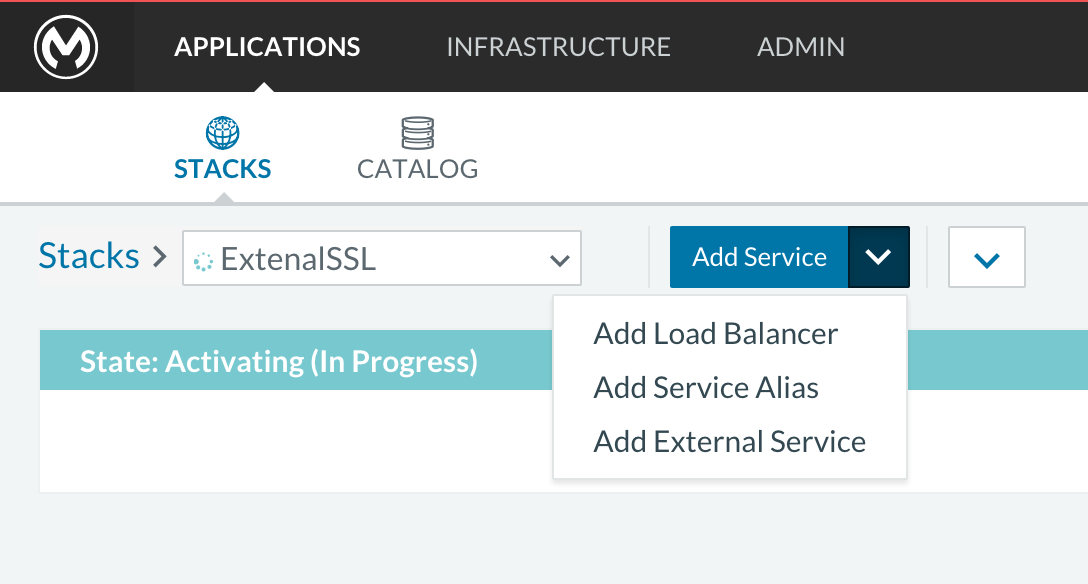
-
Click on the right part of Add Service menu and select Add Load Balancer
-
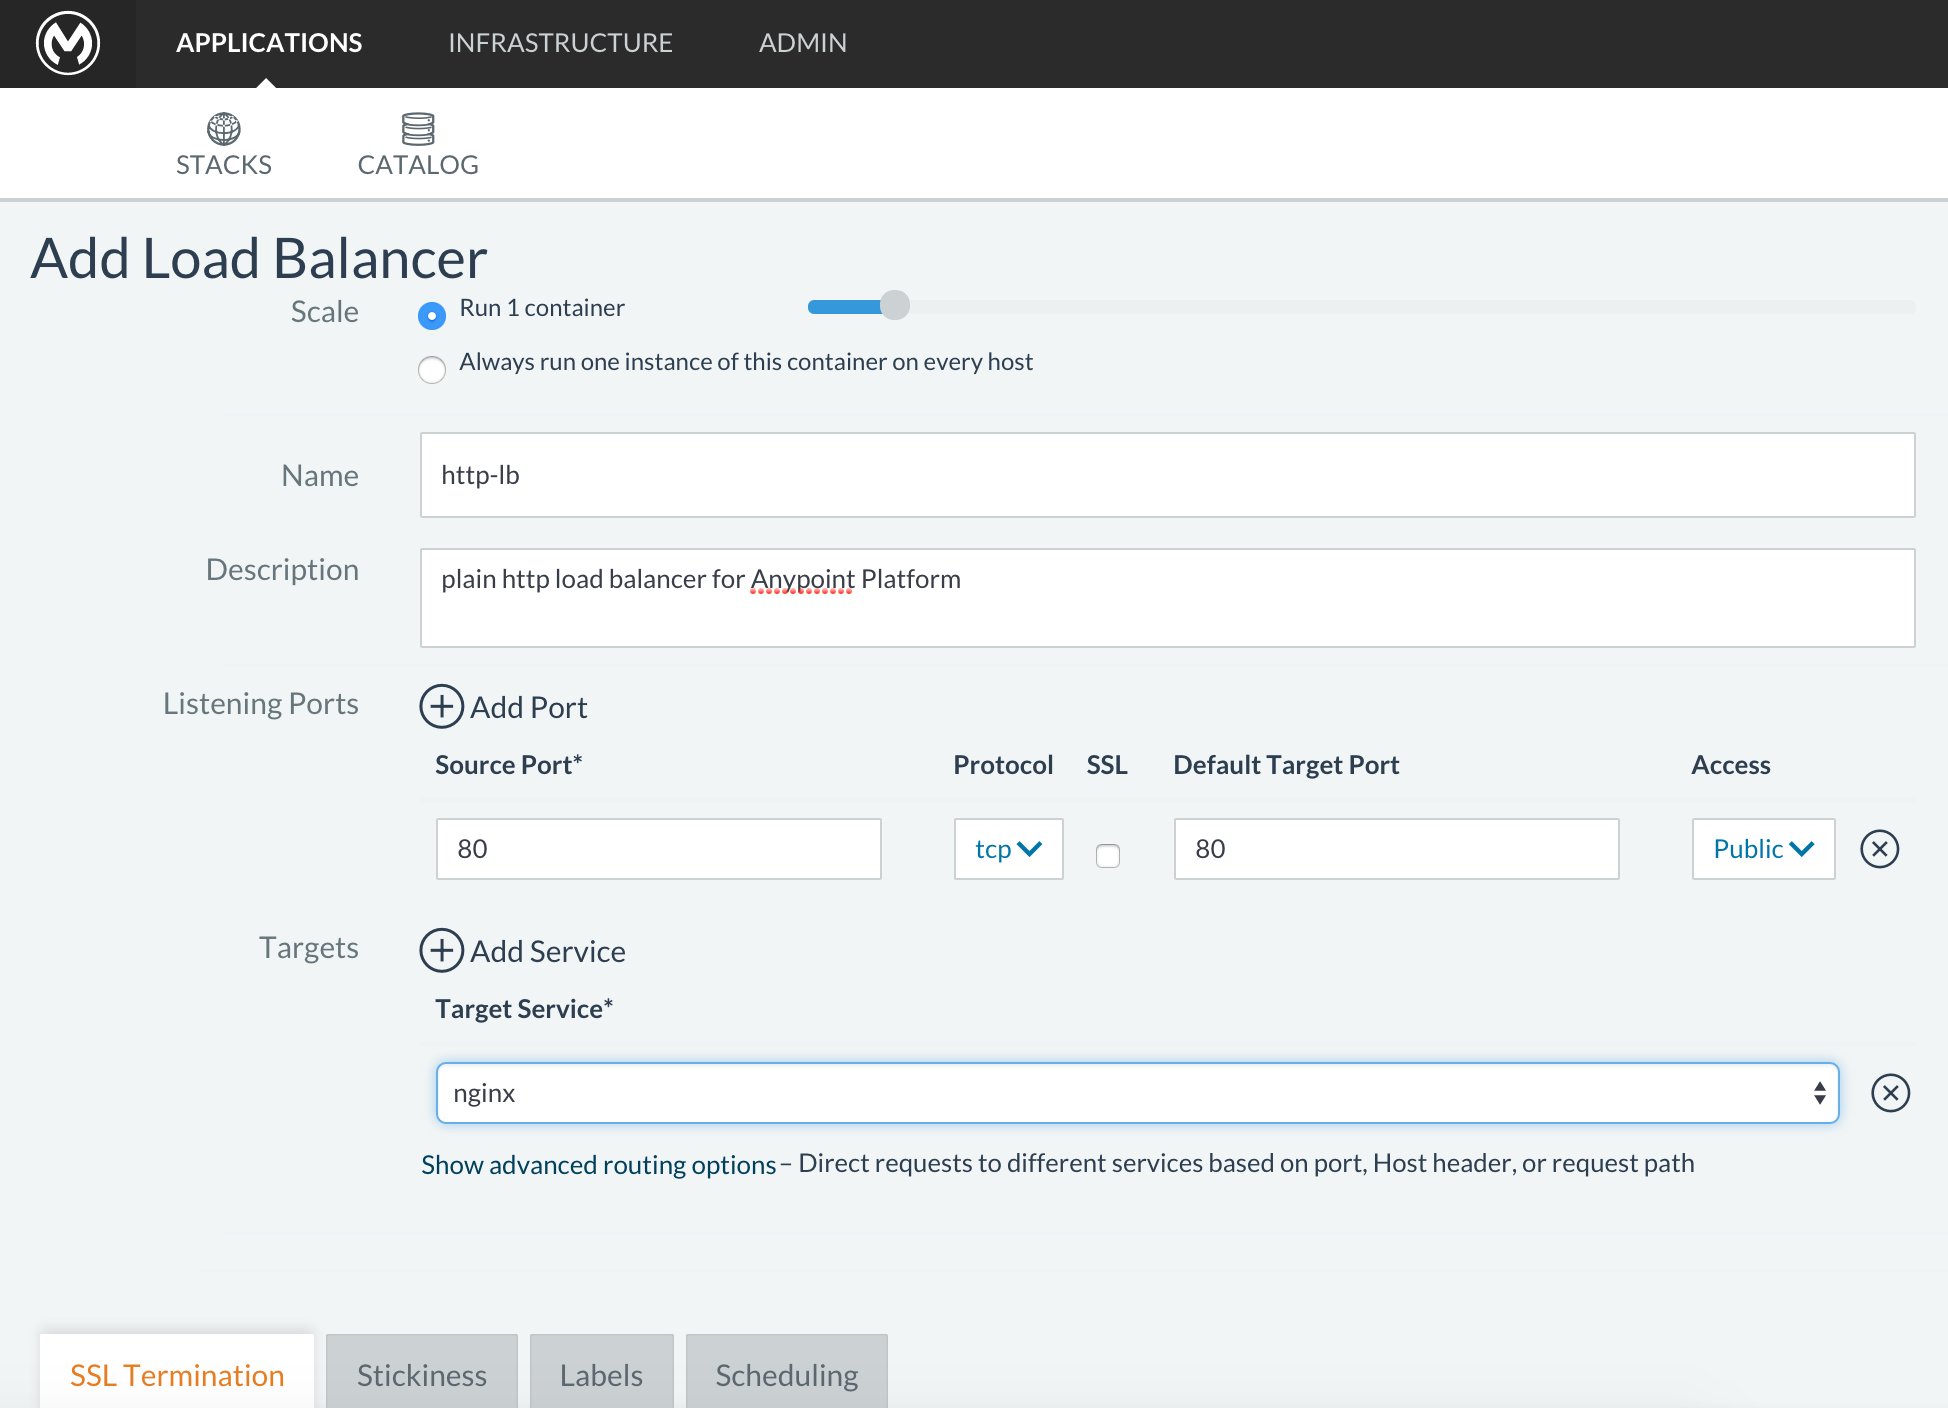
Configure it for plain HTTP load balancing, like in the following example:
Scale Always run one instance of this container on every host (* recommended option) Name
http-lb
Description
plain http load balancer for Anypoint Platform (* optional)
Source Port
80
Protocol
tcp
Default Target Port
80
Access
Public
Target Service
nginx
-
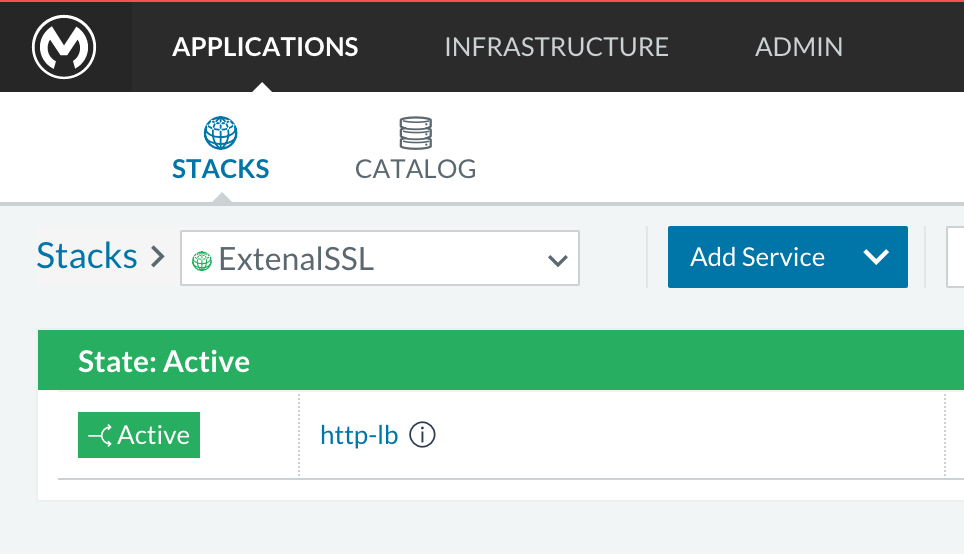
then click Save
-
Verify that the service is active (it may take a few minutes)
Identity Management Configuration
OpenAM Configuration (Version 12)
Below is an OpenAM configuration. Please replace $OPEN_AM_URL and @PLATFORM_URL for the appropriate URLs.
Identity Federation Service Provider
| sign on url | https://$OPEN_AM_URL:8443/openam/saml2/jsp/idpSSOInit.jsp?spEntityID=$PLATFORM_URL&metaAlias=/idp |
|---|---|
sign out url |
Admin Token Provider
| create url | https://$OPEN_AM_URL:8443/openam/json/authenticate |
|---|---|
username |
admin |
password |
11111 |
OAuth2 Authorization Provider
| Authorize URL | https://$OPEN_AM_URL:8443/openam/oauth2/authorize |
|---|
OAuth2 Token Provider
| Create URL | https://$OPEN_AM_URL:8443/openam/oauth2/access_token |
|---|
OAuth2 Token Validation Provider
| Validate URL | https://$OPEN_AM_URL:8443/openam/oauth2/tokeninfo |
|---|---|
Username Token Mapping |
OAuth2 Client Provider
| Create Url | https://$OPEN_AM_URL:8443/openam/frrest/oauth2/client/?_action=create |
|---|---|
Delete Url |
|
Scopes |
cn, sn, mail, uid, givenName |
Default Scopes |
cn, sn, mail, uid, givenName |
SAML 2.0
| Issuer | test.openam |
|---|---|
Public key |
asdfasdfasdfasdfasdfasdfasfasdfasdfasdfsfas |
Audience |
$PLATFORM_URL |
Bypass Expiration |
unchecked |
Group Attribute |
SSO with an example user
Go to https://$PLATFORM_URL/accounts/login/<domain>` (you can find the domain by clicking the ‘gear’ icon, then the Organization tab, and then clicking on the master organization).
Then sign in to OpenAM with your username and password.
OpenAM Configuration (Version 11)
Identity Federation Service Provider
| sign on url | https://$OPEN_AM_URL:8443/openam/saml2/jsp/idpSSOInit.jsp?spEntityID=$PLATFORM_URL&metaAlias=/idp |
|---|---|
sign out url |
Admin Token Provider
| create url | https://$OPEN_AM_URL:8443/openam/json/authenticate |
|---|---|
username |
admin |
password |
111111 |
OAuth2 Authorization Provider
| Authorize URL | https://$OPEN_AM_URL:8443/openam/oauth2/authorize |
|---|
OAuth2 Token Provider
| Create URL | https://$OPEN_AM_URL:8443/openam/oauth2/access_token |
|---|
OAuth2 Token Validation Provider
| Validate URL | https://$OPEN_AM_URL:8443/openam/oauth2/tokeninfo |
|---|---|
Username Token Mapping |
OAuth2 Client Provider
| Create Url | https://$OPEN_AM_URL:8443/openam/frrest/oauth2/client/?_action=create |
|---|---|
Delete Url |
|
Scopes |
cn, sn, mail, uid, givenName |
Default Scopes |
cn, sn, mail, uid, givenName |
SAML 2.0
| Issuer | test.openam |
|---|---|
Public key |
asdfasdfasdfasdfasdfasdfasfasdfasdfasdfsfas |
Audience |
$PLATFORM_URL |
Bypass Expiration |
unchecked |
Group Attribute |
SSO with an example user
Go to https://$PLATFORM_URL/accounts/login/<domain>` (you can find the domain by clicking the ‘gear’ icon, then the Organization tab, and then clicking on the master organization).
Then sign in to OpenAM with your username and password.
Ping Federate Configuration (Version 6.10)
Below is a PingFederate configuration. Please replace the $PING_FEDERATE_URL and $PLATFORM_URL with the appropriate URLs.
Identity Federation Service Provider
| Sign on url | https://$PING_FEDERATE_URL:9031/idp/startSSO.ping?PartnerSpId=$PLATFORM_URL |
|---|---|
Sign out url |
OAuth2 Authorization Provider
| Authorize URL | https://$PING_FEDERATE_URL:9031/as/authorization.oauth2 |
|---|
OAuth2 Token Provider
| Create URL | https://$PING_FEDERATE_URL:9031/as/token.oauth2 |
|---|
OAuth2 Token Validation Provider
| Validate URL | https://$PING_FEDERATE_URL:9031/as/token.oauth2 |
|---|---|
Username Token Mapping |
OAuth2 Client Provider
| Create Url | https://$PING_FEDERATE_URL:9031/pf-ws/rest/oauth/clients |
|---|---|
Delete Url |
|
Username |
admin |
Password |
11111 |
SAML 2.0
| Issuer | dev.mulesoft.com |
|---|---|
Public key |
asdfasdfasdfasdfasdfasdfasfasdfasdfasdfsfas |
Audience |
$PLATFORM_URL |
Bypass Expiration |
unchecked |
Group Attribute |
memberOf |
SSO with an example user
Go to https://$PLATFORM_URL/accounts/login/<domain>` (you can find the domain by clicking the ‘gear’ icon, then the Organization tab, and then clicking on the master organization).
Then sign in to OpenAM with your username and password.
LDAP Configuration
Below is an LDAP configuration. You can use your own LDAP as it’s fully configurable and support LDAPs too.
Connection
| host | ldap://$LDAP_URL |
|---|---|
port |
$LDAP_PORT |
Bind DN |
cn=Manager,dc=muleforge,dc=org |
Password |
examplepass |
connectTimeoutSeconds |
10 |
operationTimeoutMs |
30000 |
Search Bases
| user | ou=people,dc=muleforge,dc=org |
|---|---|
group |
ou=groups,dc=muleforge,dc=org |
DNs
| user | uid={{username}},ou=people,dc=muleforge,dc=org |
|---|---|
group |
cn={{groupName}},ou=groups,dc=muleforge,dc=org |
Filters
| userByUsername | (&(objectClass=inetOrgPerson)(uid={{username}})) |
|---|---|
userByEmail |
(&(objectClass=inetOrgPerson)(mail={{email}})) |
groupByGroupName |
(&(objectClass=groupOfUniqueNames)(cn={{groupName}})) |
groupsByUsername |
(&(objectClass=groupOfUniqueNames)(uniqueMember=uid={{username}},ou=people,dc=muleforge,dc=org)) |
User Field Mappings
| username | uid |
|---|---|
firstName |
givenName |
lastName |
sn |
id |
entryUUID |
Group Field Mappings
| groupName | cn |
|---|---|
id |
entryUUID |
Resetting the Admin User’s Password
Add a password reset token into the database. For simplicity, we’ll set the value of the code to the user’s name. Please change admin to the actual username of the admin user that you created in the setup steps. Execute the following on your database host:
+
> docker exec -it $(docker-compose ps -q authdb | head -n 1) psql -Udocker ms_authentication -c "insert into recover_codes (user_id, recover_code) (select id, username from users where username='admin');"
Enter a new password by navigating to the following link. Please change the host to the hostname you’re using for your installation. Change admin to the username of the admin user that you created in the setup steps. https://anypoint.mulesoft.local/accounts/#/new-password?code=admin
Creating a Backup and Restoring
You can backup the Postgres databases used by the Anypoint Platform. Database directories are automatically created, using an external storage mounted on /opt/dbs on all hosts where the database container can run.
To begin dumping data to these databases, run the following command:
$pg_dumpall -c -h $i -U username > DATABASE.dump
Here you must replace username by your actual user name and DATABASE.dump by file where data will be stored.
| For a complete overview of the 'pg_dump' command, see PostgreSQL’s documentation. |
If you ever need to restore your databases from your backups, run the following command:
pg_resore -U username DATABASE.dump
Here you must replace username by your actual user name and DATABASE.dump by file where data will be stored.
| When executing a restore, be very careful with where you restore to, and do so following any policies your organization has in regards to backup restoring. |
To open the contents of one of these databases, you can use the following command:
cat $DIR/DATABASE.dump | psql -U username -d DATABASE
Adding a Server to Your Anypoint Platform On-Premises
Downloading Mule Agent for Anypoint Platform On-Prem
To add a server to your on-premises Anypoint Platform, you need to download and install the agent.
-
Unzip the ` mule-agent-[VERSION].zip` to the
$MULE_HOME/binfolder.The agent zip file contains these 3 files - the
amc_setupfiles install the Mule agent plugin.-
amc_setup- Mac and Linux installation file -
amc_setup.bat- Windows installation file -
agent-setup-<version>.jar- Called by the installation files
-
You must then run it from this location after completing the required steps in API Platform, as described below.
Obtaining the Token for Your Server
For a full description of the steps outlined in this section, see Managing Servers.
In your Anypoint Platform On-premise Edition installation, click Applications in the navigation bar and select your environment. Then, select Servers in the left-hand menu.
Anypoint Platform provides you with a generic command to install Mule agent on a Mule server and pair the server with Anypoint Platform. This command includes a token, indicated with the -H parameter.
A sample command looks like:
./amc_setup -H 9658e868-[redacted]-d84e1116b585---1 server-nameCopy the command to your clipboard. On the machine where your Mule server resides open a terminal and go to $MULE_HOME/bin. Here you should have placed your copy of the Mule agent installer (see above).
In the $MULE_HOME/bin directory, paste the given command and append the following parameters:
./amc_setup -H <token> <server name> -A http://$DOCKER_IP_ADDRESS:8080/hybrid/api/v1 -W "wss://<Anypoint Platform host>:8443/mule" -C https://<AnypointPlatform host>/accounts -F https://<Anypoint Platform host>/apiplatformWhere:
-
<Anypoint Platform host>: The IP address or network host name of the machine where Anypoint Platform resides -
<token>: The token provided by Anypoint Platform for your server -
<server name>: The desired name for your server on the Anypoint Platform platform