About Anypoint Studio
Anypoint Studio is MuleSoft’s Eclipse-based integration development environment. With it, you can build Mule applications that can be deployed to cloud or servers on premises.
The same editor also allows you to create domains that define shared resources.
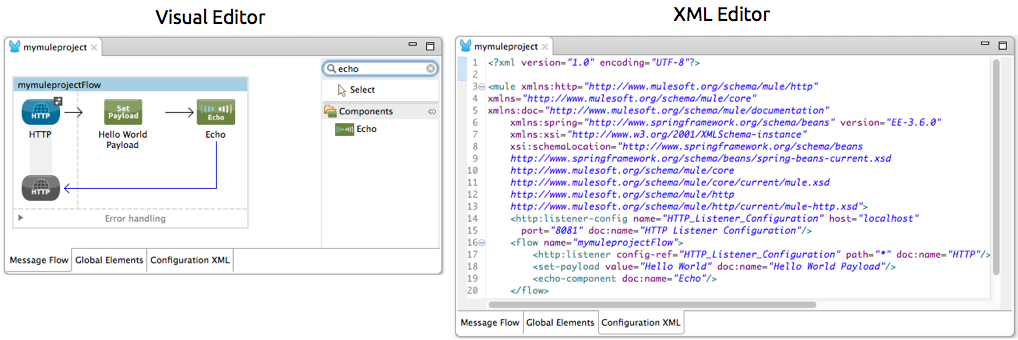
Anypoint Studio offers two parallel tabs that you can utilize to design and craft your applications:
-
Visual Editor
-
XML Editor
Whatever you place or code in one editor reflects in the other. This real-time reflection of changes is referred to as two-way editing. Same app, a different editor.
Notes:
-
In each guide in the documentation set, you can click a graphic to view an expanded illustration.
-
You can zoom the Visual Editor with the CMD/+ or - keys on a Mac, or CTRL/+ or - keys in Windows
The Visual Editor
Studio visual editor is divided into five parts:
-
Package Explorer
-
Canvas
-
Palette
-
Connection Explorer
-
Console
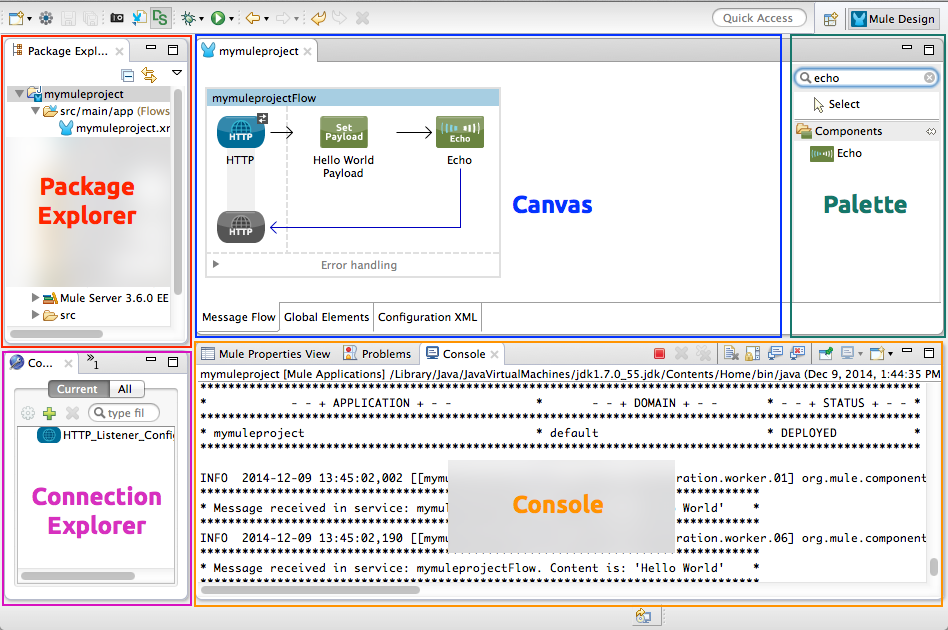
The Package Explorer displays project folders and files in a tree format. Click to expand or contract Mule project folders and examine the files that make up a Mule project.
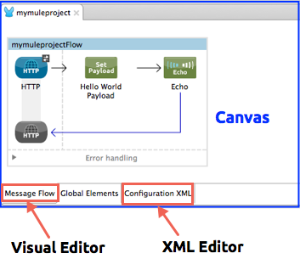
The Canvas provides a space for arranging pre-packaged building blocks into Mule applications. The Palette, on the right edge of the canvas, displays a list of building blocks that you can drag and drop onto the canvas to build your application. At the base of the canvas, Studio offers three tabs which offer different ways to interface with your application:
-
Message Flow: Drag-and-drop interface in which you arrange building blocks to form an application
-
Global Elements: Interface for creating or editing reusable configurations for Mule building blocks
-
Configuration XML: XML editor interface displays the XML elements that correspond to the building blocks arranged on the Message flow canvas
The Connection Explorer displays a list of any global connector configurations defined in your application for quick access to your configuration details. Behind this tab, a second tab contains an outline, which displays a miniaturized overview of the whole canvas, along with a box cursor that scrolls with the display in the canvas pane. This provides a high-level, bird’s-eye view of your complete Mule application as it extends beyond the borders of the canvas.
The Console area below the canvas contains the console for the embedded Mule server, which displays a list of events and problems (if any) that Studio reports as you create or run your Mule application. In the console area, you also have a properties editor. The propertied editor tab is labeled with the name of the building block that is currently selected on your canvas, or with "Mule Properties View" when no building block is selected. The properties editor includes the DataSense Explorer, which supplies real-time information about the data structure of your payload and any available inbound and outbound properties or variables. See an example of the properties editor below.
The XML Editor
Because Anypoint Studio leverages Eclipse, the Configuration XML editor incorporates many Eclipse features. The following is a list of handy tips and tricks for using Studio XML editor.
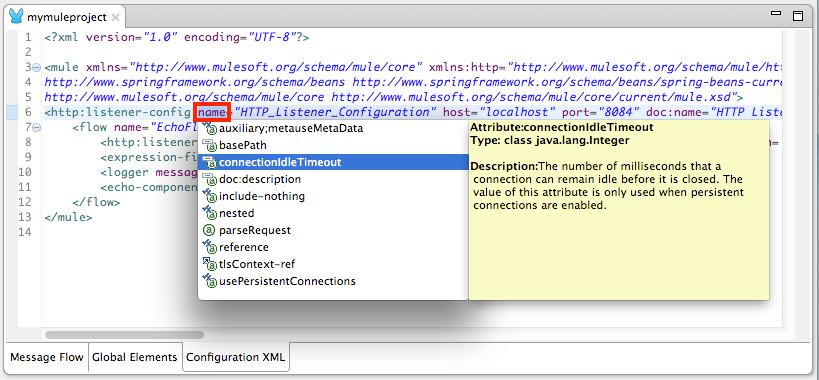
Show Attribute Options
-
Double click to select an attribute of an element, such as the
hostattribute of theHTTP endpointelement. -
Press Ctrl + space bar to open a list of suggested attributes you can configure for the element (see below).
-
Use the up and down scroll arrows to browse through the suggestions.
-
When you have highlighted the attribute you wish to use, press enter to insert it into the XML configuration.
Suggest Elements
-
Enter an element’s left angle bracket ( < ), then press Ctrl + space bar.
-
Recognizing that you are entering a new element, Studio lists all possible elements for that particular situation.
-
Use the up and down scroll arrows to browse through the suggestions.
-
When you have highlighted the element you wish to use, press enter to insert it into the XML configuration.
Building Applications in Studio
Use Anypoint Studio to arrange building blocks on the canvas to create flows which, together, form an application to process messages.
Confused? Let’s break it down.
Building Blocks
A building block is a pre-packaged unit of business logic that comes bundled with Mule. As the name implies, it is a block (a block of code, really) that you can arrange with other blocks to form a structure. In this case, you are arranging building blocks to form a Mule flow.
Building blocks fall into one of two categories depending on their function within a Mule flow:
| Type | Function | Examples |
|---|---|---|
Message Sources |
Message sources accept messages into flows from other sources or services. A message source always falls at the beginning of a flow and is almost always Anypoint Connector. |
HTTP Connector, Ajax Connector, Salesforce Connector |
Message Processors |
Message processors filter, alter, route, or validate messages. |
Payload Filter, Choice Router, Email to String Transformer |
To arrange building blocks to form a flow, simply drag and drop them from the palette onto the canvas.
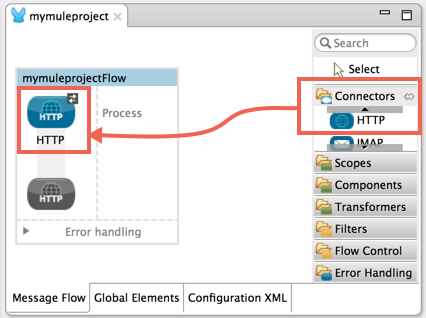
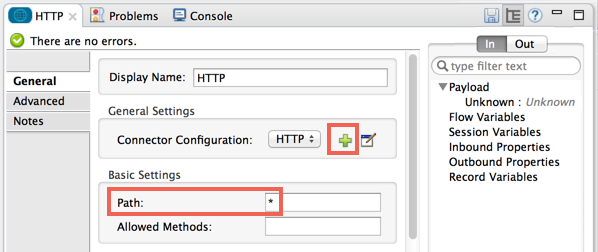
After you have arrange the building blocks in a flow, configure each by double-clicking a block to open its Properties Editor in the console. Supply the values for the configuration fields. For the HTTP connector, you first click the Connector Configuration green arrow, which displays an additional screen to enter the host and port, and specify the path on this screen. Each building block utilizes similar conventions for specifying properties.
Note that the DataSense Explorer at the right side of the properties editor provides helpful information about the data structure and metadata of your message as it enters and exits this particular building block. You can toggle the DataSense Explorer on and off by clicking this icon: 
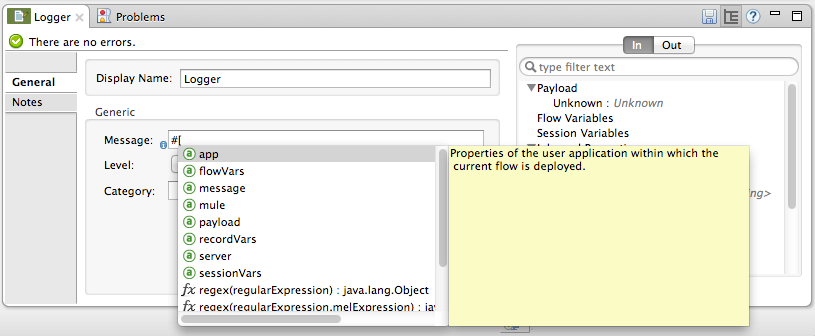
Anypoint Studio also supports auto-complete in any message processor configuration fields that support expressions. To open auto-complete, place your cursor in the field and press CTRL + space bar.
See Also
-
Learn more about flows in Mule Application Architecture.
-
Skip ahead to learn about Mule message structure.