Deploying Applications
| Tcat Server reached its End of Life in 2017. Contact your Customer Success Manager to determine options for managing, monitoring, or deploying your application. |
A Deployment is the mechanism that enables you to deploy one or more applications to multiple Tomcat instances or groups, and to undeploy them just as easily. This page describes the various tasks related to deployment.
Creating a Deployment
A Deployment is a grouping of applications you can deploy to servers or groups.
To create the deployment:
-
On the Deployments tab, click New Deployment and enter a unique name for this entity.
-
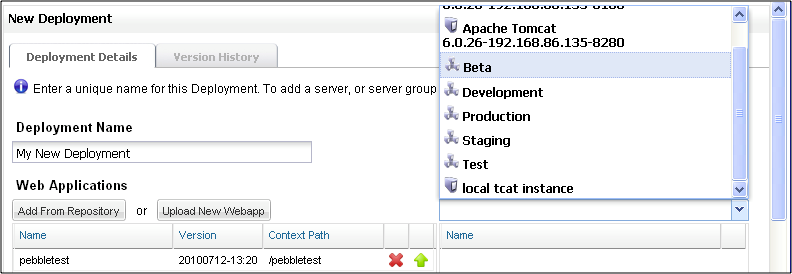
Just beneath the Web Applications list, click Add from Repository or Upload New Version.
-
Browse to the .war file and click Open.
-
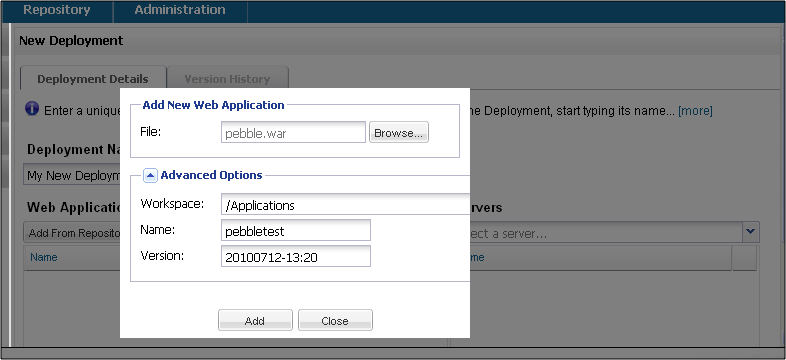
For a new web application, you can edit the URL context path by clicking Advanced Options and entering it in the Name field.
-
Edit version information (optional).
-
Click Add.

-
To the right of the Web Applications list, select the target server or group for this deployment.

-
To the bottom right, click Save.
The package now appears on the Deployments tab. If you saved the package without deploying it, you can deploy it later by selecting its check box and clicking Deploy.
Uploading Applications
There are three ways to upload applications (WAR files) into the repository:
-
Add an application manually when you are creating a deployment (described below).
-
Add applications directly into the repository using the Repository tab (administrator permissions are required).
-
When developing an application, upload it to the repository as part of the build process using the Maven Publishing Plug-in.
To upload an application manually:
-
When creating or editing a deployment on the Deployments tab, click Upload New Application.
-
Click Browse and navigate to the location of the application’s WAR file and click Open to select it.
-
Optionally, click the Advanced down arrow to specify a location, unique name, and version for the application as you want it to appear in the repository.
-
Click Add to add the application to the repository and include it in the deployment.
For information on managing an application, such as moving it from one location to another in the repository, see Managing the Repository.
Modifying a Deployment
After you have created a deployment, you might want to modify some of its details, including its applications, configuration files, or target servers.
To modify a deployment:
-
On the Deployments tab, click the name of the deployment you want to modify.
-
Make the changes you want to the deployment, and then click Save to save the changes without deploying the updated version yet (you can click Deploy later), or click Deploy to save and deploy in one step.
To upload a new web application:
-
On the Deployments tab, click the name of the deployment you want to modify.
-
Click on the green up arrow to the right of the web application you want to replace.
-
Browse to a the new .war file, click Open.
-
Click Add to upload the new .war file.
-
Click Save.
-
The deployment is now updated, but appears with a yellow icon (for unreconciled) until it is deployed.

Viewing History on a Deployment
Each time you modify, deploy, or undeploy, a new version of the deployment is created. To see what has changed over time, select the deployment and click on the History tab.
Note: Deployments can be restored from history using the Restore button.

| Two or more deployments can contain the same web application, as long as the context path of each web application is different. If the context path of the web applications is the same, the deploy action would fail. |
Parallel Deployments [v 7.0.1]
Starting with Tcat 7.0.1, you can perform truly parallel deployments such as selecting multiple deployments and performing a group action on them (deploy, undeploy, redeploy), and have them work in parallel. Earlier versions allowed you to perform group actions, but the actions were queued and prior actions had to be finished for subsequent actions to be executed. Lets explain this in greater detail.
Let’s say we have 2 deployments; D1 and D2. You could select these deployments and then click the "Deploy" button. In earlier versions of Tcat, deployment D1 would start executing and deploying its webapps to the servers one at a time, while deployment D2 would be queued; waiting for D1 to finish. In Tcat 7.0.1, both D1 and D2 can now simultaneous run in parallel. However, by default this feature is not enabled. You need to enable it before you start the Tcat console.
To enable parallel deployment:
-
Open the webapps/console/WEB-INF/classes/galaxy.properties file
-
Determine the number of deployments you would want to run in parallel and then update the following properties with that value for example, in the above scenario we want two deployments in parallel so we would set the properties as follows:
galaxy.properties
deployments.corePoolSize=2
deployments.maxPoolSize=2-
The above set the size of the "ThreadPool" which contains threads, each of which is responsible for one deployment.
Similarly, within a Deployment you could have multiple Webapps which need to be deployed to multiple Servers. To perform that in parallel (enabled by default), you could change the following:
galaxy.properties
deploymentExecutor.corePoolSize=5
deploymentExecutor.maxPoolSize=20| If you change these properties while the console is running, then you need to restart the console for the new values to be picked up. |


