$ ec2-authorize -p 8080 default
$ ec2-authorize -p 51433 defaultDeploying to Amazon EC2
| Tcat Server reached its End of Life in 2017. Contact your Customer Success Manager to determine options for managing, monitoring, or deploying your application. |
The EC2 plugin allows you to create Amazon machine instances (AMIs) of your existing Tomcat instances and deploy them to EC2 via the Tcat Server console. This page describes how to install the plug-in, create the AMI, and deploy it. If you want to use an existing, fully configured cloud implementation of Tomcat instead of creating and deploying your own instance, see Using Cloudcat with Amazon EC2 instead.
Installing the Plug-in
To install the EC2 plug-in, simply download it from the Tcat Server download page and copy it to your TCAT_HOME/webapps/console/WEB-INF/plugins directory. This directory must be owned and have the same permissions as TOMCAT_USER. When you run the administration console, the Amazon EC2 tab will appear.
If you are using Mule iBeans, you must delete the mule-ibeans/lib/modules/deployed/ibeans-module-spring-1.0-beta-9-full.jar to enable iBeans and the EC2 plugin to work in the same instance of Tcat Server.
Creating an Amazon EC2 Account
Before you can get started, you must create an Amazon EC2 account. Note your access key ID and secret key. If you have an existing account, you can find them by logging into the EC2 website, clicking Your Account, and selecting Security Credentials.
You also need to create a key pair if you do not already have one. To do this, log into the EC2 Console, click Key-Pairs on the left, click the Create Key Pair button, and then enter a key pair name.
Opening Ports
By default, Amazon creates a firewall that prevents any communication from happening between the outside world and your EC2 instances. To change this, you must download the EC2 tools so you can open ports. You then issue the following commands:
This opens up ports 8080 and 51433 by default.
Amazon Machine Images
Amazon Machine Images (AMIs) are images that get provisioned to each EC2 instance. You should familiarize yourself with the AMI concepts in the EC2 documentation before proceeding.
You want to create your own AMI with a Tcat Server instance on it. For testing purposes, we provide an image with Tcat Server and Ubuntu 9.04 from Alestic. On startup, this image starts Tcat Server and makes it available on port 8080. Note that we provide this image on an unsupported basis solely for testing, and the image ID and details of this image may change in the future. The test image ID is: ami-f7d8389e
Using the Plugin
The Amazon EC2 tab in the Tcat Server administration console allows you to manage your EC2 accounts and instances. The first step is to create the account, and then you create your instances.
To create the account:
-
On the Amazon EC2 tab, click New Account.
-
Enter a name for the account, your Amazon access key ID, your secret key, and the name of the key pair you created.
-
Click OK.

To create an instance:
-
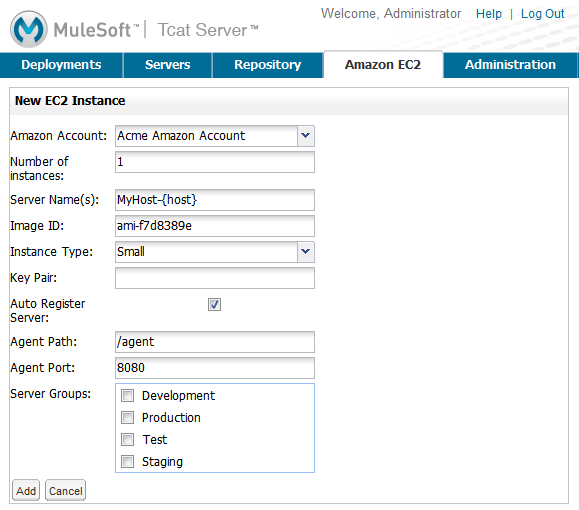
On the Amazon EC2 tab, click New Instance.
-
Select the Amazon account you created.
-
Enter the number of EC2 instances you want to create.
-
Enter the name of the server (instance). If you are creating multiple instances, you can use the {host} variable to insert the name of the host into the instance name, such as
MyHost-{host}. -
Enter the ID of the AMI you created, or use the test AMI ID (see Amazon Machine Images above).
-
Specify the instance type (size). This affects how much your Amazon account is charged.
-
Enter the name of the key pair to use with these servers.
-
If you want to automatically register these instances with your Tcat Server administration console, so that you can manage these Tcat Server instances, select the Auto Register Server check box.
-
Enter the URL path where you want the Tcat Server agent WAR to reside. By default, set this to
/agent. -
Enter the port to use for the Tcat Server agent.
-
Select any server groups you want to add these new servers to.
-
Click Add.
After the plug-in issues a new instance request, it takes a while for Amazon to provision the image. The instances list displays "pending" until the image is created, at which point it displays "running". Your new Tcat Server instance is then available on the Servers tab if you opted to automatically register it.
Creating a Tcat Server AMI
If you are deploying Tcat Server to a production environment, typically you create your own AMI with Tcat Server on it.
Configuring Tcat Server for Automatic Startup on Your AMI
To ensure that you can automatically register your new Tcat Server instance, you should configure the Tcat Server instance on your AMI to start automatically on server startup. On Linux, you can do this through an init script.
-
Install Tcat Server (or Tomcat and the Tcat Server agent WAR) into your
/usr/local/tcatdirectory. -
Download this init script to
/etc/init.d/tomcat. -
Execute
chmod +x /etc/init.d/tomcat. -
Execute
chmod +x /usr/local/tcat/conf/tomcat-env.sh. -
Execute the
update-rc.d tomcat defaultscommand. This configures Ubuntu to run the init script on startup. -
If you install Tcat Server in a different location, edit the
/etc/init.d/tomcatscriptAPP_ENVvariable to reflect where Tcat Server is installed.


