DataWeave Tutorial
| DataWeave 1.0 is compatible with Mule Runtime Engine 3.7, which reached End of Life on or before January 25, 2020. For more information, contact your Customer Success Manager to determine how you can migrate to the latest Mule version. |
Enterprise
This document walks you step by step through some basic transformations you can easily do with the Transform Message element in Anypoint Studio.
For more advanced examples written directly in DataWeave code, see DataWeave Examples.
Renaming Fields and Calculating Expressions
In this example, the data you get as an input is not only in a different format from what you need, you also need to pick out only a couple of the values in it, rename them and even infer some values from others.
Suppose that you want to send a SOAP request to a web service that places an order for a t-shirt, based on information you get from a sales tracking software you use (which outputs data in a different structure). The external service needs a JSON input with values for the following set of keys:
-
size
-
email
-
name
-
address1
-
address2
-
city
-
stateOrProvince
-
postalCode
-
country
In this example, suppose that the output that you get from your sales tracking software follows the structure of this sample JSON file:
{
    "product":{
        "price": "5",
        "model": "MuleSoft Connect 2015"
    },
    "item_amount": "3",
    "payment":{
         "payment-type": "credit-card",
         "currency": "USD",
         "installments": "1"
    },
    "buyer":{
        "email":"mike@hotmail.com",
        "name":"Michael",
        "address":"Koala Boulevard 314",
        "city":"San Diego",
        "state":"CA",
        "postCode":"1345",
        "nationality":"USA"
    },
 "shop": "main branch",
    "salesperson": "Mathew Chow"
}
You then need to select only a few of these fields, rename some, and assume a value for "size" (as it’s not provided by the input).
-
Download the above example as a file.
-
Drag an HTTP Connector into a new flow, select the connector configuration that you created for the previous example. Set the path of the connector to
ex1 -
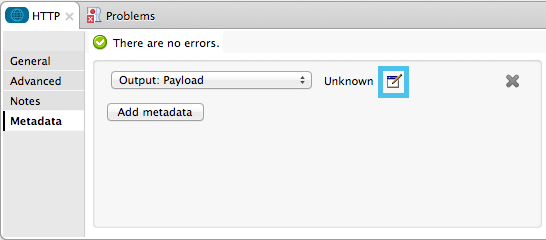
Select the Metadata tab in the HTTP Connector, then click Add Metadata. Select the Output:Payload, then click the edit icon next to it.
-
Select the Create new type radio button at the top, pick the type JSON, assign it any ID you wish, and browse for the example JSON file you just downloaded above.
-
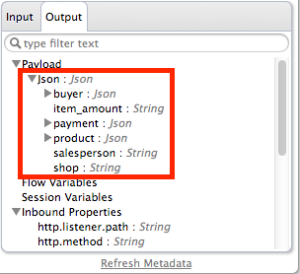
Note that now when the HTTP Connector is selected in your canvas, the Output tab of the metadata explorer should show the fields that will be present in the outgoing payload.
-
Drag a Web Service Consumer to your flow. Create a global configuration for it by clicking the green plus sign in its properties editor. In the WSDL Location field, paste the following URL: http://tshirt-service.cloudhub.io/?wsdl. Note that all of the other fields in the configuration element are completed automatically when you do this. Then click Ok.
-
Back in the Web Service Consumer’s properties editor, select OrderTshirt in the Operation field. Note that while the Web Service Consumer element is selected in your canvas, the metadata explorer should now show the set of fields that are expected in the payload as inputs.
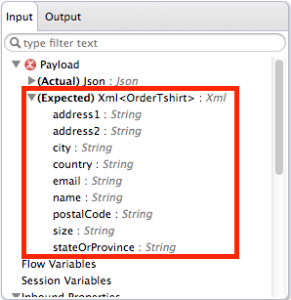
You may need to click away from the Web Service Consumer after making these changes for the metadata to be updated.
-
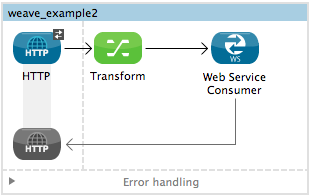
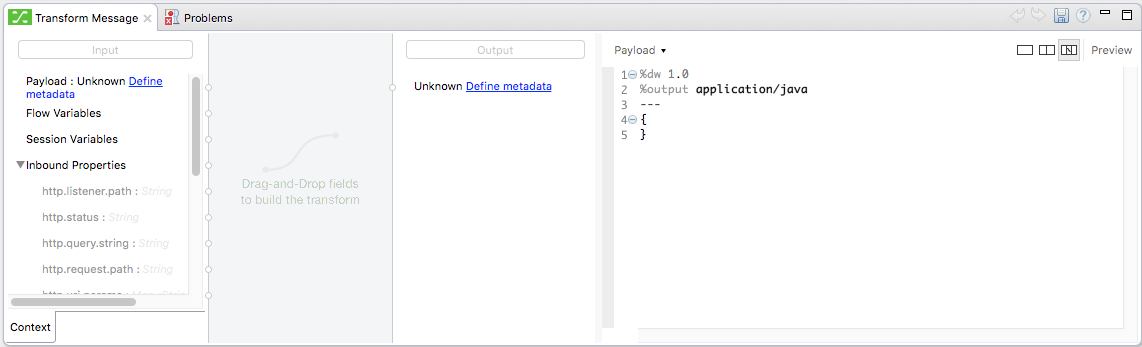
Drag a Transform Message element in between the HTTP connector and the Web Service Consumer. You will see that its properties editor is divided into two sections: on the left the graphical UI – which includes representations of the input, output and mappings between them – on the right the output, and on the right, the actual DataWeave code that this produces.
-
Note that, as there’s metadata available about both the input and expected output of this component, you can see a tree view of each, with all of the fields involved.
-
Right-click on the input section and select Edit Sample Data, a new tab opens up that shows a sample input built from the JSON example you provided the HTTP Connector:
{
  "product": {
  "price": "????",
  "model": "????"
},
  "item_amount": "????",
  "payment": {
  "payment-type": "????",
  "currency": "????",
  "installments": "????"
},
  "buyer": {
  "email": "????",
  "name": "????",
  "address": "????",
  "city": "????",
  "state": "????",
  "postCode": "????",
  "nationality": "????"
},
  "shop": "????",
  "salesperson": "????"
}
This sample input will be used to build a sample output, however, as the body of your DataWeave code doesn’t refer to any elements of the input yet, you still won’t see anything changing in the output if you edit it now.
-
Use the GUI to create the actual mapping between the input and output fields. Simply click and drag a field in the input to a field in the output. Match all of the names that are identical, as well as those that are similar, such as
state&stateOrProvinceornationality&country.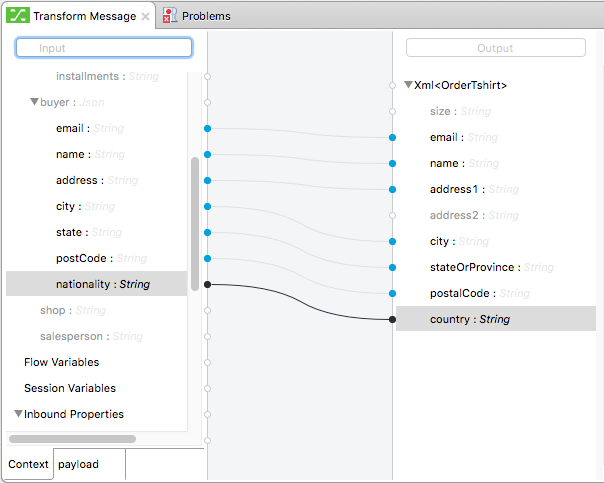
Notice how each of these actions you performed creates a line in the DataWeave code. By now your DataWeave code should look like this:
%dw 1.0
%output application/xml
%namespace ns0 http://mulesoft.org/tshirt-service
---
{
	ns0#OrderTshirt: {
		email: payload.buyer.email,
		name: payload.buyer.name,
		address1: payload.buyer.address,
		city: payload.buyer.city,
		stateOrProvince: payload.buyer.state,
		postalCode: payload.buyer.postCode,
		country: payload.buyer.nationality
	}
}
In the code above, the fields are populated with references to elements in the payload, these are often found a few levels within the data structure, so you need to drill down to it using the . selector. -
As the input doesn’t provide a value for
sizeor foraddress2, you can provide a literal expression for these. Double click on thesizeand on theaddress2fields in the output, note how this creates a line for each in your DataWeave code that loads them with the fixed valuenull. Edit the DataWeave code directly to assign the value "M" tosize, leaveaddress2as null.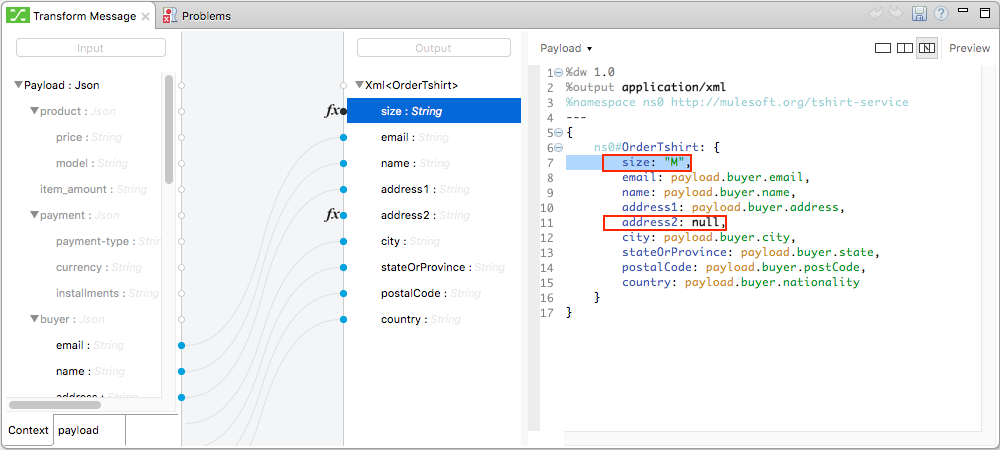
-
We can make this a little more interesting by changing the literal expression that populates "size" into a conditional expression. See in the code below how the line that defines "size" has changed, it sets it to "M" unless the buyer’s state is Texas, then it makes the shirt "XXL".
%dw 1.0 %output application/xml %namespace ns0 http://mulesoft.org/tshirt-service --- { ns0#OrderTshirt: { size: "M" unless payload.buyer.state == "TX" otherwise "XXL", email: payload.buyer.email, name: payload.buyer.name, address1: payload.buyer.address, address2: "????", city: payload.buyer.city, stateOrProvince: payload.buyer.state, postalCode: payload.buyer.postCode, country: payload.buyer.nationality } } -
Click the
Previewbutton on the top right corner of the editor. This will open a section that displays a preview of your output data based on the sample data you provide in the input. Note that right now most of the values will simply have the????placeholder.
-
Select the
payloadtab in your input section and replace the????placeholders in the relevant fields with test values. When doing this, note how these values are populated into the values of the preview in real time, giving you a tangible representation of what the final result of your mapping will be. Try populating the "state" field in the input sample with TX and note how the "size" field in the output sample is updated in real time. -
Save your Mule project and Deploy it to Studio’s virtual server to try it out by right-clicking on the project and selecting
Run As → Mule Application. -
Using a tool like Postman (chrome extension), send an HTTP POST request to http://localhost:8081/ex1 with a JSON body like the one below:
{
    "product":{
        "price": "5",
        "model": "MuleSoft Connect 2015"
    },
    "item_amount": "3",
    "payment":{
         "payment-type": "credit-card",
         "currency": "USD",
         "installments": "1"
    },
    "buyer":{
        "email":"mike@hotmail.com",
        "name":"Michael",
        "address":"Koala Boulevard 314",
        "city":"San Diego",
        "state":"CA",
        "postCode":"1345",
        "nationality":"USA"
    },
 "shop": "main branch",
    "salesperson": "Mathew Chow"
}
You should get a response with an XML body that has a single value, this is the order ID for the shirt order you just placed.
Mule XML Code:
<http:listener-config name="HTTP_Listener_Configuration" host="0.0.0.0" port="8081" doc:name="HTTP Listener Configuration"/>
    <ws:consumer-config name="Web_Service_Consumer" wsdlLocation="http://tshirt-service.cloudhub.io/?wsdl" service="TshirtServicePortTypeService" port="TshirtServicePortTypePort" serviceAddress="http://tshirt-service.cloudhub.io/" doc:name="Web Service Consumer"/>

    <flow name="dataweave_example2">
        <http:listener config-ref="HTTP_Listener_Configuration" path="ex1" metadata:id="dfb0767b-d3e5-4914-8f39-12a5455b67b3" doc:name="HTTP"/>
        <dw:transform-message doc:name="Transform Message">
            <dw:input-payload doc:sample="json.json"/>
            <dw:set-payload><![CDATA[%dw 1.0
%output application/xml
%namespace ns0 http://mulesoft.org/tshirt-service
---
{
    ns0#OrderTshirt: {
        size: "M" unless payload.buyer.state == "TX" otherwise "XXL",
        email: payload.buyer.email,
        name: payload.buyer.name,
        address1: payload.buyer.address,
        address2: null,
        city: payload.buyer.city,
        stateOrProvince: payload.buyer.state,
        postalCode: payload.buyer.postCode,
        country: payload.buyer.nationality
    }
}]]></dw:set-payload>
        </dw:transform-message>
        <ws:consumer config-ref="Web_Service_Consumer" operation="OrderTshirt" doc:name="Web Service Consumer"/>
    </flow>
DataWeave Code:
%dw 1.0
%output application/xml
%namespace ns0 http://mulesoft.org/tshirt-service
---
{
    ns0#OrderTshirt: {
        size: "M" unless payload.buyer.state == "TX" otherwise "XXL",
        email: payload.buyer.email,
        name: payload.buyer.name,
        address1: payload.buyer.address,
        address2: null,
        city: payload.buyer.city,
        stateOrProvince: payload.buyer.state,
        postalCode: payload.buyer.postCode,
        country: payload.buyer.nationality
    }
}
Rearranging your Input
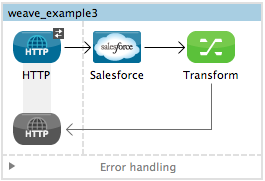
In this example, you obtain an input with several entries, and you want to regroup those entries into different categories based on the values found in one of the fields. Here you take contacts stored on a Salesforce account, and regroup them according to their role. If you don’t have a Salesforce account to carry out all of the steps here, note that there is a workaround for loading that same metadata manually into Studio.
-
Drag an HTTP Connector into a new flow, select the connector configuration that you created for the previous example. Set the path of the connector to
ex2 -
Drag a Salesforce Connector into your flow, after the HTTP Connector. Create a global configuration for it by clicking the green plus sign in its properties editor. If you own a Salesforce account, fill in your Salesforce Username, password and security token (which you should be able to find in the email you got from Salesforce when you first registered). Click Test Connection to make sure your credentials are accepted, then click ok.
-
Back in the properties editor of the Salesforce connector, select the operation Query. In the Query Text field below, write the following simple query:
SELECT Name, Email, Id, Title FROM ContactThis will retrieve every one of the contacts linked to your Salesforce account, each of them with four fields of data. Notice how now – when the Salesfoce connector is selected in your canvas – the metadata explorer’s Out tab shows that the output payload contains a list of contacts, each with these four fields. If it doesn’t, you may need to click the Refresh metadata button under the metada explorer.
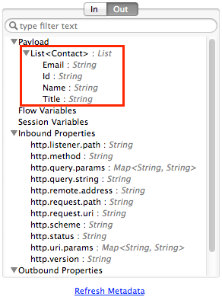
If you don’t have a Salesforce account and don’t want to go through the trouble of creating one, you can assign the data structure directly to the Transform Message component:
-
Download this sample JSON file sample JSON
-
Open the Transform message properties editor, note that the input section will have a warning about there being no metadata. Click on the
Define metadatalink. -
Select
Create new Type, pickJSON -
Name your Type Id
Contacts, selectExamplein the dropdown menu and then find the file that you just downloaded from your local drive Now you should see an input structure similar to what you’d have if you were taking metadata from a Salesforce account.
-
-
Add a Transform Message element to your flow after the Salesforce connector, and open its properties editor.
-
In the input section of the editor, right-click and select Edit Sample Data, a new tab opens up that shows a sample input with placeholders for its fields. As the type of the input is a POJO, the object is displayed as described through a DataWeave transform:
%dw 1.0
%output application/java
---
[{
    Name: "????",
    Email: "????",
    Id: "????",
    Title: "????"
}]
This sample gives you a clear reference of how the incoming data is structured and how you can reference each value. This sample input is also used to produce a sample output in the output section. Flesh it out to make it into more helpful data, for example paste this in its place:
%dw 1.0 %output application/java --- [{ Name: "Mr White", Email: "white@mulesoft.com", Id: "1234", Title: "Chief Java Prophet" }, { Name: "Mr Orange", Email: "orange@mulesoft.com", Id: "4567", Title: "Integration Ninja" }, { Name: "Mr Pink", Email: "pink@mulesoft.com", Id: "8923", Title: "Integration Ninja" }, { Name: "Mr Blue", Email: "blue@mulesoft.com", Id: "8923", Title: "Executive Growth Rockstar Embassador" } ] -
As in the previous case, in the input section you can see a tree that describes the data structure. As there’s no metadata about the desired output, there isn’t anything specified in the output section. In this example we will build the DataWeave code manually, as what we need to do requires more advanced features than what the UI can provide. In the DataWeave code, change the output directive from the default
application/javatoapplication/json. -
In the transform section, Write the following DataWeave code:
%dw 1.0
%output application/json
---
roles: payload groupBy $.Title
The output you’re creating is an object. When objects have a single element, there’s no need to wrap it in curly brackets, as is necessary when it has multiple elements. Through this you’re creating a top level object with a single element in it named "roles" which in turn holds an object that contains everything else. Its contents are gouped by the "$.Title" field, which is an expression evaluated in the context of every contact in the input array.
-
Open the
Previewsection of the editor to see the produced output. It should display this:{ "roles": { "Chief Java Prophet": [ { "Name": "Mr White", "Email": "white@mulesoft.com", "Id": "1234", "Title": "Chief Java Prophet" } ], "Executive Growth Rockstar Ambassador": [ { "Name": "Mr Blue", "Email": "blue@mulesoft.com", "Id": "8923", "Title": "Executive Growth Rockstar Ambassador" } ], "Integration Ninja": [ { "Name": "Mr Orange", "Email": "orange@mulesoft.com", "Id": "4567", "Title": "Integration Ninja" }, { "Name": "Mr Pink", "Email": "pink@mulesoft.com", "Id": "8923", "Title": "Integration Ninja" } ] } }Each different available value for "title" will have a corresponding element inside the "roles" object, each holding an array of objects with every contact that matches that value for title.
-
Save your Mule project and Deploy it to Studio’s virtual server to try it out by right-clicking on the project and selecting
Run As → Mule Application. -
Using any browser you want, make a request to http://localhost:8081/ex2. You should get a response with an JSON body that contains a top level object, and inside it the object "roles" that has each different title as an element, each of these containing an array of objects with each contact in your Salesforce Account that matches its title.
Mule XML Code:
<http:listener-config name="HTTP_Listener_Configuration" host="localhost" port="8081" doc:name="HTTP Listener Configuration"/>
    <sfdc:config name="Salesforce__Basic_authentication" username="xxxx" password="xxxx" doc:name="Salesforce: Basic authentication" securityToken="xxxx"/>


    <flow name="dataweave_example3">
       <http:listener config-ref="HTTP_Listener_Configuration" path="ex2" doc:name="HTTP"/>
        <sfdc:query config-ref="Salesforce__Basic_authentication" query="dsql:SELECT Name, Email, Id, Title  FROM Contact" doc:name="Salesforce"/>
        <weave:transform-message doc:name="Transform Message">
            <weave:set-payload><![CDATA[
%dw 1.0
%output application/json
---
roles: payload groupBy $.Title
]]>
            </weave:set-payload>
        </weave:transform-message>
    </flow>
DataWeave Code:
%dw 1.0
%input payload application/java
%output application/json
---
roles: payload groupBy $.Title
One to one JSON to XML Conversion
Suppose you want to transform any JSON payload to XML, retaining the original data structure regardless of what attributes and nested objects or arrays the input might contain.
To achieve this, follow the steps below:
-
Drag an HTTP Connector into a new flow, create a new global element for it by clicking the green plus sign in its properties editor. Set its host to
localhostand leave its port as the default8081, then click Ok. Back in the properties editor of the connector, set the path toex3. -
Drag a Transform Message Transformer to your flow, right after your HTTP Connector, then open its properties editor.
-
In the transform section of the editor, change the DataWeave code so that it looks like this:
%dw 1.0
%output application/xml
---
payload
The directives in the Header of this transform define the output as being of type XML. The body of this transform simply references the payload, which is implicitly an input directive of this transform, as are all of the components of the inbound Mule message. Whatever exists in the payload – including any child elements at any depth – is transformed directly into XML without changing any of its structure.
-
Save your Mule project and Deploy it to Studio’s virtual server to try it out by right-clicking on the project and selecting
Run As → Mule Application. -
Using a tool like Postman (chrome extension), send an HTTP POST request to http://localhost:8081/ex1 with any JSON content you want in the request body. You should get a response with an XML body that has the same data and structure as the input.
For example, if you send a request with this body:
{"ccc":
    {
    "ddd":"ddd",
    "eee":"eee",
    "fff":["fgh","ghf","hgf"]
    }
}
You should get this in the body of the response:
<?xml version='1.0' encoding='UTF-8'?>
<ccc>
  <ddd>ddd</ddd>
  <eee>eee</eee>
  <fff>
    <element>fgh</element>
    <element>ghf</element>
    <element>hgf</element>
  </fff>
</ccc>
Mule XML Code:
<http:listener-config name="HTTP_Listener_Configuration" host="localhost" port="8081" doc:name="HTTP Listener Configuration"/>
    <flow name="dataweave_example3">
        <http:listener config-ref="HTTP_Listener_Configuration" path="ex3" doc:name="HTTP"/>
        <dw:transform-message doc:name="Transform Message">
            <dw:set-payload><![CDATA[
%dw 1.0
%output application/xml
---
payload
]]>
            </dw:set-payload>
        </dw:transform-message>
    </flow>
DataWeave Code:
%dw 1.0
%output application/xml
---
payload
Code for Full Project
Mule XML Code:
<?xml version="1.0" encoding="UTF-8"?>

<mule xmlns:dw="http://www.mulesoft.org/schema/mule/ee/dw" xmlns:metadata="http://www.mulesoft.org/schema/mule/metadata" xmlns:ws="http://www.mulesoft.org/schema/mule/ws" xmlns:tracking="http://www.mulesoft.org/schema/mule/ee/tracking" xmlns:scripting="http://www.mulesoft.org/schema/mule/scripting" xmlns:http="http://www.mulesoft.org/schema/mule/http" xmlns="http://www.mulesoft.org/schema/mule/core" xmlns:doc="http://www.mulesoft.org/schema/mule/documentation"
    xmlns:spring="http://www.springframework.org/schema/beans"
    xmlns:xsi="http://www.w3.org/2001/XMLSchema-instance"
    xsi:schemaLocation="http://www.springframework.org/schema/beans http://www.springframework.org/schema/beans/spring-beans-current.xsd
http://www.mulesoft.org/schema/mule/core http://www.mulesoft.org/schema/mule/core/current/mule.xsd
http://www.mulesoft.org/schema/mule/http http://www.mulesoft.org/schema/mule/http/current/mule-http.xsd
http://www.mulesoft.org/schema/mule/ee/dfl http://www.mulesoft.org/schema/mule/ee/dfl/current/dfl.xsd
http://www.mulesoft.org/schema/mule/scripting http://www.mulesoft.org/schema/mule/scripting/current/mule-scripting.xsd
http://www.mulesoft.org/schema/mule/ee/tracking http://www.mulesoft.org/schema/mule/ee/tracking/current/mule-tracking-ee.xsd
http://www.mulesoft.org/schema/mule/ws http://www.mulesoft.org/schema/mule/ws/current/mule-ws.xsd
http://www.mulesoft.org/schema/mule/ee/dw http://www.mulesoft.org/schema/mule/ee/dw/current/dw.xsd">
    <http:listener-config name="HTTP_Listener_Configuration" host="localhost" port="8081" doc:name="HTTP Listener Configuration"/>
    <ws:consumer-config name="Web_Service_Consumer" wsdlLocation="http://tshirt-service.cloudhub.io/?wsdl" service="TshirtServicePortTypeService" port="TshirtServicePortTypePort" serviceAddress="http://tshirt-service.cloudhub.io/" doc:name="Web Service Consumer"/>
    <sfdc:config name="Salesforce__Basic_authentication" username="xxxx" password="xxxx" doc:name="Salesforce: Basic authentication" securityToken="xxxx"/>

    <flow name="dataweave_example1">
        <http:listener config-ref="HTTP_Listener_Configuration" path="ex1" metadata:id="dfb0767b-d3e5-4914-8f39-12a5455b67b3" doc:name="HTTP"/>
        <dw:transform-message doc:name="Transform Message">
            <dw:set-payload>
<![CDATA[
%dw 1.0
%output application/xml
%namespace ns0 http://mulesoft.org/tshirt-service
---
{
    ns0#OrderTshirt: {
        size: "M" unless payload.buyer.state == "TX" otherwise "XXL",
        email: payload.buyer.email,
        name: payload.buyer.name,
        address1: payload.buyer.address,
        address2: "????",
        city: payload.buyer.city,
        stateOrProvince: payload.buyer.state,
        postalCode: payload.buyer.postCode,
        country: payload.buyer.nationality
    }
}
            ]]></dw:set-payload>
        </dw:transform-message>
        <ws:consumer config-ref="Web_Service_Consumer" operation="OrderTshirt" doc:name="Web Service Consumer"/>
    </flow>
    <flow name="dataweave_example2">
       <http:listener config-ref="HTTP_Listener_Configuration" path="ex2" doc:name="HTTP"/>
        <sfdc:query config-ref="Salesforce__Basic_authentication" query="dsql:SELECT Name, Email, Id, Title  FROM Contact" doc:name="Salesforce"/>
        <weave:transform-message doc:name="Transform Message">
            <weave:set-payload><![CDATA[
%dw 1.0
%output application/json
---
roles: payload groupBy $.Title
            ]]></weave:set-payload>
        </weave:transform-message>
    </flow>
    <flow name="dataweave_example3">
        <http:listener config-ref="HTTP_Listener_Configuration" path="ex3" doc:name="HTTP"/>
        <dw:transform-message doc:name="Transform Message">
            <dw:set-payload><![CDATA[
%dw 1.0
%output application/xml
---
payload
            ]]></dw:set-payload>
        </dw:transform-message>
    </flow>
</mule>
Also See
-
See more advanced examples in DataWeave Examples
-
Migrate your old DataMapper components automatically using DataWeave Migrator Tool