Configuring a Database for Business Event Data Persistence
Mule stores event-related data in a default database, which persists the data. However, you also have the option to persist the data in an Oracle database. This can give you control over how much data to store. It can also provide better scalability and performance than the default data storage.
This page describes how to configure an Oracle database – specifically, Oracle Express Edition 10.2.0 – for business event data storage and persistence.
Step 1: Install the Database
If you haven’t already done so, download and install Oracle Express Edition v10.2.0 from http://www.oracle.com/technetwork/database/express-edition/overview/index.html.
Step 2: Update Listener Parameters
Add the Oracle System ID (SID) to the listener.ora file. This is the configuration file for the network listener. You can find the file in the <oracle_install_dir>\app\oracle\product\10.2.0\server\NETWORK\ADMIN directory, where <oracle_install_dir> is the directory where you installed the Oracle database. By default, the file is located in the C:\oraclexe\app\oracle\product\10.2.0\server\NETWORK\ADMIN directory.
The SID entry should be entered as follows:
(SID_DESC = (SID_NAME = XE) (ORACLE_HOME = C:\oraclexe\app\oracle\product\10.2.0\server) )Step 3: Restart the TNS Listener Service
If you updated the listener.ora file, you need to stop and then restart the TNS listener service for the database instance. You can use the lsnrctl command with appropriate parameters to stop and then restart the listener. You can also use the lsnrctl command to get the current status of the listener.
On the command line, enter:
-
lsnrctl status– to get status information about the listener service. -
lsnrctl stop– to stop the listener. -
lsnrctl start– to start the listener.
On Windows systems, you can also stop and start the listener from the Oracle Control Panel. You can also restart the TNS listener service on Windows systems simply by locating OracleXETNSListener, which is the default listener for the system.
Step 4: Create a Database User
Open the Database Home Page login window at http://127.0.0.1:8080/apex/. Login as follows:
-
Username: system
-
Password: Enter the password that was specified when Oracle XE was installed.
This opens the Oracle Database XE home page.
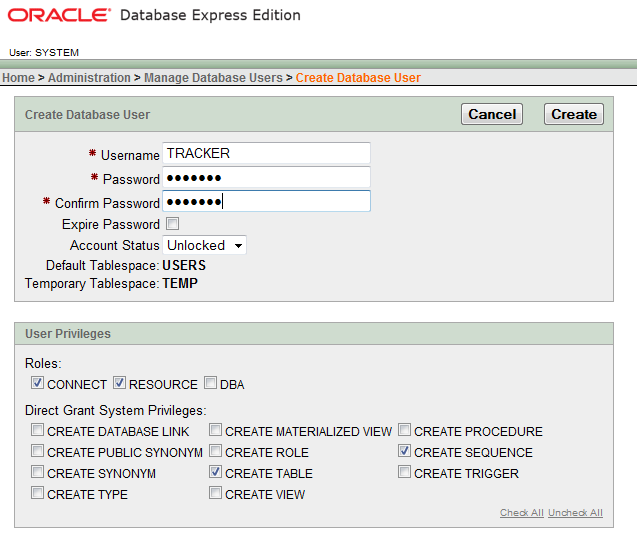
Click the Administration icon, then click on Create User in the drop-down list in the Database Users icon. This opens a Create Database User form.
Create a new user by entering the following information in the form:
-
Username: TRACKER
-
Password: tracker
-
Roles: CONNECT and RESOURCE
-
Privileges: CREATE TABLE and CREATE SEQUENCE
Here is what your entries should look like:
Step 5: Calculate the Database Quota
Calculate the database quota (that is, database space) by examining the actual usage of the account over a period of time. First, determine the actual size of the database. Open the Oracle SQL Command Line (SQL*Plus) and enter the following:
select sum(bytes) from user_segments
Next, calculate the space actually used by the schema (the schema in Oracle is the logged-in user). Enter the following in SQL*Plus:
connect TRACKER/tracker@orcl;select sum(bytes) from user_segments
The @orcl in the connect statement is the Oracle Net connect identifier.
Your results will depend on your environment and database configuration.
After you calculate the database quota, you can set it through the ALTER USER command. For example, the following command sets the database quota for the user to 1 MB:
alter user TRACKER quota 1M on users;
Step 6: Update the Management Console for Oracle
There are two things you need to do to update Mule’s management console for use with an Oracle database:
-
Add an Oracle driver.
-
Add Oracle-specific information to various XML files.
Add an Oracle Driver
Download either of the following Oracle JDBC drivers: ojdbc6.jar or ojdbc5.jar from the Oracle JDBC drivers page.
If you run the management console as a web app on Apache Tomcat, copy the Oracle driver to the <apache_install_dir>\apps\mmc\webapps\mmc\WEB-INF\lib directory, where <apache_install_dir> is the directory where you installed Apache Tomcat.
If you run the management console as part of the Mule ESB distribution, copy the the Oracle driver to the <mule_install_dir>\apps\mmc\webapps\mmc\WEB-INF\lib directory, where <mule_install_dir> is the directory where you installed Mule ESB.
Add Oracle-Specific Information to XML Files
The two XML files you need to update are persistence.xml and tracking-ApplicationContext.
If you run the management console as a web app on Apache Tomcat, you can find these files in the <apache_install_dir>\apps\mmc\webapps\mmc\WEB-INF\classes\META-INF directory, where <apache_install_dir> is the directory where you installed Apache Tomcat.
If you run the management console as part of the Mule ESB distribution,you can find these files in the <mule_install_dir>\apps\mmc\webapps\mmc\WEB-INF\classes\META-INF directory, where <mule_install_dir> is the directory where you installed Mule ESB.
In the persistence.xml file, replace:
<property name="openjpa.jdbc.DBDictionary" value="batchLimit=-1" />with:
<property name="openjpa.jdbc.DBDictionary" value="oracle (DriverVendor=oracle)" />Remove also all entries related to H2 database.
In the tracking-ApplicationContext.xml file, change the definitions of the dataSource, jpavendorAdapter, and entityManagerFactory beans as follows:
<bean id="dataSource" class="org.springframework.jdbc.datasource.DriverManagerDataSource">
  <property name="driverClassName" value="oracle.jdbc.driver.OracleDriver" />
  <property name="url" value="jdbc:oracle:thin:@127.0.0.1:1521:orcl" />
  <property name="username" value="TRACKER" />
  <property name="password" value="tracker" />
</bean><tx:annotation-driven transaction-manager="transactionManager" />
<bean id="transactionManager" class="org.springframework.orm.jpa.JpaTransactionManager">
  <property name="entityManagerFactory" ref="entityManagerFactory" />
</bean>
  <bean id="entityManagerFactory" class="org.springframework.orm.jpa.LocalContainerEntityManagerFactoryBean">
  <property name="dataSource" ref="dataSource" />
  <property name="persistenceUnitName" value="persistence-unit" />
  <property name="jpaVendorAdapter" bean id="jpaAdapter" class="org.springframework.orm.jpa.vendor.OpenJpaVendorAdapter" />
  <property name="database" value="ORACLE" />
  <property name="showSql" value="true" />
</bean>
<property>
  <property name="loadTimeWeaver">
    <bean class="com.mulesoft.mmc.tracking.jpa.OpenJPALoadTimeWeaver" />
</property>
</bean>
Note that localhost is used as the default port and SID is specified as "orcl". User "TRACKER" is the same created in step 4.
Known Limitations
The persistence.xml file includes the following property specification:
<property name="openjpa.jdbc.SynchronizeMappings" value="buildSchema(SchemaAction=add)" />\This specifies that new tables will be added as needed, but if a fundamental change is made, older tables will not be removed. This might cause some conflicts.
Using SchemaAction=refresh will solve this problem. However, this will generate "ORA-01031 Not enough privileges" exceptions. This occurs because in processing the request, the system tries to drop everything in which it is not really interested. This includes dropping sequences on XDB and SYS schemas (which are reserved schemas in Oracle).
Troubleshooting Tips
ORA-12519, TNS: no appropriate service handler found. If you get this error, you will need to run an SQL command and restart the TNS listener, as follows:
-
Login to Oracle as system, then open SQL*Plus and enter the following::
ALTER SYSTEM SET PROCESSES=150 SCOPE=SPFILE;
-
Follow the instructions in Step 3: Restart the TNS Listener Service to restart your TNS listener.