Deploying Applications
| Mule Management Console (MMC) was deprecated in December 2015. Its End of Life is July 15, 2019. For more information see the MMC Migrator Tool or contact your Customer Success Manager to determine how you can migrate to Anypoint Runtime Manager. |
"Application" (as used in the Mule ESB environment) packages one or many flows into a deployment unit that can be managed together. Flows that share a common development life cycle and/or share components are typically packaged in a single application.
When you deploy an application to the server, you actually deploy the archive or .zip file that serves as the containing package for all application components.
|
Use the Deployments Tab in the management console to perform application provisioning, including deploying, undeploying, and redeploying applications to specified target Mule ESB servers.
You can also use the Deployments Tab to to deploy, undeploy, and redeploy applications to a cluster of Mule ESB servers (nodes). For further details, see Deploying, Redeploying, or Undeploying an Application To or From a Cluster.
To provision an application, you create a new deployment. Deployments may contain one or more applications. This feature allows you to provision a group of flows simultaneously to any number of run time Mule ESB instances. For example, you could create a deployment and separately provision it to your staging and UAT (user acceptance testing) environments. Before deployment takes place, applications are automatically stored in the Mule Repository and versioned.
Use the Deployments Tab in the management console to perform application provisioning, including deploying, undeploying, and redeploying applications to specified target servers. The console lets you create deployments, which are groups for organizing web applications for deployment to target servers. Applications can be added to deployment groups and kept in the repository, to be deployed (or undeployed) at some later time. You can also deploy applications at the same time you add them to the repository.
Viewing and Managing Deployments
The Deployments Tab provides two filtered views in the navigation tree: Deployments and Repository. Deployments lists all provisioned applications, the servers to which they are provisioned, and the current status of the deployment. Click the Deployments button in the navigation tree to view and manage deployments.
Deployments also lists the clusters to which applications are provisioned, and the current status of the deployment.
The Repository view shows all applications loaded into the repository and whether or not they have been provisioned. Once applications have been added to the repository, use the Repository button in the navigation tree to view and manage them. For how to work with the repository, see Maintaining the Server Application Repository.
When you open the Applications screen, it displays a list of all deployments, as follows:

Deployments to clusters are also displayed.

To perform a deployment action on an existing deployment, locate it in the list and check the box to the left of the row. Then, select the deployment action you wish to perform. The available actions depend on the current state of the deployment. In the examples above, several deployments are selected. The appropriate buttons are highlighted for these selected deployments, depending on their status.
Deployment Provisioning Actions
The table below lists the different deployment actions you can perform and what the expected impact will be.
| Deployment Action | Impact |
|---|---|
Deploy |
Provisions the application to the configured Mule ESB instances and activates them. Only available for applications that are not currently deployed. |
Undeploy |
Deactivates and removes an existing deployed application from the configured Mule ESB instances. Only available for currently deployed applications |
Redeploy |
Recycles the deployment of an existing application. Available for deployed applications or applications where the deployment previously failed |
Delete |
Deletes the deployment configuration. If the application is currently deployed, it will be undeployed first. |
Keep in mind that if during the deploy operation, one application fails to deploy, the entire deployment fails. Similarly, the undeploy and redeploy operations fail if just one application cannot be undeployed or redeployed. However, if a server in a deployment is down at the time of the operation, the operation (deploy, undeploy, or redeploy) continues and just skips the down server.
Note, too, that the redeploy operation redeploys all applications in the deployment, regardless of whether the application is deployed or undeployed.
Reconciled Deployments
Deployments may appear as reconciled or not reconciled. When a deployment is marked as reconciled, it indicates that the applications in the deployment unit have all been successfully deployed to all servers specified for that deployment.
On the other hand, when a deployment is marked as not reconciled, it indicates that at least one application in the deployment unit did not successfully deploy to at least one server specified for the deployment. It might also indicate that at least one of the servers for the deployment is currently down.
Creating a New Deployment Group
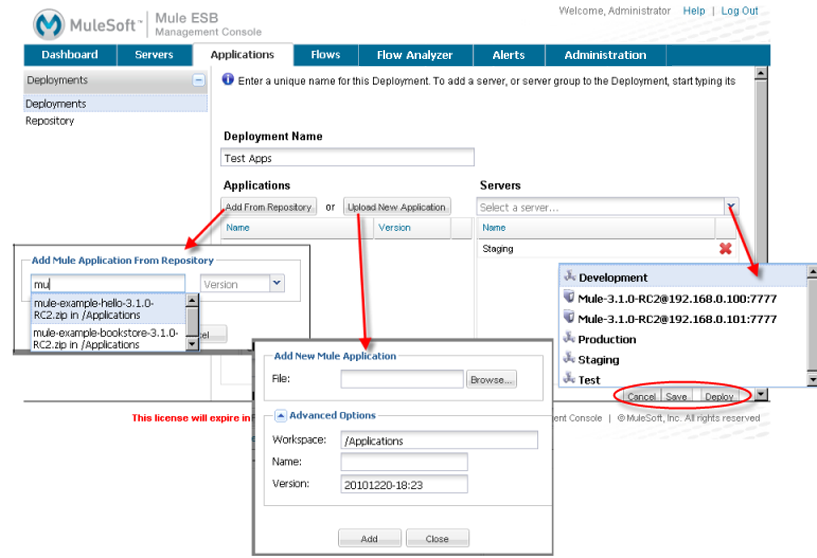
Click the New button to create a new deployment group and specify servers and applications for that group. The figure below shows the options you have for specifying applications and servers for a group.

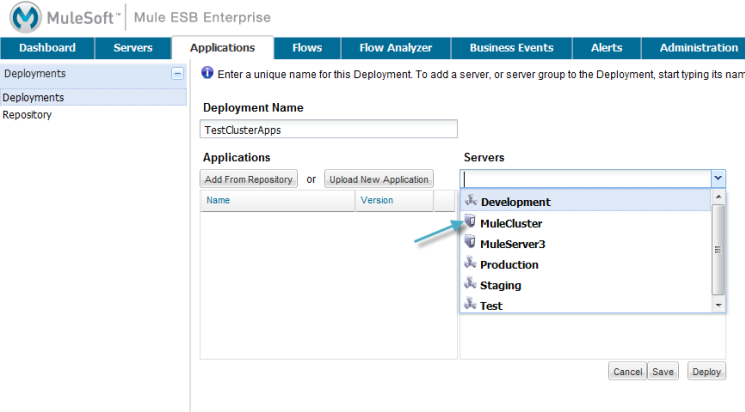
You can also specify a cluster for the group.

You enter a name for the deployment, plus select the server or servers (or server groups) for the deployment. Selected servers and server groups appear in the box beneath Servers, and can be removed by clicking the red X to the right of the server name.
You can also select a cluster for the deployment.
You also add applications to the deployment, either by selecting them from the repository or uploading new applications. (See Maintaining the Server Application Repository for more information on the advanced options when adding applications to the repository.) Added applications appear listed in the box beneath Applications, and can be removed by clicking the red X to the right of the application name.
Once you complete the deployment specification, click Deploy to save and deploy simultaneously. If you want to deploy the application later, just select Save and the application is saved in an Undeployed state. If you cancel without saving, the deployment is discarded.
Changing Deployed Applications
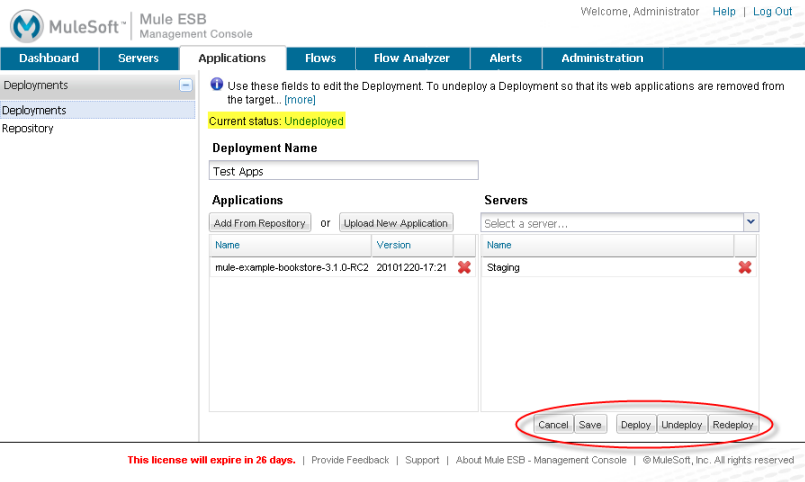
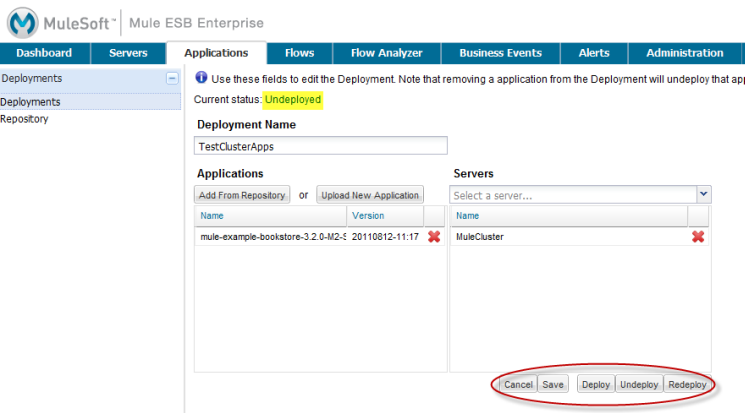
After you save a deployment, the same screen shows the current deployed status for the deployment (either deployed or undeployed) and lets you edit the deployment, such as add additional servers or applications. If you make any changes to the configuration of the deployment, you will need to redeploy for it to take effect.
Open the deployments screen from the main Applications panel by clicking the deployment name in the deployments table. Depending on the status, you can use this screen to deploy, undeploy, or redeploy the group of applications.

You can also deploy, undeploy, or redeploy the group of applications to a cluster.


