Maintaining the Server Application Repository
| Mule Management Console (MMC) was deprecated in December 2015. Its End of Life is July 15, 2019. For more information see the MMC Migrator Tool or contact your Customer Success Manager to determine how you can migrate to Anypoint Runtime Manager. |
In addition to using the Applications tab in the management console to perform application provisioning (deploying, undeploying, and redeploying applications to specified target servers), you also use this tab to maintain the server application repository.
The Applications tab provides two filtered views: Deployments and Repository. The Repository view shows all applications loaded into the repository and whether or not they have been provisioned. Once applications have been added to the repository, use the Repository button in the navigation tree to view and manage them. (See Deploying Applications for more information on deployments.)
Click the Repository node in the navigation tree to see the current application repository. The Repository pane displays a table listing the current applications.

Click the New button to add a new application to the repository. To delete an application from the repository, check the box to the left of the application name and then click the Delete button.
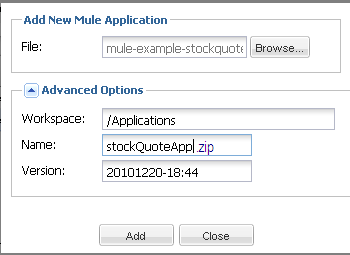
When adding a new Mule application to the repository, a dialog prompts you to browse for the application file. Optionally, you can use the advanced options to specify where to place the application within the repository. The default workspace is the /Applications folder and you can change this folder. You can also specify another name for the application file and give it a different version number, if you choose. Because applications deployed to a Mule ESB server must be contained in zip files, if you do change the application file name be sure to include the .zip extension. The default version number is the date and time the application is added to the repository. The figure below illustrates this. Click Add to save what you have done.


