JDBC Example
Enterprise Edition
A JDBC Transport in Mule ESB facilitates a client’s access to a JDBC-compatible database, such as an Oracle database or Sybase database. In other words, when an end user (client) needs to access and use information in a database (stored on a server), Mule’s JDBC transport sits in the middle to connect them together and control the flow of information into, and out of, the database.
A JDBC transport can do more than just manage access to a database; it can also use stored procedures, SQL queries, to populate a database with information, for example, or manipulate the data it retrieved from a database. This Mule ESB example application demonstrates some of the things you can do with a JDBC transport and SQL queries.
In the JDBC Example application, an end user submits requests, via a Web browser, to a Mule application to access a database to perform four different tasks:
-
transform, then save, Comma-Separated Value (CSV) data to a database, then retrieve and return the data as a response to the end user
-
clone records in the database, then return a response that indicates the number of records
-
clear the database of its contents
-
retrieve data from the database, then return the data as a response to the end user
The JDBC Example application cleverly performs several tasks:
-
it uses JDBC endpoints and SQL queries together to manipulate data
-
it sets properties on messages
-
it parses and transforms message payload data
-
it handles errors with a customized exception strategy
This example should enable you to create applications which input, retrieve and use data from a JDBC database. To understand more about Mule ESB’s ability to integrate services and systems, access the Mule Mule Examples and see other applications in action.
Assumptions
This document assumes that you are familiar with Mule ESB and the Mule Studio interface. To increase your familiarity with Studio, consider completing one or more Mule Studio Tutorials.
This document describes the details of the example within the context of Mule Studio, Mule ESB’s graphical user interface (GUI). Where appropriate, the XML configuration follows the Studio interface screenshot in an expandable section.
Set Up
As with this JDBC Example, you can create template applications straight out of the box in Mule Studio or Mule Standalone (Mule ESB without Studio). You can tweak the configurations of these use case-based templates to create your own customized applications in Mule.
|
Database Required In order to interact with a functional example, you must have access to a JDBC-compatible database, such as Oracle or Sybase. You will need to complete the following three tasks before running the Mule JDBC example application (detailed procedure below):
If you do not have access to a database to be able to see the application in action, you can still build the example application in Mule Studio or Mule Standalone and read this document, referencing the client-side user interface screenshots, to learn How it Works. |
Using the Example Application with Mule Studio
-
Complete the procedure in Examples and Exercises to create, then run the JDBC template in Mule Studio.
-
Identify an Oracle or Sybase database to which you have access, and which you don’t mind populating with some sample data for the purpose of demonstrating this example application.
-
In the Package Expolorer pane in Studio, click
src/main/resourcesto expand the folder, then click to expand thescripts.oraclefolder, if you are using an Oracle database, orscripts.sybasefolder, if you are using a Sybase database.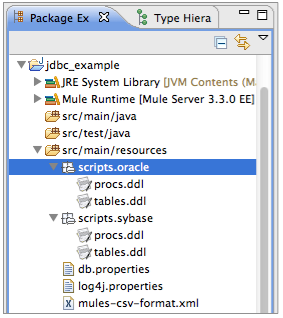
-
Copy the contents of the
procs.ddlandtables.ddlfiles and run those scripts on your database.
Need More Details?
View Granular Instructions
-
Double-click the
procs.ddlfile to open it in a new Studio Canvas pane. -
Double-click the
tables.ddlfile to open it in a new Studio canvas pane.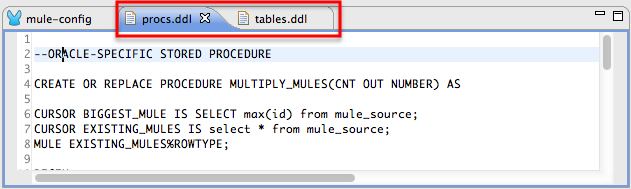
-
Access your database. For example, you can access your Oracle database through Oracle SQL Developer.
-
Copy all the contents of the
procs.ddlfile (open in a Studio canvas pane) into your database development tool. -
Copy all the contents of the
tables.ddlfile (open in a Studio canvas pane) into your database development tool. -
Run the two scripts on your database to create stored procedures and a table in your database.
-
-
In the expanded
src/main/resourcesin the package explorer pane in Studio, double-click thedb.propertiesfile to open it in a new Studio canvas pane. -
On line 5 of the file, after
database.connection=, type the connection information of your database so that the JDBC application can connect to it.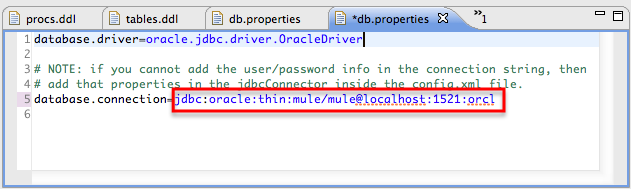
-
In the package explorer pane, right-click the file name of the
jdbc_exampleproject. -
Select
Build Path>Add External Archives…. -
In the navigation panel that appears, browse for, and open, your database’s driver file. For example, open
ojdbc6.jar. -
Click the Save icon in Studio to save your changes in Mule.
-
In the package explorer pane, right-click the
mule-config.mflowfile, then selectRun As>Mule Application. Studio runs the application and Mule is up and kicking! -
To stop the application from running, click the red Terminate button in Studio’s Console.

-
Open your Web browser, type
http://localhost:8084/services/jdbcin the address bar, then press enter. -
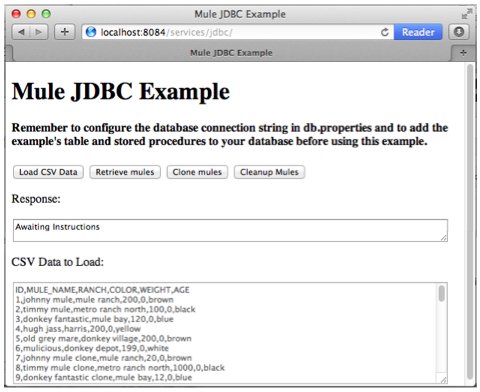
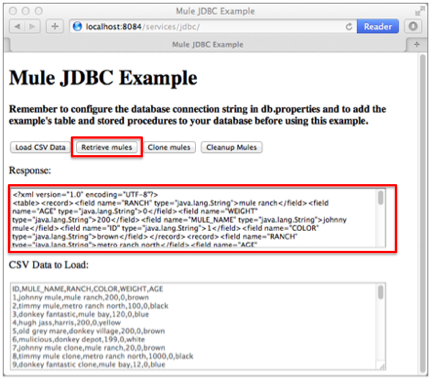
Your browser presents the Mule JDBC Example form for end users to interact with the application.
Using the Example Application with Mule Standalone
-
Complete the procedure in Examples and Exercises to create, then run the JDBC example in Mule Standalone (Mule ESB without Studio).
-
Identify an Oracle or Sybase database to which you have access, and which you don’t mind populating with some sample data for the purpose of demonstrating this example application.
-
On your hard drive, navigate to
mule-enterprise-standalone-3.3.0>examples>jdbc>scripts.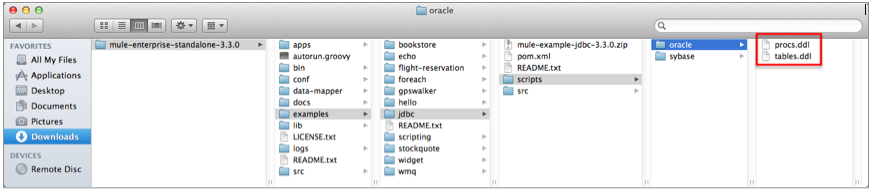
-
Click to expand the
scripts.oraclefolder, if you are using an Oracle database, orscripts.sybasefolder, if you are using a Sybase database. -
Copy the contents of the
procs.ddlandtables.ddlfiles and run those scripts on your database.Need More Details?
View Granular Instructions
-
Double-click the
procs.ddlfile to open it in your text editor. -
Double-click the
tables.ddlfile to open it in your text editor. -
Access your database. For example, you can access your Oracle database through Oracle SQL Developer.
-
Copy all the contents of the
procs.ddlfile (open in your text editor) into your database development tool. -
Copy all the contents of the
tables.ddlfile (open in your text editor) into your database development tool. -
Run the two scripts on your database to create stored procedures and a table in your database.
-
-
On your hard drive, navigate to
mule-enterprise-standalone-3.3.0>apps, then double-clickmule-example-jdbc-3.3.0.zipto unzip the file. -
When unzipped, navigate to
mule-example-jdbc-3.3.0>classes, then double-click thedb.propertiesfile to open it in your text editor. -
On line 5 of the file, after
database.connection=, type the connection information of your database so that the JDBC application can connect to it.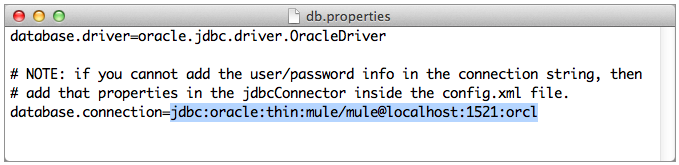
-
Save the file and close your text editor. .On your hard drive, browse your files to find your database’s driver file. For example, open
ojdbc6.jar. -
Copy the driver file, then navigate to the
mule-example-jdbc-3.3.0>lib>userfolder. -
Paste the copy of your driver file in the
userfolder. -
Start Mule and run the JDBC example.
Need More Details?
Learn how to start Mule
-
PC: Open the Console. Mac: Open the Terminal application (
Applications>Utilities>Terminal). -
Access the directory and folder in which you pasted the zip file for your example (i.e. the application folder in Mule). For example, type
cd /Users/aaron/Downloads/mule-standalone-3.3.0/apps -
Access the zip file itself. For example, type
cd .. -
Run Mule. For example, type
./bin/mule
-
-
To stop the application from running, type CTRL-C in your PC’s Console window, or Command-C in your Mac’s Terminal app.
-
Open your Web browser, type
http://localhost:8084/services/jdbcin the address bar, then press enter. -
Your browser presents the Mule JDBC Example form for end users to interact with the application (see image above).
How it Works
The JDBC example application consists of four flows, each of which processes a certain type of client request. The following offers a brief description of what each flow does in the application.
-
The CSVLoader flow transforms CSV data, saves it to the database, then returns a response that displays the records in the database in XML format.
-
The DoubleMules flow clones all the records in the database (i.e. doubles the database content), then returns a response that displays the number of records in the database.
-
The CleanupDB flow wipes clear the contents of the database.
-
The AllMules flow retrieves the information in all the records in the database, then returns a response that displays the records in XML format.
The sections below elaborate further on the flow-by-flow configurations of the JDBC example application and how it works to respond to end user requests.
|
Does order matter? It does not matter which flow appears first in this application; the AllMules flow can just as easily precede the CSVLoader flow, for example, without changing the functionality of the application. |
|
For Mule Studio Users In Mule Studio, double-click an icon representing a building block to open its Properties Panel and examine the configuration details. Alternatively, you can click the Configuration XML tab to access and examine the application’s XML config file. 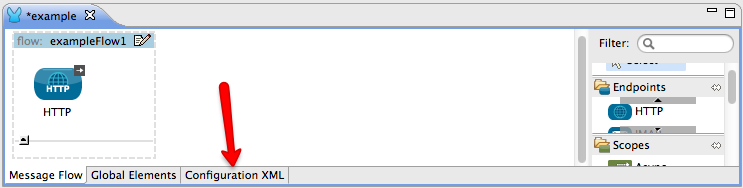
|
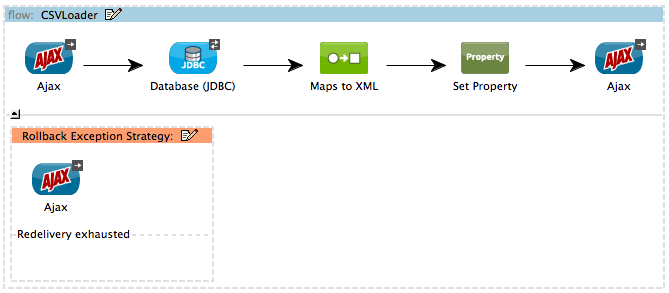
CSVLoader Flow
The CSVLoader flow saves Comma-Separated Value (CSV) data to the database, then returns a response that displays the records in XML format.
Request
On the client-side user interface on a browser (see image below), the user clicks the Load CSV Data button to submit a request to the server-side application. The request asks Mule to save CSV data to the database, then return the data in XML format. (For this example, the developer pre-populated the CSV Data to Load field with data to enable you to easily use a functional example.)
Ajax Inbound Endpoint
The request meets the JDBC example application and activates the CSVLoader flow. In this flow, the AJAX inbound endpoint “listens” for user requests on the /services/jdbc/loadCSV channel; that is to say, it waits for users to press the Load CSV Data. Note that this endpoint listens only for user requests to load CSV data, not for requests to retrieve, clean up or clone database records: one type of request, one flow to process it. Further, because it has a one-way message exchange pattern, this Ajax endpoint only receives requests from the end user; it does not return responses.
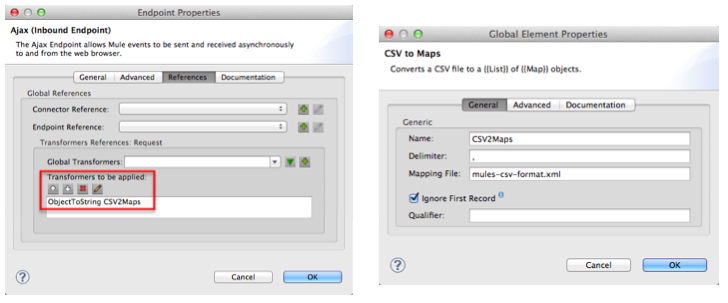
In addition to listening for, and receiving, a message, the Ajax endpoint also transforms the data format of the message from CSV data to Java map objects. To perform this transformation, the endpoint references a Global CSV to Maps Transformer to follow specific instructions on how to transform the data format. The image below, left, displays the Ajax endpoint’s properties panel in Studio; note the section outlined in red in which the endpoint references the global CSV to maps transformer. The image below, right, displays the global CSV to maps transformer’s properties panel in Studio.
|
What is a Global Element? Mule ESB supports Global Elements within application, such as the JDBC Connector and the CSV2Maps Transformer in the JDBC example. Rather than repeatedly write the same code to apply the same configuration to multiple message processors, you can create one global element that details your configurations or transport details. Then, you can instruct any number of message processors in your Mule application to reference that global element. Learn more… In this example, the code that describes the configuration of the JDBC connector does not exist within the CSVLoader flow; rather the code resides in a global element which sits above all other flows in the application’s XML config file (and in the Global Elements tab in Mule Studio). The Ajax endpoint references the global CSV2Maps transformer to obtain instructions on how to transform the data it receives; the JDBC endpoint references the global JDBC connector to obtain transport configuration details. The Ajax endpoint also references the global Ajax Connector automatically, so you do not need to specify the connector reference manually. |
JDBC Endpoint
After receiving and converting the message payload with the Ajax endpoint, the flow uses a request-response JDBC Endpoint to save CSV data to the database. In this case, the CSV data contains information about Mules that live on end user’s ranches, such as the Mule’s name, color and weight.
The JDBC endpoint in this flow performs two tasks:
-
it accesses the database
-
it saves data to the database with map objects
To perform these tasks, the JDBC endpoint works in conjunction with two other things: a Global JDBC Connector and a SQL Query, or stored procedure.
The JDBC connector — a global element in the JDBC example application — helps the JDBC Endpoint with its tasks (listed above).
-
As a connector, it helps the JDBC endpoint access the database by providing specific details about how to connect to it, such as where it exists (the URL), and how to gain access to it (username and password for database). See image below, left.
-
It stores the SQL queries (i.e. stored procedures), one of which the JDBC endpoint in this flow references in order to save data to the database:
commitLoadedMules(below, right).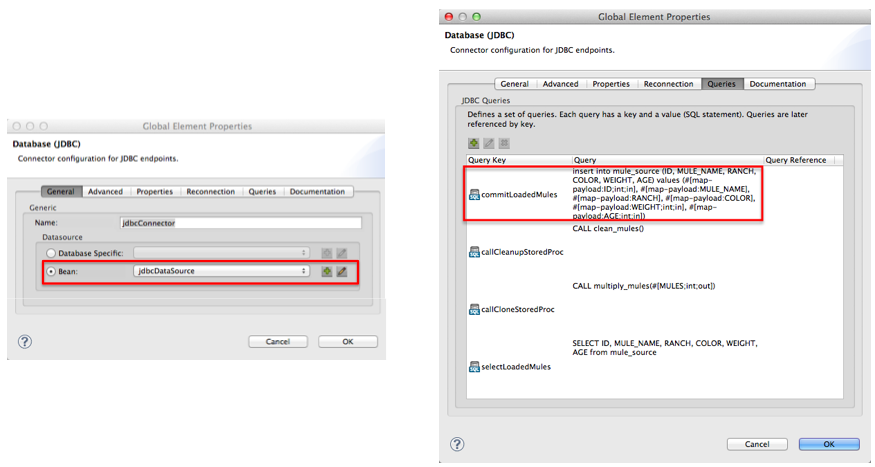
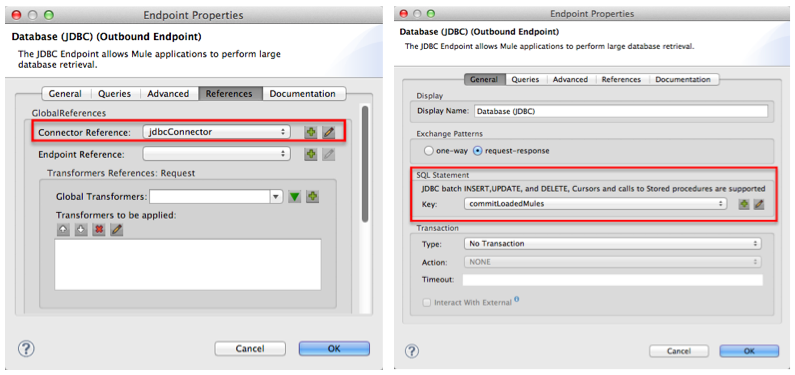
The JDBC endpoint in the CSVLoader flow simply references the connector information (see image below, left) and the SQL query (below, right) in the global JDBC connector. Note that you can store SQL queries on an individual JDBC endpoint in a flow and it will perform the procedures exactly the same as though referencing a global JDBC connector. The only reason to use a global JDBC connector to store your queries is to save time — if you anticipate using a query more than once in your application, you can efficiently write it once, in a global connector, then refer to it multiple times.
Transformers
Because the end user expects a response in XML format, the CSVLoader flow uses a Maps to XML Transformer to convert the message payload’s data format. Recall that the end user sent a request in CSV data format, and the Ajax endpoint transformed the content to map objects so the JDBC endpoint could save the data to the database. Mule now converts the message a second time in order to comply with the demand for an XML response.
The next building block in the flow, the Property Transformer, sets a property on the message payload to specify the type of content it contains (for HTTP protocol). In this case, the Set Property property transformer sets the value of the property to text/xml.
Ajax Outbound Endpoint
Finally, the Ajax outbound endpoint returns a response to the end user. It directs its response — now a message payload which contains the CSV data in XML format — to the specific channel on which the client expects a response, /jdbc/reply.
Response
After Mule processes the end user request, it returns a response to the end user as a message in the Response field in the client-side user interface on her browser. The CSVLoader flow returns a message that appears as an XML list of all the Mules in the database (see image below).
+ image::csv-loaded4.png[csv_loaded4]
Rollback Exception Strategy
Notice that the CSVLoader flow also contains a Rollback Exception Strategy.
If an error occurs in this flow, the rollback exception strategy catches the exception and performs two actions:
-
it notifies the application administrator(s)
-
it uses an Ajax endpoint to send a reply to the end user on the
/jdbc/replychannel.
When rollback exception strategy handles an error, it ultimately returns a response to the end user’s browser.
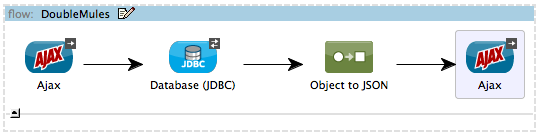
DoubleMules Flow
The DoubleMules flow clones records in the database, then returns a response to the end user to indicate the number of existing records.
View the XML
Request
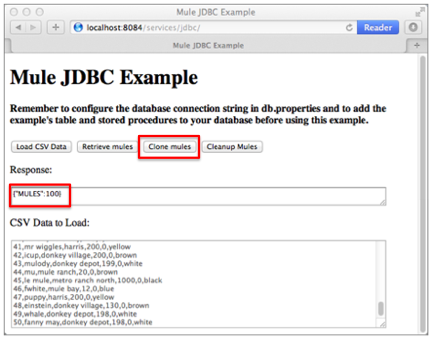
On the client-side user interface on a browser, the user clicks the Clone Mules button to submit a request to the server-side application.
Processing
In this flow, the Ajax endpoint “listens” for user requests on the services/jdbc/clone channel.
Next, the request-response JDBC endpoint calls the callCloneStoredProc procedure. Like the JDBC endpoint in the CSVLoader flow, the endpoint itself does not contain an SQL query, it simply references a stored procedure — callCloneStoredProc — on the global JDBC connector. According to the procedure, Mule clones the contents of the database, then passes the new count of total records to the next message processor as a Java object.
The Object to JSON Transformer converts the data format of the message payload so that the content — a count of all the Mules in the database — becomes human-readable.
Lastly, the Ajax outbound endpoint returns a response to the end user. It directs its response to the specific channel on which the client expects a response, /jdbc/reply.
Response
After Mule processes the end user request, it returns a response to the end user as a message in the Response field in the client-side user interface on his browser. The CSVLoader flow returns a message that appears as a simple record count (see image below).
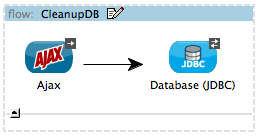
=== CleanupDB Flow
The simplest flow in the application, the CleanupDB flow simply clears the database of its content.
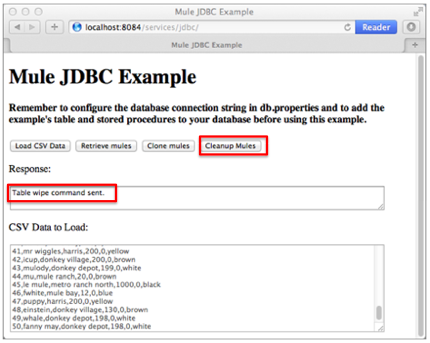
==== Request
On the client-side user interface on a browser, the user clicks the Cleanup Mules button to submit a request to the server-side application.
==== Processing
With only two building blocks, Mule begins processing a message with an Ajax endpoint which listens for end user requests. In this flow, the Ajax endpoint “listens” to the services/jdbc/cleanup channel.
The JDBC endpoint then follows the directives in the global JDBC connector’s callCleanupStoredProc SQL Query to remove all records from the database; it does not remove the table, only the data the table contains.
This is the only flow that does not return a response to the end user. The end user interface only displays a message to the user to confirm that it (the client) has sent a command to the database to clear its contents (see image below).
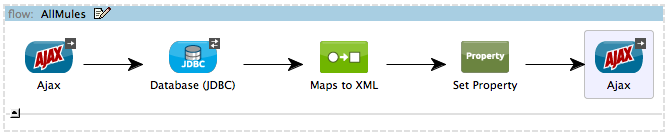
=== AllMules Flow
The AllMules flow simply retrieves data from the database and returns the data, in XML format, to the end user.
==== Request
On the client-side user interface, an end user clicks the Retrieve Mules button to submit a request to the server-side application.
==== Processing
Listening for requests on channel /services/jdbc/allMules, the Ajax endpoint receives the request and passes it to the JDBC endpoint to retrieve data.
According to the instructions of the selectLoadedMules SQL query in the global JDBC connector, the JDBC endpoint retrieves all the data from the database and passes the map objects to the Maps to XML transformer.
From this point, the AllMules flow behavior mimics that of the CSVLoader flow:
-
the
Maps to XMLtransformer converts the message payload’s data format -
the
Set Propertytransformer sets the content type,text/xmlon the message payload -
the outbound
Ajaxendpoint returns a response to the user on channel/jdbc/reply
==== Response
After processing the end user request, Mule returns a response to the end user as a message in the Response field in the client-side user interface on her browser. The message contains an XML list of all the Mules in the database (see image below).
== Related Topics
-
For more information on using the JDBC endpoint, see Database (JDBC) Endpoint Reference.
-
For more information on transformers, see Studio Transformers.
-
For more information on applying exception strategies to flows, see Error Handling.