Installing Tcat Server on Linux
| Tcat Server reached its End of Life in 2017. Contact your Customer Success Manager to determine options for managing, monitoring, or deploying your application. |
This document describes how to install MuleSoft Tcat Server on the Linux operating system. A basic installation using the Linux installer is described below, followed by advanced installations in text-only mode and with the manual zip file. In addition, this document describes how to start and stop Tcat Server, access the Tcat console, and provides advanced configuration and security steps.
|
For additional information and to install Tcat Server on other operating systems, see: Send comments or questions to: tcat-install@mulesoft.com |
Linux Operating Systems Supported
Tcat Server is supported on the following Linux operating systems:
-
CentOS 4 & 5
-
Fedora 6 through 13
-
openSUSE 10 & 11
-
Oracle Linux 5
-
RHEL 4, 5 & 5
-
SUSE 10 & 11
-
Ubuntu 9.x and 10.x
For additional operating systems supported, please see installation documentation on: Mac OS X, Solaris, and Microsoft Windows.
Required Software
Tcat Server operates within a Java Virtual Machine (JVM) and requires the Java SE Runtime Environment (JRE). You may download Tcat Server with a bundled version of JRE if you do not already have one installed. However, it is strongly recommended that you install the Java SE Developers Kit (JDK). JDK includes JRE and provides for additional utilities.
JRE/JDK Versions Supported
MuleSoft recommends the latest Oracle/Sun HotSpot JDK or JRE. However, Tcat Server has also been tested with additional versions of JRE and JDK for Linux. The following runtimes are known to work with Tcat Server:
-
Oracle/Sun JRE or JDK version 1.6.0_04 or newer (also known as "Java 6").
-
Oracle/Sun JRE or JDK version 1.5 (all builds) also work if you are only running the Tcat agent. The Tcat console requires versions 1.6.0_04 or newer.
-
Oracle/JRockit version 1.6.0_20 or higher JDK (Note: The Tcat console v6.4.1 and older show zero logs in the logs tab)
-
OpenJDK version 1.6.0_18 openjdk-6-jdk "(IcedTea6 1.8) (6b18-1.8-0ubuntu1)" on Ubuntu 10.04 Linux
-
OpenJDK version 1.6.0_0-2b12 on Linux
-
IBM J9 version 1.6.0 or higher JDK or JRE (Note: This version only works with Tcat Server v6.4.2 and newer)
Tcat Server runs in two or more Java Virtual Machines:
-
The Tcat console runs in Tomcat 6.0, and requires JDK or JRE 1.6.0_04 or newers.
-
The Tcat agents can run in Tomcat 5.5 or newer, including Tomcat 7, and require JDK or JRE 1.5.0 or higher
The following Java Runtimes have also been tested but are known to not work, and are unsupported:
-
Oracle JDK or JRE version 7, releases earlier than update 2 (due to HotSpot loop optimization bugs)
-
Oracle/Sun JDK or JRE versions 1.6.0_03 or older (due to JAXB, any Oracle/Sun Hotspot JVM older than 1.6.0_04 won’t work with the Tcat console)
-
IBM J9 1.5.0 JDK and JRE (due to lack of support for self-signed HTTPS client certificates)
-
OpenJDK versions older than 1.6.0_0-2b12 on Linux (prone to JVM crashes and other JVM failures)
-
GNU GCJ or GIJ, all versions
Older Linux distribution versions tend to contain incompatible Java runtimes that are known not to run with Tcat Server. Tcat Server is incompatible with these Java runtimes, including all versions of GCJ, any version of IcedTea lower than version 6, and OpenJDK versions lower than version 1.6.0.0-b17, though version 1.6.0_0-2b12 was tested to work.
Setting the JAVA_HOME Environment Variable
If you wish to use your own installed JRE or JDK and not the bundled version included with Tcat Server, an environment variable must be set. Tcat Server first looks for an installed JDK with the JAVA_HOME environment variable. If it doesn’t find a JDK, it looks for a JRE with the JRE_HOME environment variable. If it finds neither, it defaults to using its own bundled JRE.
Additional Required Software for 64-bit Installations
Before installing the 64-bit version of Tcat Server, the 32-bit compatibility libraries and all of their dependencies must be installed. The following sections provide details on installing 32-bit compatibility libraries for various Linux distributions. Once these libraries are installed, you may proceed with installing Tcat Server via the installer executable.
Red Hat Enterprise Linux / CentOS / Fedora
For most versions of 64-bit Red Hat Enterprise Linux (RHEL), CentOS, and Fedora, 32-bit compatibility libraries can be installed via the software installation tool, which is called "yum":
$ sudo -s
# yum install compat-libstdc++-33.i586 gtk+.i586 gtk2.i586
# exit
Or, for some newer versions of these distributions:
$ sudo -s
# yum install compat-libstdc++-33.i686 gtk+.i686 gtk2.i686
# exitInstalling Tcat Server
You need to know the default credentials to access the Tcat Server dashboard once installation is complete. Both the username and password default to admin as detailed below.
Download Tcat Server for Linux
Download Tcat Server and click the Download button. 32-bit and 64-bit versions are available for download.
Installation with the Linux Installer
Follow these steps to install Tcat Server with the Linux installer. All defaults may be chosen for an initial installation. However, custom ports, installation directory and a service instance name can be customized by changing the defaults as shown below. Later, when installing additional Tcat Server instance on one or more remote computers, the Tcat console need not be installed.
-
Install Tcat Server from Tcat - Enterprise Solution for Apache Tomcat and click the Download button.
-
Run the installer. The welcome screen opens in a few moments, click Next and accept the license agreement.
-
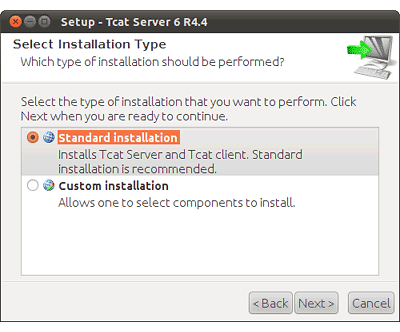
Choose a Standard Installation to install both Tcat Server and the Tcat console. Choose Custom Installation if you wish to only install Tcat Server on a remote computer that is administered by your primary installation. The Custom Installation option also lets you install Apache Tomcat documentation.
-
Configure ports. After choosing the directory for installation, the next screen lets you configure ports.
Ports can also be later changed in the
conf/server.xmlandconf/Catalina/localhost/agent.propertiesfiles.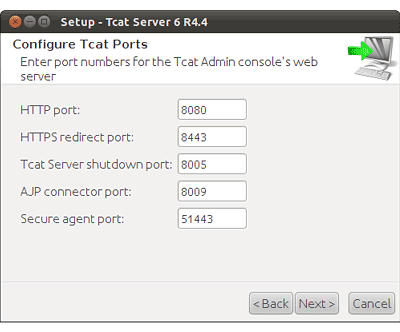
-
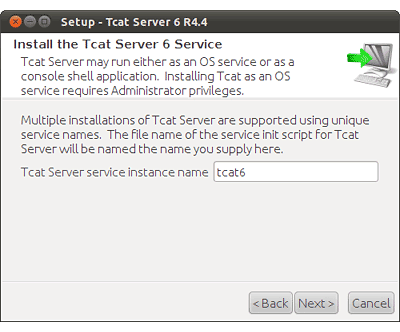
Define a unique service name for this instance of Tcat Server.
-
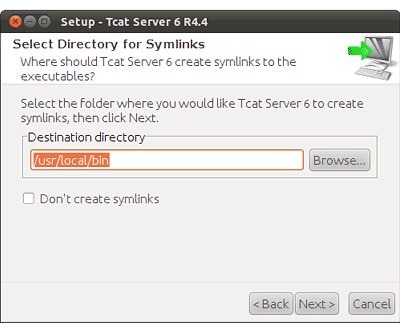
Choose whether you would like symlinks created, and if so, the directory to create them in. The directory you specify creates within the installation directory.
The installation then starts and takes several minutes to complete.
-
Start Tcat Server by opening a terminal window and navigating to the bin directory where Tcat Server was installed. Then enter:
service tcat6 start(or, if that doesn’t work, enter:/etc/init.d/tcat6 start). -
Open a web browser and navigate to:
http://localhost:8080/console -
Log in with admin for both the username and password.
The Tcat dashboard launches in your web browser.
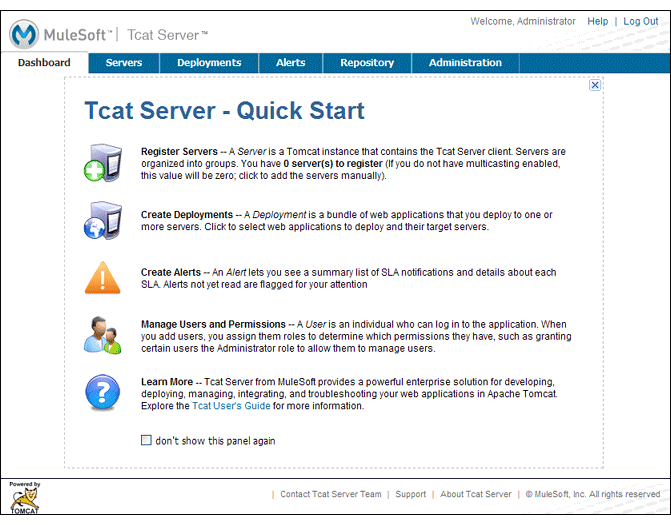
Your next steps after launching the Tcat dashboard include registering a server in the console, and then adding a new web application to the server instance. See Working with Servers for additional steps in these procedures.
Upgrade Installation
If you are upgrading from a previous release of Tcat Server, see Upgrading to Tcat Server 6 R4 and follow the upgrade instructions provided in this document.
Headless (Text-Based) Installation
The "headless" (text-only) mode of installation allows users to customize the installation in both an attended (interactive) and unattended (non-interactive) mode. In the interactive mode, users answer configuration questions in the shell, and then the installer begins an unattended installation. In the non-interactive mode, users can automate multiple installs with an external configuration file.
Attended (Interactive) Headless Installation
To begin the headless installation, open a terminal window and navigate to the directory where Tcat Server was downloaded.
Type the following at the prompt (using your downloaded filename as it may differ from the following):
sh tcat-installer-6.4.4-linux-32bit.sh -c
The installer’s interaction in the terminal window looks similar to this:
# sh  tcat-installer-6.4.4-linux-32bit.sh -c
Unpacking JRE ...
Preparing JRE ...
Starting Installer ...
This will install Tcat Server 6 on your computer.
OK [o, Enter], Cancel [c]

Read the following License Agreement. You must accept the terms of this agreement before continuing with the installation.
	...

I accept the agreement
Yes [1], No [2]
1
Which type of installation should be performed?
Standard installation [1, Enter]
Custom installation [2]

Where should Tcat Server 6 be installed?
[/opt/TcatServer6]
	...
Unattended (Non-Interactive) Headless Installation
Several options are available for an unattended headless installation:
1. Default Installation
If you wish to install Tcat Server with all default options, use the -q argument instead of -c. This installs both Tcat Server and the Tcat console in its default location of /opt/TcatServer6 for root users (for Debian installations, the default location is /usr/local/TcatServer6). It also uses all default port numbers, which can later be changed in the conf/server.xml and conf/Catalina/localhost/agent.properties files.
The command for a default installation is (where your actual filename may differ):
sh tcat-installer-6.4.4-linux-32bit.sh -q
It is recommended that Tcat Server be installed by a root user. It can, however, also be installed by a non-root user. Non-root users usually do not have permission to install in the /opt directory, and in this case, Tcat server installs in the current user’s home directory. In addition, for non-root users, the installer does not have permission to install an init script into /etc/rc.d/ and thus the commands service tcat6 start|stop|restart|status and /etc/init.d/tcat6 does not work since the files don’t exist. Instead, non-root users must run bin/tcat6 start|stop|restart|status.
2. Installation with an External Options File
An options file can be produced and referenced during the headless installation. If the installer has already been run, then a default option file response.varfile already exists in the .install4j directory within your installation directory. It is best to copy and modify this file and use it for future installations. Otherwise, the following code can be copied into a new text file, and customized for your use if necessary. It can then be used as the installation option file when installing Tcat Server version 6.4.4. The contents of this varfile is in the same format as a simple Java properties file:
#install4j response file for Tcat Server 6 R4.4
sys.component.51$Boolean=true
sys.installationDir=/opt/TcatServer6
sys.languageId=en
sys.programGroup.linkDir=/usr/local/bin
sys.programGroup.name=Tcat Server 6 [tcat6]
tomcatHttpsPort$Long=8443
tomcatShutdownPort$Long=8005
sys.programGroup.enabled$Boolean=true
sys.component.53$Boolean=true
sys.component.37$Boolean=true
tcatServiceName=tcat6
tomcatAjpPort$Long=8009
sys.programGroup.allUsers$Boolean=true
tomcatHttpPort$Long=8080
sys.installationTypeId=39
secureAgentPort$Long=51443
sys.component.54$Boolean=true
sys.component.52$Boolean=true
After producing the above options file, and naming it response.varfile, execute the following command in the terminal window to start installation (using your filename which may differ from the following):
sh tcat-installer-6.4.4-linux-32bit.sh -q -varfile response.varfile
To also display debugging information about the installation, use the following command to start installation:
sh tcat-installer-6.4.4-linux-32bit.sh -q -varfile response.varfile -Dinstall4j.debug=true -Dinstall4j.detailStdout=trueInstalling Tcat Server on Linux with the Manual Installation Zip File
The following steps detail how to install Tcat Server on a Linux distribution with the Manual Installation Zip file. Install Tcat Server from Tcat - Enterprise Solution for Apache Tomcat and click the Download button.
First unzip the Tcat Server Manual Installation file:
sudo -s
cd /opt
unzip TcatServer-6.4.4.zip
Then create the TCAT_HOME environment variable:
# export TCAT_HOME=/opt/TcatServer6
If you wish to install Tcat Server into a different file system location, it is recommended that you use the automated installer. Try installing it into /opt/TcatServer6 first.
# groupadd tomcat
# useradd -c "Tcat JVM user" -g tomcat -s /bin/bash -r -M -d $TCAT_HOME/temp tomcat
If the 'tomcat' user already exists, do this instead:
# finger tomcat > ~/tomcat-user-settings.txt
# usermod -s /bin/bash -d $TCAT_HOME/temp tomcat
Either way, continue:
# ln -s $TCAT_HOME/conf/Catalina/localhost/tcat6-linux.sh /etc/init.d/tcat6
# ln -s $TCAT_HOME/conf/Catalina/localhost/tcat6-linux.sh $TCAT_HOME/bin/tcat6
# ln -s $TCAT_HOME/conf/Catalina/localhost/tcat6-linux.sh $TCAT_HOME/conf/Catalina/localhost/tcat6
# chmod 770 $TCAT_HOME/conf/Catalina/localhost/*.sh
# chmod 660 $TCAT_HOME/conf/Catalina/localhost/*.conf
# cp $TCAT_HOME/conf/Catalina/localhost/tcat-env-linux.conf $TCAT_HOME/conf/Catalina/localhost/tcat-env.conf
# chown -R tomcat:tomcat $TCAT_HOME
On Red Hat, CentOS, and Fedora Linux distributions, use the chkconfig command so that the Tcat Server starts upon a reboot:
# chkconfig tcat6 on
On other Linux distributions, such as Debian and Ubuntu, you may need to use this command instead:
# update-rc.d tcat6 defaults
Next, edit your Tcat Server environment file to set the value of JAVA_HOME to point to your Java JDK:
$TCAT_HOME/conf/Catalina/localhost/tcat-env.conf
If you do not have a JDK, but instead a JRE, set the value of JRE_HOME instead of JAVA_HOME. Make sure you set only one of these environment variables, not both.
Then start Tcat Server in one of the following ways:
# service tcat6 start
Or:
# /etc/init.d/tcat6 start
Adding Tcat Server Capabilities to an Existing Apache Tomcat Installation
Tcat Server capabilities can be added to an existing Apache Tomcat installation. All Tomcat 5.5.x and higher releases, and all Tomcat 6.0.x and 7.0.x releases are supported. See Add Tcat Server Capabilities to an Existing Tomcat Install for installation instructions.
Installing Multiple Tcat Instances on a Single Computer
Multiple instances of Tcat Server can be run on a single machine. One instance (or more) of the Tcat console allows users to manage all the additional Tcat Server instances, each running in their own Java Virtual Machine (JVM). For more information, see Installing Multiple Tcat Instances on a Single Machine.
Starting and Stopping Tcat Server
If you want to use the standard Tomcat catalina or startup commands to start Tomcat, any environment variables you set in the Tcat console do not take effect until you restart Tomcat using Tcat Server commands. Therefore, for best results when setting environment variables in the Tcat console, you should always start Tomcat using Tcat Server commands described below. Commands for starting, stopping, restarting and obtaining the server’s status and process ID take the following format:
If you installed as a root-user via the installer, you should be able to use the init script located in the bin directory where Tcat was installed:
service tcat6 start|stop|restart|status
If the "service" command is not available or is not working properly, try running:
/etc/init.d/tcat6 start|stop|restart|status
If the installation user did not have permission to write tcat6 into /etc/init.d, you should be able to execute:
$CATALINA_BASE/bin/tcat6 start|stop|restart|status
As a next step, you may wish to start the Tcat console as detailed in the following section.
Starting the Tcat Console
The Tcat console is an administration console for managing and monitoring Tomcat instances. To run the Tcat console on a local installation, enter http://localhost:8080/console in your web browser. If the server is remote or you changed the default port, replace localhost:8080 with the correct server name and port where the console is deployed.
You can now select and register one or more of the unregistered servers, adding them to server groups as needed. For more details, see Working with Servers.
Make Contents of Webapps Directory Unwritable
By default, the Tcat console enables a user to edit files on any Tcat Server instance registered to it. For additional security, you may wish to make the Webapps directory unwritable.
This property is set in the spring-services.xml file located in the webapps/agent/WEB-INF/ directory. Below is the relevant snippet:
<property name="writeExcludes">
    <list>
        <value>lib/catalina*.jar</value>
        <value>**/tomcat*.jar</value>
        <value>conf/tcat-overrides.conf</value>
        <!-- block the webapps directory -->
        <!-- <value>webapps/**</value> -->
    </list>
</property>
To disable this ability, take the following steps:
Uncomment last element shown in the above snippet, replacing this:
<!-- <value>webapps/**</value> -->with this:
<value>webapps/**</value>-
Save the file
-
Restart Tcat Server instance
Modifying JAVA_OPTS
You may wish to modify the JAVA_OPTS environment variable for several reasons:
-
To enable JMX so that you obtain more detailed information about connectors and server status, for example,
-Dcom.sun.management.jmxremote -
To increase memory settings because you are installing all the components offered in the installer, as an example:
-Xmx512M -XX:PermSize=64M -XX:MaxPermSize=128M -
To modify the secure port, for example:
-Dtcat.securePort=51444
You can modify JAVA_OPTS after installing Tcat Server using the Tcat console. This can be done in two ways:
-
Manually setting the options on each server by modifying the server’s environment variables
-
Modifying the options in the server profile that you use across multiple Tcat Server instances. This requires administrative privileges.
Renaming the tcat6 Service on Linux
You may wish to rename your Tcat Server init script, either because you’re installing more than one copy of Tcat Server in a single operating system and you need to prevent an init script naming conflict, or because you want to invoke the init script using a different name. Tcat Server supports renaming the service.
First, make sure you shut down your Tcat/Tomcat instance whose service you want to rename:
$ sudo service tcat6 stopOr, if you’re currently using a stock Tomcat package init script:
$ sudo service tomcat6 stopSwitch to a root shell:
$ sudo -sSet the new service name as an environment variable, along with the absolute path to the directory to the Tcat Server installation you’re changing the service name for:
# export NEW_SERVICE_NAME=t1
# export TCAT_HOME=/opt/TcatServer6
Next, rename the init script symlinks to the new service name (copy and paste these commands – don’t type them in):
# mv /etc/init.d/tcat6 /etc/init.d/$NEW_SERVICE_NAME 2>/dev/null
# mv $TCAT_HOME/bin/tcat6 $TCAT_HOME/bin/$NEW_SERVICE_NAME 2>/dev/null
# mv $TCAT_HOME/conf/Catalina/localhost/tcat6 $TCAT_HOME/conf/Catalina/localhost/$NEW_SERVICE_NAME
If any of the above "tcat6" files do not exist, it is because you installed the Tcat agent webapp only, which is okay. You must pair the agent with the console before the agent unpacks its service scripts.
And, in your Tcat/Tomcat instance’s environment file, which is used for the JVM’s startup environment, change the service name setting (copy and paste this command – don’t type it in):
# sed -i.bak -e "s/\-Dtcat\.service\=[^ ]* /-Dtcat.service=$NEW_SERVICE_NAME /g" \
    $TCAT_HOME/conf/Catalina/localhost/tcat-env.conf
Exit from the root shell.
# exit
If you’re changing the service to install two or more Tcat Server installations in a single operating system, you should also ensure that the port numbers in Tomcat’s <tomcatHome>/conf/server.xml do not conflict, and also that the Tcat agent secure port number of each Tcat Server instance is unique (copy and paste these commands – don’t type them in):
# export NEW_AGENT_SECURE_PORT=51444
# sed -i.bak -e "s/^securePort=.*/securePort=$NEW_AGENT_SECURE_PORT/g" \
    $TCAT_HOME/webapps/agent/WEB-INF/agent.properties
Then inspect the agent.properties file to ensure the setting is correct.
The default agent secure port is 51443.
You’re now finished renaming the service. You can now start, stop, or restart Tcat Server using the service name you chose:
$ sudo service t1 startUninstalling Tcat Server
The following options uninstall Tcat Server:
-
For a Tcat Server installation with the Linux installer, choose the uninstall shell script in the Tcat Server installation directory.
-
If Tcat Server and Tomcat were manually installed in the same directory, and you want to delete both programs, simply delete the entire folder.
-
If Tcat Server was manually installed on an existing Tomcat installation, delete the console, agent webapps and their folders from the webapps directory.