Basic Studio Tutorial
This exercise is designed to introduce you to Mule Studio and help you get comfortable building applications.
This tutorial walks you through how to use Mule Studio to build a simple HTTP request-response application. After creating and running the example locally, you should be able to apply what you have learned to create more complex applications.
Assumptions
This tutorial assumes that you have downloaded and installed Mule Studio. If you do not have any previous experience with Eclipse or an Eclipse-based IDE, please review the brief introduction to the Mule Studio interface.
Goals
In this tutorial, your goals are to:
-
Create an application in Mule Studio containing a single flow that
-
receives an HTTP request,
-
logs the message payload, and
-
returns a modified payload as an HTTP response.
-
-
Run the application on a local runtime embedded in Mule Studio.
-
Test the application using a browser.
-
Stop the application.
-
Edit the application and rerun it.
-
(Optional) Apply your knowledge to an extra credit challenge.
Launching Studio
If you have already launched Studio as part of the installation process, and it is now running, skip the rest of this section and proceed directly to Creating a New Project.
-
Navigate to the directory on your local drive in which you installed Studio.
-
Double-click the executable file to launch Studio.
-
MuleStudio.exein Windows -
MuleStudio.appin Mac OS -
MuleStudioin Linux +. When Studio presents the Workspace Launcher dialog, click OK to accept the default workspace.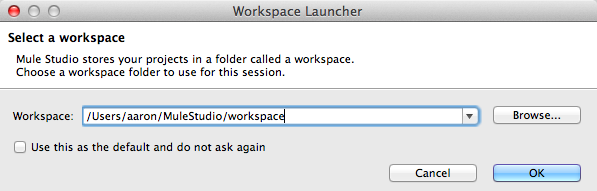
-
-
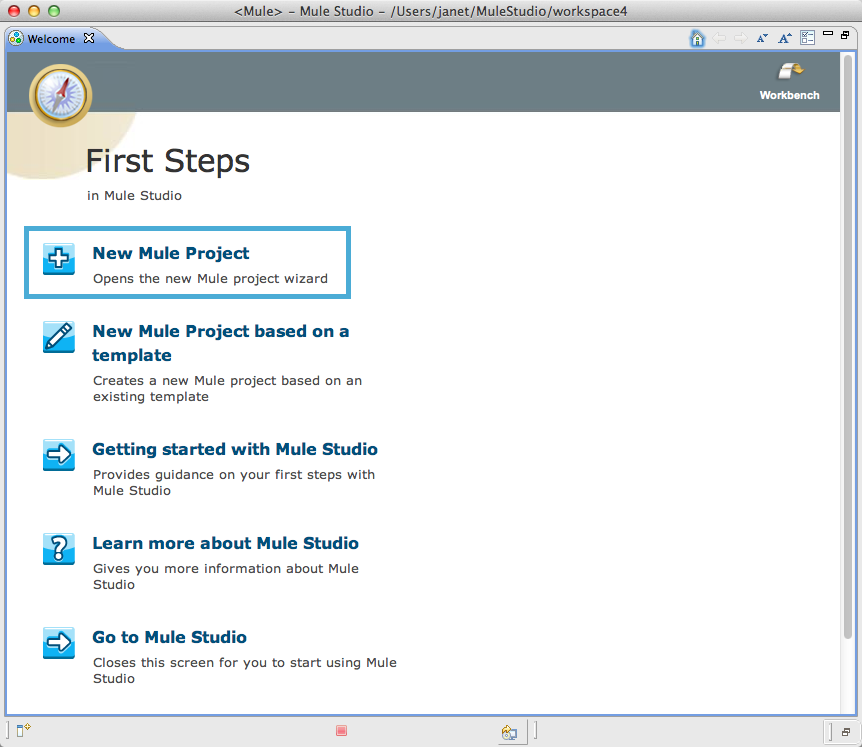
If this is the first time you have launched Studio, you may see a Welcome screen. Click New Mule Project to dismiss the screen and jump straight to the New Mule Project wizard.
Creating a New Project
-
Unless the New Project Wizard is already open, click File > New > Mule Project.
-
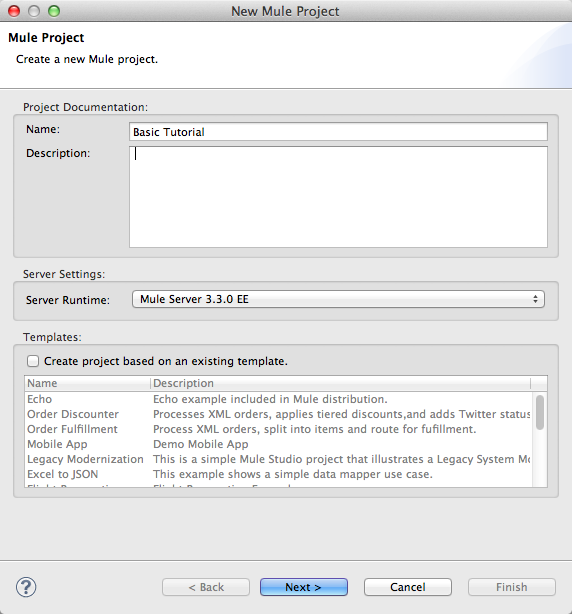
Studio opens the New Mule Project wizard. Fill in the Name field with the value Basic Tutorial.
-
Select the Server Runtime to which you will want to deploy your project. Mule Studio automatically populates the Server Runtime field with one of the default servers that comes bundled with your download. You can change to a different runtime if you wish, but this project will work with any runtime. For more about installing additional runtime versions, see Installing Extensions.
-
Click Next to proceed.
-
Studio prompts you to create a new flow in your new project. It auto-fills the flow Name field and flow File name field using the name of the Mule project you entered. Click Finish.
-
In the Package Explorer,
Basic Tutorial.mflowappears inside theflowsfolder andmule-project.xmlappears underneath thesrcfolder.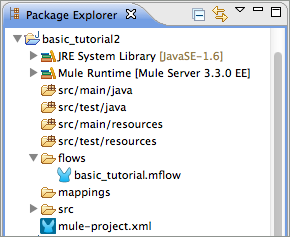
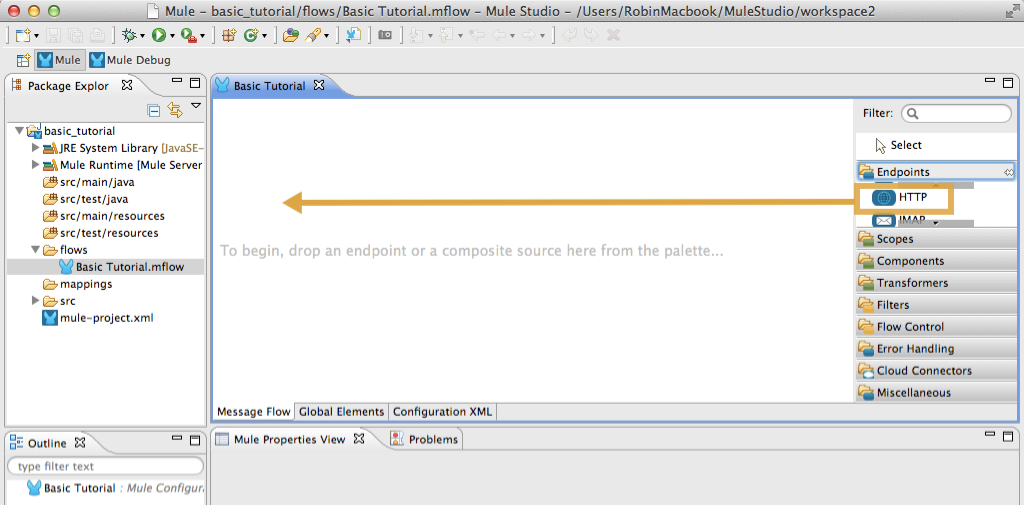
The
.mflowfile stores flow information for the visual editor. When your new project opens for the first time, Mule Studio automatically opens the.mflow fileand presents you with a blank canvas, in which the prompt text reads, "To begin, drop an endpoint or a composite source here from the palette…".
|
More about the .mflow and mule-project.xml files The .mflow file is a Studio-specific file that is used to render your project on the visual editor canvas. This file is not useful outside of Mule Studio and should not be committed to source control systems such as git or svn. Instead, share the actual project .xml files. Each <name>.mflow file has a corresponding <name>.xml under src/main/app. This is the file that you should use to share and commit your project. The mule-project.xml file is the Mule project descriptor file. You can open this file to change the project runtime, set or edit environment variables, or edit the project description. Commit this file, along with your <name>.xml file to your source control systems to avoid errors when sharing your project. |
Modeling a Mule Flow
In this tutorial, your goal is to build an application that receives an HTTP request, logs the message payload, and then modifies the payload before returning it as an HTTP response. You can build this application using three building blocks in Studio:
-
an HTTP endpoint, which allows your Mule application to connect to Web resources through the HTTP or HTTPS protocol. Find this in the Endpoints section of the palette at the right of the screen.
-
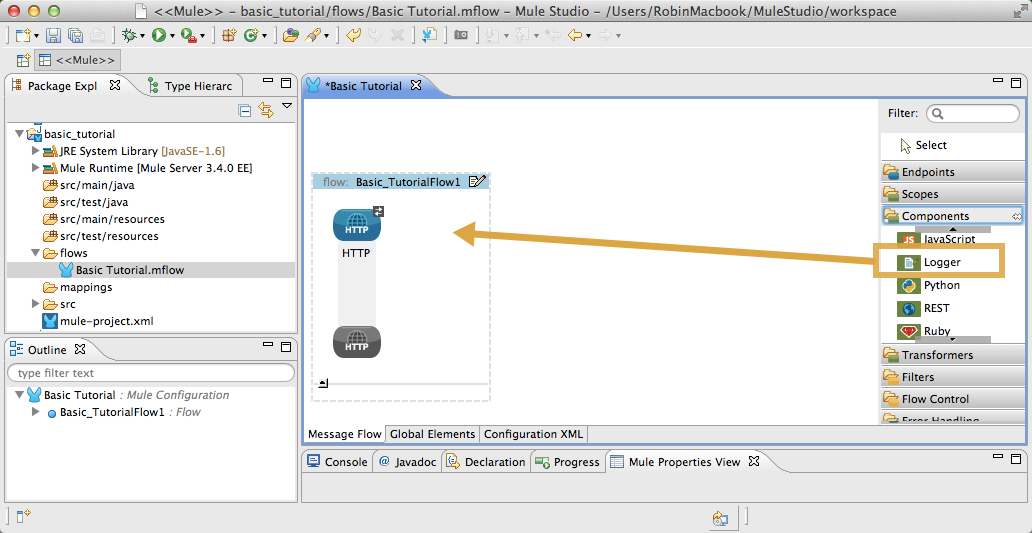
a Logger, which logs messages or activity based on the value of a Mule expression. Find this in the Components section of the palette at the right of the screen.
-
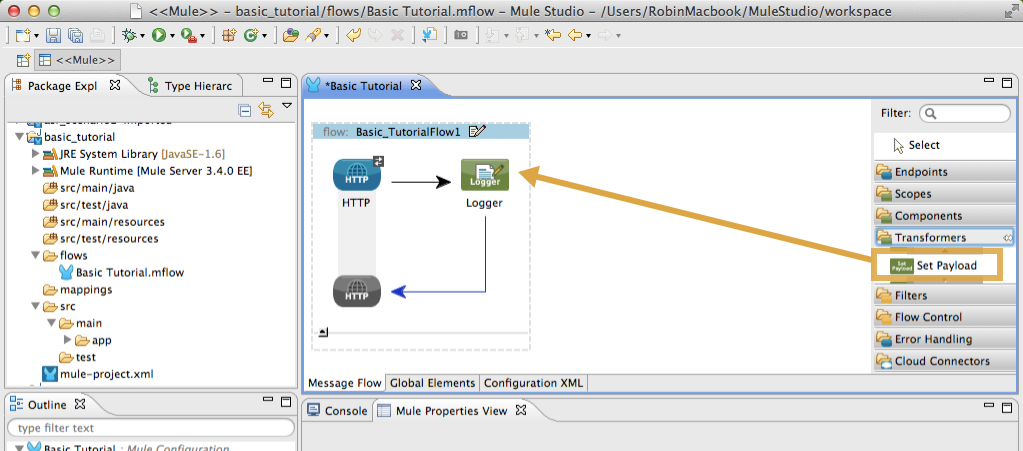
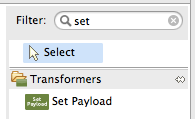
a Set Payload Transformer, which modifies your payload into a "Hello, World" message. Find this in the Transformers section of the palette at the right of the screen.
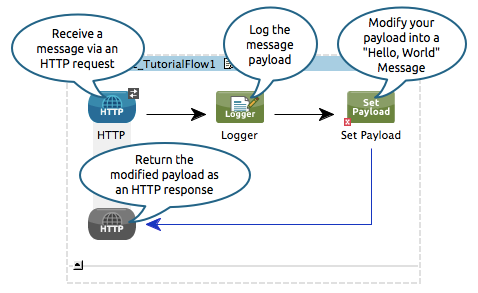
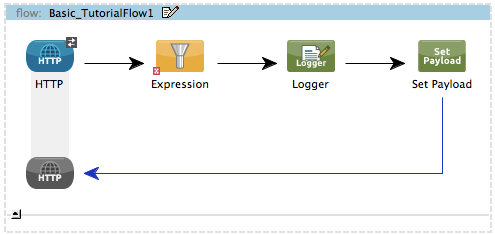
Drag and drop these three building blocks into place on the canvas to visually construct, or model, your flow, in the order shown:
|
More detailed instructions If necessary, consult this quick overview on how to use the visual editor to drag and drop building blocks from the palette onto the canvas. Or, follow this step-by-step guide to model the flow for this example.
|
|
Tip: Use the Palette Filter
|
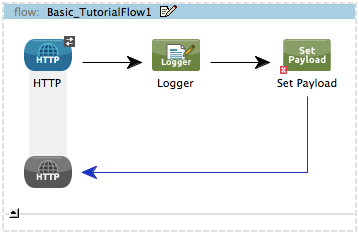
With just a few clicks, you have modeled your entire application on the Studio canvas.
Once you configure the individual elements within it, which you will do in the Configuring the Flow Elements, this flow will accomplish the goals that you set out to achieve with this application. Each building block that you selected and placed on the canvas will perform part of the functionality of your application, as shown in the image below.
Configuring the Flow Elements
Nearly all Mule elements provide configuration options, which you can set in one of two ways:
-
via the building block Properties tabs in Studio’s visual editor
-
via XML code in Studio’s XML editor
The following instructions introduce you to configuring in both editors.
-
Click the HTTP building block in your flow to open its properties editor. By default, the endpoint is set to the request-response exchange pattern. This means that Mule will return a response to the endpoint after processing is complete in the flow. By default, Host is set to
localhostand Port to8081. -
Click Configuration XML at the bottom of the canvas to switch to the XML editor view.

Observe that the default configurations shown on the Message Flow canvas and the Configuration XML view are the same:
<http:inbound-endpoint exchange-pattern="request-response" host="localhost" port="8081" doc:name="HTTP"/>The
doc:nameattribute corresponds to the display name that appears underneath the building block icon on the Message Flow canvas. -
Still in the XML configuration view, change the value of the port attribute to
8084. -
Click Message Flow to switch back to the visual editor.

-
Click the HTTP building block to reopen its properties tab, and note that the Port field now reflects the updated value of
8084. You can change this value in either editor; Studio’s two-way editor automatically updates the configuration as you switch back and forth.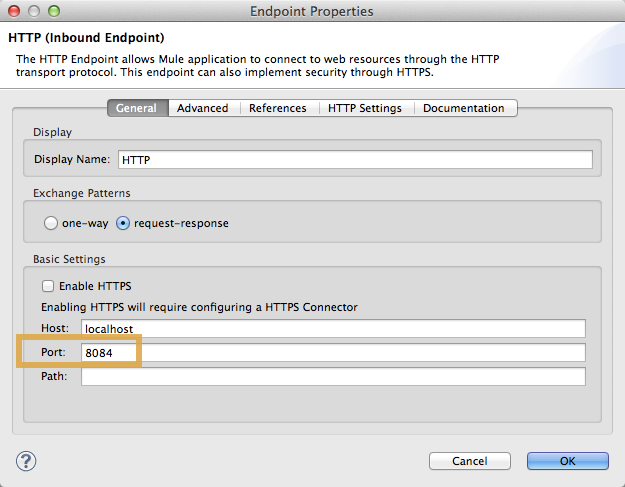
-
Click the Logger building block (or press the right arrow on your keyboard) to switch the properties tab to the Logger component.
-
In the Message field, type:` Current payload is #[message.payload]`.
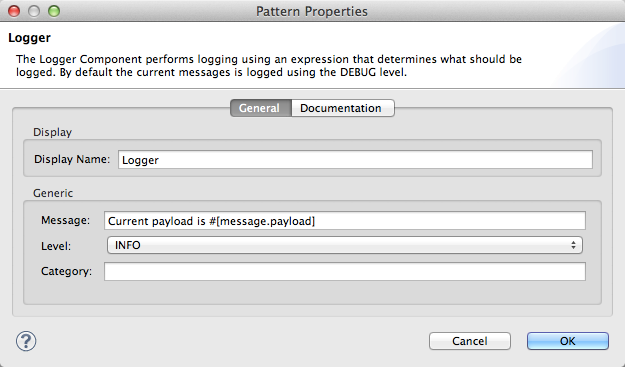
The string
#[message.payload]is a simple Mule expression which evaluates to the current payload of the message as it passes this point in the flow. Including this message here instructs Mule to log this information in the application log files, which can be useful in more complex use cases, when you need to track the payload at different points in your flow. -
Click the Set Payload building block (or press the right arrow on your keyboard) to switch the properties tab to the Set Payload transformer.
-
Notice that the Value field contains these characters: #[]
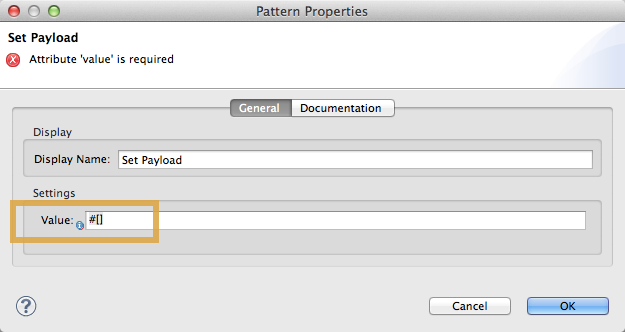
This indicates that this field supports Mule expressions, which take the form of a string enclosed with "\#[]". If you enter a Mule expression here, Mule evaluates it at runtime and returns or uses the results for further processing. Note that this field also accepts literals, so you can enter any string here to instruct Mule to set that string as your new payload. In this tutorial, however, you will use an expression to create a dynamic message.
-
In the Value field, enter:
#['Hello, ' + message.payload + '. ]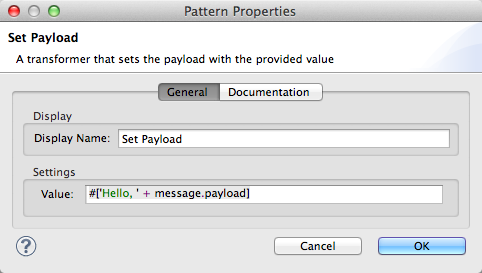
Anything that you enter inside of the "#[]" syntax which is not a Mule expression must be enclosed with quotes so that Mule reads it as a string. -
Save your application by clicking File > Save.
Your complete application XML, once configured, should look like this:
<?xml version="1.0" encoding="UTF-8"?>
<mule xmlns="http://www.mulesoft.org/schema/mule/core" xmlns:http="http://www.mulesoft.org/schema/mule/http" xmlns:doc="http://www.mulesoft.org/schema/mule/documentation" xmlns:spring="http://www.springframework.org/schema/beans" xmlns:core="http://www.mulesoft.org/schema/mule/core" xmlns:xsi="http://www.w3.org/2001/XMLSchema-instance" version="EE-3.3.0" xsi:schemaLocation="
http://www.mulesoft.org/schema/mule/http http://www.mulesoft.org/schema/mule/http/current/mule-http.xsd
http://www.springframework.org/schema/beans http://www.springframework.org/schema/beans/spring-beans-current.xsd
http://www.mulesoft.org/schema/mule/core http://www.mulesoft.org/schema/mule/core/current/mule.xsd ">

    <flow name="Basic_TutorialFlow1" doc:name="Basic_TutorialFlow1">
        <http:inbound-endpoint exchange-pattern="request-response" host="localhost" port="8084" doc:name="HTTP"/>
        <logger message="Current payload is #[message.payload]" level="INFO" doc:name="Logger"/>
        <set-payload value="#['Hello, ' + message.payload]" doc:name="Set Payload"/>
    </flow>
</mule>
Running the Application
Having built, configured, and saved your new application, you are ready to run it on the embedded Mule server (included as part of the bundled download of Mule Studio).
-
In the Package Explorer pane, right-click the
Basic Tutorial.mflowfile, then select Run As > Mule Application. (If you have not already saved, Mule prompts you to save now.)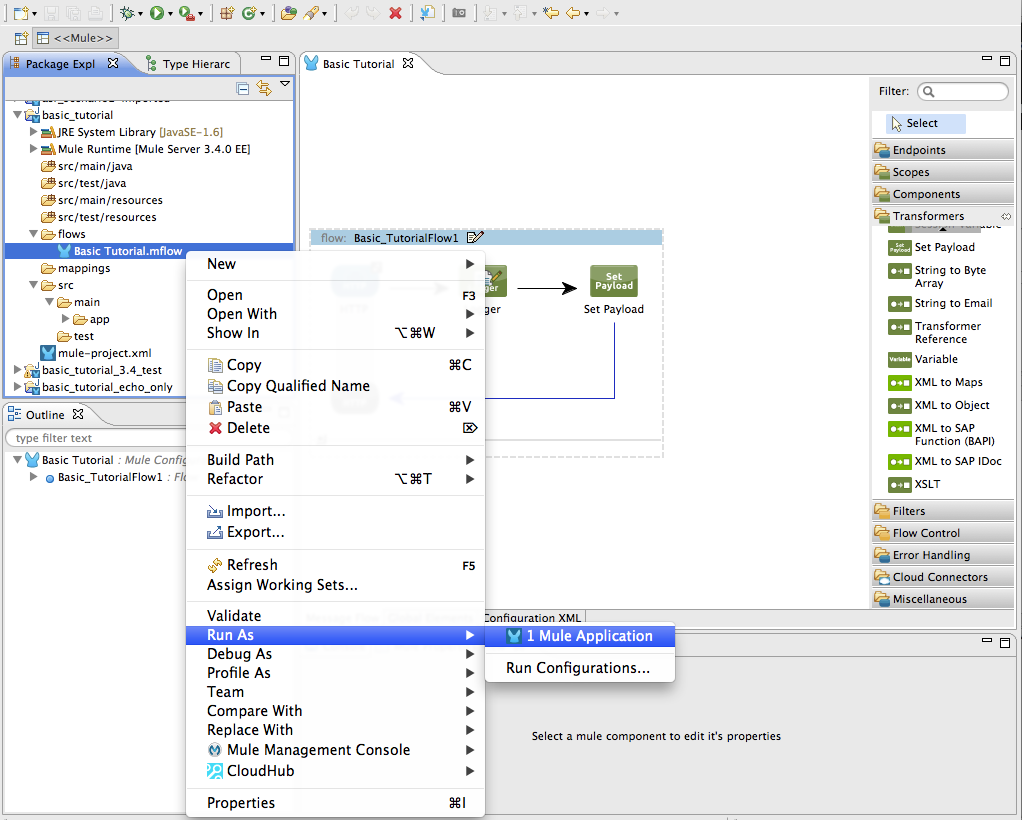
-
Mule immediately kicks into gear, starting your application and letting it run. When the startup process is complete, Studio displays a message in the console that reads,
Started app 'basic_tutorial'.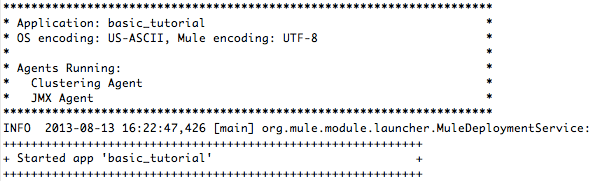
Using the Application
-
Open any Web browser and go to` http://localhost:8084/world`
-
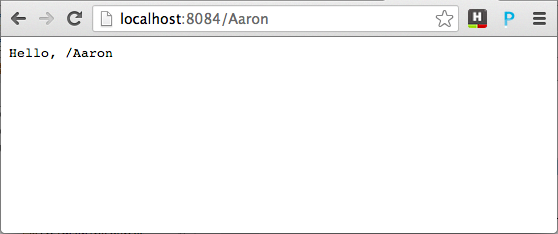
Your browser presents a message that reads,
Hello, /world. -
In your browser’s address bar, replace the word
worldwith your own name, then press enter. -
Your browser presents the same message, but includes your name instead of "world".
-
Next, check your console to verify that Mule logged the payload before the message reached the expression transformer.
-
Place your cursor in the console window, press CTRL+F or COMMAND+F to open a Find dialog, then search for “Current payload”. Look for results corresponding to the payloads that you entered in your browser. For example:
INFO 2013-08-21 09:22:26,446 [[basic_tutorial].connector.http.mule.default.receiver.02] org.mule.api.processor.LoggerMessageProcessor: Current payload is /AaronYou may also see some other results for a payload of “/favicon.ico”. These results are automatically generated by your browser. You can filter out these results in the Editing the Application section, below.
Congratulations! You’ve run and tested your application. You submitted a request to the inbound endpoint of your application via your Web browser. The Mule application received your request and logged the payload (whatever you typed after "http://localhost:8084/") to the console. The application then sent the message on to the Set Payload transformer, which transformed the payload per its instructions and returned the results to your HTTP endpoint.
Stopping the Application
To stop the application, click the red, square Terminate icon above the console panel.

Editing the Application
You may have noticed that your browser inserts an additional payload of “/favicon.ico” upon each refresh. You can add a filter element into your flow to exclude these payloads. Here’s how:
-
Drag and drop an Expression Filter onto your canvas, positioning it between the HTTP endpoint and the Logger.
-
Click the Expression Filter to open its properties tab and enter the following in the Expression field:
#[message.payload != '/favicon.ico']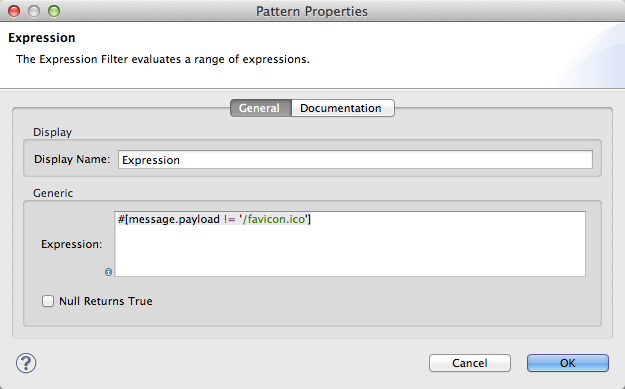
This expression tells Mule to check that the payload is not equal to the string '/favicon.ico'. If the expression evaluates to true, Mule passes the message on to the next step in the flow. If the expression evaluates to false, Mule stops processing the message.
-
Save your application and run it again. (Right-click Basic Tutorial.mflow in your Package Explorer, then click Run As > Mule Application.)
-
Wait for the message in the console that reads,
Started app 'basic_tutorial'. -
Return to your Web browser and go to http://localhost:8084/world
-
Replace "world" with another word of your choice and refresh. Repeat this step several times with different words.
-
Check the logged payloads in your console: place your cursor in the console window, press CTRL+F or COMMAND+F to open a Find dialog, and search for “Current payload”.
-
All payloads that you see should correspond to the words you entered in your browser, and "/favicon.ico" should no longer be included.
Your complete application XML, once edited, should look like this:
<?xml version="1.0" encoding="UTF-8"?>
<mule xmlns="http://www.mulesoft.org/schema/mule/core" xmlns:http="http://www.mulesoft.org/schema/mule/http" xmlns:doc="http://www.mulesoft.org/schema/mule/documentation" xmlns:spring="http://www.springframework.org/schema/beans" xmlns:core="http://www.mulesoft.org/schema/mule/core" xmlns:xsi="http://www.w3.org/2001/XMLSchema-instance" version="EE-3.3.0" xsi:schemaLocation="
http://www.mulesoft.org/schema/mule/http http://www.mulesoft.org/schema/mule/http/current/mule-http.xsd
http://www.springframework.org/schema/beans http://www.springframework.org/schema/beans/spring-beans-current.xsd
http://www.mulesoft.org/schema/mule/core http://www.mulesoft.org/schema/mule/core/current/mule.xsd ">

    <flow name="Basic_TutorialFlow1" doc:name="Basic_TutorialFlow1">
        <http:inbound-endpoint exchange-pattern="request-response" host="localhost" port="8084" doc:name="HTTP"/>
        <expression-filter expression="#[message.payload != '/favicon.ico']" doc:name="Expression"/>
        <logger message="Current payload is #[message.payload]" level="INFO" doc:name="Logger"/>
        <set-payload value="#['Hello, ' + message.payload]" doc:name="Set Payload"/>
    </flow>
</mule>
Extra Credit
Now that you know your way around Studio, try applying your knowledge to this extra task:
Revise your application so that, in addition to returning the transformed payload as an HTTP response in your browser as it does now, Mule also:
-
logs the unique message id that Mule automatically assigns to each message that passes through a flow
-
writes the message payload that you see in your browser to a new .txt file on your local drive
-
names each .txt file using the message id
To achieve this, you need to add another message processor to your flow to direct Mule to write your payload to a file. You also need to use another Mule expression that you haven’t seen before in order to log and use the unique message id.
How do I log the message id?
|
The Mule expression that resolves to the unique message id of the current message is |
How do I write to a file?
|
Try adding a File Endpoint after the Set Payload transformer in your flow. |
How do I name a text file using the message id?
|
Fill in the Output Pattern field in the File Endpoint to tell Mule how to name the file and what file type to use. Note that you can use the same Mule expression here that you used to log the message id. |
Answer
There is more than one way to achieve the goals outlined above, but here is the fastest way:
-
Click on your existing Logger component to open its properties tab.
-
Revise the Message field to read:
Current payload is #[message.payload] and message id is #[message.id](If you prefer, you can instead use a new Logger component to log the message id in a separate step. If you choose to do this, the second Logger component can be placed anywhere in the flow after the Expression filter.)
-
Drag and drop a File Endpoint onto your canvas, immediately after the Set Payload transformer.

-
Click on the File Endpoint to open the Properties editor.
-
Enter a Path where you want Mule to create a file. For example:
/Applications/muleStudio/examples/BasicTutorial -
Enter an Output Pattern that defines the file name and type, as follows:
#[message.id].txt -
Save your application and run it again. (Right-click Basic Tutorial.mflow in your Package Explorer, then click Run As > Mule Application.)
-
Wait for the message in the console that reads,
Started app 'basic_tutorial'. -
Return to your Web browser and go to` http://localhost:8084/world` .Replace "world" with another word of your choice and refresh. .Check your console, using the Find command, for the logged payload and message id to confirm that Mule has logged both successfully for each message you have initiated using the browser.
-
Navigate to the folder on your local drive that you defined in Step 5, above.
-
Your folder should contain .txt files. Open each .txt file and confirm that:
-
the payload matches what you observed in your browser
-
the file name corresponds to the message id logged in your console
-
Congratulations! You earned your extra credit. You’re all set to go on to the Intermediate Tutorial.
View the code of the revised application
<?xml version="1.0" encoding="UTF-8"?>
<mule xmlns="http://www.mulesoft.org/schema/mule/core" xmlns:http="http://www.mulesoft.org/schema/mule/http" xmlns:file="http://www.mulesoft.org/schema/mule/file" xmlns:doc="http://www.mulesoft.org/schema/mule/documentation" xmlns:spring="http://www.springframework.org/schema/beans" xmlns:core="http://www.mulesoft.org/schema/mule/core" xmlns:xsi="http://www.w3.org/2001/XMLSchema-instance" version="EE-3.3.0" xsi:schemaLocation="
http://www.mulesoft.org/schema/mule/http http://www.mulesoft.org/schema/mule/http/current/mule-http.xsd
http://www.mulesoft.org/schema/mule/file http://www.mulesoft.org/schema/mule/file/current/mule-file.xsd
http://www.springframework.org/schema/beans http://www.springframework.org/schema/beans/spring-beans-current.xsd
http://www.mulesoft.org/schema/mule/core http://www.mulesoft.org/schema/mule/core/current/mule.xsd ">

    <flow name="Basic_TutorialFlow1" doc:name="Basic_TutorialFlow1">
        <http:inbound-endpoint exchange-pattern="request-response" host="localhost" port="8084" doc:name="HTTP"/>
        <expression-filter expression="#[message.payload != '/favicon.ico']" doc:name="Expression"/>
        <logger message="Current payload is #[message.payload] and message id is #[message.id]" level="INFO" doc:name="Logger"/>
        <set-payload value="#['Hello, ' + message.payload]" doc:name="Set Payload"/>
        <file:outbound-endpoint path="/Applications/Mule 3.3.0/MuleStudio 3.3 EE/examples" outputPattern="#[message.id].txt" responseTimeout="10000" doc:name="File"/>
    </flow>
</mule>
See Also
-
Want to learn more about Mule Expression Language (MEL)? Check out the complete reference documentation.
-
Want to try a Hello World example using CloudHub instead? Check out Deploy to CloudHub.