Anypoint Connector Tutorial
After learning some of the basic functionality in the Basic and Content-Based Routing, it’s time to try your hand at developing a more complex application which makes use of Anypoint Connectors.
Out of the box, Mule comes with a set of connectors that you can easily add to flows to connect your application with several common software as a service (SaaS) applications such as Salesforce, Google Contacts, Facebook and Twitter. These connectors simplify the interaction with the SaaS providers' APIs considerably as they provide pre-built methods for all of the available connector operations. Because much of the functionality of the individual connectors is dependent upon its target, there exist specific documentation for each connector; that said, there are also many features common to almost all connectors. After creating and running the application in this tutorial, you should be able to apply what you’ve learned to connect applications to various SaaS applications.
Assumptions
This tutorial assumes that you have downloaded and installed Mule Studio. If you do not have any previous experience with Eclipse or an Eclipse-based IDE, please review the brief introduction to the Mule Studio interface and the document describing Global Elements in Mule. Further, consider following the Basic and Content-Based Routing tutorials.
Goals
In this tutorial, your goals are to:
-
Walk through the process for obtaining Twitter API access and credentials.
-
Create an application in Mule Studio that uses a connector to access the Twitter API.
-
Learn how to use Global Elements and Foreach scope in the application.
-
Run the application on a local runtime embedded in Mule Studio.
-
Test the application using a browser.
-
Stop the application.
-
(Optional) Apply your knowledge to an extra credit challenge.
Obtaining Access to Twitter API
In order to use the Twitter API you must first create a Twitter developer account and obtain a set of credentials.
-
If you don’t already have one, create a regular Twitter account. You may wish to create a demo account for testing as you will be posting things to twitter in this exercise.
-
Visit the Twitter Developers page and sign in using your Twitter account credentials. This activity creates a separate developer account for you, with an association to your regular Twitter account.
-
To create a new Twitter Application, navigate to https://dev.twitter.com/apps/new
-
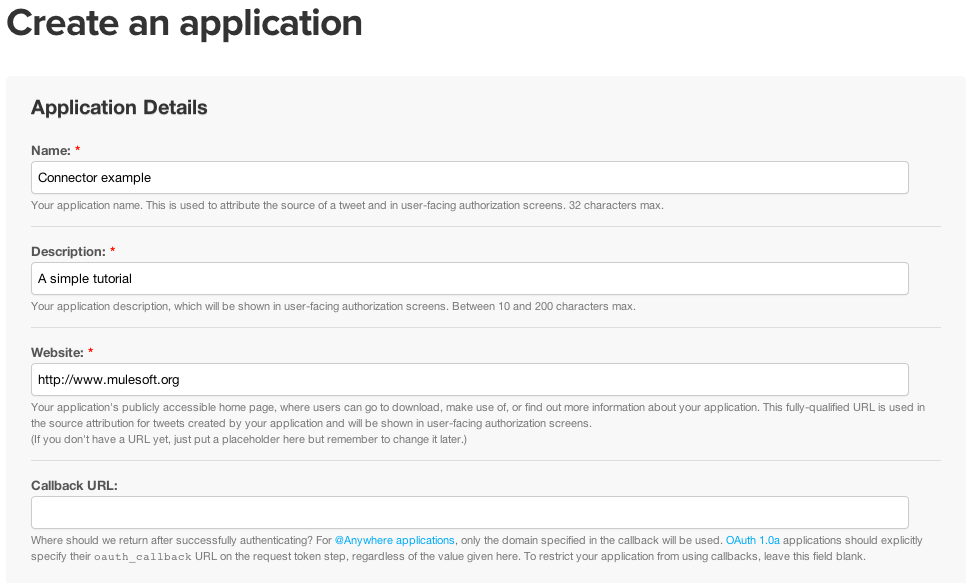
Complete the Application Details form according to the table and image below.
Field
Value
Name
A name for your application which must be unique to the Twitter system and which cannot contain the word "Twitter".
Description
A brief overview of the application you are building.
Website
An entry is required here, however, because this Twitter application will not be public, this field is not meaningful; enter a simple placeholder value.
Callback URL
Leave blank.
-
Agree to the terms, enter a value for the CAPTCHA, then click Create your Twitter application.
-
Optionally, access the Settings tab to adjust the Application Type from
Read onlytoRead and Write. Use the radio buttons under Application Type to adjust the setting, then save your changes.
image::devacct4.png[] -
Access the Details tab. Create an Access Token by clicking the button at the bottom of the screen (see image below).

Using an Access Token, you can easily connect with the Twitter API via your own application. However, your access to the API is restricted to your own user account. For the purposes of this tutorial, an Access Token gives you the access you need for your application to interact with the Twitter API.
However, if you wanted to expose such an application publicly, you would need to configure your application to authenticate via OAuth.
-
Refresh the page in the browser to display the values for Access token and Access token secret. Because you need to enter these values in your Mule application, record the following four keys from Twitter (refer to image below):
-
Consumer key
-
Consumer secret
-
Access token
-
Access token secret
image::devacct3.png[]
-
Modeling a Flow with a Connector
Launch Mule Studio and create a new Mule Project named Connector Tutorial. If you need more directions on launching Studio and creating a project, please refer to the Basic Studio Tutorial.
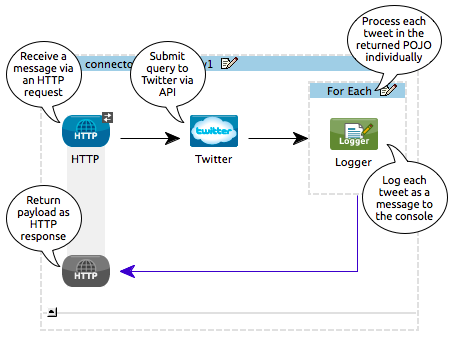
Next, use the building blocks in the Studio palette to model an application that:
-
receives an HTTP request
-
submits a query over Twitter’s API to retrieve a user’s timeline of tweets
-
logs each individual tweet, displaying the tweets in Studio’s console
You can model this application using these building blocks in Studio:
allows your Mule application to connect to Web resources through the HTTP or HTTPS protocol; find this in the Endpoints section of the palette |
|
enables you to perform operations against one or more Twitter resources; find this in the Cloud Connectors section of the palette |
|
Twitter global element |
defines connection credentials so as to connect to Twitter’s API; define this in the Global Elements tab in Studio |
processes each item in a POJO iteratively |
|
logs messages or activity based on the value of a Mule expression; find this in the Components section of the palette at the right of the screen |
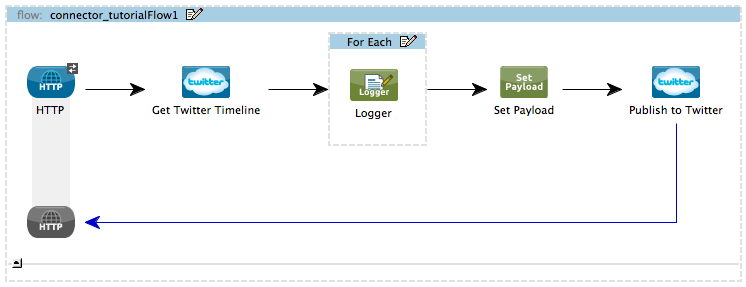
Drag and drop these building blocks into place on the canvas to visually construct, or model, a flow, as shown below.
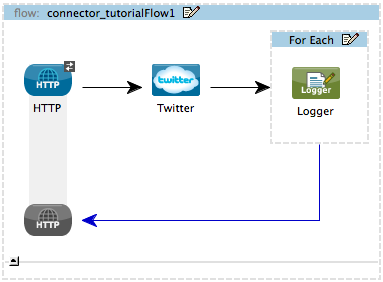
Once you configure the individual elements within it, which you will do in the next section, this flow will accomplish the goals that you set out to achieve with this application. Each building block that you selected and placed on the canvas will perform part of the functionality of your application, as shown in the image below.
Configuring the Flow Elements
Next, configure the flow elements to make the application accept HTTP requests, and submit queries to Twitter for a user’s tweet timeline. When you invoke http://localhost:8081/gettweets?sname=mulesoft, the application should send a request to Twitter to retrieve all of the recent tweets of a particular user which, in this case, is MuleSoft.
Nearly all Mule elements provide configuration options, which you can set in one of two ways:
-
via the building block Properties Editor in the console of Studio’s visual editor
-
via XML code in Studio’s XML editor, or in any other XML editing environment
The following instructions walk you through how to configure each building block in the visual editor and via XML. Use the tabs to switch back and forth between the instructions for the visual editor and the XML editor.
HTTP Endpoint
Studio Visual Editor
Click the HTTP Endpoint on your canvas to view its Properties Editor, then enter values for the fields according to the table below.
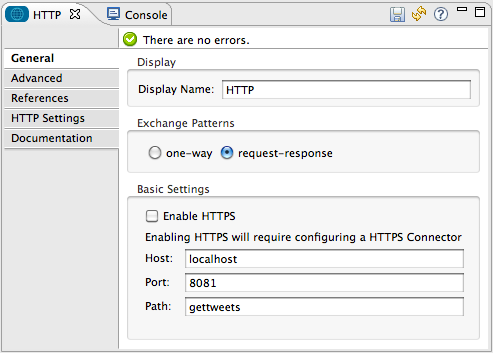
| Field | Value |
|---|---|
Display Name |
|
Host |
|
Port |
|
Path |
|
XML Editor or Standalone
Configure the HTTP inbound endpoint as follows:
<http:inbound-endpoint exchange-pattern="request-response" host="localhost" port="8081" doc:name="HTTP" path="gettweets"/>| Attribute | Value |
|---|---|
doc:name |
|
host |
|
port |
|
path |
|
Twitter Connector
Studio Visual Editor
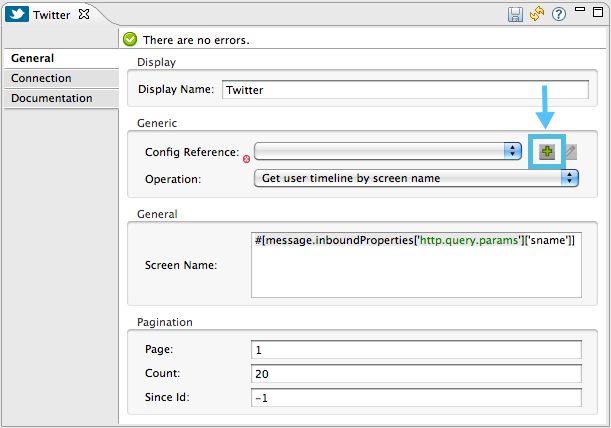
Click the Twitter connector to open its Properties Editor, then enter values for the fields according to the table below.

| Field | Value | Description |
|---|---|---|
Display Name |
|
The name Studio displays for the element in the flow. |
Operation |
|
Defines the operation to perform on Twitter; this value returns a tweet stream from the twitter user you specify. |
Screen Name |
|
Defines the Twitter user; set to an expression that extracts a parameter from the HTTP request. |
Count |
|
Defines the number of tweets the query returns. |
XML Editor or Standalone
Configure the HTTP inbound endpoint as follows (note that one attribute is excluded on purpose; you will add the attribute in the next step):
<twitter:get-user-timeline-by-screen-name doc:name="Twitter" screenName="#[message.inboundProperties['http.query.params']['sname']]"/>| Element | Description |
|---|---|
|
Defines the operation to perform on Twitter; this value returns a tweet stream from the twitter user you specify. |
| Attribute | Value | Description |
|---|---|---|
doc:name |
|
The name Studio displays for the element in the flow. |
screenName |
|
Defines the twitter user; set to an expression that extracts a parameter from the HTTP request. |
Twitter Global Element
A Global Element allows you to enter configuration information once, then reference the credentials from elements in multiple flows. In this case, you use the Twitter global element to configure all your connection details and API access credentials which the Twitter connector in your flow uses when it queries Twitter.
Read more about Global Elements in Mule.
Studio Visual Editor
-
Click the Twitter connector to open its Properties Editor, then click the plus sign next to the Config Reference field.
-
Enter values for the fields according to the table below.
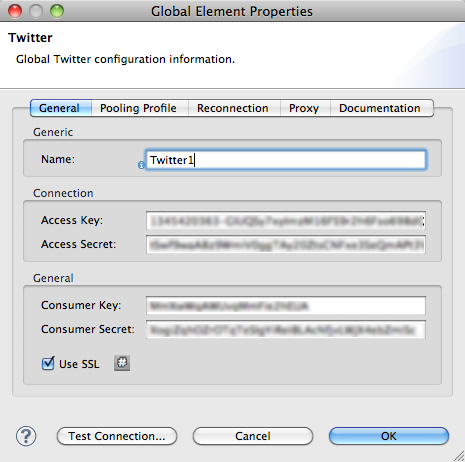
Field Value Name
Twitter1Access Key
Your unique Access Token value as obtained from Twitter
Access Secret
Your unique Access Token Secret value as obtained from Twitter
Consumer Key
Your unique Consumer Key value as obtained from Twitter
Consumer Secret
Your unique Consumer Secret value as obtained from Twitter
Use SSL
true(checked) -
Click OK to save the configurations, then, in the Config Reference field of the Twitter connector in your flow, use the drop-down to select the name of the global element you just created,
Twitter1.
XML Editor or Standalone
-
Above all flows in your application, configure the global element as follows:
<twitter:config name="Twitter1" accessKey="" accessSecret="" consumerKey="" consumerSecret="" doc:name="Twitter1">
        <twitter:connection-pooling-profile initialisationPolicy="INITIALISE_ONE" exhaustedAction="WHEN_EXHAUSTED_GROW"/>
</twitter:config>
Attribute Value name
Twitter1accessKey
Your unique Access Token value as obtained from Twitter
accessSecret
Your unique Access Token Secret value as obtained from Twitter
consumerKey
Your unique Consumer Key value as obtained from Twitter
consumerSecret
Your unique Consumer Secret value as obtained from Twitter
doc:name
Twitter1
-
Add a child element to the global element, configuring as follows:
<twitter:config name="Twitter1" accessKey="" accessSecret="" consumerKey="" consumerSecret="" doc:name="Twitter1">
        <twitter:connection-pooling-profile initialisationPolicy="INITIALISE_ONE" exhaustedAction="WHEN_EXHAUSTED_GROW"/>
</twitter:config>
Child Element twitter:connection-pooling-profileAttribute Value initialisationPolicyINITIALISE_ONEexhaustedActionWHEN_EXHAUSTED_GROW -
Revisit the configuration of the Twitter connector in your flow. Add the
config-refattribute as follows:<twitter:get-user-timeline-by-screen-name config-ref="Twitter1" doc:name="Twitter" screenName="#[message.inboundProperties['http.query.params']['sname']]"/>
Foreach Scope
When Twitter returns a response to the query, the payload is an array of objects, each of which describes a tweet and its attending metadata. The only field this application needs to access is , as it contains the actual tweet content. You can access the text of the latest tweet via the expression `#[payload[0].text], but this application uses a Foreach scope to access the text of every tweet in the array.
Studio Visual Editor
Click the Foreach to open its Properties Editor, then enter values for the fields according to the table below.
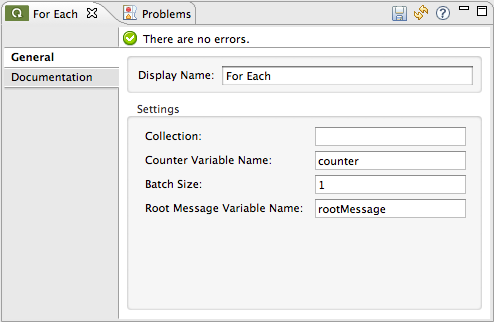
| Field | Value |
|---|---|
Display Name |
|
Counter Variable Name |
|
Batch Size |
|
Root Message Variable Name |
|
XML Editor or Standalone
Configure the Foreach scope as follows:
<foreach doc:name="For Each">
</foreach>| Attribute | Value |
|---|---|
doc:name |
|
Logger
Studio Visual Editor
Click the Logger to open its Properties Editor, then enter values for the fields according to the table below.
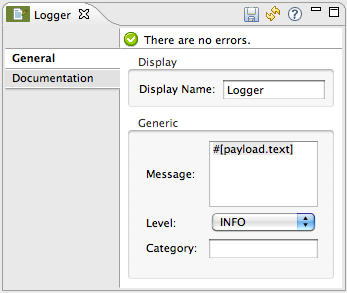
| Field | Value |
|---|---|
Display Name |
|
Message |
|
Level |
|
xml Editor or Standalone
Configure the Logger, inside the Foreach scope, as follows:
<foreach doc:name="For Each">
         <logger message="#[payload.text]" level="INFO" doc:name="Logger"/>
</foreach>| Attribute | Value |
|---|---|
doc:Name |
|
message |
|
level |
|
Your complete application XML, once configured, should look like the code below.
|
Keep in mind that for this example to work, you must manually configure the following values of the Twitter global element (
|
?xml version="1.0" encoding="UTF-8"?>

<mule xmlns:tracking="http://www.mulesoft.org/schema/mule/ee/tracking" xmlns:scripting="http://www.mulesoft.org/schema/mule/scripting" xmlns:http="http://www.mulesoft.org/schema/mule/http" xmlns:twitter="http://www.mulesoft.org/schema/mule/twitter" xmlns="http://www.mulesoft.org/schema/mule/core" xmlns:doc="http://www.mulesoft.org/schema/mule/documentation" xmlns:spring="http://www.springframework.org/schema/beans" xmlns:xsi="http://www.w3.org/2001/XMLSchema-instance" xsi:schemaLocation="http://www.springframework.org/schema/beans http://www.springframework.org/schema/beans/spring-beans-current.xsd
http://www.mulesoft.org/schema/mule/core http://www.mulesoft.org/schema/mule/core/current/mule.xsd
http://www.mulesoft.org/schema/mule/http http://www.mulesoft.org/schema/mule/http/current/mule-http.xsd
http://www.mulesoft.org/schema/mule/twitter http://www.mulesoft.org/schema/mule/twitter/2.4/mule-twitter.xsd
http://www.mulesoft.org/schema/mule/scripting http://www.mulesoft.org/schema/mule/scripting/current/mule-scripting.xsd
http://www.mulesoft.org/schema/mule/ee/tracking http://www.mulesoft.org/schema/mule/ee/tracking/current/mule-tracking-ee.xsd">
    <twitter:config name="Twitter1" accessKey="" accessSecret="" consumerKey="" consumerSecret="" doc:name="Twitter">
        <twitter:connection-pooling-profile initialisationPolicy="INITIALISE_ONE" exhaustedAction="WHEN_EXHAUSTED_GROW"/>
    </twitter:config>
    <flow name="connector_tutorialFlow1" doc:name="connector_tutorialFlow1">
        <http:inbound-endpoint exchange-pattern="request-response" host="localhost" port="8081" doc:name="HTTP" path="gettweets"/>
        <twitter:get-user-timeline-by-screen-name config-ref="Twitter1"      doc:name="Twitter" screenName="#[message.inboundProperties['http.query.params']['sname']]"/>
        <foreach doc:name="For Each">
         <logger message="#[payload.text]" level="INFO" doc:name="Logger"/>
        </foreach>
    </flow>
</mule>
Running the Application
Having built, configured, and saved your new application, you are ready to run it on the embedded Mule server (included as part of the bundled download of Mule Studio).
-
In the Package Explorer pane, right-click the
Connector Tutorial.mflowfile, then select Run As > Mule Application. (If you have not already saved, Mule prompts you to save now.) -
Mule immediately kicks into gear, starting your application and letting it run. When the startup process is complete, Studio displays a message in the console that reads,
Started app 'connector_tutorial'.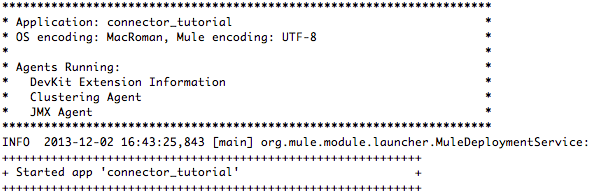
Using the Application
-
Open a Web browser, then navigate to the following URL:
http://localhost:8081/gettweets?sname=mulesoft -
This request initiates a request to the application which, ultimately, returns a
gettweetsfile that your browser prompts you to download. Rather than downloading the file, return to Mule Studio and check the contents of the console for logged message. The console displays a set of 20 log entries that spell out the latest tweets from MuleSoft’s official Twitter account (see image below).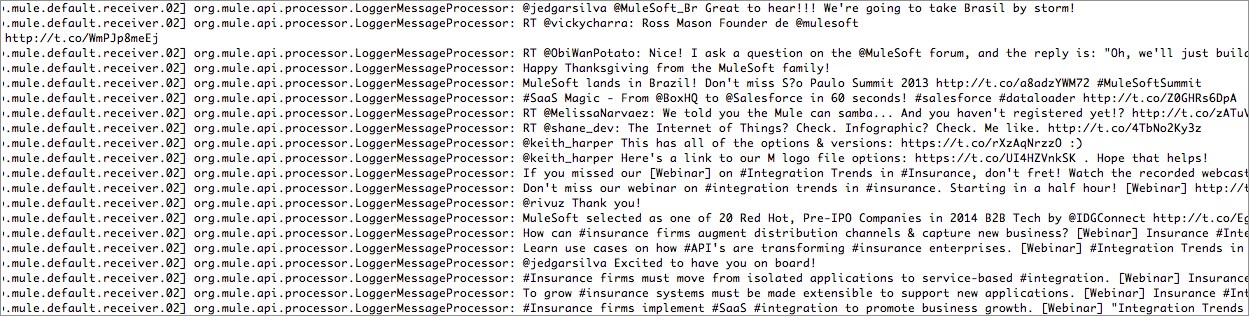
-
In your browser, replace the value of
mulesoftwith another twitter user’s screenname. Press enter, then view the logged results in the Studio console.
Stopping the Application
To stop the application, click the red, square Terminate icon above the console.

Extra Credit
Now that you’re familiar with connectors, try applying your knowledge to an extra task. Revise your application so that, after retrieving tweets from a user, it posts the last of these to your own demo twitter account.
As it’s kind of impolite to copy someone’s tweet without acknowledging its origin, keep in mind that your retweet should follow this structure RT @screenname : tweet text
Use the hints below if you need help.
How do I get the username?
Insert a second Twitter connector in your app, then reuse the expression from the screenName attribute (Screen Name field).
#[message.inboundProperties['http.query.params']['sname']]
Alternatively, you can use a more reliable expression: as each tweet comes with metadata, you can access the variable you need – screen name from this metadata. In this case, the screen name can be accessed using the following expression:
#[payload[0].user.screenName]How do I alter the tweet to include RT @username: ?
There are a few ways to accomplish this task, one of which is to add the extra text to the tweet inside a new variable. However, you can take a shortcut using the set payload transformer. Replace the content of the entire payload using an expression composed of multiple parts, such as the following the following:
RT @#[payload[0].user.screenName]: #[payload[0].text]
How do I post the tweet to Twitter?
You can configure the second twitter connector to perform various actions using the Operation field. Set the operation to Update Status. If you replaced the payload in the previous step, simply use #[payload] as the status. If you stored the text of the tweet in a variable, then call the variable instead.
Answer
View the answer, including explanation of steps and complete code
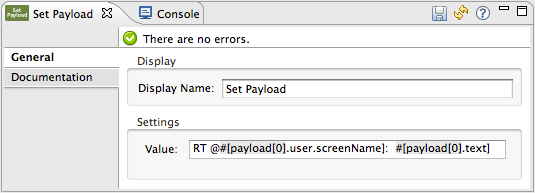
-
Append a Set Payload message processor to the end of your flow, then click to open its Properties Editor.
-
In the Value field, set the payload to
RT @#[payload[0].user.screenName]: #[payload[0].text]. This uses two of the variables in the object returned by the Get timeline operation: the screenName and the tweet text. -
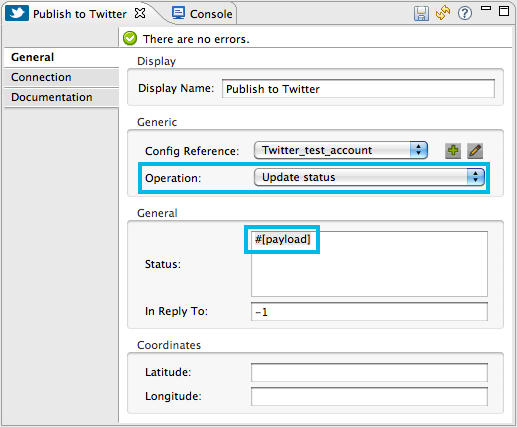
Add another Twitter Connector to the end of the flow, then click to open its Properties Editor.
-
Set its Config Reference to the same global element as the first Twitter Connector.
-
Set its Operation to Update Status, then set the status to
#[payload].
|
|

<mule xmlns:tracking="http://www.mulesoft.org/schema/mule/ee/tracking" xmlns:scripting="http://www.mulesoft.org/schema/mule/scripting" xmlns:http="http://www.mulesoft.org/schema/mule/http" xmlns:twitter="http://www.mulesoft.org/schema/mule/twitter" xmlns="http://www.mulesoft.org/schema/mule/core" xmlns:doc="http://www.mulesoft.org/schema/mule/documentation" xmlns:spring="http://www.springframework.org/schema/beans" xmlns:xsi="http://www.w3.org/2001/XMLSchema-instance" xsi:schemaLocation="http://www.springframework.org/schema/beans http://www.springframework.org/schema/beans/spring-beans-current.xsd
http://www.mulesoft.org/schema/mule/core http://www.mulesoft.org/schema/mule/core/current/mule.xsd
http://www.mulesoft.org/schema/mule/http http://www.mulesoft.org/schema/mule/http/current/mule-http.xsd
http://www.mulesoft.org/schema/mule/twitter http://www.mulesoft.org/schema/mule/twitter/2.4/mule-twitter.xsd
http://www.mulesoft.org/schema/mule/scripting http://www.mulesoft.org/schema/mule/scripting/current/mule-scripting.xsd
http://www.mulesoft.org/schema/mule/ee/tracking http://www.mulesoft.org/schema/mule/ee/tracking/current/mule-tracking-ee.xsd">

    <twitter:config name="Twitter1" accessKey="" accessSecret="" consumerKey="" consumerSecret="" doc:name="Twitter">
        <twitter:connection-pooling-profile initialisationPolicy="INITIALISE_ONE" exhaustedAction="WHEN_EXHAUSTED_GROW"/>
    </twitter:config>
    <flow name="connector_tutorialFlow1" doc:name="connector_tutorialFlow1">
        <http:inbound-endpoint exchange-pattern="request-response" host="localhost" port="8081" doc:name="HTTP" path="gettweets"/>
        <twitter:get-user-timeline-by-screen-name config-ref="Twitter1"      doc:name="Get Twitter Timeline" screenName="#[message.inboundProperties['http.query.params']['sname']]"/>
        <foreach doc:name="For Each">
            <logger message="#[payload.text]" level="INFO" doc:name="Logger"/>
        </foreach>
        <set-payload value="RT @#[payload[0].user.screenName]:  #[payload[0].text]" doc:name="Set Payload"/>
        <twitter:update-status config-ref="Twitter1" status="#[payload]" doc:name="Publish to Twitter"/>
    </flow>
</mule>
See Also
-
NEXT STEP: Learn how to start and stop Mule from the command line.
-
Import additional connectors into your instance of Studio.