Concur Connector
Standard
The Concur Anypoint connector for Mule ESB and CloudHub is used as a bi-directional gateway between Concur and Mule applications.
To use the Concur connector, you must have, at minimum, the following requirements:
-
A Concur developer account - sign up for one at developer.concur.com
-
The consumer key assigned by Concur; refer to the detailed documentation on how to use the Concur connector to access an OAuth API.
Assumptions
This document assumes that you are familiar with Mule, Anypoint™ Connectors, and the Anypoint Studio interface. To increase your familiarity with Studio, consider completing one or more Anypoint Studio Tutorials. Further, this page assumes that you have a basic understanding of Mule flows and Mule Global Elements.
This document describes implementation examples within the context of Anypoint Studio, Mule ESB’s graphical user interface, and, also includes configuration details for doing the same in the XML Editor.
Installing Concur Connector in Anypoint Studio
You can "test drive" the Concur connector by installing it in Anypoint Studio. Follow the instructions to download and launch Anypoint Studio, then follow the steps below to install the Concur connector.
However, to use the Concur connector in a production environment, you must have either:
-
An Enterprise license to use Mule
-
A CloudHub Starter, Professional, or Enterprise account
Contact the [MuleSoft Sales Team] to obtain either of these. (Read more about Installing an Enterprise License.)
To install the Concur Connector in Anypoint Studio:
-
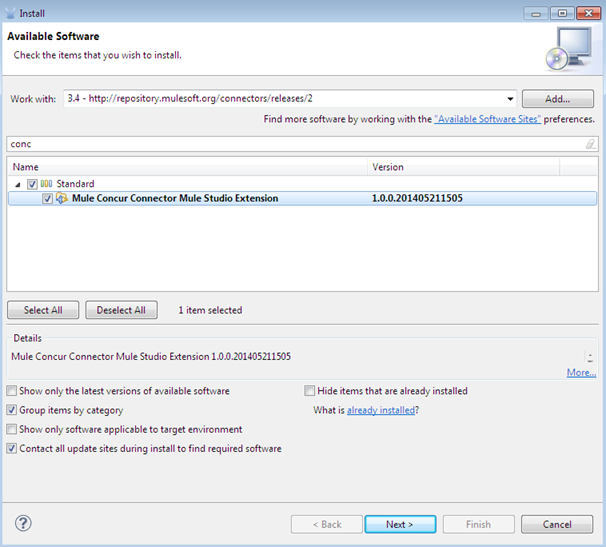
Under the Help menu in Anypoint Studio, select Install New Software.
-
On the Install wizard, in the Work with: field, enter the following URL: http://repository.mulesoft.org/connectors/releases/2
-
In the table below the Filter field, click to expand the Standard folder, then select Mule Concur Connector Mule Studio Extension. Click Next.
-
Review the details of the item you selected, then click Next.
-
Click to accept terms and conditions of the product, then click Finish.
-
Click Restart Now to complete the installation. Once you have installed the connector and restarted Studio you will see several new message processors available in the palette, under the Connectors category.
Configuring the Concur Connector
To use the Concur connector in your Mule application, you must configure:
-
A global Concur element that is used by all the Concur connectors in the application (read more about global elements in Mule).
-
Parameters of each Concur connector instance in the application.
Studio Visual Editor
Follow these steps to create a global Concur configuration in a Mule application:
-
Click the Global Element tab at the base of the canvas, then click Create.
-
In the Choose Global Type wizard, use the filter to locate, then select Concur, then click OK.
-
Configure the parameters according to the table below.
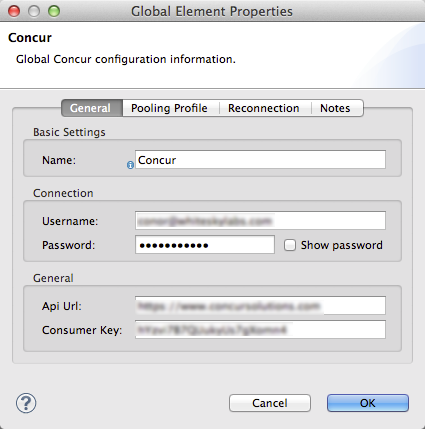
Parameter Description Name
Enter a name for the configuration so it can be referenced later by config-ref.
Username
A Username for connecting to the Concur instance.
Password
Password associated with the username.
API URL
The base URL to connect to the Concur API.
Consumer Key
The Consumer Key assigned to the account.
-
Access the Pooling Profile tab to configure any settings relevant to managing multiple connections via a connection pool.
-
Access the Reconnection tab to configure and settings relevant to reconnection strategies that Mule should execute if it loses its connection to Concur.
-
Click OK to save the global connector configurations.
-
Return to the Message Flow tab in Studio.
Follow these steps to configure the parameters of a Concur connector in the flow:
-
Drag the Concur connector onto the canvas, then select it to open the Properties Editor console.
-
Configure the parameters of the connector according to the table below.
Field Description Default Display Name
Enter a unique label for the connector in your application
Concur
Connector Configuration
Connect to a global element linked to this connector. Global elements encapsulate reusable data about the connection to the target resource or service. Select the global Concur connector element that you just created.
Operation
Select the action this component must perform
Batch Attendee List
-
Save your configurations.
XML Editor
First, ensure that you have included the Concur namespaces in your configuration file.
http://www.mulesoft.org/schema/mule/concur
http://www.mulesoft.org/schema/mule/concur/current/mule-concur.xsd
Follow these steps to configure a Concur connector in your application.
-
First, create a global Concur configuration outside and above your flows, using the following global configuration code.
<concur:config name="Concur" username="YOUR_USERNAME" password="YOUR_PASSWORD" apiUrl="YOUR_SERVICENOW_URI" consumerKey="YOUR_CONSUMER_KEY" doc:name="Concur"/>Attribute Description name
Enter a name for the configuration so it can be referenced from within the flow.
username
Username for connecting to the Concur instance.
password
Password to log into the Concur instance.
apiUrl
The URL of the Concur instance.
consumerKey
The consumer key associated with your Concur account.
-
Build your application flow, then add a Concur connector using one of the following operations.
Operation Description <concur:batch-attendee-list>
Make batch changes to attendee lists
<concur:batch-list-items>
Make batch changes to list items
<concur:close-payment-batch>
POST Payment Batch Close
<concur:create-or-update-users>
Create or update users with batch of user profiles
<concur:create-receipt-image>
Create a new image in the receipt store
<concur:get-attendee-details>
GET Attendee Details
<concur:get-expense-entry-details>
GET Expense Entry Details
<concur:get-expense-group-configuration>
Retrieve the expense group configuration
<concur:get-expense-report-detail>
GET Expense Report Detail
<concur:get-itinerary>
Get Itinerary Details
<concur:get-list-details>
Get List Details
<concur:get-list-items>
GET List Items Request
<concur:get-list-of-attendees>
GET List of Attendees
<concur:get-list-of-expense-reports>
GET List of Expense Reports
<concur:get-list-of-form-fields>
Get List of Employee Form Fields
<concur:get-list-of-forms-of-payment>
Retrieve the list of Forms of Payment
<concur:get-list-of-lists>
Get List of Lists
<concur:get-list-of-payment-batches>
Get List of Payment Batches
<concur:get-list-of-receipts>
Get a list of all receipt IDs owned by the user associated with the OAuth token
<concur:get-receipt-image-uri>
Get the URI of a Receipt Image for a given ID
<concur:get-travel-profile>
Retrieve the travel profile
<concur:get-travel-requests-list>
Retrieve the Travel requests list
<concur:get-updated-travel-profiles>
Retrieve the list of updated travel profiles
<concur:get-user-profile>
Retrieve the user profile
<concur:list-itineraries>
Retrieve the List of Itineraries
<concur:post-expense-entry-attendee>
POST Expense Entry Attendee
<concur:post-expense-entry-request>]
POST Expense Entry Request.
Note: Concur recommends that you post one expense entry per request.<concur:post-expense-report-header>
POST Expense Report Header
<concur:post-expense-report-header-batch>
POST Expense Report Header Batch
<concur:post-expense-report-submit-request>
POST Expense Report Submit Request
<concur:quick-expense>
Post a new quick expense
<concur:quick-expense-list>
Retrieve all quick expenses
<concur:trip-approval>
Approve Trip Itinerary
<concur:update-loyalty-program>
Update the Loyalty Program
Follow the links in the table above to access detailed configuration reference for each of these operations.
Example Use Case
As a Concur administrator, I would like to create and submit expense reports to Concur.
STUDIO Visual Editor
-
Drag an HTTP Endpoint into a new flow. Open the properties editor of the endpoint. Set the exchange pattern to
one-wayand the Path tosubmitreport
The new flow is then reachable through the path http://localhost:8081/submitreport. As the exchange pattern is set to one-way no response message will not be returned to the requester.
-
Add a Set Payload transformer after the HTTP endpoint to set the payload to a predefined set of values that match the format that Concur expects.
-
Configure the Set Payload transformer according to the table below.
Field Value Display Name
April Expenses
Value
#[['name':'April Expenses','purpose':'All expenses for April','comment':'This is a comment.','orgUnit1':'US','orgUnit2':'NW','orgUnit3':'Redmond','custom1':'Client','custo
m2':'Local','userDefinedDate':'2011-03-26 15:15:07.0']]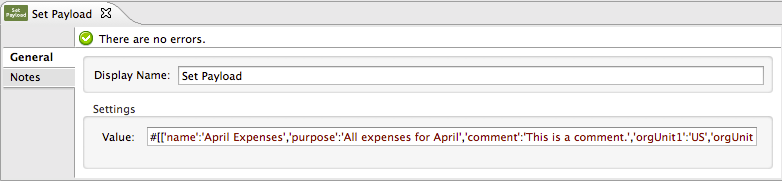
You can configure an external source such as a .csvfile instead of using the Set Payload transformer to supply values to the expense report. -
Drag a Concur connector into the flow to post an expense report header.
-
Add a new global element by clicking the plus sign next to the Connector Configuration field.
-
Configure this Global Element according to the table below (Refer to Configuring the Concur Connector for more details).
Property Description Name
Enter a unique label for this global element to be referenced by connectors.
Username
Enter a Username for connecting to the Concur instance.
Password
Enter user password.
API URL
Enter the base URL to connect to the Concur API.
Consumer Key
Enter the Consumer Key assigned to the user.
-
Click Test Connection to confirm that Mule can connect with you Concur instance. If the connection is successful, click OK to save the configurations of the global element. If unsuccessful, revise or correct any incorrect parameters, then test again.
-
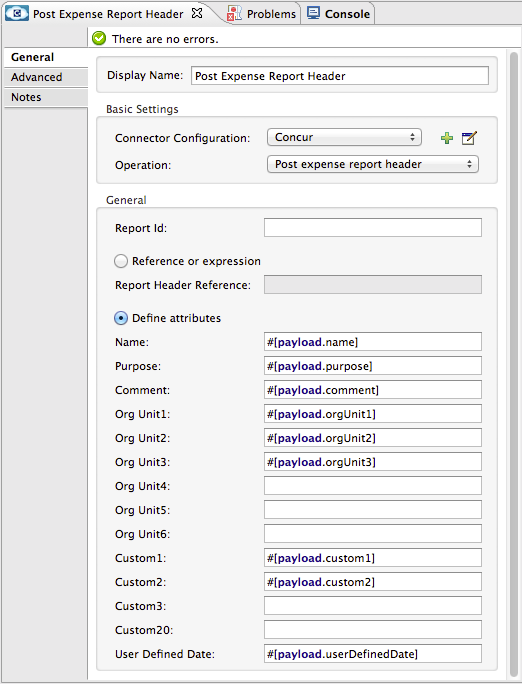
Back in the properties editor of the Concur connector, configure the remaining parameters according to the table below.
Field Value Display Name
Post Expense Report Header
Connector Configuration
Concur (the global element you have created)
Operation
Post Expense Report Header
General
Select Define Attributes, then enter the following:
Name: #[payload.name]
Purpose: #[payload.purpose]
Comment: #[payload.comment]
OrgUnit1: #[payload.orgUnit1]
OrgUnit2: #[payload.orgUnit2]
OrgUnit3: #[payload.orgUnit3]
Custom1: #[payload.custom1]
Custom2: #[payload.custom2]
User Defined Data: #[payload.userDefinedData]
-
Drag a DataMapper transformer between the Set Payload transformer and the Concur connector, then click on it to open its properties editor.
-
Configure the properties of the DataMapper according to the steps below.
-
In the Input type, select Map<k,v>, then select User Defined.
-
Click Create/Edit Structure.
-
Enter a name for the Map, and under Type, select Element.
-
Add fields to the input structure according to the table below.
Name Type comment
String
custom1
String
custom2
String
name
String
orgUnit1
String
orgUnit2
String
orgUnit3
String
purpose
String
userDefinedData
String
-
The Output properties are automatically configured to correspond to the Concur connector.
-
Click Create Mapping.
-
Drag each input data field to its corresponding output Concur field.
-
Click the blank space on the Canvas to save the changes.
-
-
Add a Variable transformer to preserve the Report ID from the message payload. Configure the transformer according to the table below.
Field Value Display Name
Extract Report ID (or any other name you prefer)
Operation
Set Variable
Name
Report ID
Value
#[groovy:payload.reportDetailsUrl.tokenize('/')[-1]]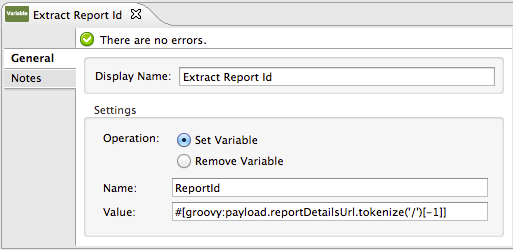
-
Add a Set Payload transformer, then configure it according to the table below.
Field Value Display Name
Set Payload
Value
#[['crnCode':'US','expKey':'BUSPR','description':'Business Promotions','transactionDate':'2011-01-12', 'transactionAmount':'29', 'comment':'Brochure Sample', 'vendorDescription':'Kinkos','isPersonal':'N']] -
Add another Concur connector to the flow to create a expense entry request.
-
In the Connector Configuration field, select the global Concur element you have created.
-
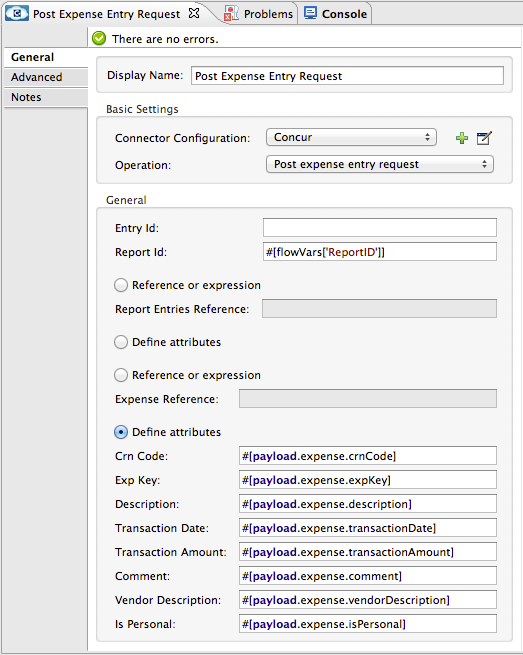
Configure the remaining parameters according to the table below.
Field Value Display Name
Post Expense Entry Request
Config Reference
Concur (the global element you have created)
Operation
Post expense entry request
Report ID
#[flowVars['ReportID']]General
Select Define Attributes, then enter the following:
Crn Code: #[payload.expense.crnCode]
Exp Key: #[payload.expense.expKey]
Transaction Date: #[payload.expense.transactionDate]
Transaction Amount: #[payload.expense.transactionAmount]
Comment: #[payload.expense.comment]
Vendor Description: #[payload.expense.vendorDescription]
Is Personal: #[payload.expense.isPersonal]
-
Drag another DataMapper between the Set Payload transformer and the Post Expense Entry Request, then configure it according to the steps below.
-
In the Input type, select Map<k,v>, then select User Defined.
-
Click Create/Edit Structure.
-
Enter a name for the Map, then under Type, select Element.
-
Add fields to the input structure according to the table below.
Comment Type crnCode
String
description
String
expKey
String
isPersonal
String
transactionAmount
String
transactionDate
String
vendorDescription
String
-
The Output properties are automatically configured to correspond to the Concur connector.
-
Click Create Mapping.
-
Drag each input data field to its corresponding output Concur field.
-
Click the blank space on the Canvas to save the changes.
-
+
| Field | Value |
|---|---|
Display Name |
Post Expense Report |
Operation |
Post expense report submit request |
Report ID |
|
+ image::9.png[]
-
Run the project as a Mule Application.
Example Code
<mule xmlns:json="http://www.mulesoft.org/schema/mule/json" xmlns:concur="http://www.mulesoft.org/schema/mule/concur" xmlns:data-mapper="http://www.mulesoft.org/schema/mule/ee/data-mapper" xmlns:http="http://www.mulesoft.org/schema/mule/http" xmlns:file="http://www.mulesoft.org/schema/mule/file" xmlns:tracking="http://www.mulesoft.org/schema/mule/ee/tracking" xmlns="http://www.mulesoft.org/schema/mule/core" xmlns:doc="http://www.mulesoft.org/schema/mule/documentation"
    xmlns:spring="http://www.springframework.org/schema/beans" version="EE-3.4.0"
    xmlns:xsi="http://www.w3.org/2001/XMLSchema-instance"
    xsi:schemaLocation="http://www.springframework.org/schema/beans http://www.springframework.org/schema/beans/spring-beans-current.xsd
http://www.mulesoft.org/schema/mule/core http://www.mulesoft.org/schema/mule/core/3.4/mule.xsd
http://www.mulesoft.org/schema/mule/http http://www.mulesoft.org/schema/mule/http/3.4/mule-http.xsd
http://www.mulesoft.org/schema/mule/ee/tracking http://www.mulesoft.org/schema/mule/ee/tracking/3.4/mule-tracking-ee.xsd
http://www.mulesoft.org/schema/mule/concur http://www.mulesoft.org/schema/mule/concur/3.4/mule-concur.xsd
http://www.mulesoft.org/schema/mule/ee/data-mapper http://www.mulesoft.org/schema/mule/ee/data-mapper/3.4/mule-data-mapper.xsd
http://www.mulesoft.org/schema/mule/file http://www.mulesoft.org/schema/mule/file/3.4/mule-file.xsd
http://www.mulesoft.org/schema/mule/json http://www.mulesoft.org/schema/mule/json/3.4/mule-json.xsd">
    <concur:config name="Concur" username="conor@whiteskylabs.com" password="plots71Erie" apiUrl="https://www.concursolutions.com" consumerKey="hYzvi7B7QUukyUs7gXomn4" doc:name="Concur"/>
    <data-mapper:config name="Map_To_Report" transformationGraphPath="map_to_report.grf" doc:name="Map_To_Report"/>
    <data-mapper:config name="Map_To_ReportEntries" transformationGraphPath="map_to_reportentries.grf" doc:name="Map_To_ReportEntries"/>
    <flow name="concur-sample-usecase-submitreport" doc:name="concur-sample-usecase-submitreport">
        <http:inbound-endpoint exchange-pattern="one-way" host="localhost" port="8081" path="submitreport" doc:name="/submitreport"/>
        <set-payload doc:name="Set Payload" value="#[['name':'April Expenses','purpose':'All expenses for April','comment':'This is a comment.','orgUnit1':'US','orgUnit2':'NW','orgUnit3':'Redmond','custom1':'Client','custom2':'Local','userDefinedDate':'2011-03-26 15:15:07.0']]"/>
        <data-mapper:transform config-ref="Map_To_Report" doc:name="Map To Report"/>
        <concur:post-expense-report-header config-ref="Concur" doc:name="Post Expense Report Header">
            <concur:report-header name="#[payload.name]" purpose="#[payload.purpose]" comment="#[payload.comment]" orgUnit1="#[payload.orgUnit1]" orgUnit2="#[payload.orgUnit2]" orgUnit3="#[payload.orgUnit3]" custom1="#[payload.custom1]" custom2="#[payload.custom2]" userDefinedDate="#[payload.userDefinedDate]"/>
        </concur:post-expense-report-header>
        <set-variable variableName="ReportId" value="#[groovy:payload.reportDetailsUrl.tokenize('/')[-1]]" doc:name="Extract Report Id"/>
        <set-payload value="#[['crnCode':'US','expKey':'BUSPR','description':'Business Promotions','transactionDate':'2011-01-12','transactionAmount':'29','comment':'Brochure Sample','vendorDescription':'Kinkos','isPersonal':'N']]" doc:name="Set Payload"/>
        <data-mapper:transform config-ref="Map_To_ReportEntries" doc:name="Map To ReportEntries"/>
        <concur:post-expense-entry-request config-ref="Concur" reportId="#[flowVars['ReportID']]" doc:name="Post Expense Entry Request">
            <concur:report-entries>
                <concur:expense crnCode="#[payload.expense.crnCode]" expKey="#[payload.expense.expKey]" description="#[payload.expense.description]" transactionDate="#[payload.expense.transactionDate]" transactionAmount="#[payload.expense.transactionAmount]" comment="#[payload.expense.comment]" vendorDescription="#[payload.expense.vendorDescription]" isPersonal="#[payload.expense.isPersonal]"/>
            </concur:report-entries>
        </concur:post-expense-entry-request>
        <concur:post-expense-report-submit-request config-ref="Concur" reportId="#[flowVars['ReportID']]" doc:name="Post Expense Report"/>
    </flow>
</mule>
See Also
-
Learn more about working with Anypoint Connectors.
-
Access the release notes for the Concur Connector.