SaaS Integration Simple Mapping
This Shortcut to Success aims to give you the context and basic knowledge to be able to quickly build a Mule project that integrates a flat file with a SaaS provider.
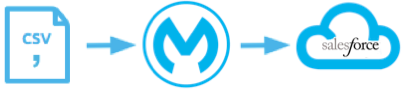
We’ll use an example use case to illustrate how you can use a Mule application to push a list of contact from a CSV file into Salesforce. We’ll show you what the finished project looks like, explain how it works, then outline the steps to take to build your own version.
This Shortcut to Success:
-
We’ll consider a very simple use case with a 1:1 mapping of data. Basically, we’re taking contact information – name, email address, etc. – out of a flat file, mapping it to a structured object that Salesforce recognizes, then uploading the information into Salesforce and automatically creating new contacts in a account.
Next Shortcuts to Success:
-
Coming Soon! In SaaS Integration Simple Mapping with Choice Routing, we’ll make this a little more interesting by adding a step to sync only new contact information.
-
Coming Soon! In SaaS Integration 1 to N Mapping, we’ll add some more complexity by creating a flow that creates a Salesforce account, then adds contacts to the new account for each line in our CSV file.
Before You Begin
It’s a good idea to have a basic understanding of Mule before you get started. Take this short test to find out if you’re ready to dive into this Shortcut to Success.
-
In the context of computer software, Mule is:
-
an enterprise service bus and integration platform.
-

-
some kind of tool that might help me connect applications or Web services
-
-
You can use Mule Studio as:
-
an integration development environment (IDE)
-
a large room where equine mammals can gather to explore the art of dance.
-
a drag-and-drop tool to assemble an application
-
-
A Mule application consists of one or more:
-
flows, which contain a series of elements that act upon a message.
-
references from colleagues with whom the animal has worked.
-
endpoints, I think?
-
-
Mule applications work by processing:
-
messages through a message source, such as HTTP, and any number of message processors which route, transform, enrich or otherwise act upon the contents of the message.
-
cheese.
-
incoming messages via HTTP, and maybe also from queues?
-
-
Mule uses global elements to:
-
define configurations that can be shared across multiple message processors in the same application.
-
call its relatives in Australia for less than 10¢ per minute.
-
reuse bits of code and, I think, some other things like configuring connections
-
-
MEL stands for:
-
Mule Expression Language.
-
Mules for Equine Liberty, an activist group which seeks to ensure freedom for pack animals worldwide.
-
probably Mule Expression Language, but what is the syntax like?
-
If you were tempted to answer "b" or "c" to any of the questions above, we highly recommend that you take four minutes to read Anypoint Fundamentals before getting started with this Shortcut to Success.
Example
Our example focuses on a simple use case. Imagine you have a spreadsheet of contact information – names, email addresses, phone numbers, etc. – that you want to stop tracking in Excel and start managing in a CRM (customer relationship manager) like Salesforce. Imagine you have no interest in doing this by manually entering contacts one-by-one into Salesforce, and that you have a dozen colleagues who have similar lists which all need to somehow be transferred into Salesforce. You can build an app for that.
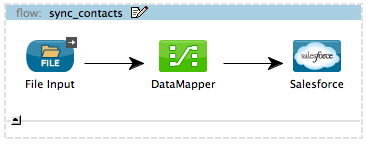
Using a single Mule flow with three elements, this application accepts CSV files containing contact records, then uploads the contacts to Salesforce. Check out the visual representation, and the XML representation of this application, below.
Visual Editor
XML Editor or Standalone
<mule xmlns:data-mapper="http://www.mulesoft.org/schema/mule/ee/data-mapper" xmlns:sfdc="http://www.mulesoft.org/schema/mule/sfdc" xmlns:file="http://www.mulesoft.org/schema/mule/file" xmlns:tracking="http://www.mulesoft.org/schema/mule/ee/tracking" xmlns="http://www.mulesoft.org/schema/mule/core" xmlns:doc="http://www.mulesoft.org/schema/mule/documentation" xmlns:spring="http://www.springframework.org/schema/beans" version="EE-3.4.0" xmlns:xsi="http://www.w3.org/2001/XMLSchema-instance" xsi:schemaLocation="

http://www.mulesoft.org/schema/mule/file http://www.mulesoft.org/schema/mule/file/current/mule-file.xsd

http://www.mulesoft.org/schema/mule/ee/data-mapper http://www.mulesoft.org/schema/mule/ee/data-mapper/current/mule-data-mapper.xsd

http://www.mulesoft.org/schema/mule/sfdc http://www.mulesoft.org/schema/mule/sfdc/5.0/mule-sfdc.xsd

http://www.springframework.org/schema/beans http://www.springframework.org/schema/beans/spring-beans-current.xsd

http://www.mulesoft.org/schema/mule/core http://www.mulesoft.org/schema/mule/core/current/mule.xsd

http://www.mulesoft.org/schema/mule/ee/tracking http://www.mulesoft.org/schema/mule/ee/tracking/current/mule-tracking-ee.xsd ">

    <sfdc:config name="Salesforce" username="testsfdc@mulesoft.com" password="password"  doc:name="Salesforce" securityToken="bgfsG5688kroeemIHMnYJ">
        <sfdc:connection-pooling-profile initialisationPolicy="INITIALISE_ONE" exhaustedAction="WHEN_EXHAUSTED_GROW"/>
    </sfdc:config>

    <data-mapper:config name="datamapper_grf" transformationGraphPath="datamapper.grf" doc:name="DataMapper"/>

    <flow name="sync-contacts" doc:name="sync-contacts"
        <file:inbound-endpoint path="/Users/RobinMacbook/Desktop/Input"  responseTimeout="10000" doc:name="File" connector-ref="File" moveToDirectory="/Users/RobinMacbook/Desktop/Output"/>
        <data-mapper:transform config-ref="datamapper_grf" doc:name="DataMapper"/>
        <sfdc:create config-ref="Salesforce" type="Contact" doc:name="Salesforce">
            <sfdc:objects ref="#[payload]"/>
        </sfdc:create>
    </flow>
How it Works
Let’s break it down.
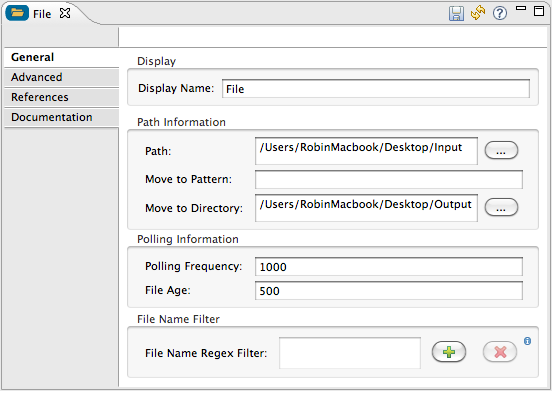
File Goes In
Before it can do anything with the contact information, the first thing the application has to do is actually accept a CSV file. The File endpoint in the flow behaves as the inbound message source, accepting files that get put into a specified folder. Once in a Mule flow, the content of the file becomes a Mule message with a header and a payload. The other message processors in the flow will act upon this message by adding to it, transforming it, or otherwise manipulating it.
Magic Happens
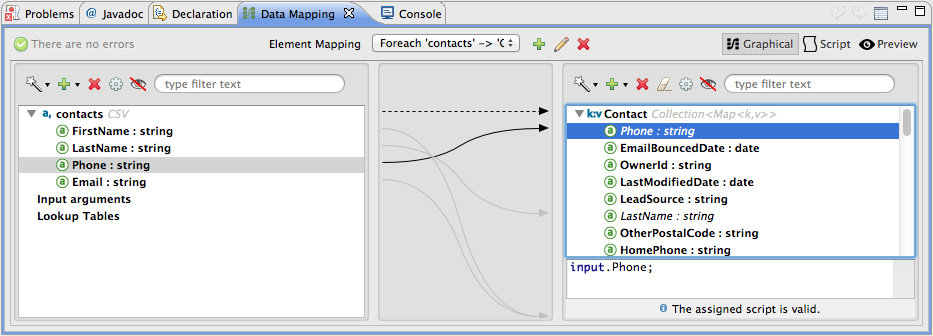
Now Mule has the CSV file content – still structured in flat-file format – in a message payload. What next? Well, Salesforce only accepts data in a structured format, so we first have to convert the data format from flat to structured. Also, the data in the CSV file is labeled differently than in Salesforce: the CSV uses "first", "last" "emailAddress" and "phone" whereas in Salesforce, the contact information is labeled as "LastName", "FirstName", "Email" and "Phone". So we’ll have to map the data from its CSV label to its new Salesforce label – last to LastName, first to FirstName, emailAddress to Email, and phone to Phone. To perform both of these chores at once, we can use magic. Or a DataMapper.
We added a DataMapper Transformer to our flow and told it the type of input data it can expect (flat file), the type of output data we want it to produce (structured), then used the drag-and-drop interface to visually map input fields to output fields. In its lovely completed form, DataMapper gives us visibility into all these transformation details and visually represents each mapping with arrows.
|
Why use DataMapper rather than the CSV-to-Maps Transformer? Incidentallly, you could use multiple message processors to first convert the CSV data into an object, then manually map the data input to output. However, DataMapper is faster and easier to use, especially if you enable DataSense on your Salesforce connector so that Mule auto-populates your output mapping fields for you. We’ll get into the details in the next section, but for now, know that using a DataMapper transformer can save you time and effort, even for the simplest mappings. |
Contact Info Goes Out
When it has converted all the contacts in the file to a collection of Salesforce-friendly data, the application uses a Salesforce Connector to push data into your Salesforce account.
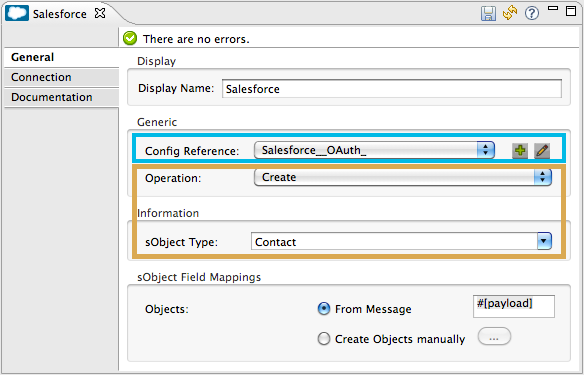
The connector’s configurations (shown in the orange box below) specify the operation – Create – and the sObject type – Contact – which dictate exactly how the data uploads to Salesforce; in this case, it creates new contacts. The configuration also indicates that the object field mappings can be extracted from the message payload, because in our example, the message payload is the CSV file that we want to map.
The Salesforce connector also requires a Global Element, which contains global configurations. At minimum, the global configuration should include a Username, Password, and Security Token, shown in the orange box (below).
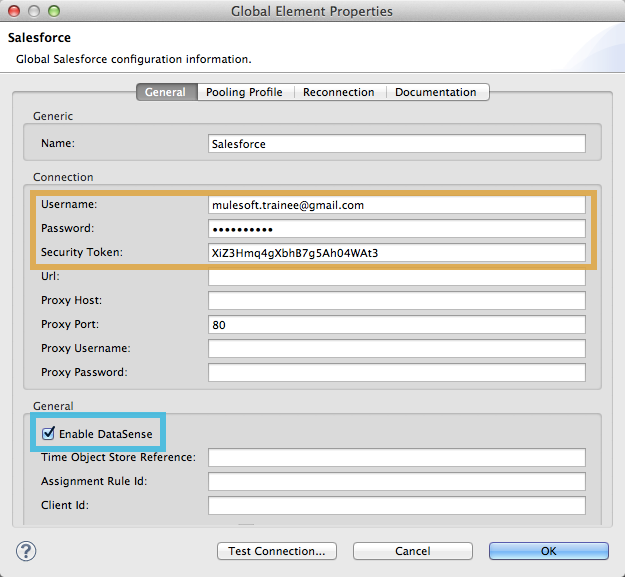
As you may have suspected, the real magic happens in the blue box (above). The Enable DataSense checkbox does two thrilling things:
-
allows you test your connection with Salesforce so you know that the connection is working right away so there are no surprises later
-
proactively acquires information about data, such as data type and structure, from Salesforce and then feeds it into DataMapper so that you don’t have to enter anything manually.
It’s a beautiful thing.
With all the pieces in place, all you have to do is run the application and start feeding it files (i.e. putting CSV files into the input folder). To test it, you can deploy the application on the embedded Mule runtime that is bundled with Studio, or to an on-premise server, or in the cloud using CloudHub. There are actually a number of different ways you can deploy and manage a Mule application; learn more about Deployment Scenarios.
Build Your Own
Here are the end-to-end instructions for how to build your own version of this example, using any endpoint and connector you want.
-
First, define your message source. Select the endpoint that corresponds with wherever it is your input data resides and insert it into your flow. You’re one-third of the way there.
-
Next, determine your intended destination. Select the Anypoint Connector that corresponds with the SaaS vendor you wish to integrate with, insert it into your flow, and configure it as necessary.
-
If the connector you have selected offers DataSense, be sure that the "Enable DataSense" box is checked when you configure your connector’s global element. You’re now two-thirds of the way there, and DataMapper is about to do the rest of the hard work.
-
Add a DataMapper transformer into your flow in between your message source and your connector.
Pro Tip
Insert a DataMapper transformer in your flow AFTER you have already placed and configured your DataSense-enabled Anypoint Connector. Building your flow in this order saves you the most time because it will trigger DataSense to dynamically discover your outbound mapping fields and feed the information into DataMapper.
-
Configure the DataMapper transformer. If your connector is DataSense-enabled, you should only need to configure the input values. Otherwise, you can quickly map inputs to outputs by clicking and dragging input fields to output fields in the Data Mapping Console.
-
Save and run your application.
-
Bask in the glory of your success.
Dive Deeper
-
Walk through this example step by step using the Connect with Salesforce Example, included with your instance of Mule Studio.
-
Try out more complex DataMapping using Mule Expression Language to extract specific data from your message header or payload and dynamically map to your desired format.
-
Learn how to customize your error handling strategies for more fine-grained control of what kinds of errors are captured and where the data is sent.