DataSense
| Mule Runtime Engine versions 3.5, 3.6, and 3.7 reached End of Life on or before January 25, 2020. For more information, contact your Customer Success Manager to determine how you can migrate to the latest Mule version. |
DataSense uses message metadata to facilitate application design. With this functionality, Anypoint™ Studio proactively acquires information about data, such as data type and structure, in order to prescribe how to accurately map or use this data in your application.
Rather than forcing you to manually discover information about the data your internal and external resources employ, Mule intelligently discovers this information and uses it to make application design suggestions. For example, if your application must connect to Twitter, DataSense captures information about the type and structure of data that Twitter employs, then uses the information to advise you of the type of data you should send to, or expect to receive from Twitter.
Assumptions
This document assumes that you are familiar with the Visual Editor in Anypoint Studio, the Anypoint™ Connectors, and the Anypoint DataMapper transformer that you can use to create applications in Studio. Further, this document references Connectors and Global Elements.
DataSense Functionality
Studio offers several DataSense features to support proactive discovery of metadata from external resources:
-
Connection Testing (for selected connectors)
-
Perceptive Flow Design
-
DataSense Explorer
Connection Testing
This functionality enables you to test connections to external resources. As you model your application in Studio, you have the opportunity, when configuring most connectors that support DataSense, to test the functionality of its connection to a service or database. Rather than waiting until you run the application to test the connection, you can test early to confirm functionality before moving on.
For example, if you are configuring an Anypoint Connector to communicate with Salesforce, you can enter the required configuration values (login credentials, host and port, proxy settings), then simply click to test connectivity. Mule submits a call to Salesforce to confirm the connection exists and is functional.

Perceptive Flow Design
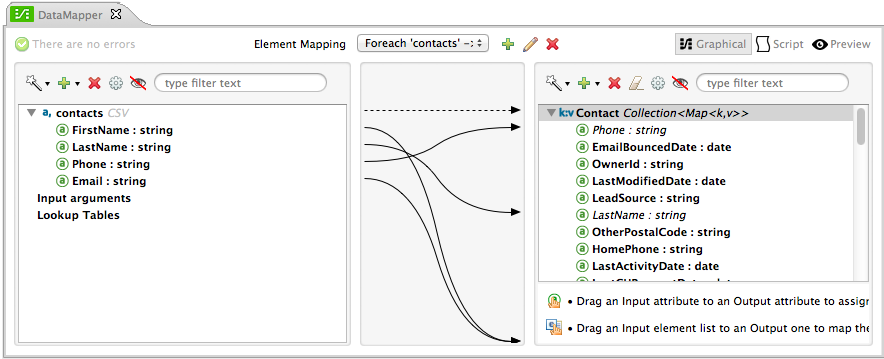
Mule takes one more step to make designing your application easier with Perceptive Flow Design. If you model a flow to include an Anypoint Connector, preceded or followed by an Anypoint DataMapper transformer, Mule uses the working connection to the resource – a SaaS provider, for example- to retrieve metadata about message payload and properties. Capturing the data type and structure that a SaaS employs, Mule feeds that data into the DataMapper, thereby informing the DataMapper of the expected input or output. This functionality facilitates mapping of data from one data format and structure to another which saves you the development time you would otherwise spend trying to discover the structure and format yourself.
For example, imagine you are tasked with the job of connecting your organization’s Salesforce accounts with Twitter to publicize specific performance indicators. One of your first tasks would be to examine the available documentation from both SaaS providers to determine what type of data structures they use so that you can, eventually, figure out how to map one structure to the other. Rather than plod through that exhausting exercise, you can utilize Perceptive Flow Design. Drop two connectors onto your Studio canvas – Salesforce and Twitter – then configure them, making sure to test the connection for Salesforce. After confirming connectivity, simply drop a DataMapper Transformer between the connectors. Open DataMapper to find that Mule has intelligently captured the data type and structure information from each SaaS provider, and prescribed the input and output for your data mapping. With the prescription in place, all you need to do is configure the mapping.
As an even simpler example, imagine you are obtaining status update data from a Twitter connector and that you want to log the tweet text but you aren’t familiar with the property names used by this connector. Instead of having to look up Twitter’s documentation to find out what arbitrary name they picked for the property you need, you can just place a Logger message processor right after the Twitter connector and write in it. If you start writing #[payload. in the logger’s Message field, and then press ctrl + space bar, you will get a list of all the properties and methods associated to the payload, including the properties returned by the request that you’re performing on the Twitter connector.

DataSense Explorer
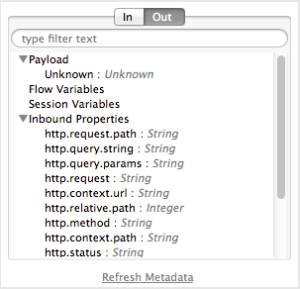
This handy feature in Studio allows you to preview the Message data structure at different points of the flow, while still in design time. Select a specific element in the flow, then click the DataSense Explorer icon (shown below) and explore the structure of the data that enters and leaves it.
The DataSense Explorer allows you to navigate the Payload, Flow and Session Variables, Inbound and Outbound Properties, and Record Variables. It takes the known output fields of flow elements and the DataSense metadata of compatible connectors into account to predict the message contents at any given point in the flow. Thnaks to this ,you can easily find what information is available where, even the variables that are implicitly created by certain flow elements which you might not be aware of.
DataSense Best Practices
To take full advantage of the functionality DataSense has to offer, design-time best practice dictates that you should build an application in the following order:
-
Begin by dropping and connectors into your flow through which data flows into, and out of, your application. For example, start by configuring an HTTP endpoint, followed by an Anypoint connector.
-
Configure the endpoints and connectors — and the global configurations they reference — so that, where possible, you can establish connections and use DataSense to extract any metadata about the expected input or output with the external source.
-
Insert other elements into your flow to enrich the message, set, copy or remove variable or properties, route messages, etc.
-
Lastly, insert DataMapper transformers into your flow to adjust the format or structure of the message so that each connector receives the input it expects.
The objective of this design-time strategy is to set the pieces of the integration puzzle in place, then "glue them together" with DataMappers. Rather than designing a flow sequentially, this type of "align, then glue together" strategy ensures that you are utilizing DataSense, wherever possible, to pre-populate the information about the structure and format of the input or output data into a DataMapper.
For example, if you configure a Salesforce connector in your application, then drop a DataMapper after it, the DataMapper uses the information that DataSense extracted to pre-populate the input values for mapping, so that you only need to confirm (or adjust) the input selections, then proceed to mapping to your desired output. In other words, DataSense makes sure that DataMapper knows the data format and structure with which it must work so you don’t have to figure it out manually. Whenever you can use DataSense, you are taking a development shortcut, removing the hassle of manually discovering the format and structure of data contained within a message.
See Also
-
Learn how to test connections to external resources.
-
See the list of DataSense-enabled connectors.
-
Learn how to exploit DataSense Perceptive Flow Design.
-
Learn how to use the DataSense Explorer to preview to contents of the message
-
See DataSense in action! Examine an example application built using DataSense: Connect with Salesforce Example