ServiceNow Connector
The ServiceNow connector facilitates connections between Mule integration and ServiceNow applications. The ServiceNow connector currently provides access to standard tables in the ServiceNow database, enabling you to perform the following set of operations on them: Insert, Delete Record, Delete Multiple, Update, Get, Get Keys, and Get Record.
Release Notes: ServiceNow Connector Release Notes
Before You Begin
This document assumes that you are familiar with Mule, Anypoint connectors, and the Anypoint Studio interface. To increase your familiarity with Studio, consider completing one or more Anypoint Studio Tutorials. Further, this page assumes that you have a basic understanding of Mule flows and Mule Global Elements.
This document describes implementation examples within the context of Anypoint Studio, Mule runtime’s graphical user interface, and, also includes configuration details for doing the same in the XML Editor.
If you don’t use Anypoint Studio for development, follow the instructions to install the ServiceNow Maven dependencies into your pom.xml file.
For ServiceNow connector v4.0 to function properly, the namespace for locally declared elements must be qualified by the target namespace. Make the following change in your ServiceNow instance to do so:
-
Go to System Properties > Web Services
-
Click Properties
-
De-select the YES|NO box for the elementFormDefault property as shown below.
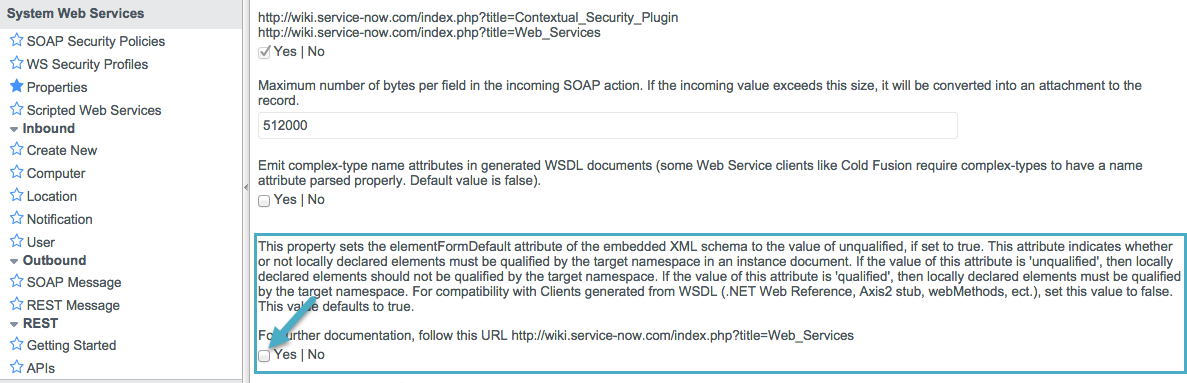
Note that the box is selected by default, setting the elementFormDefault property to true. By de-selecting the box, we set the property to false thereby specifying that locally declared elements must be qualified by the target namespace.
Installing ServiceNow Connector in Anypoint Studio
You can install a connector in Anypoint Studio using the instructions in To Install a Connector from Anypoint Exchange.
However, to use the ServiceNow connector in a production environment, you must have either:
-
An Enterprise license to use Mule
-
A CloudHub Starter, Professional, or Enterprise account
Contact the MuleSoft Sales Team to obtain either of these. (Read more about Installing an Enterprise License.)
Configuration
To use the ServiceNow connector in your Mule application, you must configure:
-
A global ServiceNow element to be used by all the ServiceNow connectors in the application.
-
Parameters of each ServiceNow connector instance in the flow.
Configuring Using the Studio Visual Editor
Follow these steps to create a global ServiceNow configuration in a Mule application:
-
Click the Global Elements tab at the base of the canvas, then click Create.
-
In the Choose Global Type wizard, use the filter to locate and select, ServiceNow, then click O*.
-
Configure the parameters according to instructions below.
Field Description Name
Enter a name for the configuration so it can be referenced later.
Username
Username for connecting to the ServiceNow instance
Password
Password to log into the ServiceNow instance
Service Endpoint
The URL of the ServiceNow instance.
Format:`https://<instancename>.service-now.com` -
Access the Pooling Profile tab to configure any settings relevant to managing multiple connections via a connection pool.
-
Access the Reconnection tab to configure any settings relevant to reconnection strategies that Mule should execute if it loses its connection to ServiceNow.
-
Click OK to save the global connector configurations.
-
Return to the Message Flow tab in Studio.
Follow these steps to configure the parameters of a ServiceNow connector in the flow:
-
Drag the ServiceNow connector onto the canvas, then select it to open the properties editor.
-
Configure the connector’s parameters according to the table below.
Field Description Display Name
Enter a unique label for the connector in your application.
Connector Configuration
Connect to a global element linked to this connector. Global elements encapsulate reusable data about the connection to the target resource or service. Select the global ServiceNow connector element that you just created.
Operation
Select the action this component must perform: Insert, Delete Record, Delete Multiple, Update, Get, Get Keys, and Get Record.
Type
Select the ServiceNow table to act upon. For a complete list, see the ServiceNow Release Notes.
<Operation> Request
From Message: Select this option to define the operation based on the incoming payload.
Create Object manually: Select this option to define the search values manually. Mule provides an editor to facilitate this task. -
Save your configurations.
Configuring Using the XML Editor or Standalone
-
Ensure that you have included the ServiceNow namespaces in your configuration file.
http://www.mulesoft.org/schema/mule/servicenow http://www.mulesoft.org/schema/mule/servicenow/current/mule-servicenow.xsd -
Create a global ServiceNow configuration outside and above your flows, using the following global configuration code.
<servicenow:config name="ServiceNow" username="YOUR_USERNAME" password="YOUR_PASSWORD" serviceEndpoint="YOUR_SERVICENOW_URI"/>Attribute Description name
Enter a name for the configuration so it can be referenced from within the flow.
username
Username for connecting to the ServiceNow instance.
password
Password to log into the ServiceNow instance.
serviceEndpoint
The URL of the ServiceNow instance.
Format: `https://<instancename>.service-now.com ` -
Build your application flow, then add a ServiceNow connector using one of the following operations.
Operation Description Delete multiple records from the targeted table by example values.
Delete a record from the targeted table by supplying its sys_id.
Query a single record from the targeted table by sys_id and return the record and its fields.
Query the targeted table by example values and return a comma delimited list of sys_id.
Query the targeted table by example values and return all matching records and their fields.
Creates a new record for the targeted table.
Updates a existing record in the targeted table in the URL, identified by the mandatory sys_id field.
-
Follow the links in the table above to access detailed configuration reference for each of these operations.
Example Use Case
As a ServiceNow administrator, insert a user record in the ServiceNow application, and if the user belongs to development department, create a request for a Blackberry phone for the user.
Studio Visual Editor
-
Drag an HTTP connector into a new flow. Open the connector’s properties editor. Set the exchange pattern to
one-wayand the Path toonboard.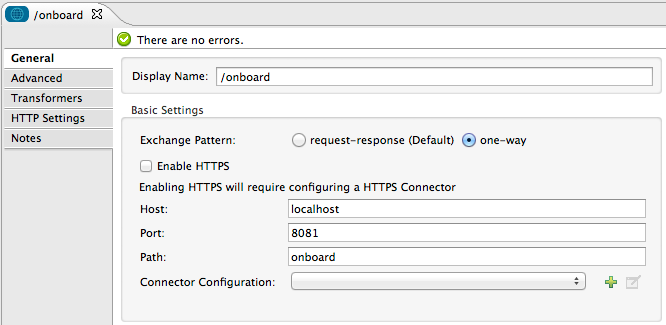
-
The new flow is now reachable through the path
http://localhost:8081/onboard. As the exchange pattern is set to one-way, no response message will be returned to the requester. -
Add a Set Payload transformer after HTTP endpoint to process the message payload.
-
Configure the Set Payload transformer according to the table below.
Field Value XML Display Name
User info
doc:name="User info"Value
Note: Copy the lines below and concatenate into a continuous statement
before adding to Anypoint Studio:#[['fname':message.inboundProperties['fname'], 'lname':message.inboundProperties['lname'], 'email':message.inboundProperties['email'], dept':message.inboundProperties['dept']]]`
value="# [['fname':message.inboundProperties['fname'],
'lname':message.inboundProperties['lname'],
'email':message.inboundProperties['email'],
'dept':message.inboundProperties['dept']]]"
With the above configuration, the transformer is set to accept browser query parameters in the following format:
http://localhost:8081/onboard?fname=<user’s first name> &lname=<user’s last name> &email= <user’s email address>&dept=<department of the user> -
Add a Variable transformer to preserve the user’s first name and last name from the message payload.
Configure the transformer as follows: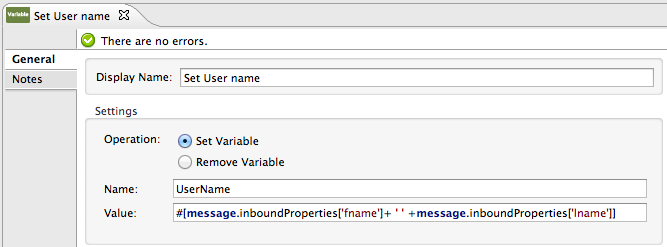
-
Drag a ServiceNow connector into the flow to create a ServiceNow user with the message payload.
-
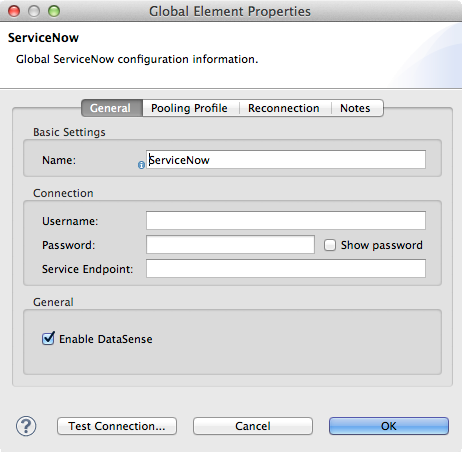
Add a new Global element by clicking the plus sign next to the Connector Configuration field.
-
Configure this Global Element according to the table below (Refer to Configuration for more details).
Field Description Name
Enter a unique label for this global element to be referenced by connectors in the flow.
Username
Enter a Username for connecting to the ServiceNow instance.
Password
Enter the user password.
ServiceNow Endpoint
Enter the URL of your ServiceNow server.
The format of the ServiceNow URL is:https://<instancename>.service-now.com -
Click Test Connection to confirm that Mule can connect with your ServiceNow instance. If the connection is successful, click OK to save the configurations of the global element. If unsuccessful, revise or correct any incorrect parameters, then test again.
-
Back in the properties editor of the ServiceNow connector, configure the remaining parameters according to the table below.
Field Value Display Name
Insert System User (or any other name you prefer)
Config Reference
ServiceNow (Enter name of the global element you have created)
Operation
Insert
Type
User Management -→ User (SYS_USER)
Insert Request
Select the
From Messageoption -
Drag a DataMapper transformer between the Variable transformer and the ServiceNow connector, then click it to open its properties editor.
-
Configure the Input properties of the DataMapper according to the steps below.
-
In the Input type, select Map<k,v>, then select User Defined.
-
Click Create/Edit Structure.
-
Enter a name for the Map, then select Element for Type.
-
Add the child fields according to the table below.
Name Type dept
String
email
String
lname
String
fname
String
-
-
The Output properties are automatically configured to correspond to the ServiceNow connector.
-
Click Create Mapping, then drag each input data field to its corresponding output ServiceNow field. Click the blank space on the canvas to save the changes.
-
Add another ServiceNow connector to the flow.
-
In the Connector Configuration field, select the global ServiceNow element you have created.
-
Configure the remaining parameters according to the table below.
Field Value Display Name
Create a Request (or any other name you prefer)
Config Reference
Enter the name of the global element you have created
Operation
Insert
Type
Service Catalog -→ Requested Item (SC_REQ_ITEM)
Insert Request
Select Create Manually, then click the … button next to the option. On the Object Builder window, find requestedFor:String field and enter the following value:
#[flowVars['UserName']] -
Add a Variable transformer, then configure it according to the table below.
Field Value Display Name
Set Request ID
Operation
Set Variable
Name
Request ID
Value
#[payload.number] -
Add a ServiceNow connector into the flow to create a ServiceNow request item for the user.
-
In the Connector Configuration field, select the ServiceNow global element you created.
-
Configure the remaining parameters according to the table below.
Field Value Display Name
Assign the Requested Item to User (or any other name you want to give to the connector)
Config Reference
Enter the name of the global element you have created
Operation
Insert
Type
Service Catalog -→ Requested Item (SC_REQ_ITEM)
Insert Request
Select Create Manually, then click the button next to it. On the Object Builder window, do the following:
Enter
Blackberryin CatItem: String fieldEnter
#[flowVars['RequestID']]in request:String field -
Save and run the project as a Mule Application.
-
From a browser, navigate to
http://localhost:8081/onboard `and enter the user’s first name, last name, email address, and department in the form query parameters:

`http://localhost:8081/onboard?fname=<user’s first name>&lname=<user’s last name> &email= <user’s email address>&dept=<department of the user> -
Mule performs the query and creates the user record in ServiceNow, then assigns Blackberry phone if the user is a developer.
XML Editor
-
Add a servicenow:config global element to your project, then configure its attributes according to the table below (see code below for a complete sample).
<servicenow:config name="ServiceNow" username="<user>" password="<pw>" serviceEndpoint="<endpoint_URL>" doc:name="ServiceNow"/>Attribute Value name
ServiceNow
doc:name
ServiceNow
username
<Your username>
password
<Your password>
serviceEndpoint
<the URL of your ServiceNow instance>
-
Create a Mule flow with an HTTP endpoint, configuring the endpoint according to the table below (see code below for a complete sample).
<http:inbound-endpoint exchange-pattern="one-way" host="localhost" port="8081" doc:name="/onboard" path="onboard"/>Attribute Value exchange-pattern
one-way
host
local host
port
8081
path
onboard
doc:name
/onboard
-
After the HTTP endpoint, add a set-payload transformer to set the message payload in the flow.
<set-payload value="#[['fname':message.inboundProperties['fname'],'lname':message.inboundProperties['lname'],'email':message.inboundProperties['email'],'dept':message.inboundProperties['dept']]]" doc:name="Set Payload"/>Attribute Value value
#[['fname':message.inboundProperties['fname'],'lname':message.inboundProperties['lname'],'email':message.inboundProperties['email'],'dept':message.inboundProperties['dept']]]doc:name
Set Payload
-
Add a set-variable element in the flow to preserve the user name from the payload.
<set-variable variableName="UserName" value="#[message.inboundProperties['fname']+ ' ' +message.inboundProperties['lname']]" doc:name="Set User name"/>Attribute Value variableName
UserName
value
#[message.inboundProperties['fname']+ ' ' +message.inboundProperties['lname']]doc:name
Set User name
-
Add the servicenow:insert element to the flow. Configure the attributes according to the table below.
<servicenow:insert config-ref="ServiceNow" type="SYS_USER" doc:name="Insert System User">
      <servicenow:insert-request ref="#[payload]"/>
</servicenow:insert>
Attribute Value config-ref
ServiceNow
type
User Management -→ User (SYS_USER)
doc:name
Insert System User
ref
"#[payload]"
-
Add a DataMapper element between the Set Payload transformer and the ServiceNow connector to pass the message payload to ServiceNow.
<data-mapper:transform config-ref="Map_To_Map" doc:name="Payload to Insert User"/>Attribute Value config-ref
Map_To_Map
doc:name
Payload to Insert User
-
You must configure the DataMapper element through Studio’s Visual Editor. Switch the view to Message Flow view, then click the DataMapper element to set its properties.
-
In the Input type, select Map<k,v>, then select User Defined.
-
Click Create/Edit Structure.
-
Enter a name for the Map, then select Element for Type.
-
Add the child fields according to the table below.
Name Type dept
String
email
String
lname
String
fname
String
-
-
Add a servicenow:insert element to create a request for an item in ServiceNow. Configure the attributes according to the table below.
<servicenow:insert config-ref="ServiceNow" type="SC_REQUEST" doc:name="Create a Request">
      <servicenow:insert-request>
          <servicenow:insert-request key="requestedFor">#[flowVars['UserName']]</servicenow:insert-request>
      </servicenow:insert-request>
</servicenow:insert>
Attribute Value config-ref
ServiceNow
type
Service Catalog -→ Request (SC_REQUEST)
doc:name
Create a Request
key
requestedFor
-
Add a set-variable element to preserve the ServiceNow request ID.
<set-variable variableName="RequestID" value="#[payload.number]" doc:name="Set Request Id"/>Attribute Value variableName
RequestID
value
#[payload.number]doc:name
Set Request Id
-
Add servicenow:insert to assign the specified catalog item against the request ID.
<servicenow:insert config-ref="ServiceNow" type="SC_REQ_ITEM" doc:name="Assign a requested item with user">
      <servicenow:insert-request>
          <servicenow:insert-request key="request">#[flowVars['RequestID']]</servicenow:insert-request>
          <servicenow:insert-request key="catItem">Blackberry</servicenow:insert-request>
      </servicenow:insert-request>
</servicenow:insert>
Attribute Value config-ref
ServiceNow
type
Service Catalog -→ Requested Item (SC_REQ_ITEM)
doc:name
Assign a requested item with user
key
"request">#[flowVars['RequestID']]key
"catItem">Blackberry
Example Code
<mule xmlns:tracking="http://www.mulesoft.org/schema/mule/ee/tracking" xmlns:json="http://www.mulesoft.org/schema/mule/json" xmlns:servicenow="http://www.mulesoft.org/schema/mule/servicenow" xmlns:data-mapper="http://www.mulesoft.org/schema/mule/ee/data-mapper" xmlns:http="http://www.mulesoft.org/schema/mule/http" xmlns="http://www.mulesoft.org/schema/mule/core" xmlns:doc="http://www.mulesoft.org/schema/mule/documentation" xmlns:spring="http://www.springframework.org/schema/beans" xmlns:xsi="http://www.w3.org/2001/XMLSchema-instance" xsi:schemaLocation="http://www.springframework.org/schema/beans http://www.springframework.org/schema/beans/spring-beans-current.xsd
http://www.mulesoft.org/schema/mule/core http://www.mulesoft.org/schema/mule/core/current/mule.xsd
http://www.mulesoft.org/schema/mule/http http://www.mulesoft.org/schema/mule/http/current/mule-http.xsd
http://www.mulesoft.org/schema/mule/servicenow http://www.mulesoft.org/schema/mule/servicenow/current/mule-servicenow.xsd
http://www.mulesoft.org/schema/mule/ee/data-mapper http://www.mulesoft.org/schema/mule/ee/data-mapper/current/mule-data-mapper.xsd
http://www.mulesoft.org/schema/mule/json http://www.mulesoft.org/schema/mule/json/current/mule-json.xsd
http://www.mulesoft.org/schema/mule/ee/tracking http://www.mulesoft.org/schema/mule/ee/tracking/current/mule-tracking-ee.xsd">
    <data-mapper:config name="Map_To_Map" transformationGraphPath="map_to_map.grf" doc:name="Map_To_Map"/>
    <servicenow:config name="ServiceNow" username="<user>" password="<pw>" serviceEndpoint="<endpoint>" doc:name="ServiceNow"/>
    <flow name="onboarding-example" doc:name="onboarding-example">
        <http:inbound-endpoint exchange-pattern="one-way" host="localhost" port="8081" doc:name="/onboard" path="onboard"/>
        <set-payload value="#[['fname':message.inboundProperties['fname'],'lname':message.inboundProperties['lname'],'email':message.inboundProperties['email'],'dept':message.inboundProperties['dept']]]" doc:name="Set Payload"/>
        <set-variable variableName="UserName" value="#[message.inboundProperties['fname']+ ' ' +message.inboundProperties['lname']]" doc:name="Set User name"/>
        <data-mapper:transform config-ref="Map_To_Map" doc:name="Payload to Insert User"/>
        <servicenow:insert config-ref="ServiceNow" type="SYS_USER" doc:name="Insert System User">
            <servicenow:insert-request ref="#[payload]"/>
        </servicenow:insert>
        <servicenow:insert config-ref="ServiceNow" type="SC_REQUEST" doc:name="Create a Request">
            <servicenow:insert-request>
                <servicenow:insert-request key="requestedFor">#[flowVars['UserName']]</servicenow:insert-request>
            </servicenow:insert-request>
        </servicenow:insert>
        <set-variable variableName="RequestID" value="#[payload.number]" doc:name="Set Request Id"/>
        <servicenow:insert config-ref="ServiceNow" type="SC_REQ_ITEM" doc:name="Assign a requested item with user">
            <servicenow:insert-request>
                <servicenow:insert-request key="request">#[flowVars['RequestID']]</servicenow:insert-request>
                <servicenow:insert-request key="catItem">Blackberry</servicenow:insert-request>
            </servicenow:insert-request>
        </servicenow:insert>
    </flow>
</mule>
See Also
-
Learn more about working with Anypoint Connectors.