Web Service Consumer Connector
When developing applications with Mule, users often need to be able to consume a SOAP Web service to acquire data from an external source. In the best case scenario, you can use an existing Anypoint Connector in your Mule application to connect to a specific service provider, such as Zuora or Avalara. However, where no service-specific connector exists to facilitate the connection, the quickest, easiest way to consume a Web service from within a Mule application is to use the Web Service Consumer.
Using the information contained in a service’s WSDL, this connector enables you to configure a few details in order to establish the connection you need to consume a service from within your Mule application. Simply identify the location of the Web service’s WSDL file, then ask the Web Service Consumer to configure itself from the WSDL – host, port, address.
Before this component existed in Studio, you may have configured an HTTP connector and SOAP Component in a Mule flow to be able to consume a Web service; now you can simply insert the Web Service Consumer connector into your flow. Requiring less effort to configure. The Web Service Consumer also offers extra functionality to help you build out your application:
-
Used in conjunction with a DataMapper transformer, the Web Service Consumer makes use of DataSense functionality to acquire information about the expected format and structure of the input or output, so as to eliminate the guesswork in trying to figure out what to send to, and what you’ll receive from, a SOAP Web service
-
Used in conjunction with a DataMapper transformer, you can visually map the input you receive (SOAP header or body) into another data format or structure for further processing
-
Secure your Web service requests using the functionality embedded within the Web Service Consumer to add a username token to requests, and/or WS-Security timestamp
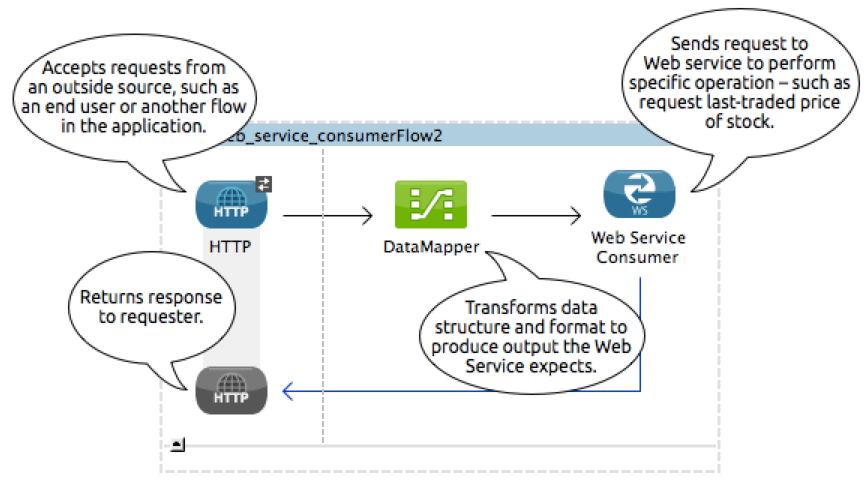
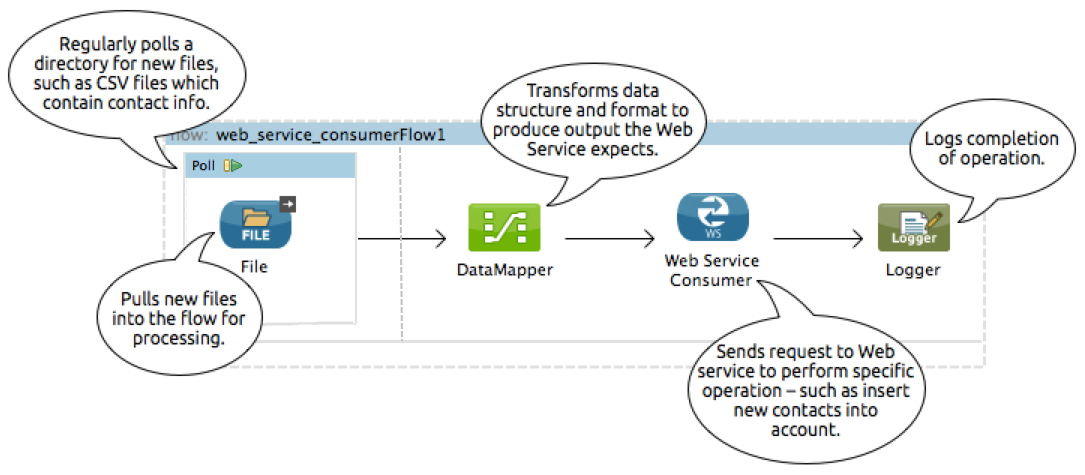
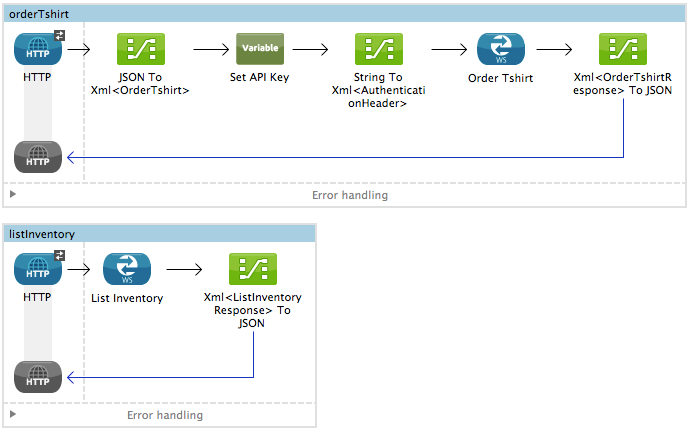
For example, imagine you wish to build an application in which you need to gather information about the last price at which a stock traded. After accepting an end-user request, you need to consume an external SOAP Web service that checks for the most recent trade of a particular stock, and the price at which it sold, then return a response. Such an application could make use of the Web Service Consumer to consume the stock quote information, then uses a DataMapper to map the results to a format that could be returned to the end-user. See first figure below; a second example follows below it.
 |
The component formerly known as the SOAP Connector is now known as the CXF Component. It should not be confused with the Web Service Consumer. |
|---|
Before You Begin
This document assumes that you are familiar with Anypoint Studio; review the chapter on Anypoint Studio Essentials to learn more about developing with Mule ESB’s graphical user interface. This document also assumes you are familiar with the Anypoint DataMapper transformer, Global Elements, and DataSense.
Installation
You can install a connector in Anypoint Studio using the instructions in To Install a Connector from Anypoint Exchange.
Limitations
-
The Web Service Consumer interfaces only with SOAP Web services, not REST APIs.
-
Within Mule, the Web Services Consumer is available for use only in conjunction with the following connectors:
-
FTP
-
File
-
HTTP
-
JMS
-
SFTP
-
HTTPS
Basic Anatomy
To use a Web Service Consumer in your Mule application, you must carry out three tasks:
-
Add the WSDL file of the service you want to consume to your Mule project
-
Embed a Web Service Consumer element in your Mule flow and configure it to define the operation it will perform, and identify the Global Web Service Consumer element it will reference
-
Configure the Global Web Service Consumer element in which you reference the service’s WSDL, enable DataSense, and apply any security settings that the service provider demands
To really take advantage of the design-time power of the Web Service Consumer, consider using it in conjunction with the following Mule features:
-
DataSense: When enabled, DataSense uses information in the WSDL to automatically extract metadata about the data structure and format a SOAP Web service delivers or expects. When this functionality is enabled (in the Global Web Service Consumer element), Mule does the heavy lifting of discovering the type of data that is sent or expected by the service.
-
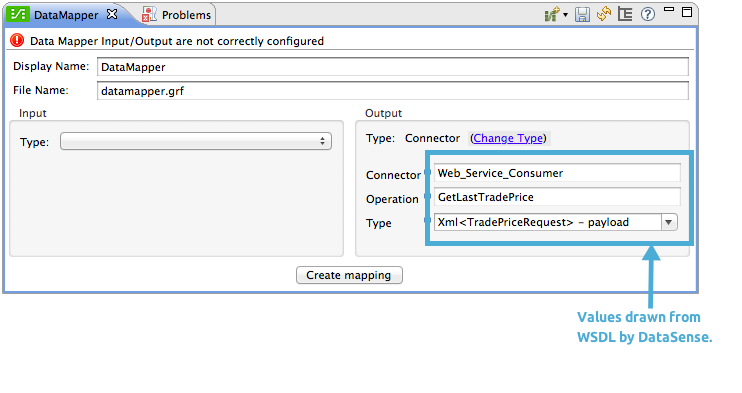
DataMapper transformer: When used in conjunction with a DataSense-enabled Web Service Consumer, DataMapper can automatically extract payload or header metadata from the service that you can map and transform through a visual interface. For example, if you configure a Web Service consumer in your application, then drag a DataMapper after it, the DataMapper uses the information that DataSense extracted to pre-populate the input values for mapping, so that you only need to confirm (or adjust) the selections, then proceed to mapping to your desired output. In other words, DataSense makes sure that DataMapper knows the data format and structure with which it must work so you don’t have to figure it out manually.
For more information on best design-time practices with DataSense and DataMapper, consult the DataSense documentation.
Configuring Web Service Consumer
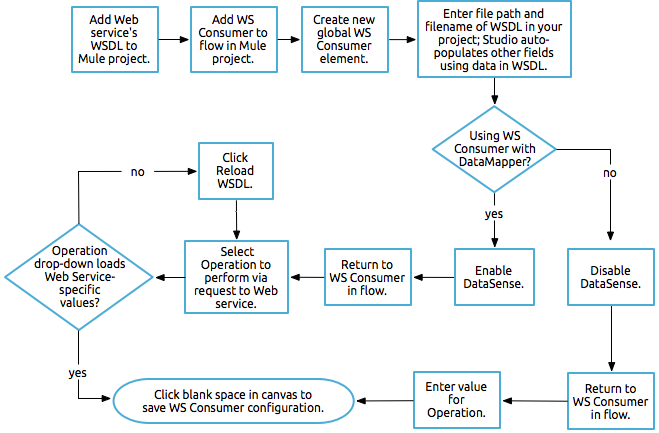
To prepare an application to use a Web Service as in one of the examples above, you must first add the Web service’s WSDL to your Mule project, then configure, at minimum, the required parameters for the Web Service Consumer element and a Global Web Service Consumer element. The diagram and section below describe how to address these requirements.
-
Begin by acquiring the WSDL file for the SOAP Web service you intend to consume, or identifying the URL of the WSDL.
-
If you are using a WSDL file, copy the file into the` src/main/resources` folder of your Studio project. (You can drag and drop the file to copy it to the folder.) If using a URL, there is no need to copy anything to your Studio project.
-
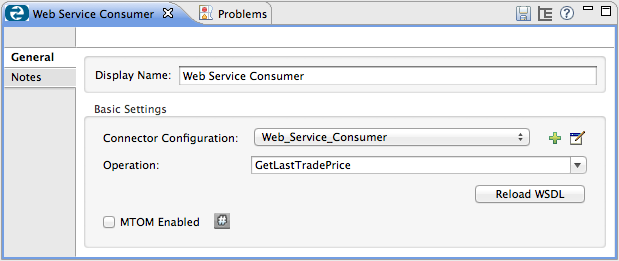
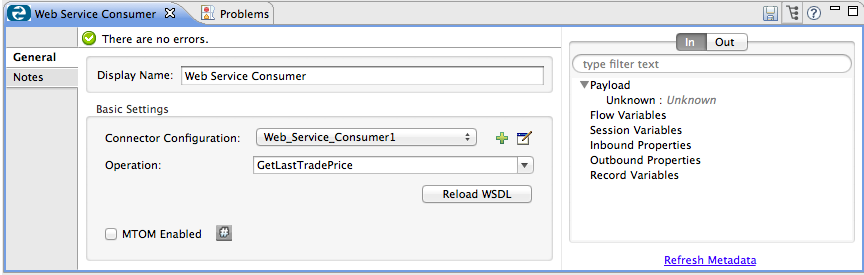
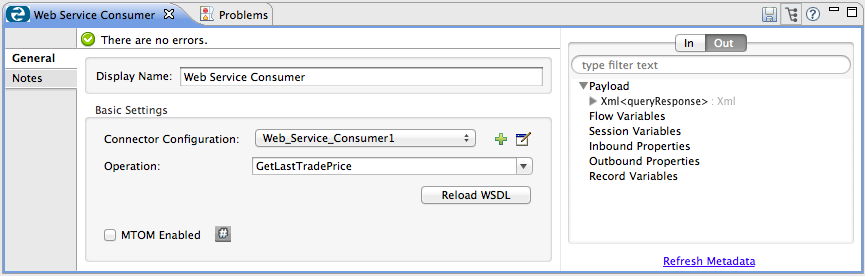
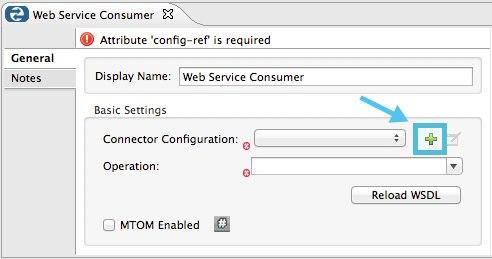
Drag a Web Service Consumer connector into a flow in your application. Click the Web Service Consumer icon to open its Properties Editor, then change the default value of the Display Name of the connector, if you wish.
-
Define the Global Configuration of the connector: click the plus sign next to the Global Configuration field.
-
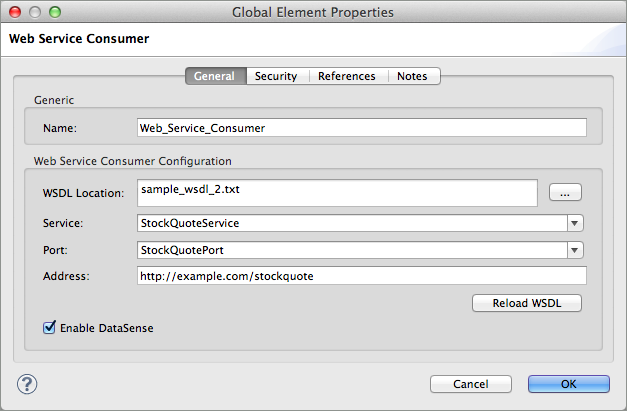
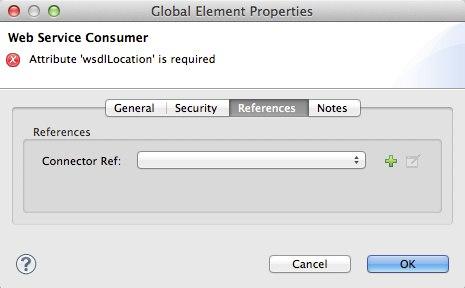
In the window that opens, begin by entering a value in the WSDL Location field. Populate this field first, with either the WSDL’s URL, or the filepath and filename of the WSDL file you copied into the
src/main/resourcesfolder of your project. Upon filling this field, you five Studio the opportunity to read the contents of the WSDL and automatically populate the remaining empty fields —Service,PortandAddress— using information contained in the WSDL file. Alternatively, you can manually populate these fields with the appropriate information about the Web service.
-
Confirm that the Enable DataSense box is checked, then click OK to save.
-
Notice that Studio auto-populates the following fields in the Properties Editor of the Web Service Consumer element in your flow:
-
Global Configuration with the name of the Global Web Service Consumer you just created
-
Operation with the name of an operation the Web service supports for its consumers.
-
-
Adjust the Operation of the Web Service Consumer, if you wish (and if the SOAP Web service indeed offers more than one operation), then click inside the canvas to auto-save your configuration.
-
Begin by acquiring the WSDL file for the SOAP Web service you intend to consume, or identifying the URL of the WSDL.
-
If you are using a WSDL file, copy the file into the` src/main/resources` folder of your Studio project. (You can drag and drop the file to copy it to the folder.) If using a URL, there is no need to copy anything to your Studio project.
-
Above all the flows in your application, add a global ` ws:consumer-config ` element to your application. Configure its attributes according to the code sample below to define how to connect to the Web service you intend to consume. For a full list of elements, attributes and default values, consult Web Service Consumer Reference.
-
Add a ` ws:consumer ` element to a flow in your application. Configure its attributes according to the code sample below to define the global Web Service Consumer to reference, and the operation to perform with a request to the Web service. For a full list of elements, attributes and default values, consult Web Service Consumer Reference.
Web Service Consumer and DataMapper
As stated above, when used in conjunction with a DataSense-enabled Web Service Consumer, DataMapper can automatically extract payload or header metadata that you can use to map and or transform to a different data format or structure through a visual interface. When you have a configured, DataSense-enabled Web Service Consumer in your flow, you can drop a DataMapper next to it – preceding or following it – and DataMapper automatically extracts the information that DataSense collected from the WSDL about the expected format and structure of the message.
-
If DataMapper follows the fully-configured Web Service Consumer, DataMapper pre-populates its Input values.
-
If DataMapper precedes the fully-configured Web Service Consumer, DataMapper pre-populates its Output values (see below). To take advantage of the Web Service Consumer-DataSense-DataMapper magic, be sure to configure these elements in the following order:
-
The Global Web Service Consumer element, with DataSense enabled
-
The Web Service Consumer connector in a flow in your application, which references the Global Web Service Consumer connector
-
The DataMapper transformer, dropped before or after the Web Service Consumer connector in your flow
-
Then, simply supply the DataMapper’s missing input or output values to "glue the pieces together".
Changing Element Type
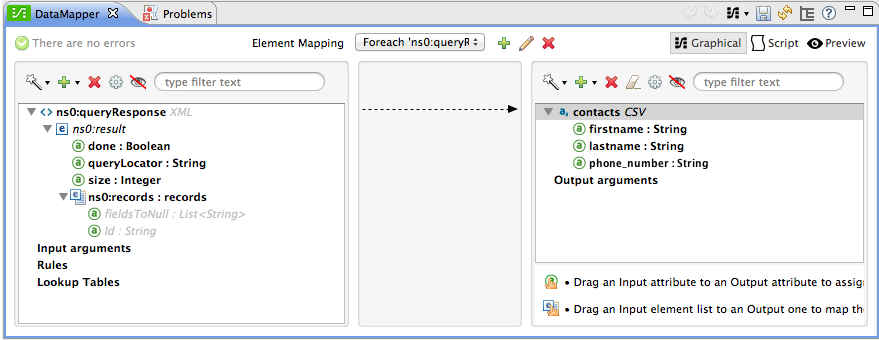
Where the Web Service Consumer returns sObjects that are abstract types, you can adjust the type of element in your mapping to a different element which extends from the sObject.
For example, imagine you wish to map specific output – name and phone number, perhaps – from a Web service’s response to a CSV file. However, a Web service response might return an abstract type such as "records" within which is buried the name and phone number information you wish to map to output values. To access these buried fields, you can change the element type of the input data to select a nested object, such as "Contact" which gives you access to fields such as "FirstName", "LastName" and "phone number" that you can map to the corresponding output fields in your CSV file.
-
First, be sure you have configured a DataSense-enabled Web Service Consumer in your flow, set a DataMapper to follow it, and created your mapping. The example below maps a Web service response to a CSV file with three fields.
-
Because it is impossible to properly map "records" (on the left) to the three fields in the CSV file (on the right), you must change the element type of the records sObject. To do so, right-click the sObject, then select Change Element Type….
-
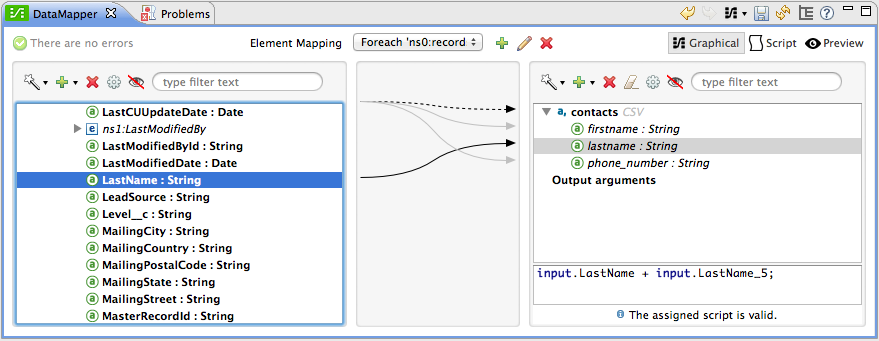
In the dialog box that appears, select a new element type, then click OK; the example would select "Contacts".
-
DataMapper adjusts the information in the Input panel to present the fields available within the selected element type; in the case of the example, it presents the fields related to Contact information.
-
Proceed to map the input values to the output values in DataMapper.
Adding Custom Headers
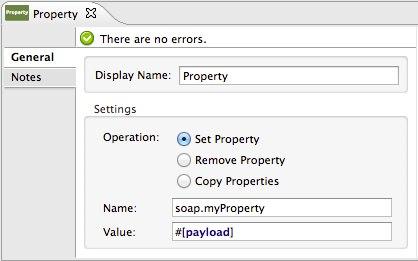
SOAP headers should be created as outbound properties. You can do that through the Property transformer
|
Outbound properties that begin with a soap. prefix will be treated as SOAP headers and ignored by the transport. All properties that aren’t named with a soap. prefix will be treated as transport headers (by default, the WSC uses the HTTP transport). |
|---|
|
When configuring the header manually, the value you pass should have the structure of an XML element, it shouldn’t be a plain pair of key and value. Using a set property element, for example, the value of the property must contain the enclosing XML tags, like so: The example above works, the one below doesn’t: |
|---|
Preparing and Mapping SOAP Headers
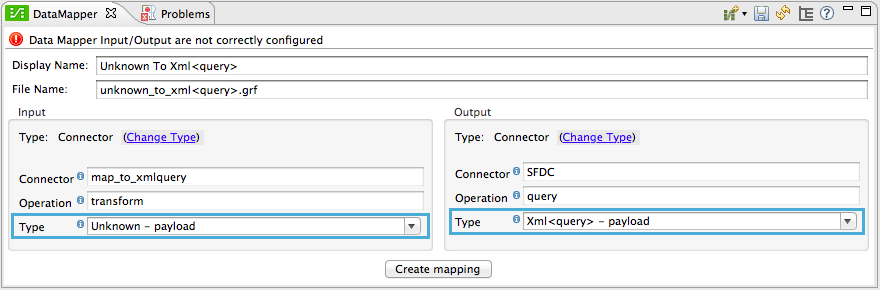
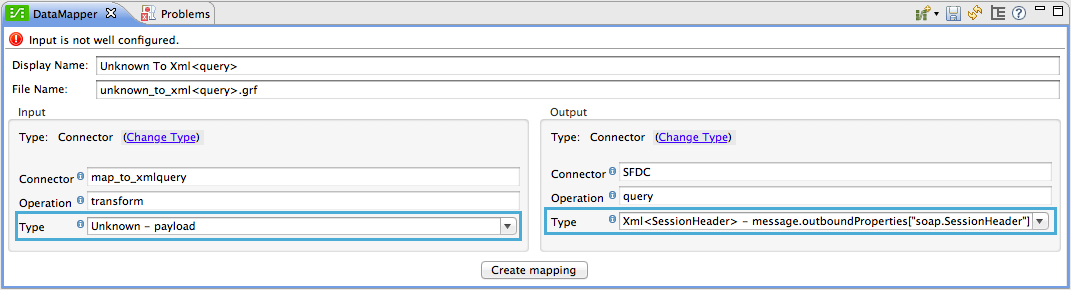
When used in conjunction with a Web Service Consumer, a DataMapper offers you the option of mapping and transforming a message’s payload, properties or variables via the Type attribute. Importantly, you can use the value of Type to indicate information that DataMapper should map from the message to the SOAP header or SOAP body.
-
First, be sure you have configured a DataSense-enabled Web Service Consumer in your flow and set a DataMapper to follow it. Click the DataMapper icon in the canvas to open its Properties Editor.
-
Adjust the value of the Type fields in the Input and Output panels to map as desired. Note that any property with a value of
soap.indicates that the the Type is a SOAP header. -
Click Create Mapping, then map the input values to output values as desired.
| Whenever you want to map data to or from both the SOAP header and the SOAP body, you must use two individual DataMapper transformers. Use one DataMapper to map the headers, and the other DataMapper to map the body. |
Web Service Consumer and DataSense Explorer
Use the DataSense Explorer feature in Studio to gain design-time insight into the state of the message payload, properties, and variables as it moves through your flow. The DataSense Explorer is mostly useful in understanding the content of a message before it encounters a Web Service Consumer, and after it emerges from the connector so as to better understand the state of the data your application is working with.
The DataSense Explorer in the example below offers information about the Payload, Variables, Inbound Properties and Outbound Properties contained that comprise the message object at the moment the message encounters the Web Service Consumer. Use the In-Out toggle at the top of the DataSense Explorer to view metadata of message as it arrives at, or leaves the message processor.
Securely Connecting to a SOAP Web Service
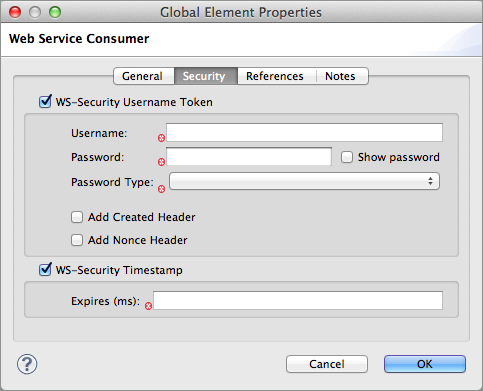
Depending upon the level of security employed by a SOAP Web service, you may need to correspondingly secure the requests your Web Service Consumer sends. In other words, any calls you send to a Web service have to adhere to the Web service provider’s security requirements. To comply with this requirement, you can configure security settings on your Global Web Service Consumer connector.
-
Within the Global Web Service Consumer element’s Global Element Properties panel, click the Security tab.
-
Based on the security requirements of the Web service provider, select to apply Username Token security, or a WS-Security Timestamp or both.
-
Enter values in the required fields. For a full list of elements, attributes and default values, consult Web Service Consumer Reference.
-
Click OK to save your security settings.
Add child elements to the global ` ws:consumer-config ` element you configured in your application. Configure the child elements' attributes according to the code sample below. For a full list of elements, attributes and default values, consult Web Service Consumer Reference.
Using Basic Authentication and SSL
If the web service you’re connecting to requires basic authentication, you can easily provide your username and password as part of the URL when you reach out to it.
The URL should follow the structure below:
In the Web Service Consumer’s Global Element, add a reference to an http-request-config element:
-
Enter the Web Service Consumer’s global configuration element
-
Open the References tab
-
Create a new reference by clicking the green plus sign
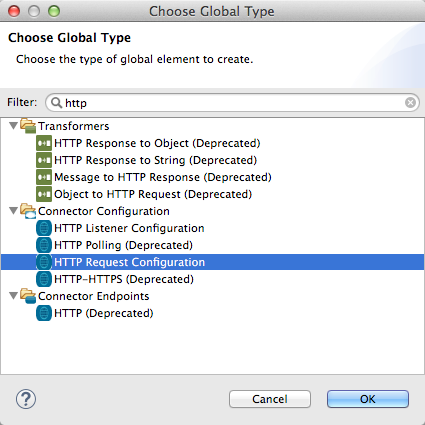
By default, the WSC consumer runs over a default configuration for the HTTP Outbound Endpoint. If you need it to instead run over a configuration of the connector that uses HTTPS (or an HTTP configuration that is different from the default) follow the steps below:
-
Click the Global Elements tab, below the canvas and create a new Global Element.

-
For the Global Element type, select HTTP Request Configuration.
-
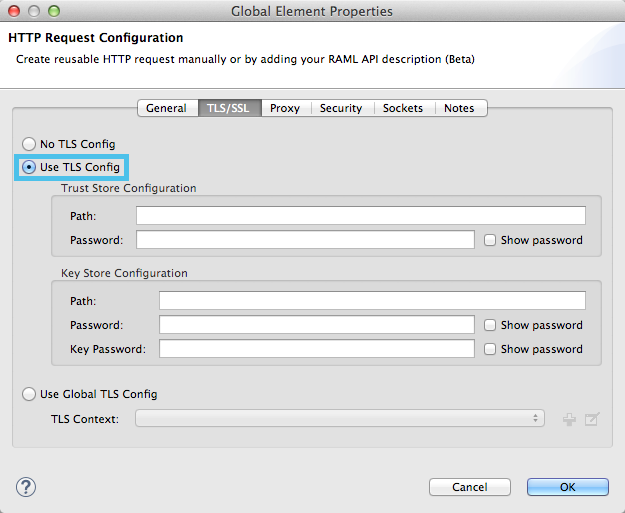
Complete the required fields in the General tab (host and port)
-
Then select the TLS/SSL tab and configure the fields related to the HTTPS authentication.
-
In your instance of the Web Service Consumer in your flow, click on the green plus sign next to Connector Configuration.
-
In the References tab, select your newly created HTTPS Global Element for the Connector Ref field.
-
Add an HTTP Connector global element in your project, configure it with the necessary security attributes.
-
In your
ws:consumer-configelement, include aconnectorConfigattribute to reference to this HTTP connector configuration element.
Referencing the Deprecated HTTP Transport
In order to set alternate HTTP settings, instead of referencing an instance the new HTTP Connector, you can reference an instance of the deprecated HTTP transport and accomplish the same. To add this reference, add a connector-ref attribute to the WSC configuration element. The connectorConfig and connector-ref attributes are mutually exclusive, and both optional.
If none of the two reference attributes are specified, a default instance of the new HTTP connector is used. For backwards compatibility, you can change this behavior and make an instance of the deprecated HTTP Transport the default configuration. There’s a global configuration property that has been added in Mule runtime 3.6, that allows you to change this default behavior:
The default value for this attribute is false. When setting this flag to true, Mule falls back to the deprecated HTTP transport to resolve URIs when no transport/connector is specified.
See Also
-
Learn more about how to use the DataMapper transformer.
-
Learn how to publish a REST API in Mule using APIkit.
-
Access the Mule Fundamentals to learn the basics.