About Anypoint Connector DevKit

| DevKit is compatible only with Studio 6 and Mule 3. To build Mule 4 connectors, see the Mule SDK documentation. |
The MuleSoft Anypoint™ Connector DevKit provides the following features to help you develop or maintain a connector:
-
Visual design and implementation using Anypoint Studio with an Eclipse-oriented interface that helps simplify and speed up development
-
Maven support for development and building
-
Connector development and packaging tools
-
Authentication support for multiple types of authentication like OAuth and Basic Authentication
-
DataSense support to acquire metadata from endpoints
-
Extensive testing capabilities
-
Examples, training, and support to simplify startup and solve issues
-
Provides Batch, query pagination, and DataSense Query Language support
What is a Connector?
A connector is software that provides a connection between a Mule flow and an external resource. The resource can be any source of content, such a database, protocol, or API. You can create a connector with the Anypoint Connector DevKit and the Anypoint Studio IDE. A connector is written in Java version 6 or 7. Connectors access web resources using REST, SOAP, or the Java SDK.
Anypoint Connector DevKit provides the tools and interfaces for building custom connectors. As reusable components that hide API complexity from the integration developer, custom connectors facilitate integration with SaaS and on-premise Web services, applications, and data sources. Connectors that you build using Anypoint Studio and in Mule ESB runtime environments, function as extensions of the core product.
Prerequisites
-
Before creating a connector, explore the MuleSoft connectors to see if one meets your needs.
-
Download and install Java version 6 or 7 and Apache Maven.
-
Get access to sandbox environment for testing your connector with the target resource before taking your connector into production.
Connector Architecture
Connectors operate within MuleSoft flows:
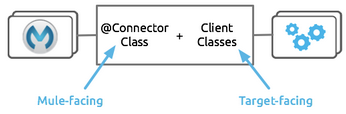
A connector has two sides. The Mule-facing side communicates with a resource’s target-facing client side to enable content to travel between the Mule flow and the resource.
Mule-Facing Functionality
From the Mule-facing side, a connector consists of:
-
A main Java class. Java code that you annotate with the
@Connectorattribute. -
Connector attributes. Properties of the
@Connectorclass that you annotate with the@Configurableattribute. See the Annotation Reference for information about Anypoint Connector DevKit annotations. -
Methods. Functionality that you annotate with the
@Processorattribute.
Additional annotations define authentication-related functionality and connection management, and to control the layout of the Anypoint Studio dialogues for the connector. The data model and exceptions that either raise or propagate are also Mule-facing classes.
Anypoint DevKit generates a skeleton connector when you create your Anypoint Connector project in Studio. The skeleton connector includes the @Connector class, the @Configurable attributes, the @Processor methods, and authentication logic to build out your connector. During the build process, the annotation processor extends your code with functionality to integrate with Mule.
Target-Facing Functionality
The target facing or client facing side of a connector depends on the client technology that enables access to the resource. This functionality consists of a class library and one or more classes that Mule-facing @Connector class uses to access client functionality. This functionality is called the client class.
The client class in turn generally depends on other classes to actually implement calls to the target. Depending on your target, some of these classes may be generated or provided for you. For example, if you have a Java client library, or are working with a SOAP or REST service, most of the client code is implemented there. In other cases, you have to write this code yourself.
Programming
Anypoint Connector DevKit lets you build connectors that don’t exist. Before creating a connector, check [Connectors] for available connectors. The Connectors page also lists Community open source connectors that let you contribute to the growing community of public connector development.
Connector Data Model
The data model for the connector consists of the objects passed into and out of the exposed operations. While many Web services accept and return XML or JSON data, a proper Mule connector must translate the data format the client uses into Java objects - either POJOs or key-value maps, which represent the data objects sent to, and returned from, the target. (Returning raw XML or JSON responses to Mule is one marker for an immature, improperly implemented connector.)
REST Versus SOAP
REST simplifies access to HTTP using POST, GET, PUT, and DELETE calls to provide access to creating, getting, putting, and deleting information on a resource.
DevKit provides a set of annotations called @RestCall annotations that helps building a Connector for a RESTful API.
SOAP is a traditional means of communicating with a resource and requires a WSDL file, which is an XML file that specifies all aspects of a Java class’s structure, methods, properties, and documentation. SOAP is an industry standard with tools for governance, building, and schema information.
DevKit provides a tool that helps building a connector using a WSDL file.
Creating a Connector
To create a connector:
-
Set up your development environment - Install Java JDK version 6, Apache Maven, and Anypoint Studio to build and test your connector. You can develop a connector using Windows, Mac, or Linux.
-
Create an Anypoint project - Set up Anypoint Studio and install the connector plugin.
-
Determine resource access - Each resource has a different access method, such as REST, SOAP, FTP, or the Java SDK features.
-
Choose an authentication mechanism - Mule supports OAuth V1 or V2, basic authentication using a username and password, or basic using authentication protocols such as API Key, SAML, NTLM, Kerberos, or LDAP.
-
Choose the connector’s data model - Models can be static Java objects or dynamic objects. You can use DataSense - Determine what information the target resource expects.
-
Add connector @ attribute annotations - Create code for your connector containing the @ attribute that Mule uses to designate the important parts of your connector.
-
Code tests - Tests can be unit tests, functional tests, and Studio interoperability tests.
-
Document your connector -MuleSoft provides a template that helps you fill in the blanks to create documentation to help your staff and help others understand the features and use of your connector.
Anypoint Connector DevKit Features
Anypoint Connector DevKit supports:
Authentication Types
-
Other Authentication schemes: Authentication Methods
API Types
Anypoint Platform
Connector Development Lifecycle
More Information
| Document | Description |
|---|---|
Provides step to follow from set up to packaging a connector. |
|
How to use and implement connectors - this section is in the Mule Runtime docs. |
|
Connectors available from MuleSoft or third party sources. |
|
View which MuleSoft connectors support DataSense. |
|
Describes DevKit elements that start with an at sign (@), which you can use in your connector to identify classes and functions for Anypoint functionality. |
|